Management of an orthodontic practice
Every orthodontist spends years of learning how to be an excellent clinician. We can move teeth in all directions and correct complex malocclusions, but how we take care of our patients ultimately affects the success of our practise. Enhancing efficiency and profitability should be an ongoing process of incremental improvements to existing office systems. Every attempt should be made to modify or discard the systems that are not efficient and effective. It should be recognized that patients expect exceptional service in everything nowadays and spend substantial amount where they receive extraordinary attention.
This chapter discusses some of the elements in managing an ideal orthodontic practise. The emphasis will be on principles of efficient patient scheduling, analysis of ‘the numbers’ of your practise, practise building, patient compliance and cost containment. The data and ideas were drawn from orthodontic practises in North America, and some information may not be applicable to an orthodontic practise in other countries.
Scheduling
Before developing an ideal schedule, it is important to know what kind of a practise you wish to create. We are not talking about mission statements or philosophical goals, but ask yourself ‘How many days do I want to work each month?’ Or ‘How much money do I want to net each month?’ If an orthodontist determines how many days a month he or she is willing to see patients and what net income is desired, it is simple mathematics to calculate everything else.
Goal Setting
For example, let us say that our doctor wants to net $75,000 a month from his or her primarily full treatment practise (a Phase I or a Phase II practise is calculated a little differently). We’ll assume that the full treatment fee is $4850, and the overhead is running approximately 55% a month. Of course, one can always play with the fee and work on lowering the overhead, but for simplicity sake, we’ll take those as given.
Generally, we create a situation where the practise (unless it is new or growing quickly) produces (charges out) 15% more than anticipated collections. This formula doesn’t work immediately but should kick in after approximately 6 months following a major change in production.
If overhead is 55%, the gross collections must be approximately $167,000 a month to net $75,000. If production should be 10–15% higher than collections, to generate this collection figure, a schedule must be built to produce $192,000 a month. If the treatment fee is $4850, one must start 40 full cases a month.
Let us also assume that our doctor wants to see patients 14 days a month. This means starting the treatment of three new patients a day. Allowing for no shows but anticipating a 75% conversion rate on exams, the practise should schedule four exams a day (plus two recall patients who fit into exam slots), totalling an average of 84 exam slots a month.
If the rotation is 8 weeks and the patients are seen for approximately 14 visits throughout active treatment, the practitioner will see approximately 100 patients a day. From this information, one can determine that this practise, when correctly scheduled 14 days a month, will benefit from two scheduling coordinators, one treatment coordinator, six clinicians, one financial coordinator and possibly a records technician who helps with sterilization. The choice of having in-house laboratory staff is up to the doctor. The number of clinicians is best determined by how the orthodontist practises – utilization of technology, rotation between visits, extent of expanded duties, percentage of patients beyond their estimated completion date, number of emergencies per day etc.
A well-crafted schedule that ensures that the doctor is only needed in one place at a time is the secret to success in an orthodontic practise. You can have highly skilled staff with wonderful attitudes, but without a schedule to support them and the practise goals, even the best staff are inefficient.
Prior to implementing a doctor-time schedule, the following problems are observed in most orthodontic practises:
A doctor-time schedule is based on templates that are fully mastered with all the appointments needed during the day. Each schedule has the same number of columns as there are clinical auxiliaries treating patients plus a column for each treatment coordinator and a column for the records technician. Chairsides stay in their own column and see the patients listed in that column. The doctor is available at their chair whenever needed.
Step 1 in designing a schedule is to list the outcome you want. Let’s say you always want to run on time, you want the doctor to be available when needed to minimize the time that chairside auxiliaries spend waiting for the doctor, you want someone to be available to take records following each exam, you want adequate time to complete each procedure, you want patients finished with treatment by their estimated completion date, you want emergencies minimized, you want the correct number of exams and starts to feed the production level you desire and you want an exemplary level of communication among patients, parents and staff.
Then, you must make some basic decisions about treatment in your practise:
Step 2 is to set the foundation so the practise cannot fail. Here is a checklist:
Step 3 involves taking a critical look at how you deliver orthodontics. How many visits does each treatment plan take? How efficient are you at performing all the procedures necessary at each visit? Are emergencies taking too much of your clinical time during the day? Is your rotation in sync with the capability of the brackets and wires you are using?
Step 4 is to list all the procedures that you perform. Then, time these procedures and agree on common timings among the chairsides. These timings (also referred to as configurations or types) will become the basis of your schedule. You don’t want to choose the fastest timings unless all chairsides can accomplish the procedure in that time. And you don’t want to choose the longest, for your faster auxiliaries will become impatient with the schedule.
Configurations (or types) will reflect how long the chairsides take to complete a procedure in 5-min increments and how long the doctor takes in 1.33-min increments. (Each doctor-time increment is 1.33 min.) When you are timing your procedures, I suggest you add 5 min at the end of each procedure to allow time to chat with mom and clean up. Thus, if a procedure takes 15 min of chairside time with 3 min of doctor time after the first 5 min, the actual configuration will be 20 min with 3 min of doctor time after the first 5 min.
Of course, each practise must develop its own timings. Step 5 is to combine these timings so there are as few configurations as possible. In other words, minimize the number of different configurations by combining as many procedures as possible into the same configuration. Even if you have to increase the doctor time by 1.33 min to accommodate an increased number of procedures, it may be worth it to minimize the number of configurations. The more procedures that fit into one configuration, the more times that configuration is offered during the day, and thus, the more choices a patient has.
The configuration list shows different configurations and their corresponding appointments (Exhibit 1).
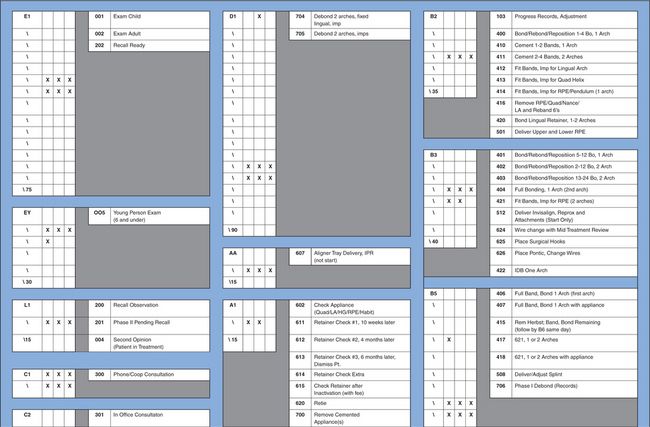
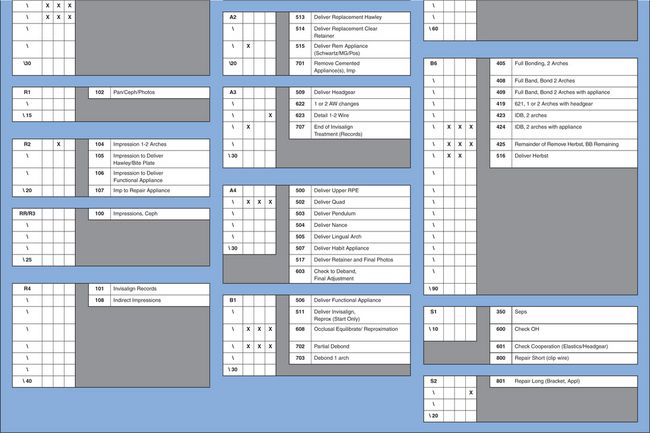
Exhibit 1
Step 6 is to tally procedures so that you know how many times each procedure is performed in a month. If 12 different procedures are grouped into one configuration, add up the counts for all 12 procedures, and that is the total number of times that configuration must occur in a month. Once you know the number of times a configuration should be available in a month, it is a simple task to determine how many times that configuration must be available each day. If you use the computer to count procedures, remember that this information is based on patients who are checked out as having had that procedure. You may need a higher count of each configuration because patients often make an appointment and cancel or do not show and still need another appointment of the same configuration later.
Also remember that sometimes you do two or more procedures at one visit. The combination of the most frequently done multiprocedures should be given a name and be linked to a configuration that reflects the time needed to perform all the procedures.
Appointing rules
Before developing the doctor-time schedules or grids for each day, determine the appointing rules you wish to follow. Your appointing rules may look like this:
Any rules that the physical plant requires should also be listed in preparation for building your scheduling standards or grids. If you must take records in the exam room, for example, the schedule cannot place two exams back to back. But your rules may also indicate that the treatment coordinator should take the records rather than records technicians since their room is unavailable for any other appointment anyway.
Building the standards or grids
Once you have the configurations, the counts and the appointing rules, encourage the chairsides to help build the schedule. They are a wise group who can bring much to the discussion as to which procedures should go into which columns etc. The scheduling coordinators should offer their talents as well, for they know what time of day certain appointments are needed. For example, you might want to offer 45 min of short appointments at the start of each day before starting the longer appointments.
Configurations are fit together so that the doctor stays busy throughout the day but is never needed in more than one place at a time. If an appointment calls for just 1.5 min of the doctor’s time, then it is possible to be at another column (or even two other columns) during that same 5-min period since only 1.5 min is needed in the first appointment.
If you want to keep the doctors busy and use their time efficiently, you must have five or even six chairsides (depending on the configurations in the practise). Note that when studying this sample schedule (Exhibit 2), the x indicates the doctor time. As you can tell from the three xs across almost every 5 min, the doctor time is almost maximized.

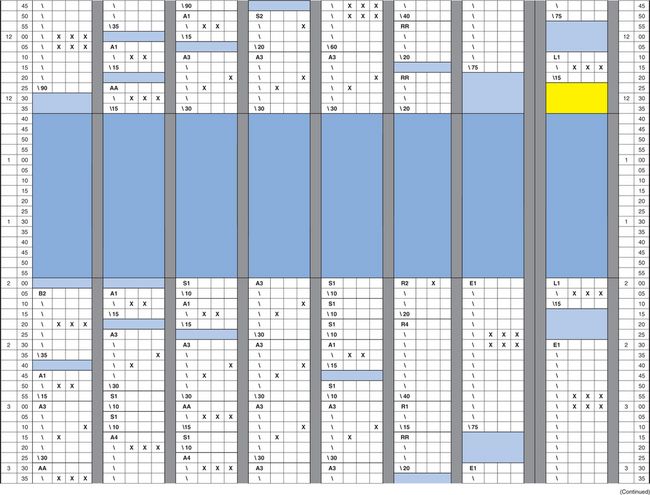

Exhibit 2
It is best to create three grids every time you revise the schedule. If you are scheduling for 14 days a month, one grid can be used five times a month (A), the other grid five times a month (B) and the last grid four times (C). The configurations should be placed at different times on each grid, so there is flexibility in choices of times available. The two starts might be at 9:00 a.m. and 10:30 a.m. on Grid A but at 9:30 a.m. and 10:10 a.m. on Grid B. Maybe you would want to offer an afternoon start on Grid C.
Enter the grids into the computer to reflect hours, number of chairsides and doctors etc for each day alternating among Grids A, B and C. The corresponding list with the procedures and their matching configurations should also be entered into the computer so that the procedures and configurations (searches) are linked.
The list of procedure codes is called a buck slip. This list also indicates the start codes that are posted when a contract is posted to indicate the start of treatment (Exhibit 3).
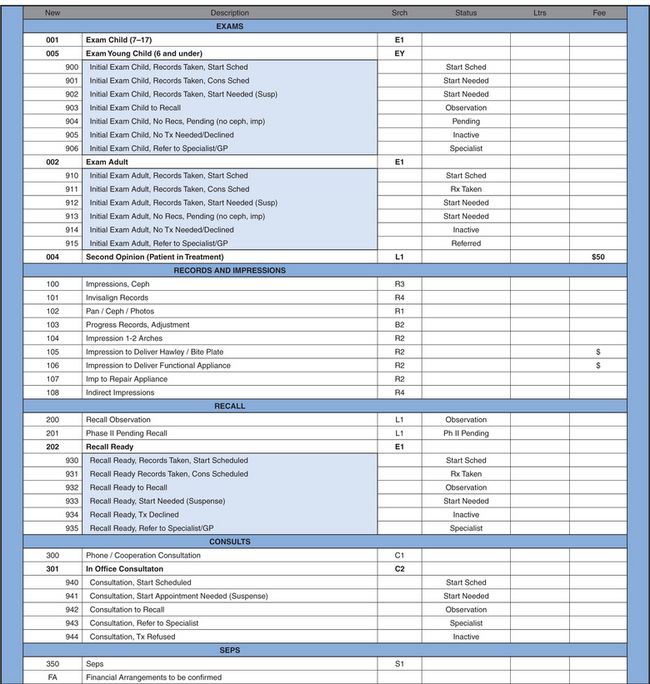
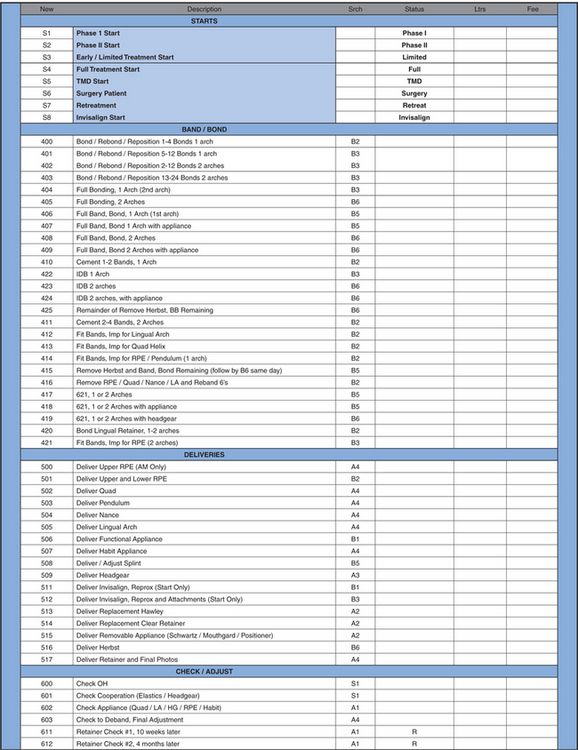
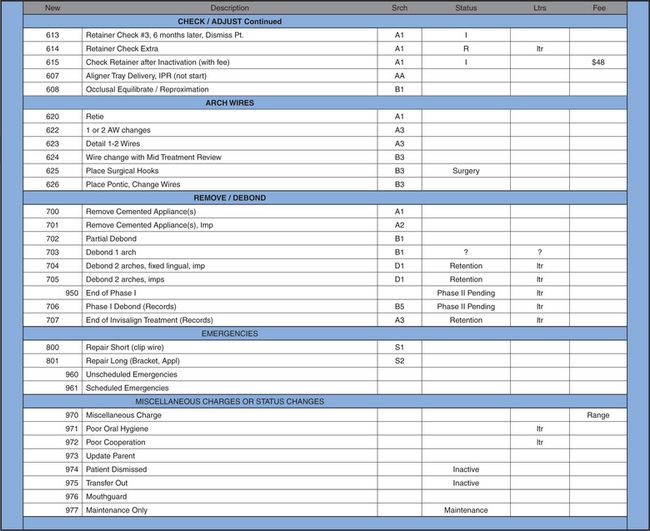
Exhibit 3
When procedures are correctly posted in the computer, you can easily retrieve valuable information indicating the number of times each procedure occurred in a day, month and year. You can also verify that all production has been ‘charged out’. Posting procedures changes statuses automatically when appropriate. Also, charges and letters are generated from these same postings.
Determine when to start using the new grids at some point in the future when the schedule is not too heavy. Print the days that will be revised so that you have a record of which patients are already scheduled when and for which procedure. Delete those schedules, load the new grids and then reenter the already scheduled patients into the new schedule using searches. Some appointments will ‘fall in’ at the same time; others must be given a new time.
Notify patients of change in next appointment
If you have more than 50 appointments to change, it is a good idea to order and send postcards with the office name and address. (‘Due to a schedule change in our office, your appointment, originally scheduled for ____________, has been changed to________. If this is inconvenient for you, please call our office to reschedule. Thank you’.)
Stay updated, free dental videos. Join our Telegram channel
VIDEdental - Online dental courses


