14: Problem-Solving Techniques for Revision of Previous Root Canal Procedures

Chapter 14

Problem-Solving Techniques for Revision of Previous Root Canal Procedures

Problem-Solving List

Problem-solving issues and challenges in the revision of previous root canal procedures addressed in this chapter are:

Recommendations for Removal of Existing Restorations
Removal of Restorative Materials from the Pulp Chamber

    Techniques for removing intraradicular posts
Removal of Soft Root Canal Filling Materials

    Techniques for removing gutta-percha
    Techniques for removing paste root canal filling materials
    Techniques for removing plastic core carriers
Removal of Metallic Objects from the Root Canal

    The ultrasonic instrument
    Hedström files
    Specialized forceps
    Masserann kit
    Techniques for removing metallic core-carrier obturators
Removal of Silver Cones from the Root Canal
Prevention of Metallic Instrument Separation During Root Canal Procedures
Removal of Separated Instruments from the Root Canal

    Gates-Glidden bur heads, Peeso bur heads, and large metallic fragments
    Separated endodontic instruments

“Whenever a pulp is removed and the canal treated and filled in a manner that is compatible with or favorable to a physiologic reaction, we may expect a satisfactory percentage of success. Also, whenever treatment is carried on in such a way as to antagonize biologic processes of repair, we will continue to have many failures.”< ?xml:namespace prefix = "mbp" />4

J.R. Blayney, 1928

“If by accident, the instrument used should break—and this is an accident careful handling should make very rare—it will sometimes be found difficult, and it may be impossible, to remove. If not jammed in the fang so as to be immovable, it may, in many cases, be withdrawn by rendering a small instrument magnetic, and passing gently up till it comes into contact with the fragment to be removed. The use of a magnetized instrument was suggested some time ago by the late Dr. John Harris, for a similar purpose. Once or twice during my practice I have found it impossible to remove the broken fragment of the instrument from the fang, and was obliged to fill without regard to it. I have observed no unfavorable results in these cases which I could attribute to this cause.”2

R. Arthur, 1852

Unfortunately, the need for revision of previous nonsurgical (and surgical) root canal procedures is quite common in today’s practice of endodontics. The number of these cases can be largely reduced, however, if adherence to the principles of technical excellence provided in this book is a priority during the initial treatment.1 Sadly, the origin of the majority of recurrent pathosis can be attributed to diagnostic and technical inadequacies in the treatment previously provided by others or by the examining clinician. This set of circumstances is being used by many professionals in other dental disciplines to condemn all endodontic or root canal interventions as “an implant in waiting.” The label of root canal or endodontic failure is not the basis for the wholesale extraction of many teeth in favor of implants. In the vast majority of cases, the issue is in reality a dentist failure, or endodontist failure. It is difficult to admit one has failed and proceed to revise the treatment at no cost to the patient or refer the patient to a capable, experienced specialist. It is much easier to condemn the tooth and reap the impending financial rewards of implants than to commit to performing all aspects of endodontic treatment at a higher level. Furthermore, there are many cases where a wait-and-watch approach may be warranted, especially when the patient is symptom free and any radiolucency is stable or appears to be reduced.11,19,26

The purpose of this chapter is to provide guidance in the techniques for successful revision of failed nonsurgical treatment.12 These cases are more difficult and usually involve compromised circumstances. Also, teeth requiring revision usually have undergone extensive restorations, requiring specialized access techniques not commonly needed for initial treatment. The diagnosis of treatment failure was discussed at length in Chapter 5. This chapter will focus on techniques for removal of restorative and root canal filling materials. Following removal, it is assumed the reader will follow the principles referred to in this text for cleaning, reshaping, disinfecting, and reobturating the canals.

Recommendations for Removal of Existing Restorations

Root canal treatment in general, whether initial treatment or revision, does not usually require the removal of existing crowns. It is in the best interests of the patient to preserve satisfactory restorations, but if by doing so, the ability to revise the previous root canal treatment is compromised, it behooves the clinician to treatment plan the dismantling of the restoration. Similarly, while it is wise to make access cavities as conservative as possible, the access cavity should not be so small as to compromise access to the root canal system and perhaps the quality of the revision. Excessively large access cavities, on the other hand, undermine the retention of existing and usually satisfactory fixed prostheses. In most cases, the size of the access cavity should be the same as one would make for initial treatment.

Revision of root canal treatment can sometimes be accomplished while preserving existing posts and cores as well. Knowledge of internal tooth anatomy will provide avenues of success without the necessity of post removal. Anatomically wide canals such as the distal canals of mandibular molars or the canals of maxillary second premolars typically have a morphology a preformed stainless steel post will not completely obliterate (Fig. 14-1, A). This fact leads to two clinically useful approaches to revision. The first approach concerns the root that has only one canal. If the post is round and the canal is ovoid, it is possible to negotiate past the post and revise the canal treatment without removing the post or restoration (see Figs. 14-1, B and C).

image

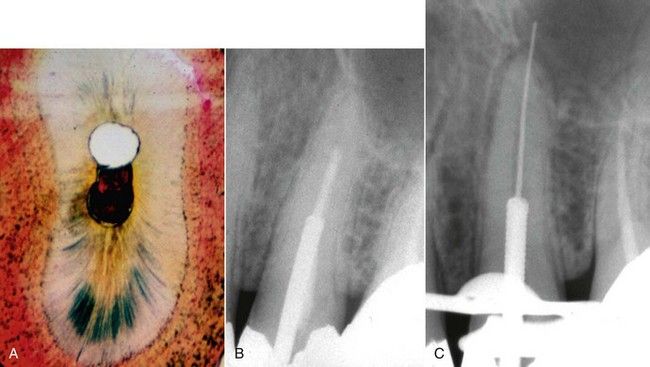
FIGURE 14-1 A, Cross-section of a typical maxillary premolar showing unprepared canal space that might be available to bypass an existing post during revision. B, Symptomatic maxillary premolar with inadequate root canal treatment. C, Revision in progress without removal of existing restoration.

Second, in a multicanal tooth, the canal in which the post was placed may not need revision. Again, it may be possible to access a canal with recurrent pathosis or a canal that was previously uncleaned without removing the entire restoration. Fig. 14-2 illustrates a case in which a root canal treatment failure was encountered in a mandibular molar with four canals, a large cast post core, and satisfactory crown restoration. Fortunately the post was placed in the distal-buccal root, which had no radiographic signs of pathosis. Without removing the post and the coronal restoration, access was made through the crown and core, and revision was completed.

image

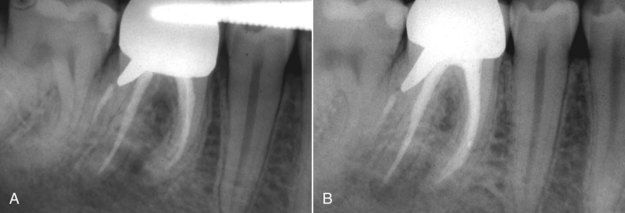
FIGURE 14-2 A, Inadequate root canal treatment and recurrent apical pathosis in mandibular first molar. Note the post is in the distal buccal root, which has no apical lesion. B, Completed revision of three canals without removal of the cast post-core.

Crown or restoration removal becomes a necessity when recurrent caries is found to extend well under the crown margins and is often in fact the etiology of periapical pathosis. A simple method for removing a full crown is seen in Fig. 14-3, A to D. If the crown is metallic, a fissure bur, long carbide finishing bur or transmetal bur can be used to cut through the crown to the depth of the tooth structure (see Fig. 14-3, B) To preserve as much of the internal structure as possible, the cut should not extend into dentin but may extend into underlying buildup material. Cut completely from the gingival margin on the buccal vertically and across the occlusal surface onto the lingual surface. The crown is then expanded with any flat-bladed instrument and removed. If the crown is metalloceramic, a diamond bur used for crown preparation will remove the veneer prior to cutting the underlying metal coping with a carbide bur.

image

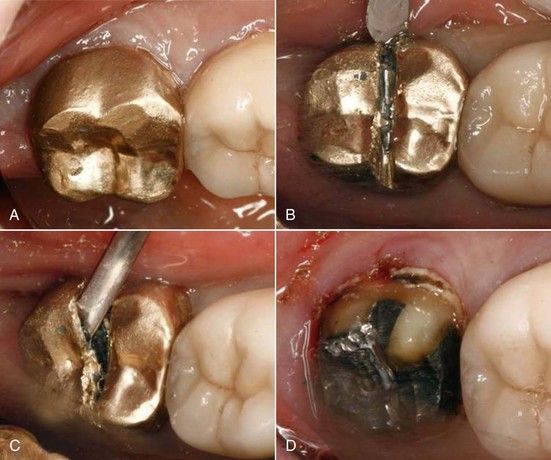
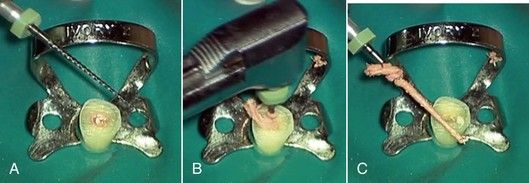
FIGURE 14-3 A, Crown indicated for removal due to recurrent caries under margin. B, Beginning at the buccal gingival margin, the crown is cut up the buccal surface and across the occlusal-lingual aspect. Note the underlying tooth structure is not cut. C, Large, flat instrument such as an operative chisel or surgical elevator is used to pry the crown away from the tooth. D, Crown removed.

Removal of Restorative Materials from the Pulp Chamber

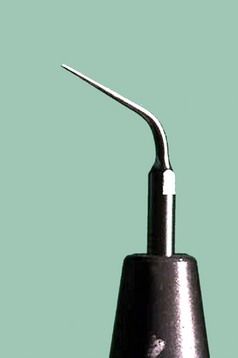
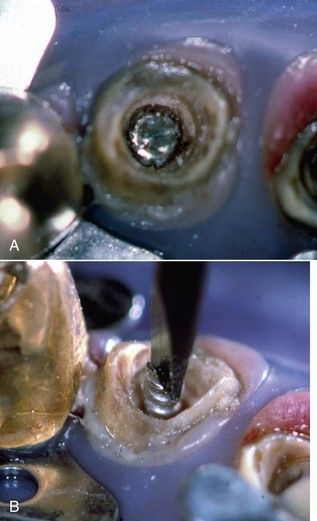
Although standard round and fissure burs are typically used for this procedure as the access preparation extends into the pulp chamber, there is an inherent risk of cutting excessive tooth structure and weakening the tooth. If the pulp chamber is restored with amalgam or composite resin, there is no alternative but to carefully dissect this material with high-speed burs. If, on the other hand, the pulp chamber is found to be filled with a cement such as Cavit (3M ESPE Cavit Temporary Filling Material, St. Paul, MN, USA), zinc oxyphosphate, or zinc oxide eugenol, an ultrasonic handpiece will efficiently remove the restorative material with little effect on the dentinal walls. The ultrasonic tip of choice is usually a prophylaxis tip or a probe shaped tip (Fig. 14-4) used on a moderate to maximum power setting with copious water irrigation. The ProUltra (Dentsply Tulsa Dental Specialties, Tulsa, OK) without water or Start-X (Dentsply Maillefer, Ballaigues, Switzerland) ultrasonic tips—with or without water—are effective alternatives. Gutta-percha is one of the easiest materials to remove by this technique.

image

FIGURE 14-4 Probe-type ultrasonic tip.

The ultrasonic technique is especially useful if the root filling material has a core carrier or is composed of metal. A bur will cut these materials and eliminate the potential to retrieve them using a forceps-type instrument. The removal of zinc phosphate cement from the pulp chamber with the ultrasonic instrument is seen in Fig. 14-5. The entire pulp chamber was cleaned in 3 minutes.

image

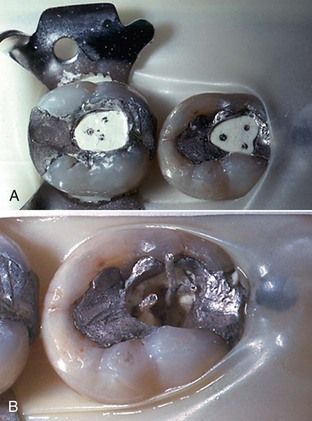
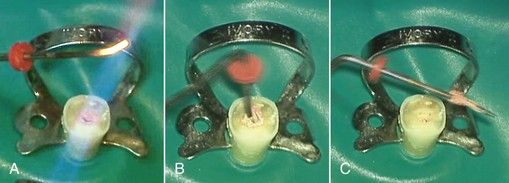
FIGURE 14-5 A, Demonstration case: silver cones embedded in zinc phosphate cement. B, Removal of zinc phosphate was done with the probe-type ultrasonic tip. The cement was removed completely in 3 minutes without damage to silver cones.

Techniques for Removing Intraradicular Posts

Intraradicular posts are used routinely in restoring severely carious or fractured teeth (see Chapter 20). It is not unusual to find a post in a root in which root canal treatment has failed; to revise the treatment nonsurgically, the post must be removed.5 The presence of a post, the difficulty of removing it, and the possible adverse restorative consequences of removal are considered an accepted indication for surgical repair.3 Nevertheless, nonsurgical revision is the treatment of choice in most but not all instances.

image

CLINICAL PROBLEM

Problem

A 43-year-old male presented with symptoms that focused on the maxillary left second premolar area. He stated that the tooth had had root canal treatment and a post and crown, and he could not understand why he was now having a problem. The tissues were slightly swollen in the midroot region of this tooth. Radiographically, there was evidence of root canal treatment with a post and the presence of a large lateral lesion (Fig. 14-6, A). One of two possibilities might explain the cause of the lesion: a post perforation (which did not seem plausible) or a lateral canal. These aberrant canal structures cannot possibly be cleaned and obturated thoroughly.24 Failure was probably due to the internal exposure of the lateral canal during post preparation. The crown was aesthetic and worth preserving. Moreover, surgical revision would be extremely difficult, with the location of the lateral canal interproximally on the distal surface of the root.

image

FIGURE 14-6 A, Lateral lesion on a maxillary premolar due to a lateral canal communicating with unsealed canal space prepared for the post. B, Reevaluation of revised root canal treatment after 7 months, showing complete resolution of the lesion.

Solution

Through a routine occlusal access opening, the composite resin surrounding the post was carefully removed, and the post was subjected to ultrasonic vibration with the probe type of tip described above. Revision was completed, and a 7-month reexamination of the patient indicated that the tooth was in full function; radiographically, healing of the lesion was apparent (see Fig. 14-6, B). This problem-solving case points to the importance of approaching each case based on its unique circumstances and assessing all factors before making a plan of treatment.

image

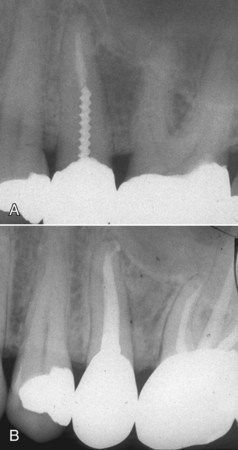
Although it is possible to remove almost any post with the current technology, the tooth may become so mutilated in the process, prognosis is questionable. For example, after post removal, a short root with thin walls has little hope for a long-term viable restoration (Fig. 14-7). The potential for retention of a new post is compromised, and the risk of vertical root fracture increases. The following case illustrates the problem of the fractured intraradicular post, which can occur with and without concomitant failure of the root canal treatment. Unfortunately, this occurrence is labeled incorrectly by many clinicians as an endodontic failure.

image

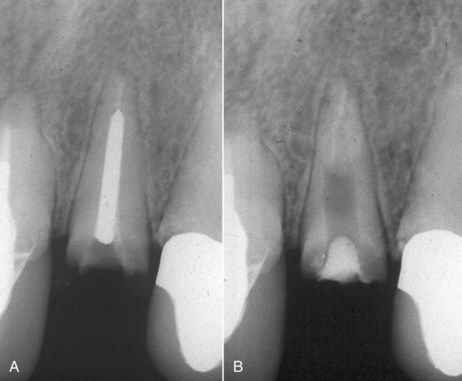
FIGURE 14-7 A, Inadequate root canal treatment in a maxillary lateral incisor with a fractured post. B, Successful removal of the post, but a very weak tooth remains. Treatment planning may warrant the consideration of an implant.

image

CLINICAL PROBLEM

Problem

A 55-year-old male presented with a fractured post in the maxillary right second premolar. In addition, the root canal treatment was less than acceptable, resulting in recurrent periapical pathosis (Fig. 14-8, A). The patient was having no pain but faced the dilemma of either having the tooth removed and an implant placed or trying to have the post removed and the entire treatment revised. Problem-solving considerations must include a full explanation of the treatment possibilities and outcomes, including the potential for implant failure. The clinician can give guidance to aid the patient in making the choice but should not make the choice of treatment for the patient.

image

FIGURE 14-8 A, Fractured post in a maxillary second premolar. Note the inadequate root canal treatment and periapical pathosis. B, Successful removal of the post fragment and revision of the root canal treatment. C, Reevaluation after 30 months, indicating healing of the apical lesion.

Solution

Following a thorough discussion of the treatment options and potential outcomes, the patient opted to retain the tooth. The post was removed using ultrasonic techniques, and the root canal treatment was revised. The root canal was filled slightly short of the divergent apical canal walls using a custom-fit gutta-percha cone and a root canal sealer that included mineral trioxide aggregate (MTA) powder (see Fig. 14-8, B). The patient returned for reexamination at 12 months. He was symptom free, and the tooth was restored to function with a post and crown. At the 30-month reexamination, healing was almost complete, and the patient was still symptom free (see Fig. 14-8, C). This case illustrates that a conservative choice of treatment usually has a positive outcome and points to the importance of approaching each case based on its unique circumstances.

image

Fractures of intraradicular posts are typically observed to occur at or just below the cavosurface margin of the post preparation. They appear to be the result of metal fatigue, not unlike continuous bending of a piece of wire (like a coat hanger) that breaks eventually. In almost all cases of post facture, it is also observed that there was minimal extension of the crown margin past the post/core buildup onto tooth structure. This is often referred to as lack of a ferrule. Several examples are illustrated in Chapter 20. Initially after placement, a crown restoration under function has support from the core cement bond to the surface of the tooth and the post. Eventually, the cement bond between the core and the tooth surface will fail, and the post becomes the sole support for the crown. This will be undetectable clinically until the post fatigues and breaks, and the crown falls out. Prevention of post failure focuses on preservation of as much tooth structure as possible in the initial carious excavation. If there is minimal tooth structure remaining, crown lengthening (see Chapter 17) is an excellent solution.

With the availability of ultrasonic devices, removal of intraradicular posts has become much easier, and there is less risk of physical damage to the root compared with levering types of post removers or pullers. In addition, specialized tips are available designed to apply energy to the post.

Posts can be removed successfully from the inside of full crowns in molar teeth, as illustrated in Fig. 14-9. Through a traditional access opening, the coronal restorative material was dissected from the post circumferentially with surgical length half-round burs. It was necessary to remove the surrounding material to the level of the orifice at least on the mesial, buccal, and lingual surfaces. The post material extending into the pulp chamber was freed from the restorative material prior to use of the ultrasonic device. Sometimes it is advantageous to apply lateral pressure on the post with a hand instrument inside the access cavity to observe even slight movement. This will break the bond with any remaining restorative material. Using the ultrasonic tips previously mentioned, more often than not the post can be loosened using midrange to high energy levels, depending on the ultrasonic unit. A conventional heavy-gauge scaler tip will also suffice. If the cement luting the post has also degraded from coronal or apical leakage, ultrasonic vibration will often loosen the remaining portion of the post in a few seconds.

image

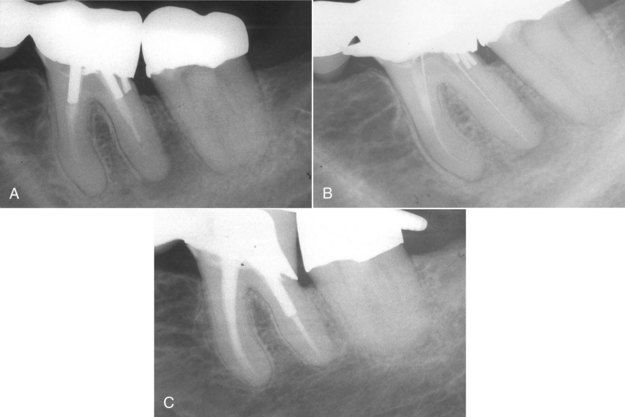
FIGURE 14-9 A, Mandibular first molar bridge abutment with inadequate root canal treatment. Clinically, a drainage tract had been present for months. B, Following removal of two posts and renegotiation of the canals. C, Reevaluation after 1 year, indicating complete periapical healing.

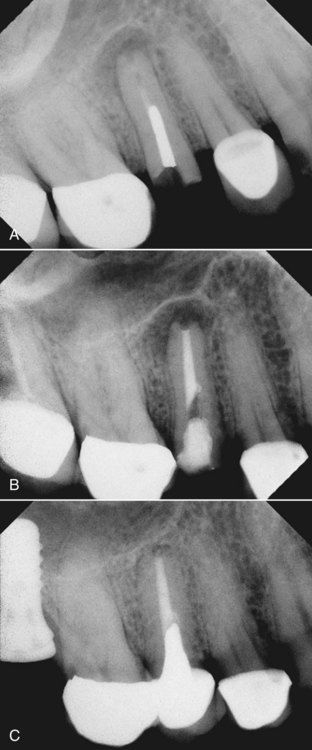
If the post cannot be removed with ultrasonic application only, a Masserann trephining bur (MicroMega SA, Besançon, France)28 is selected that has a diameter slightly larger than the post. The Masserann kit will be described later in the section on removal of metal fragments from the canal, but at this point, the trephine, which is a tubular drill, will effectively prepare a narrow space around a post sufficient to allow the ultrasonic instrument to vibrate it loose (Fig. 14-10). Since the trephines are made of stainless steel, they will not be effective if composite resins, amalgam, or glass ionomer cements remain around the base of the post. The ultrasonic device is useful for the removal of fragments of these materials if they have been reduced sufficiently with burs. After removing the restorative material in the center of the pulp chamber, often it is helpful to bend the post to remove additional restorative materials behind it. For example, if the post is in the distal root and surrounded by composite filling material, bend it to the anterior after removing the composite from the more accessible mesial side. This will enable further removal of composite on the distal side with surgical-length small round burs.

image

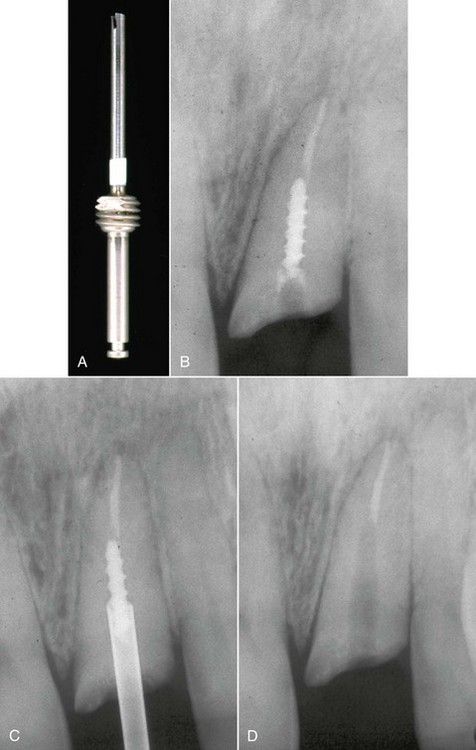
FIGURE 14-10 A, Masserann trephining bur. B, Fractured post in a maxillary lateral incisor. C, Use of the trephine to create space around the post prior to application of ultrasonic instrument. Approximately half the post length must be exposed for successful removal. D, Post removed.

In the case of fractured posts, access is no problem, but the margins of the fractured end of the post must be troughed with a half-round bur or the ultrasonic instrument in advance of the trephine. With copious irrigation, frequent pauses to clean the bur, and slow penetration, a space is created around the post fragment to a depth of approximately half the post length. During use, it is important to inspect the bur for flaring and to resharpen it. Since the post is metal, there is no danger of cutting into it or of straying from it into the root. The drilling normally will take between 5 and 10 minutes.

Once the space has been created around the post, the ultrasonic device is used on the maximum setting with a vibrating tip against the exposed end of the post.8,15 Ultrasonic vibration of the post may take from 30 seconds to 10 minutes before mobility is detected. The post fragment can then be teased out of the canal. If there is no mobility after 10 minutes of continuous vibration, the Masserann bur should be used to deepen the space around the post another few millimeters, after which the ultrasonic probe is applied again in the same manner.

Occasionally the most difficult part of post removal is getting the loose post fragment out of the canal because of the very limited space around it and the lack of post material above the occlusal surface on which to grasp with an instrument. The usual approach is continued ultrasonic vibration.18,29 Other aids that have worked successfully are the ultrasonically energized endodontic file in the space alongside the post, or a tightly fitting Masserann extractor that can effect removal by friction. If available, any section of stainless steel tubing, such as a section of a very large-gauge hypodermic needle, can be attached with cyanoacrylate cement.

Another option that can be used with fractured threaded posts is a combination of ultrasonic vibration and cutting a slot across the top of the post to serve as purchase for a small screwdriver. The slot can be made with a No. image to 1 round bur or 33image inverted cone. A small jeweler’s screwdriver is placed in the groove, followed by application of ultrasonic vibration. Pressure is applied in a counterclockwise fashion on the screwdriver during vibration (Fig. 14-11, A and B). This approach is very useful when the fractured post has no place for lateral purchase and troughing would be dangerous owing to root configuration.

image

FIGURE 14-11 A, Fractured post in a maxillary lateral incisor. B, Removal with a jeweler’s screwdriver.

Removal of Soft Root Canal Filling Materials

Techniques for Removing Gutta-Percha

Large Canals

Hedström File Technique

When the need for treatment revision is identified in the case of a poorly obturated, relatively large diameter canal, such as the maxillary central in Fig. 14-12, this is a very effective and rapid approach to gutta-percha removal.

Establish access to the entire pulp chamber, eliminating dentinal overhangs or constrictions around the access opening.
Enlarge the coronal 5 mm of the palatal or lingual aspect of the canal using a No. 5 or No. 6 Gates-Glidden (GG) drill to provide a more straight-line path of removal for the filling material. This operation is done even if this involves removal of some of the root filling material itself, which will present no difficulty for the bur.
Screw a large-size Hedström or K-file (No. 45 or greater) into the gutta-percha material, and pull the file out (see Fig. 14-12, B). If the file proves too difficult to withdraw by hand, a surgical needle holder (preferably with carbide jaws to reduce slippage) can be used to lever the file against the occlusal or incisal edge of the tooth in the manner shown in Fig. 14-12, C. If the instrument pulls out leaving the gutta-percha filling material, a larger-sized instrument is then inserted, and the procedure is repeated. In most cases where removal is successful, the gutta-percha will come out in one piece after the first or second attempt (see Fig. 14-12, D).
If this approach fails, the coronal canal space is already prepared for the use of rotary instruments (see Fig. 14-12, E). The technique will be the same as described later for small canals. This method will seldom completely remove the material in large canals, but it will quickly reduce the amount remaining in the canal, after which the remainder in the apical third can be removed with hand files.
image

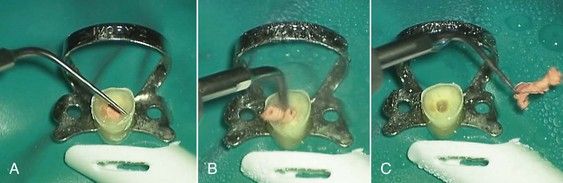
FIGURE 14-12 A, Inadequate root canal treatment in a maxillary right central incisor. B, Removal of gutta-percha in one piece with a large Hedström file. C, File retrieval assisted with a surgical needle holder. D, Hedström file with removed gutta-percha. Note the fluting of the file is ideally designed to engage the filling material on withdrawal. E, Nickel-titanium rotary instruments for gutta-percha and paste removal.

(E courtesy Dentsply Tulsa Dental Specialties, Tulsa, OK, USA.)

Small Canals

The Hedström file technique is also viable for small canals but is unlikely to remove the entire filling in one piece, and the smaller-diameter files required are more prone to fracture if they are screwed into the gutta-percha. To devise a plan for removing gutta-percha from small canals, no one hand-instrument technique is effective or recommended to clear the entire canal. It is helpful to consider which techniques are more useful in the coronal half of the canal and which are more appropriate for the apical half, especially in the presence of curves.

Gutta-Percha Removal in the Coronal Half of Small Canals

Rotary Nickel-Titanium Technique

Nickel-titanium (NiTi) files normally used for canal preparation can be used for gutta-percha removal as well.23 The instruments can remove gutta-percha at normal preparation speeds for shaping the root canal (250 to 400 rpm) but are more effective at higher speeds (500 to 700 rpm) owing to thermoplasticization (Fig. 14-13). ProFile and ProTaper instruments (Dentsply Tulsa Dental Specialties, Tulsa, OK, USA; Dentsply Maillefer, Ballaigues, Switzerland) have been advocated for removal of gutta-percha in the coronal half of the canal. One of the newest and most consistent techniques uses NiTi rotary retreatment instruments. In particular, the D-series revision instruments have been designed with descending tapers (.09→.08→.07) to permit removal of the bulk of gutta-percha from the coronal portion of the canal, opening a pathway to the apical half of the canal (D-files [Dentsply Tulsa Dental Specialties, Tulsa, OK, USA]; see Fig. 14-12, E). These instruments rotate between 500 and 700 rpm and soften and remove the gutta-percha by creating frictional heat in addition to their mechanical activity in the canal. They are designed to be used in a crown-down manner, reaching depths up to 22 mm and moving around curves without deviation or destruction of root walls. The first instrument has a cutting tip and is limited to a depth of 16 mm, which is ideal to remove the coronal half to two-thirds of the material in most canals. The remaining two instruments have modified tips to prevent gouging into the root walls. Depending on the length of the canal, removal in the apical few millimeters may require the use of a hand instrument.7,9,13

image

FIGURE 14-13 A, Rotary nickel-titanium file for removal of gutta-percha. B, Instrument is rotated at 500 to 700 rpm to soften the material. C, Gutta-percha adhering to the instrument.

Heat Technique

Heated instruments have been recommended to remove the gutta-percha from the orifices and coronal third to half of the canal space (Fig. 14-14).

The instrument can be a plugger or spreader made of metal designed to be heated (if not, the instrument will be unusable for its intended purpose after just a few heatings) or a specific heat-transfer instrument. It is heated until it is cherry red and then plunged into the gutta-percha.
The instrument is left in the softened gutta-percha for no more than 1 to 2 seconds. Usually the gutta-percha will have an ideal consistency for removal.
The process is repeated, and gutta-percha is sequentially removed as the technique is continued into the canal.
The disadvantage of this approach is that it is relatively ineffective for old gutta-percha that has lost its plasticity with age.
image

FIGURE 14-14 A, Heated endodontic plugger used for gutta-percha removal. B, The heated instrument is plunged into the canal. C, Melted gutta-percha adhering to the plugger.

Ultrasonic Technique

Currently available ultrasonic units designed for endodontic use possess enhanced energy to soften even old, hardened gutta-percha material (Fig. 14-15).

Using a probe-type tip or even a standard prophylaxis tip, the machine is set on moderate to maximum power. If the ultrasonic instrument has been used to remove materials from the pulp chamber, it is easy and uncomplicated to extend the tip into the orifices of the canals at the same time. This will also help to locate the canals and clarify the internal anatomy.
With copious irrigation, the tip is inserted into each canal orifice. The gutta-percha will soften immediately and come out of the canal.
Depth of penetration into the canal will be limited by the length of the tip.
image

FIGURE 14-15 A, Ultrasonic instrument used for gutt/>

Only gold members can continue reading. Log In or Register to continue

Stay updated, free dental videos. Join our Telegram channel

Jan 2, 2015 | Posted by in Endodontics | Comments Off on 14: Problem-Solving Techniques for Revision of Previous Root Canal Procedures

VIDEdental - Online dental courses

Get VIDEdental app for watching clinical videos