Excellence in finishing
Proper finishing is of critical importance in achieving an excellent occlusal result after orthodontic appliance removal, and it has been widely recognized for many years. Stability of the orthodontic treatment result has been a topic of great interest to the profession since the inception of our specialty. The improvements in the position of teeth achieved after great deal of effort may be lost to varying degrees after the removal of orthodontic appliances. Sometimes, changes in tooth positions are noticed even during the period when the patient is using retention appliances.1 It has been recognized for many years that the stability of orthodontic treatment results at least partially depends on the way cases have been finished.2 Orthodontic finishing still remains a continual challenge for the orthodontist. Toward the end of the nineteenth century, the great evolutionary process in orthodontics began. A clearer conception of orthodontic problems was gained principally through the careful application of fundamental principles by such interested workers as Farrar, Guildford, Jackson, Case and Angle. Angle’s final achievement, the edgewise appliance, was the culmination of many years of effort and many different appliance designs attempting to place the teeth according to his ‘line of occlusion’. The basic mechanical component was a metal bracket with a rectangular slot, and the original size of the slot was 0.022” × 0.028”. Due to the limitations of this appliance system and the existing treatment philosophy, most often the cases were undertreated, exhibiting lack of torque in upper incisors and absence of true Class I molar relationship. This all resulted into occlusion that had the appearance of a ‘nice orthodontic result’ that looked ‘artificial’ and compromised long-term stability of the result. Over the years, many changes and modifications have been made by various clinicians in the basic appliance itself. Preadjusted edgewise appliances in their current variations probably represent the biggest step up the orthodontic evolutionary ladder and provide great benefits to orthodontists in all stages of treatment, especially during finishing and detailing. However, in some clinical situations, it requires a great deal of effort and skill to achieve an excellent occlusal result after appliance removal.
This chapter deals with defining finishing goals and achieving them with the appropriate treatment mechanics for optimal aesthetics, function and stability. It highlights certain occlusal (static and dynamic), periodontal and aesthetic parameters that provide useful guidelines for finishing in both the adolescent and adult orthodontic patients. It is author’s belief that the orthodontic finishing begins with diagnosis and treatment planning. With advances in treatment mechanics, there is hardly an abrupt stage of complicated wire bending to fine-tune the tooth positions; rather, it is a gradual progression toward finishing. In the management of a routine orthodontic case, it is extremely important for a clinician to define finishing goals at the beginning of treatment and continue to focus on them till the finishing stage in order to achieve them with appropriate treatment mechanics. The commonly accepted orthodontic treatment goals are as follows:1–3
The intent of this chapter is to inform the orthodontic clinician of the importance of occlusal, periodontal and aesthetic parameters to finish orthodontic cases to the highest standards. The American Board of Orthodontics (ABO) established guidelines and objective grading system for scoring dental casts and panoramic radiographs containing eight parameters. These include alignment, marginal ridges, buccolingual inclination, occlusal relationships, occlusal contacts, overjet, interproximal contacts and root angulation.5
To achieve these goals, precision wire bending and archwire configurations are required during a clearly defined finishing stage of treatment when standard edgewise appliances are used. However, in contemporary orthodontics, with the use of the built-in features of preadjusted appliance and precise bracket placement, moving teeth to their final position begins as soon as the initial archwires are placed. There is a gradual and a progressive movement of teeth toward finishing rather than a well-defined ‘finishing stage’.1,3 The entire discussion of orthodontic finishing with redefined finishing goals and the appropriate treatment mechanics to achieve the same can be outlined as follows:
Occlusal Parameters
Achieving proper occlusal relationship of maxillary and mandibular teeth at the conclusion of orthodontic treatment has been a fundamental objective of any orthodontic treatment plan. It was generally assumed that when the teeth were aligned properly and orthodontic appliances were taken off, they would settle into good intercuspation and good function would follow. Unfortunately, this was not always the case, as teeth never settled into maximum interdigitation and some instances of excessive wearing of teeth and temporomandibular dysfunction were noted. Therefore, it is extremely important to define finishing goals with respect to occlusal relationships of teeth based on optimal aesthetics, function and long-term stability and achieve them with the appropriate treatment mechanics before the removal of appliances. The occlusal parameters can be described as follows:
Static occlusal parameters
Angle6 proposed his most famous key to occlusion as a guide to orthodontic diagnosis and treatment planning. It was based on the relationship of the upper first permanent molar to the lower first permanent molar. Andrews7 proposed his six keys to occlusion, which gave a well-delineated prescription for an ideal intercuspation of the teeth. These all constitute only a static relationship.
Alignment
Proper alignment of teeth has been generally acknowledged to be the fundamental objective of any orthodontic treatment plan. The predebonding evaluation must contain an assessment of tooth alignment in the anterior and posterior segments of maxillary and mandibular dental arches. In assessing the tooth alignment, it is essential to identify the determinants of anterior and posterior tooth alignment.
The ABO5 further clarified and quantified the static occlusal goals by providing a grading system for study casts and panoramic radiographs. In the maxillary anterior segment, the incisal edges and lingual surfaces of incisors and canines are used to establish anterior alignment. This is based on the fact that these surfaces are the functioning surfaces, and when aligned properly, the anteriors appear to be in their best aesthetic relationship (Fig 13.1B). In the maxillary posterior segment, mesiodistal central grooves of the premolars and molars are used to attain optimal alignment. Again, these areas are used since they represent the functioning surfaces of the maxillary posterior teeth and are easy to observe intraorally (Fig 13.1B).
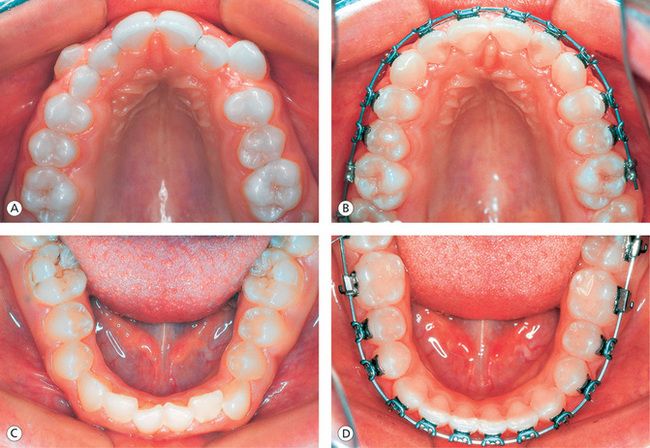
Figure 13.1 Achieving proper alignment of teeth. (A) Pretreatment maxillary arch showing crowding and high labially placed canines. (B) Proper alignment of anterior and posterior segment teeth with full-size archwire in place. (C) Pretreatment mandibular arch showing anterior crowding and rolled-in first molars. (D) Well-aligned anterior teeth and uprighted, properly positioned first molars.
In the mandibular arch, the labioincisal edges of the incisors and canines are the determinants of anterior alignment (Fig 13.1D). In the mandibular posterior segment, the buccal cusps of premolars and molars represent the functioning surfaces, and they are easy to visualize intraorally. Therefore, these landmarks are used to establish the proper alignment in the posterior teeth within the patient’s acceptable archform (Fig 13.1D).
The alignment of teeth, irrespective of the treatment technique, is carried out during the initial phase of treatment before correction of major elements of malocclusion. It is not considered to be complete until finishing archwires become passive in the brackets. The degree of rotational control of teeth is dependant on the mesiodistal width of the bracket. The greater the width the greater the rotational control. This is achieved, however, at the expense of reducing the interbracket distance that has implications during the subsequent stages of treatment.
Archform coordination
It has been recognized for many years that by the finishing stage of treatment, the maxillary and mandibular archforms should be accurately established with the rectangular archwires. It is a good practise to coordinate the upper and lower arch widths to the patient’s original archforms right from the beginning of treatment through the transitional phase to avoid extra efforts and time required to adjust them during the finishing stage. Broomell8 in 1902 wrote that ‘… the teeth are arranged in the jaws in the form of two parabolic curves, the superior arch describing the segment of a larger circle than the inferior, as a result of which the upper teeth slightly overhang the lower’. Most clinicians have acknowledged that there are extensive variations in the size and shape of human archform. Chuck9 noted the variation in human archform and suggested that archforms had been referred to as square, round, oval, tapering etc. He further stated that while the Bonwill–Hawley9 archform was not suitable for every patient, it could be used as a template for the construction of individualized archforms. Over the years, the majority of edgewise appliance users used the Bonwill–Hawley10 archform as a beginning template for the construction of the edgewise archwire. White11 compared the accuracy of various standardized arch designs with 24 untreated ideal adult occlusions.
From these research studies, it is evident that there are extensive variations in human archforms and there is no single archform that can be used for all orthodontic cases. However, it is universally accepted that there are three basic types of archforms. They are ovoid, tapered and square.
Felton et al13 evaluated a wide range of manufactured archwires from orthodontic companies. It was observed that the archforms were quite close to ovoid, tapered and square groups. When these archforms are superimposed, they vary mainly in the intercanine width, having a range of approximately 6 mm.
Components of archform: In order to select the specific archform for a patient and modify it to coordinate well to the patient’s original archform, it is essential to identify the different components of archform. Understanding various parts of archform would provide a basis for the design of a preformed archwire system and the need for minor adjustments to make it individualized. The components of archform (Fig 13.2A) are as follows:
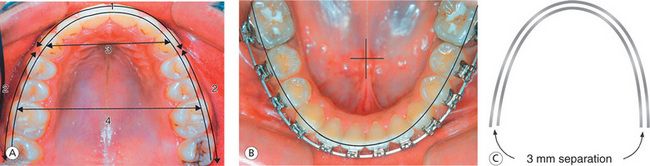
Figure 13.2 Archform coordination. (A) Components of archform: (1) anterior curvature, (2) posterior curvature, (3) intercanine width and (4) intermolar width. (B) Mandibular archform during finishing stage. (C) Maxillary and mandibular archwires should be coordinated by keeping even separation of 3 mm when superimposed.
The anterior curvature This component of the archform is a smooth curve in the anterior segment extending from canine to canine. Since the labiolingual thickness of the maxillary lateral incisor is less, the labial surface of lateral incisors is more lingually placed when compared with central incisors and canines. The greater labiolingual dimension of the cuspid places its labial surfaces more labially than the central and lateral incisors. However, in a well-finished case, the lingual surfaces of these teeth in the maxillary arch should describe a smooth curve (Fig 13.2A1). When the intercanine width is narrow, this component of the archform is more tapered; and when the intercanine width is wide, it is more square or flattened.
The posterior curvature The posterior curvature of the archform extends from the cuspids posteriorly to the second molars. This component exhibits a straight line in the Bonwill–Hawley archform and a significant curvature in the Brader archform. There seems to be an universal acceptance favoring a gradual curvature between canines and second molars. However, it is author’s observation that this part of the archform exhibits a gradual curvature from the canine to the mesiobuccal cusp of the first molar and another gradual curvature from this point to the distobuccal cusp of the second molar (Fig 13.2A2). This is because the mesiobuccal cusp of the maxillary first molar is the most prominent part of the posterior segment, and the buccal surface is also substantially angled, with the distal buccal surface more lingual than the mesiobuccal allowing the distobuccal cusp to occlude properly with the lower first molar.
The intercanine width This is the distance between the two canines on the maxillary and mandibular archforms (Fig 13.2A3). This component of the archform is considered to be the most critical, and the strict adherence to the patient’s original dimension is highly recommended since significant relapse occurs if this component is altered. In most of the archform system, the intercanine width varies by 6 mm.
Burke et al14 used the meta-analysis technique to review 26 previous studies of mandibular intercanine width. They concluded that ‘regardless of patient’s diagnostic and treatment modalities, mandibular intercanine width tends to expand or increase during treatment in the order of about one to two millimetres, and to contract postretention to approximately the same dimension’.
Intermolar width This component of the archform, across the molar region, (Fig 13.2A4) can be altered during treatment depending on the patient’s requirement. This is because the treatment changes in this area appear to be more stable than the changes in intercanine width. If the maxillary arch has been expanded, earlier in the treatment, the expansion needs to be maintained during the finishing stage either by expanding the chosen archform in the molar region or by using the square archform.
Archwire coordination: Once the archform has been selected as per the patient’s original archform, the maxillary and mandibular archforms should be coordinated throughout the treatment. Whatever changes are done during the initial and transitional stages of treatment, they should be maintained during the finishing stage. Before making any alterations in the chosen archform for desired treatment changes, it is critical to identify the areas for potential relapse. Gardner15 studied intercanine, interfirst premolar, intersecond premolar and interfirst molar widths, as well as arch length changes in 103 cases. In all, 74 were nonextraction, and 29 were treated with extraction of four first premolars. He concluded that intercanine width increased during treatment but had a strong tendency to return to its original pretreatment width in both nonextraction and extraction cases. Interfirst premolar width showed the greatest treatment increase, with only a minimal amount of posttreatment width decrease. Second premolar width in nonextraction cases showed a significant amount of increase, with a slight tendency for postretention decrease. Second premolar width in extraction cases showed a decrease during treatment and a slight continued decrease postretention. The intermolar width in nonextraction cases showed a significant increase in width during treatment, but the extraction cases showed a significant decrease during treatment. However, there were no changes in intermolar width in either extraction or nonextraction cases postretention. The incisor to intermolar distance decreased with treatment and had a slight tendency to continue to decrease postretention. Archform templates can be used to coordinate maxillary and mandibular finishing archwires. When superimposed, the maxillary archwire should be approximately 3 mm wider outside of the mandibular archwire (Fig 13.2C).
Establishing marginal ridge relationships
The marginal ridges are used as a key to achieve relative vertical positioning of the maxillary and mandibular posterior teeth. During the finishing stage, it is important to make sure that the marginal ridges of adjacent posterior teeth are positioned at the same level (Fig 13.3A and B). The leveled marginal ridges will position the cusps and fossae of the teeth at the same level, thereby promoting proper occlusal contacts. According to Casko et al,5 once the marginal ridges of the posterior teeth are positioned at the same relative level, then the cementoenamel junctions are also at the same relative level. This will lead to the bone levels between the adjacent teeth being flat, producing a much healthier periodontal situation for the patient. The precise bracket placement, especially in the vertical plane, has been generally acknowledged to be the critical element in establishing marginal ridge relationships. The vertical bracket height affects the torque and in–out and height of the tooth and, therefore, holds the key to proper vertical crown positioning, marginal ridge relationships and contact points.16 If there is an error in vertical bracket placement, it will be expressed as abnormal crown position after the initial leveling. At this stage, the bracket should be precisely repositioned to level marginal ridges and to ensure better stability. If this is not performed during the initial phase of treatment, these corrections can be done during the finishing stage of treatment by incorporating some bends in the finishing archwire.
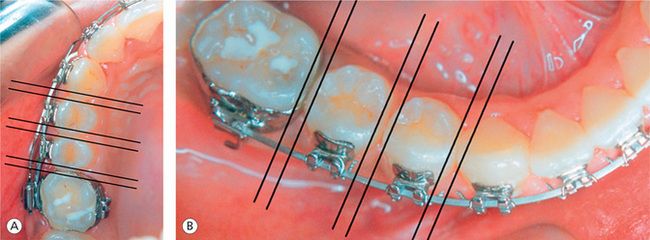
Figure 13.3 Establishing marginal ridge relationships. Proper positioning of marginal ridges in the maxillary right posterior segment (A) and in the mandibular right posterior segment (B).
The ABO5 noted that the most common mistakes in marginal ridge alignment were between the maxillary first and the second molars and between the mandibular first and the second molars. The difficulty in the positioning of posterior attachments due to limited visibility, gingival hypertrophy, variable clinical crown height and delayed eruption of teeth may lead to these errors.17 The lack of distal root tip in the maxillary second bicuspids, expressed during the finishing stage, leads to discrepancy in the marginal ridge matching between these teeth and the first molar. This also leads to a lack of occlusal contact in the posteriors.
The leveled marginal ridges are not a good indicator of relative posterior vertical tooth position in a periodontally compromised adult patient. In such clinical situations, it is appropriate to rely on the bone levels between the teeth to determine the proper vertical position of teeth.18
Contact points
The importance of proper contact points between the teeth in preventing food impaction and stability of the dental arches after orthodontic treatment has been well understood by all specialists. Interproximal contacts are also used to determine if all spaces within the dental arch have been closed. During the finishing stage, three-dimensional control of the teeth positions and their relationship with the adjacent teeth are essential to establish the correct location of interproximal contact points. In order to get the proper perspective of their positioning, the contact points should be observed from two aspects: the labial or buccal aspect and the incisal or occlusal aspect. These views will demonstrate the relative positions of the contact points cervicoocclusally, labiolingually or buccolingually.
Contact points or contact surfaces of teeth are generally located in the occlusal one-third of the proximal walls, slightly buccal to the central fossa in the molar and premolar areas with the exception of the maxillary first and second molars19,20 (Fig 13.4A–C). The position of contact points in the maxillary anterior segment, when viewed from front, seems to progress from the incisal to the cervical and from the central incisors to the canine (Fig 13.4A). When viewed from the occlusal aspect, the contact points in the maxillary anterior teeth are centred labiolingually. In the mandibular anterior segment, the contact points are located at the incisal third of the crowns and seem to move toward cervical region from anterior to posterior teeth. Since the molars become progressively shorter from the first to the third, the centres of the contact areas drop cervically when viewed from the buccal aspect (Fig 13.4C). The contact points in the mandibular anterior and posterior segments are centred labiolingually or buccolingually, when viewed from the occlusal aspect.
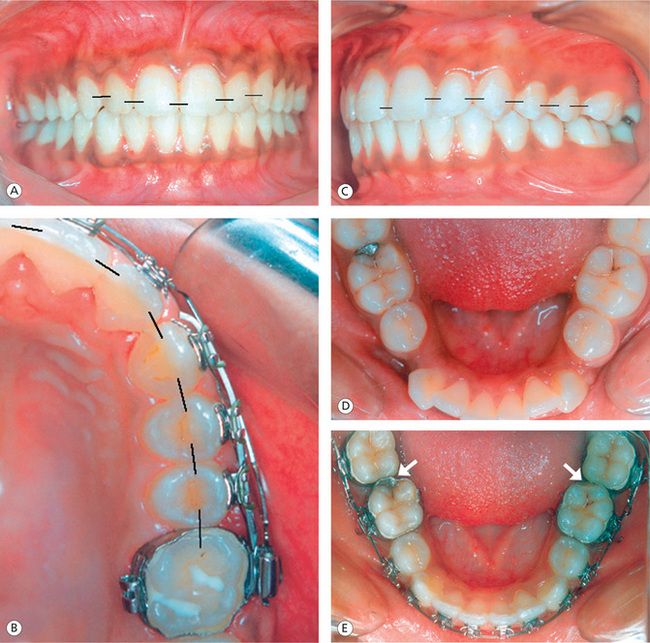
Figure 13.4 Proper location of contact points. (A) Contact points in the maxillary anterior teeth progress from incisal to cervical and from central incisor to canine. (B) Contact points in the maxillary posterior segment when viewed from the occlusal aspect. (C) Contact points when viewed from the buccal aspect. (D) Another patient showing normal contact relationship between the mandibular first and second molars pretreatment. (E) Abnormal position of contact points between the first and second molars due to built-in offsets in the first molar attachments.
During the finishing stage of treatment, it is important to make sure that the teeth are properly vertically positioned, the rotations are corrected, and the interproximal spaces are closed and maintained to optimally position the contact points. The distal offsets incorporated in the mandibular first molar attachments found in some appliance prescriptions lead to inappropriate or broken contacts between first and second molars.21 This offset rotates first or second molars to the mesial or can displace the second molars to the lingual creating abnormalities in marginal ridge relationships and contact points (Fig 13.4E). These discrepancies of treatment must be carefully evaluated and addressed during the finishing stage in order to promote proper proximal contacts, marginal ridges and alignment.
Occlusal relationship
Optimal interarch relationship of maxillary and mandibular teeth at the conclusion of treatment is the prime objective of any orthodontic treatment plan. In order to achieve accuracy in this relationship, each individual tooth should be assessed in anteroposterior, transverse and vertical planes and positioned into its best fit, both anatomically and functionally. Andrews once said that ‘We (orthodontists) tend to look at teeth collectively rather than individually’. It is therefore essential to define goals for each individual tooth and achieve them with appropriate treatment mechanics before the removal of orthodontic appliances.
Molar position: At the conclusion of orthodontic treatment, the maxillary permanent first molar should be positioned in such a way that its mesiobuccal cusp occludes in a groove between the mesial and the middle cusps of the mandibular permanent first molar.22 It should have sufficient distal rotation, mesioaxial inclination and buccal root torque, so as to fit the mesiolingual cusp in the central fossa of the mandibular first molar and its distal marginal ridge occluding with the mesial marginal ridge of the mandibular second molar (Fig 13.5A). Insufficient thickness of maxillary second bicuspid causes first molar to rotate mesially upon initial wire engagement, leading to an increase in Class II tendency and buccal movement of second bicuspid (Fig 13.5B).

Figure 13.5 Molar position. (A) Proper position of maxillary and mandibular first molars with optimal mesioaxial inclination and buccal root torque. (B) Insufficient thickness of maxillary second bicuspid causes first molar to rotate mesially and buccal movement of second bicuspid upon initial wire engagement. (C) Limited amount of maxillary posterior buccal root torque and the extreme amount of mandibular posterior buccal root torque, leading to improper interdigitation, increased buccal overjet and balancing interferences. (D) Improved buccolingual relationship of posterior teeth by reducing the lower posterior torque and by increasing the upper posterior torque.
During the finishing stage, it is of paramount importance to evaluate the buccolingual inclination of the posterior teeth to achieve good intercuspation and prevent interferences during mandibular movements. This should be assessed by evaluating the relationship between the buccal and the lingual cusps of the maxillary and mandibular premolars and molars – called the curve of Wilson. In normal situation, the lingual cusp should be at the same level or within a millimetre of the same level as the mandibular buccal cusps.5
This relationship makes the occlusal tables of posterior teeth relatively flat, therefore promoting better contact of the maxillary lingual cusps and the fossae of the mandibular posterior teeth (Fig 13.5D). The extreme amount of mandibular posterior lingual crown torque found in many preadjusted appliance prescriptions results in ‘rolled-in’ mandibular posterior teeth as a result of expressed torque (Fig 13.5C).23,24 The mandibular molars should be uprighted and progressively torqued with no rotations and spaces.
Bicuspid position: The buccal cusps of the maxillary premolars should be positioned to have a cusp–embrasure relationship with the mandibular premolars (Fig 13.6A), and the lingual cusps of the maxillary premolars should exhibit a cusp–fossa relationship with the mandibular premolars. Ricketts25 pointed out that the contact position of the maxillary second premolar is the key to a properly treated malocclusion. The maxillary second bicuspid should have a normal contact relation with the mesial incline of the lower first molar, which produces an interlocking into the corresponding interspaces of the lower premolars (Fig 13.6D). This relationship causes the tip of the mesiobuccal cusp of the upper first molar to be slightly distal to the mesiobuccal groove of the lower first molar. According to Ricketts, this is the most efficient, self-cleansing and self-preserving relationship in accordance with nature’s plan. The maxillary bicuspids should have mesioaxial angulation with the second bicuspid exhibiting distal root tip to promote marginal ridge matching between these teeth and the first molar and for better interocclusal contact (Fig 13.6F). The lower bicuspids should have their normal mesioaxial angulation with proper contact points and leveled marginal ridges.
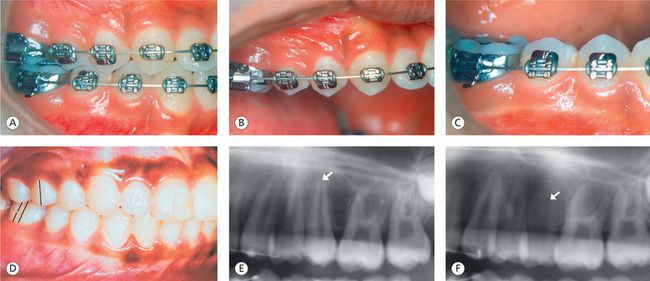
Figure 13.6 Bicuspid position. (A) Sagittal, transverse and vertical positioning of maxillary and mandibular bicuspids leading to good intercuspal relationship. (B) Maxillary right segment bicuspids. (C) Mandibular right segment bicuspids. (D) Position of maxillary second bicuspid – a key to a properly treated malocclusion. (E) Lack of distal root tip in the maxillary second bicuspid. (F) Distal root tip expressed during the finishing stage promotes better marginal ridge relationship and interocclusal contact.
Stay updated, free dental videos. Join our Telegram channel
VIDEdental - Online dental courses


