12: Problem-Solving Challenges in Root Canal Obturation

Chapter 12

Problem-Solving Challenges in Root Canal Obturation

Problem-Solving List

Problem-solving challenges and dilemmas in obturation of the enlarged, shaped, cleaned, and disinfected root canal system addressed in this chapter are:

Root Canal Sealers: Their Role and Use
Gutta-Percha Obturation Techniques

    Lateral compaction
    Vertical compaction
    Thermoplasticized injection techniques
    Thermoplasticized core-carrier techniques
Resin-Bonded Obturation Techniques
Guiding Principles for All Obturation Techniques
Problems Preparing to Obturate the Canal
Problems During Canal Obturation
Problems Identified After Obturation

“Gutta-percha … for convenience, utility, and harmlessness withal, it is invaluable.”< ?xml:namespace prefix = "mbp" />19

A. Hill, 1848

“Perhaps there is no technical operation in dentistry or surgery where so much depends on the conscientious adherence to high ideals as that of pulp-canal filling.”17

E.H. Hatton, 1924

The evolution of root filling materials and techniques has a long and challenging history, but not much has changed in this regard. Gutta-percha, the use of which is credited to Dr. Asa Hill in 1847, is still being used to obturate prepared root canals.19 Many teeth have been retained in symptom-free function thanks to this material filling the root canals, and any failures were not due to the material. During the past 80 years, there have been efforts to change the way root canals are filled. Materials have included paste fills, silver cones, synthetic gutta-perchas, and resin-bonded materials. In each case, there must have been a clinical problem the dental clinician faced that prompted the need for a better product or an easier and more thorough way to achieve the goal of root canal obturation. That goal: to fill completely and seal the enlarged, shaped, cleaned, and disinfected space created when the dental pulp of the tooth was removed. What were those problems, those challenges? What were their effects on what is done today? Have the problems been rectified? Is the clinician in a better position to provide predicate outcomes with the present-day obturation materials and techniques?

Dr. Neil Postman, a noted author and professor of media and communications at New York University, once posed a very useful question in an interview on PBS: “When confronted with a new technology, whether it’s a cellular phone or high-definition television or cyberspace or Internet, the question, the one question, should be What is the problem to which this technology is the solution?” Later in the interview, he concludes with the observation, “It is very easy to be swept up in the enthusiasm for technology, and of course all the technophiles around, all the people who adore technology, are promoting it everywhere you turn.”33

Turning these concepts to root canal obturation, pastes were developed to speed the tedious process of obturation and more effectively move filling material into canal irregularities.16 Innovative clinicians, who were also dabbling scientists, thought they could create a more biological filling material, one that would destroy bacteria while sealing the root canal. Silver cones were brought to the clinician to enhance bacterial control and create a more radiopaque root canal filling on the radiograph (possibly the beginning of esthodontics within endodontics). Silver cones also sped up the obturation process as placement was easy, especially in small, tortuous root canals—and in some respects served as compactors of the root canal sealer into canal irregularities.21 Synthetic gutta-perchas were developed to address the decrease in availability of naturally occurring gutta-percha and eliminate the possibility of impurities and allergic reactions related to latex allergies. Warmed gutta-percha delivered on a core focused on the need for better methods of easily and predictably obturating and sealing the canal.22 Resin-bonded materials were brought to market in hopes of creating a better seal and (potentially) strengthening the root canal system by taking advantage of the bonding capacity of the newer restorative materials and techniques that were being used in the coronal portion of the tooth.42

Yet as we enter the second decade of the 21st century, gutta-percha still dominates. The gutta-percha cones that have been available for decades and gutta-percha on core carriers that have been used extensively over the past 20-plus years are still the filling material of choice globally—used, of course, with some type or root canal sealer or cement and compacted into the prepared root canal space.

When all the more recent developments in root canal obturation materials and techniques are considered, there appear to be recurring themes that beg Dr. Postman’s question: What is the problem to which this technology is the solution? The list includes developing ways to manage the intricacies of the root canal system, ensuring complete obturation, sealing the canal system, providing a radiographic appearance of the filled root that signifies to the clinician they have achieved their goal (and, of course, provided that needed signature of expertise), and strengthening the root canal to prevent potential fracture during function (see Chapter 20). A missing link in these themes only came into the clinician’s hands in the middle to late 1990s: new tools (nickel-titanium instruments; see Chapter 10) necessary to prepare the root canal system for proper obturation.

Root Canal Sealers: Their Role and Use

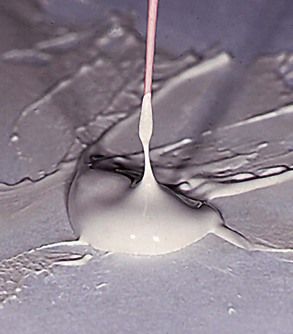
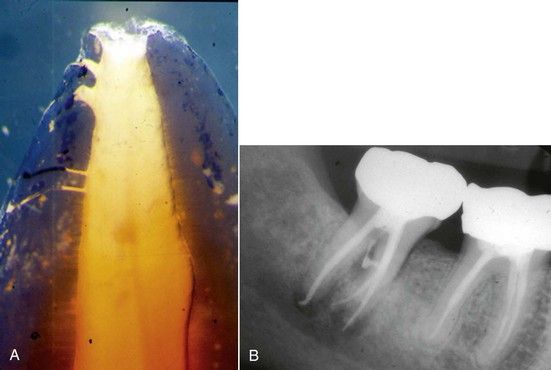
A root canal sealer or cement is essential with any gutta-percha technique, just as an etching agent and bonding material are required when using resin-filling techniques.15,46 These products serve many functions, such as being a lubricant to facilitate obturation and adhesiveness to enhance the seal and stability of the root canal filling. When mixed properly, they can be elevated from a mixing slab approximately 1 inch (2.54 cm) and held there for 5 to 10 seconds without flowing off the elevating instrument (Fig. 12-1). The sealer will flow into the dentinal tubules if the smear layer has been removed,6,13,15,23 depending on the obturation technique used,6 (Fig. 12-2; also see Chapter 11) and may be expressed through lateral or accessory canals (Fig. 12-3).

image

FIGURE 12-1 Properly mixed sealer can be strung out at least 1 inch.

image

FIGURE 12-2 Sealer penetration into the dentinal tubules (Rhodamine B dye).

(Courtesy Ronald Ordinola-Zapata, São Paulo, Brazil.)
image

FIGURE 12-3 A, Sealer penetrating into dentinal tubules and accessory communications in a tooth that has been demineralized and cleared for visualization. B, Mandibular molar showing the movement of root canal sealer into accessory communication into the furcation.

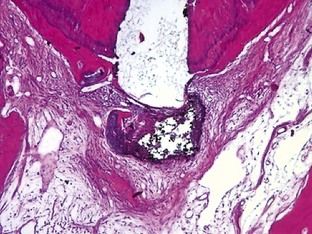
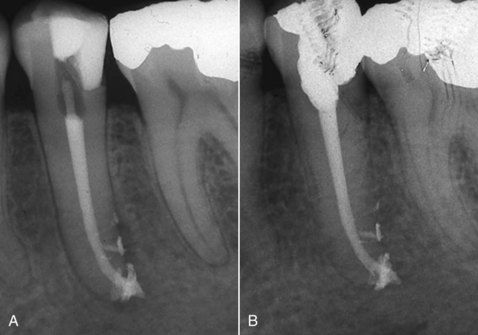
Ideally, all sealers should be antimicrobial and biocompatible; some sealers or portions of substances within them may be absorbed when exposed to tissues and fluids.5,29,37 Substances used for radiopacity within the sealer are generally insoluble and may remain in the tissues either engulfed by macrophages or surrounded by fibrous capsules (Fig. 12-4). If large amounts are pushed beyond the canal confines, the patient may experience discomfort, especially if the sealer has a slow set, or chronic inflammation may persist and create problems at a later time.5,25,37 Sealer may be consolidated during the healing process and remain pushed up against the root of the tooth by the encapsulating tissue (Fig. 12-5), never really allowing the tissue to heal fully, although clinicians attempt to identify this as healing so long as the patient is symptom free.

image

FIGURE 12-4 Photomicrograph showing chronic inflammation surrounding the extrusion of root canal sealer beyond the root canal (H&E ×10).
image

FIGURE 12-5 A, Obturated mandibular premolar that exhibits multiple accessory communications and extrusion of sealer. B, Six-month reexamination shows what most clinicians would consider as healing; however, healing cannot occur with the presence of the irritating sealer that contributes to long-term chronic inflammation.

Sealers are generally grouped based on their primary component or chemical make up (e.g., zinc oxide eugenol, polyketone, epoxy, calcium hydroxide, silicone, glass ionomer, or resin based). Ideally, none of these sealers should be extruded beyond the end of the root canal, because chronic inflammation may persist (see Chapter 9). However, many clinicians attempt to extrude the sealer with their obturation technique and empirically claim that when they see sealer extruded beyond the confines of the canal, the canal is “perfectly sealed.” The fallacies in this position are that (1) a seal cannot be seen on a radiograph, (2) the radiograph only represents a two dimensions of a highly variable three-dimensional object, and (3) there is no evidence-based information to support this claim.10 As noted earlier, there is evidence to support the long-term presence of chronic inflammation.34

Gutta-Percha Obturation Techniques

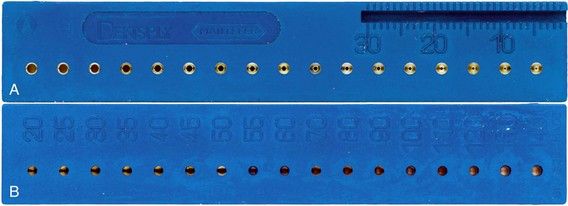
Popular methods of canal obturation are lateral compaction, vertical compaction, thermoplasticized gutta-percha injection techniques, and thermoplasticized core-filler techniques.15,46 Although other variations on these themes exist, such as thermatically executed lateral compaction and thermomechanical compaction, specific problems occur with these techniques, and their overall popularity at present is variable. Similarly, problem solving the standard techniques should aid in the execution of these alternative approaches to gutta-percha compaction. A brief synopsis of each technique is provided in the following text; however, the reader is encouraged to seek complete descriptions of each technique in the references cited and in other “how-to-do-it” endodontic textbooks. Each technique presumes proper canal preparation prior to commencing obturation. For the first two techniques and any technique that requires the use of a master cone, a gauge is available to assist in choosing a master cone with the proper diameter and length to match the canal preparation size and shape (Fig. 12-6).

image

FIGURE 12-6 A and B, Measuring gauge is shown for both length and apical sizing.

(Courtesy Dentsply Maillefer, www.maillefer.com.)

Lateral Compaction

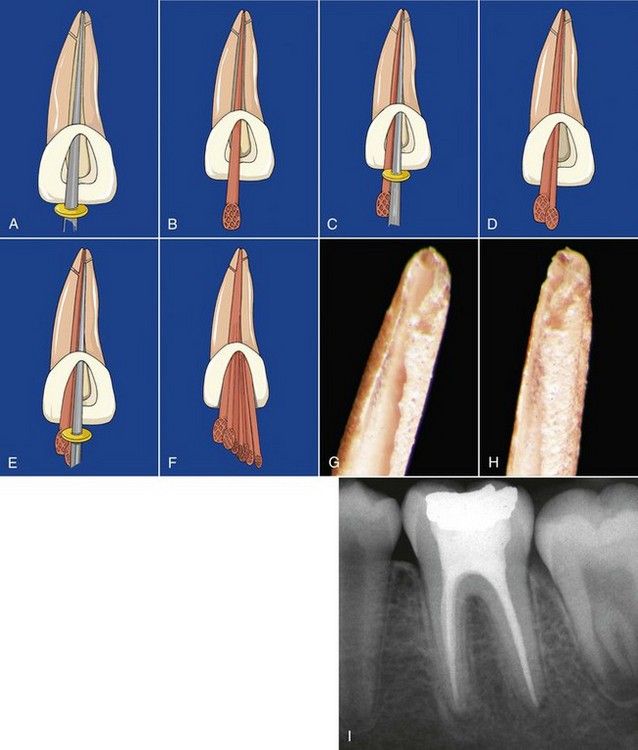
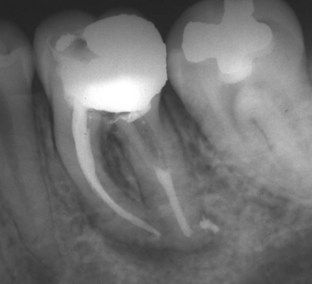
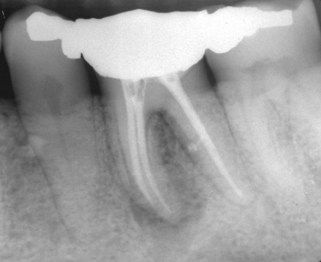
A spreader that reaches the working length or within 0.5 mm is chosen and fitted in the canal (Fig. 12-7, A).15,31,46 A standard or variably sized gutta-percha cone (master cone taper .02, .04, .06, .08) is chosen to correspond to the final size of the last K-file to the apex (master apical file; see Fig. 12-7, B). The cone is fitted to the working length with close adaptation in the apical 1 to 3 mm (snugness of fit, or tugback); A radiograph is obtained to verify the position of the master cone. Subsequently, the master cone is coated with a root canal sealer in the apical half and seated to the working length in the canal (see Fig. 12-7, B). A metal root canal spreader is placed beside the master cone, compacting the cone apically and laterally and at the same time creating space adjacent to the master cone (see Fig. 12-7, C). A smaller, nonstandardized accessory cone is placed in the void created by the spreader (see Fig. 12-7, D). The spreader is reinserted and the second cone is compacted (see Fig. 12-7, E). This procedure is continued until the spreader cannot penetrate into the apical two-thirds of the canal (see Fig. 12-7, F). The excess coronal gutta-percha is seared off at the orifice, and the coronally softened gutta-percha is compacted apically with a large plugger. The adaptation of the master cone apically should be noted when the spreader can be placed to the working length (see Fig. 12-7, G and H). Compaction performed in this manner results in well-filled root canals (see Fig. 12-7, I) even in long, narrow, or curved canals and the filling of accessory communications (Figs. 12-8 and 12-9). Variations on this approach include softening the master cone with solvents such as chloroform to achieve a better adaptation to the intricacies of the apical portion of the canal.

image

FIGURE 12-7 A, Fit of the spreader is visualized to the working length in a prepared canal. B, Fitting of the master cone to the working length. C, The spreader is placed alongside the master cone to length to compact the apical portion of the cone and seal the canal. D and E, Adding additional cones are followed by compaction apically and laterally. F, Finished compaction. G and H, Adapting the master cone to the root canal walls and apical preparation when the spreader is placed to the working length during lateral compaction. Failure results in a single uncompacted master cone in a sea of cement—an invitation to failure! I, Mandibular molar shows well-adapted and laterally compacted gutta-percha fillings.
image

FIGURE 12-8 Obturation of a mandibular molar with long, curved canals.

(Courtesy Dr. David P. Rossiter III.)
image

FIGURE 12-9 Mandibular molar is obturated using the lateral compaction technique; note lateral canal in the distal root.

(Courtesy Dr. David Stamos.)

If the shape of the canal is developed with a hand instrument, the taper usually closely corresponds to a cone that is .02 or slightly larger. Cleaning and shaping is often accomplished using the step-back technique or variation thereof. A .02 master cone is chosen for obturation that provides sufficient taper or space lateral to the master cone for root canal sealer and placement of the spreader to within 1 mm or less of the working length.

If the shape is developed with a rotary instrument at larger taper sizes (.04, .06), the chosen master cone corresponds to the last instrument placed to the working length. The size of the cone may have a specific taper, or it may be a nonstandardized cone (e.g., fine-medium, medium) cut to fit the taper and length of the prepared canal. These cones can be cut to fit into the apically prepared space more accurately using a metallic standardized gauge (see Fig. 12-6). With ALL techniques of canal preparation and choice of lateral compaction:
The cone must fit to the prepared length with snugness of fit or tugback.
Space exists laterally to the cone for the fit of the spreader during compaction.
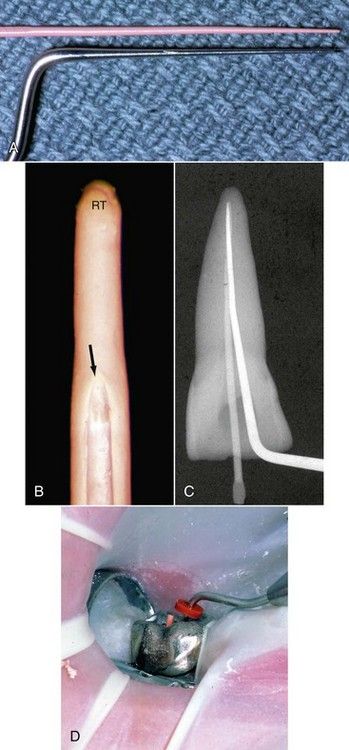
Accessory cones must be slightly smaller or basically equal to the size of the spreader (Fig. 12-10, A).
The spreader must reach to within 0.5 to 1 mm of the working length without binding in the canal1 (see Fig. 12-10, B-D). If binding should occur, there is a chance for tooth fracture with excessive pressures32 (Fig. 12-11).
The sealer and core material (with the spreader) are adapted into the prepared apical third of the canal.
image

FIGURE 12-10 A, Accessory gutta-percha and resin-bonded accessory cones are chosen based on the size of the compacting instrument. The cones should be slightly smaller. B, Spreader inserted into a root canal only reached to the position of the arrow, far short of the ideal length (RT). Note there is no compaction of the gutta-percha apical to the arrow. C, Spreader reaches to the desired length at the extent of the master cone. D, Spreader reaching the reference point for the working length adjacent to the master cone in a molar tooth.

image

FIGURE 12-11 Excessive use of apical compaction with a large spreader resulted in a root fracture.

image

CLINICAL PROBLEM

Problem

At the point of cone selection, it appears that there is insufficient room for the spreader to extend to the proper depth as described in the preceding section.

Solutions

The interrelationship between the shape of the canal and the technique for obturation cannot be overemphasized. Furthermore, the understanding of the balance between preparation and obturation varies from person to person. It involves such subjective aspects as experience, the “feel” of the canal shape, the “feel” of the cone fit and the “fit” of the spreader. There are a number of objective remedies if there are problems with the fitting of master cone or the fitting of the spreader. For most clinicians, the majority of the problems seem to occur in the mid-root areas. Usually, there is insufficient enlargement of the canal space, but there may be other contributing factors.

To address this issue, there are a number of effective remedies:

The orifice can be further enlarged with orifice wideners, Gates Glidden drills or Peeso reamers.
The canal can be reshaped by hand with larger file sizes in a step-back manner principally in the middle and coronal thirds.
If rotary instruments are in use, the canal can be reshaped with the same rotary instruments applying more lateral pressure to “plane” the canal walls.
The canal can be reshaped with rotary instruments having a greater taper.
If .06 tapered gutta-percha cones are being used, a .04 or .02 tapered gutta-percha cone of identical apical size could be used. It is generally unwise to choose a smaller apical size gutta-percha cone as it will not provide an adequate filling of the apical portion of the canal.
Try different brands of gutta-percha products as the sizing varies somewhat among manufacturers.
Choose a spreader of smaller diameter and taper. Spreaders are available in many sizes.

Some of these concepts will be revisited in greater detail later in this chapter in the discussion of obturation problem areas in general.

image

Vertical Compaction

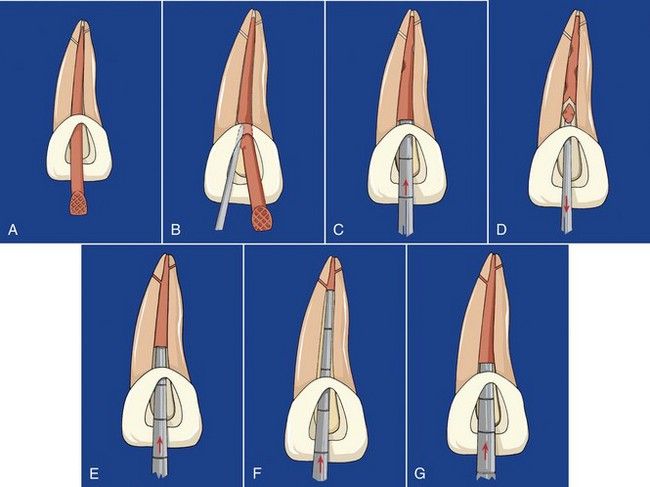
A nonstandardized master gutta-percha cone (master cone taper .02, .04, .06, .08) is chosen to ensure that it has a slightly smaller taper than the prepared root canal space (Fig. 12-12, A.15,46 The cone is fitted snugly 1 to 2 mm from the prepared apical constriction. Root canal pluggers are also prefitted to ensure depth of penetration into the apical third of the canal without binding on the canal walls. A light coating of root canal sealer is placed on the apical half of the master cone, which is then seated in the canal short of the apical constriction. A heated instrument is used to sear off and remove coronal segments of gutta-percha and transfer heat to the remaining portion of the master cone (see Fig. 12-12, B). A cold vertical plugger is used to compact the softened portion of the cone apically and laterally (see Fig. 12-12, C). This process of heating, removing, and compacting (see Fig.12-12, D and E) is continued until softened gutta-percha is delivered into the apical 1 to 2 mm of the prepared apex (see Fig. 12-12, F). Subsequently, softened segments are added and compacted to obturate the canal from the apical segment to the canal orifice see Fig. 12-12, G). Figure 12-13 illustrates the clinical application of this technique.

image

FIGURE 12-12 A, The master cone is fitted for vertical compaction. B, Heated instrument is used to sever the coronal portion of the canal and add heat to the cone. C, Initial compaction. D, Segments are removed with a heated instrument, followed by compaction. E, Once the apical extent of compaction is reached (F), heated segments are placed in the canal and compacted (G).
image

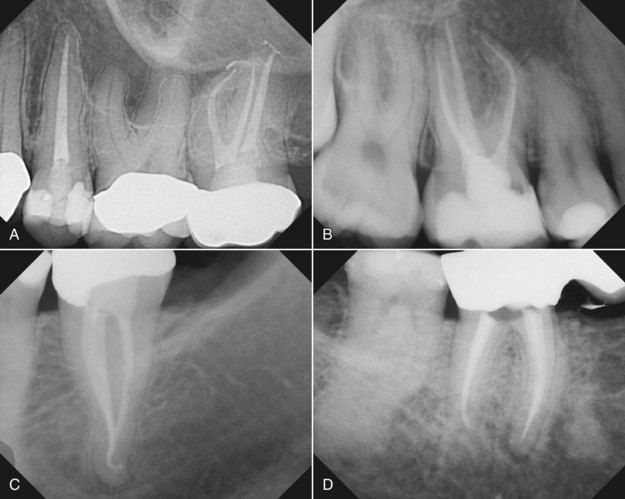
FIGURE 12-13 A to D, Examples of well-shaped and well-obturated canals that were achieved by using NiTi rotary instruments to ensure proper enlarging and shaping. Note the tapers and shapes of the canals. Excessive removal of root dentin was not necessary to achieve these goals.

With ALL techniques of canal preparation and choice of vertical compaction for obturation:

Canal tapers should be .04 or larger. In these cases, selection of a corresponding master cone with the same taper and apical size is routine.
If a nonstandardized cone (e.g., fine-medium, medium) is selected, it must be cut to the appropriate apical size and have a taper that allows it to penetrate to within 0.5 to 1 mm of the length of the prepared canal (see Fig. 12-6). The vertical compaction process will move the cone apically into the prepared canal.
With canal preparation using NiTi rotary instruments, the taper will also be variable and may even be greater than the size of the instrument. In these cases, selection of a nonstandardized cone may be indicated. Nonstandardized cones can be cut to fit more accurately into the apically prepared space using a metallic standardized gauge (see Fig. 12-6).
The cone must fit to the appropriate length with snugness of fit or tugback.
Pluggers (compactors) must be prefit to within 3 to 5 mm from the working length without binding.
Sufficient space must exist for the plugger to move apically to the desired depth without binding between the dentin walls during compaction.

Thermoplasticized Injection Techniques

Gutta-percha may be softened and delivered to the prepared canal using a variety of instruments designed for injection that permits compaction (Calamus Flow, Calamus Dual 3D obturation system [Dentsply Tulsa Dental Specialties, Tulsa, OK, USA]; BeeFill 2in1 [VDW, Munich, Germany]; Elements Obturation Unit [SybronEndo, Orange, CA, USA]; E&Q Master [Meta Dental Co., Elmhurst, NY, USA]).15,

Only gold members can continue reading. Log In or Register to continue

Stay updated, free dental videos. Join our Telegram channel

Jan 2, 2015 | Posted by in Endodontics | Comments Off on 12: Problem-Solving Challenges in Root Canal Obturation

VIDEdental - Online dental courses
Get VIDEdental app for watching clinical videos