12
Oral Health Assessment and Diagnosis
- the assessment methods used to examine the oral tissues and structures
- the methods used to chart teeth
- the methods used to record malocclusion
- the methods used to assess the periodontal tissues
- processing techniques
- ionising radiation and the principles of its use in dentistry
- determining radiographic faults
Oral health assessments are carried out each time that a patient attends the dental workplace, usually for an examination.
Some patients attend more or less frequently than others by their own personal choice, and some require more frequent attendance than others, in the dentist’s professional opinion. The dentist’s opinion is based on the known risk factors of various oral diseases, and the patient’s frequency of exposure to these risk factors.
The two main purposes of carrying out the oral health assessment are:
- prevention of disease by regular opportunities to reinforce oral health education messages
- early detection and diagnosis when disease is already present.
If disease is already present, regular oral assessment will detect it at an earlier stage and allow the necessary treatment to be carried out so that a full recovery is more likely. If a serious and potentially life-threatening disease is present, such as oral cancer, regular inspection will identify it earlier and allow the patient to be referred for urgent specialist care, with a better chance of successful treatment and recovery.
Although the oral health assessment should detect an abnormality in any of the areas assessed, the obvious oral diseases that are particularly looked for are dental caries, chronic gingivitis and chronic periodontal disease.
The whole dental team has an important role to play in this assessment and prevention process.
- Dentist – makes the initial diagnosis, formulates a treatment plan and carries out all treatments restricted to the dentist only.
- Hygienist – works under the prescription of the dentist to carry out scaling and oral hygiene instruction.
- Therapist – works under the prescription of the dentist to carry out suitable treatments as necessary.
- Dental nurse – assists the dentist during the assessment by accurately recording all the information as necessary, assists the other dental team members while treating the patient, reinforces all the oral hygiene messages given to the patient.
Assessment of oral health is carried out in the following areas.
- Extraoral soft tissues.
- Intraoral soft tissues.
- Deciduous and mixed dentition of children.
- Permanent dentition.
- Occlusion.
- Periodontal tissues.
Methods used to carry out assessment
The main methods available to carry out oral health assessments are the following.
- Use of vitality tests to determine if an individual tooth is alive, dying or dead (non-vital).
- Use of study models to record the occlusion of the teeth, and the individual appearance and position of each tooth.
- Use of photographs to record the visible appearance of a structure at that time, and for comparison with earlier or later views.
- Visual inspection to detect visible abnormalities, such as size and colour changes.
- Manual inspection to feel abnormalities, such as a lump where none should be present.
- Use of mouth mirrors for intraoral soft tissue and tooth charting assessments.
- Use of various dental probes for tooth inspections and charting.
- Use of transillumination of anterior teeth to detect interproximal cavities (bright light such as that from the curing lamp is shone through the tooth, and cavities show as dark lesions).
- Use of periodontal probe for periodontal assessment.
- Use of various radiograph views, to determine both the presence or absence of various structures or pathology.
Figure 12.1 Ethyl chloride container.
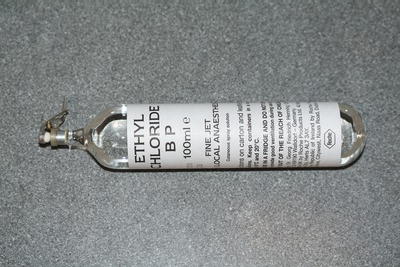
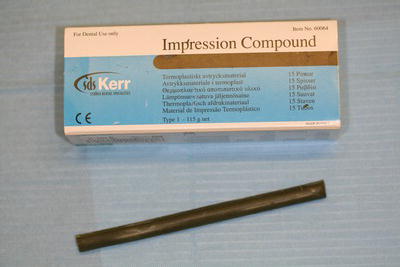
Figure 12.2 Greenstick compound.
Vitality tests
These are sometimes necessary to help in determining whether a tooth is vital (alive) or non-vital (dead).
- Cold stimulus with ethyl chloride (Figure 12.1).
- Hot stimulus with warmed gutta percha (Figure 12.2).
- Electrical test with electric pulp tester.
The first two techniques are used to diagnose toothache where the symptoms include pain with cold or heat, whereas electric pulp testers are more accurate in determining the ‘degree’ of vitality of a tooth, as follows.
- Normal response – healthy pulp.
- Increased response – early pulpitis present.
- Reduced response – pulp is dying, or tooth has heavily lined deep restoration present so the voltage cannot be adequately transmitted to the pulp.
- No response – pulp tissue is dead.
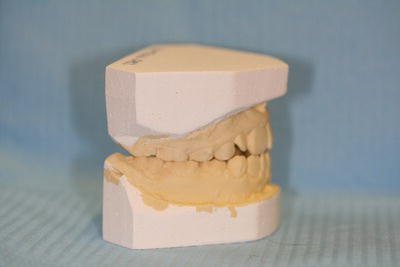
Figure 12.3 Study model set.
Patients will vary in their response to electric pulp testers, so it is always advisable to test several apparently healthy teeth to establish what their ‘normal’ response is, before testing the suspect tooth.
Electric pulp testers are either battery operated or mains operated, and they work by sending an increasing voltage into the tooth until the patient is aware of a tingling sensation in that tooth. The point at which the patient indicates a sensation is recorded numerically on a scale, so that the ‘degree’ of vitality can be determined in relation to ‘test’ teeth.
Ethyl chloride is a liquid that vaporises quickly at room temperature, leaving ice crystals which provide a cold stimulus when touched by the skin or onto a tooth. This cold sensation is detected particularly well by a hypersensitive tooth, and can help to indicate which one requires dental treatment.
Gutta percha is a natural rubber-like product with several uses in dentistry. As a compound of greenstick (see Figure 12.2), it can be warmed in a flame and placed on a pulpitic tooth to determine a hypersensitivity reaction to heat, indicating which one requires dental treatment. The teeth to be tested should be dried in both cases first, and a thin smear of Vaseline placed before applying the warm greenstick compound to avoid the substance sticking to the tooth and causing pain to the patient.
Study models
In some situations, it is necessary for the dentist to consider the patient’s occlusion before being able to decide on any treatment necessary, for example when providing partial dentures or orthodontic treatment. Impressions are taken of both dental arches using alginate impression material (see Chapter 16) and then cast up to produce a set of study models (Figure 12.3).
Study models are useful in the following cases.
- Occlusal analysis in complicated crown or bridge cases.
- Orthodontic cases, to determine if extractions are required and which type of appliance is necessary.
- Occlusal analysis where full mouth treatment may be necessary, to determine the functioning of the dentition.
- Where tooth surface loss is evident, either by erosion from acidic foods and drinks or by attrition due to tooth grinding, so that the progression of the tooth wear can be monitored and treatment determined.
Photographs
These can be taken to record various aspects of the dentition or soft tissues, for future reference. They can be produced using conventional cameras (especially ‘Instamatic’ types), digital cameras with ‘macro’ lenses for close-up shots, or by using specialist intraoral digital cameras. Specialised computers and equipment are required for this last technique.
Photographs are useful to record:
- soft tissue lesions to aid diagnosis
- the extent of injury following trauma
- before-and-after views of dental treatment.
Extraoral soft tissue assessment
The dentist will often be visibly assessing the extraoral soft tissues (those outside the mouth) of the patient while greeting them into the surgery area, and chatting to them before beginning the intraoral assessments. In particular, they will be looking at and palpating the following structures for any signs of abnormality.
- External facial signs – checking for skin colour, facial symmetry, the presence of any blemishes, especially moles and ‘cold sores’.
- The lips – checking for any change in colour or size, the presence of any blemishes, and palpating for any abnormalities.
- The lymph nodes – lying under the mandible and in the neck, these are palpated to detect any swellings or abnormalities, the presence of which may indicate an infection or a more sinister lesion.
Variations in skin colour do occur, especially in different ethnic groups. Some patients are naturally pale and others are naturally ruddy. However, an unusual facial appearance can sometimes indicate problems, such as nervous patients becoming pale and clammy as they are about to faint or the unnatural ruddiness of a patient with hypertension.
Facial asymmetry (where one side of the face is shaped differently from the other) could indicate the presence of a swelling, or problems with the nerve supply or muscular control of that area, all of which require further investigation.
The sudden appearance of unusual skin blemishes, especially moles, may indicate the presence of an early skin cancer (melanoma), which will need urgent referral for treatment.
Similarly, the lips are examined and details recorded of blemishes, such as the presence of a ‘cold sore’ indicating infection with the herpes simplex type 1 virus, or the presence of minor salivary gland cysts (mucoceles).
Lips that are generally tinged bluish-purple indicate some degree of chronic heart failure, which needs noting before local anaesthesia and traumatic dental procedures are carried out.
Lymph nodes are part of the body’s immune system and are present in certain areas throughout the body. Any enlargement of those accessible to the dentist in the head and neck region indicates that the body is fighting infection or some other disease process, and requires further investigation.
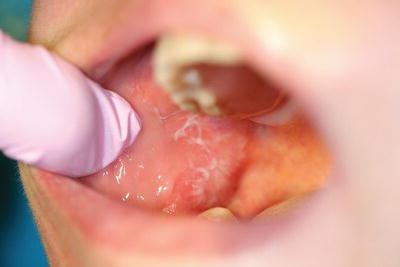
Figure 12.4 Leucoplakia of buccal mucosa.
Intraoral soft tissue assessment
This is carried out at each dental examination and in a systematic manner, so that no areas or lesions are missed out.
- Labial, buccal and sulcus mucosa – checked for their colour and texture, the presence of any white patches (especially the buccal mucosa – Figure 12.4), and the moisture level is noted.
- Palatal mucosa – both the hard and soft palates, the oropharynx and the tonsils (if present).
- Tongue – checked for colour and texture, symmetry of shape and movement, the level of mobility; all surfaces are checked, especially beneath the tongue, as this is one of the most common sites for oral carcinoma to develop.
- Floor of mouth – checked for colour and texture, the presence of any white or red patches, and the presence of any swellings.
Low moisture levels in the mouth can indicate problems with the functioning of the salivary glands, such as Sjögren’s syndrome, or xerostomia (dry mouth) due to age-related changes to the glands or as a side-effect in those taking certain medications. Saliva has important functions with regard to defence, cleansing and dental disease initiation, and any indication of reduced flow levels is of great importance to the dental team, with regard to maintaining a healthy oral environment for the patient.
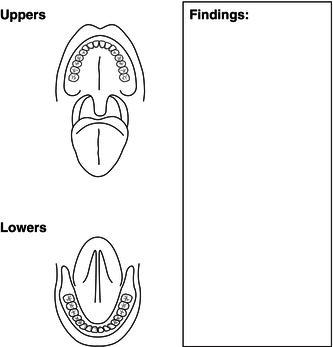
The more likely areas for oral cancers to develop are on the borders of, or beneath, the tongue and in the floor of the mouth, and these areas will be particularly well examined in patients with known risk factors, such as smoking and excessive alcohol consumption. All findings can then be recorded on a suitable assessment sheet (Figure 12.5). In addition, photographs can be taken at the time and retained for comparison at a later date, while any benign lesions are kept under observation.
Tooth charting
Accurate tooth charting is one of the most important skills acquired by a dental nurse in their role as an assistant to the dentist, both during oral health assessments and during the provision of dental treatment.
Figure 12.5 Soft tissue assessment sheet.
Inaccuracies in the charting can result in catastrophic consequences for the patient, such as the wrong classification or type of restoration being provided or even the wrong tooth being extracted. It is a fundamental skill of all members of the dental team to record and follow a tooth chart correctly.
Charting is used as a style of ‘dental shorthand’ to quickly and accurately record a patient’s dentition, as it appears at the time of the oral health assessment. Dental nurses are referred to the definitive charting booklet produced by the National Examining Board for Dental Nurses (NEBDN). This describes the approved current charting notations used both for teeth and for periodontal conditions, following the three styles currently in use.
- Palmer notation – for tooth charting.
- International Dental Federation (FDI) notation – for tooth charting.
- Basic periodontal examination (BPE) – for periodontal charting.
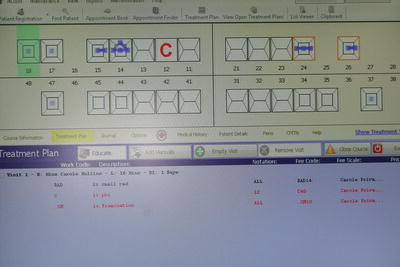
Although many dental workplaces are now computerised, the software systems in use for tooth charting vary enormously (Figure 12.6) and very often cannot actually distinguish the finer points of the written notation, which may lead to errors. Therefore, it is necessary for trainee dental nurses to be taught tooth charting using written records, so that they are standardised upon qualification.
With tooth charting, a two-grid system is used (forensic notation) which separates the current dental status from any treatment required. Each anterior tooth charted diagrammatically is shown with four surfaces and an incisal edge or canine cusp, and each posterior tooth with five surfaces, as shown in Figure 12.7.
The teeth are recorded from the centreline backwards for both the deciduous and the permanent dentition, and the charting grid is arranged as follows.
- Inner grid – shows current dental status and dental treatment already present in the mouth.
- Outer grid – records all dental treatment that needs to be carried out.
Figure 12.6 Computer chart example.
For the purpose of tooth charting, current dental status refers to the following notations only.
- The presence or absence of a tooth.
- The presence of a root.
- The notation of any tooth that is stated as unerupted, and charted as ‘UE’.
- The notation of any tooth that is stated as partially erupted, and charted as ‘PE’.
- The position of a tooth in relation to the normal dental arch, and may be stated as ‘instanding’or ‘buccal to the arch’, for example.
The condition of the teeth and the presence of any restorations can then be charted in a code form on the inner grid, and work to be carried out is recorded in the outer grid. Examples of some of the recognised charting notations are shown in Figure 12.8, but readers are again advised to consult the charting booklet produced by NEBDN for the full range of current definitive notations.
The notable exception to the usual rules of inner grid versus outer grid is the charting of a fracture to a tooth. A fracture can range from a minimal incisal edge chip to a tooth, which requires no treatment (and is therefore charted on the inner grid as it represents ‘current dental status’), or it can be a full fracture of the crown of the tooth from its root at gingival level (and is therefore charted on the outer grid as it represents ‘dental treatment that needs to be carried out’).
The charting symbol in both these instances of a fracture is ‘#’, so the dental nurse must be careful to determine if an indication is made as to whether the tooth is to be restored or not, as this will determine which grid should be used for the notation.
Palmer notation
This is based on the division of the dentition into four quadrants when looking at the patient from the front: upper right and left, and lower left and right. Using either the letters representing the deciduous dentition or the numbers representing the permanent dentition (see Chapter 10), each tooth can then be written and identified individually. With the increased use of computers to record the patient’s dental records, including tooth chartings, the use of the quadrant symbol has been superseded by the use of the following.
- UR for upper right.
- UL for upper left.
- LL for lower left.
- LR for lower right.
Figure 12.7 Manual charting grid.

Figure 12.8 Completed charting grid.

So, individual teeth are charted as, for example, UR6 (upper right first permanent molar) and LLE (lower left second deciduous molar), and so on.
The Palmer system relies on the use of the English language for its correct interpretation, and a more international system of tooth charting is also available that is not language dependent, but is based on numbers only.
Two-digit FDI notation
This system replaces the quadrant symbol or use of UR, UL, etc. with a quadrant number as well as a tooth number.
- Upper right – permanent quadrant 1, deciduous quadrant 5.
- Upper left – permanent quadrant 2, deciduous quadrant 6.
- Lower left – permanent quadrant 3, deciduous quadrant 7.
- Lower right – permanent quadrant 4, deciduous quadrant 8.
The quadrant number forms the first digit while the second identifies an individual tooth as 1–8 in the same way as the Palmer system. Reading clockwise from the upper right third molar, all 32 permanent teeth and 20 deciduous teeth have their own two-digit number indicating their quadrant (first digit) and identity (second digit).
For permanent teeth:
| 18 17 16 15 14 13 12 11 | 21 22 23 24 25 26 27 28 |
| 48 47 46 45 44 43 42 41 | 31 32 33 34 35 36 37 38 |
And for deciduous teeth:
| 55 54 53 52 51 | 61 62 63 64 65 |
| 85 84 83 82 81 | 71 72 73 74 75 |
The lower left second premolar, for example, is written as 35 and pronounced ‘three-five’, not ’thirty-five’, and the upper right deciduous first molar would be written as 54 and pronounced ‘five-four’, and so on.
While examining the teeth, the dentist will also record any evidence of non-carious tooth surface loss that is evident – erosion, abrasion or attrition. This information will be linked with other information (such as diet, tooth brushing habits, etc.) provided during medical, social and dental history taking (see Chapter 13).
The dental instruments normally used to carry out the tooth charting assessment are as follows.
- Mouth mirror – used to reflect light onto the tooth surface, to retract the soft tissues to provide clear vision, and to protect the soft tissues during the assessment.
- Angled probe – used to detect soft tooth surfaces and margins on existing restorations.
- Tweezers – used to hold cotton wool pledgets to wipe tooth surfaces dry, or to place cotton wool rolls (Figure 12.9).
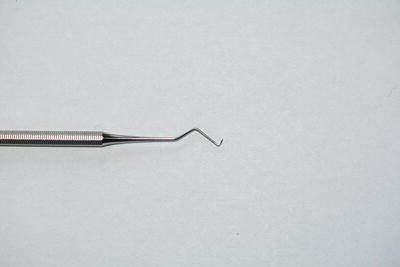
- Briault probe – two-ended probe specially designed to detect interproximal caries, either mesially or distally (Figure 12.10).
Figure 12.9 Mirror, probe and tweezers.
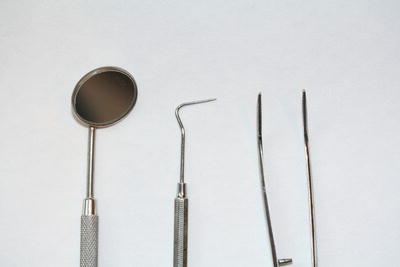
Figure 12.10 Briault probe.
Occlusion
Occlusion is the term used to describe the situation when the mouth is closed and the teeth of both jaws interlock together so that their occlusal surfaces are in contact. When each jaw is of a normal size in relation to the other, and they have developed during childhood in the correct relationship to each other, the cusps of the teeth in one arch should interdigitate with the fissures and interproximal areas of the other (Figure 12.11).
In normal occlusion, all the teeth are well aligned and there is no crowding, no protruding teeth and no undue prominence of the chin. Upper incisors slightly overlap the lowers vertically and horizontally and special names are given to this overlap; vertical overlap is called overbite and horizontal overlap is called overjet (Figure 12.12). With the mouth closed and the teeth touching together in occlusion, the position of the first molars and the canines in each jaw determines ideal occlusion and malocclusion. This is called Angle’s classification.
Figure 12.11 Buccal occlusion.
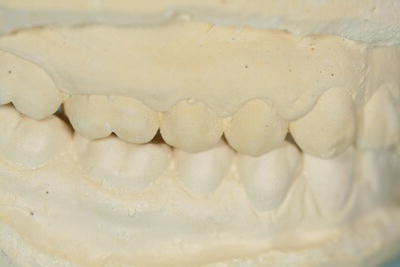
Figure 12.12 Overjet and overbite.
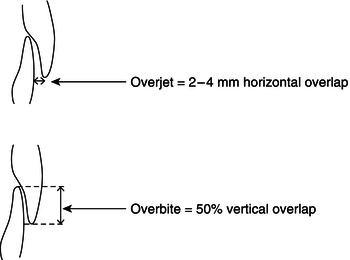
Ideal class I occlusion occurs where the mesiobuccal cusp of the upper first molar lies in the buccal groove of the lower first molar (Figure 12.13). The ideal overjet is 2–4 mm and the ideal overbite is 50%.
For teeth to erupt into normal occlusion, the jaws must be in correct horizontal and vertical relationship to each other, and of sufficient size to accommodate their full complement of teeth. The teeth can then erupt into a normal position of balance between the pressures exerted by the lips and cheeks on their outer side, and the tongue on the inner side of the dental arches.
When normal occlusion is not present, the patient is described as having a malocclusion.
Figure 12.13 Class I molar and canine relationship.
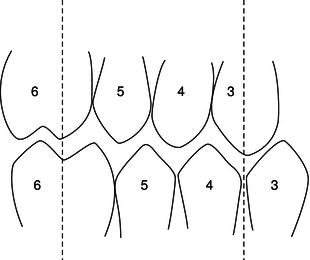
Figure 12.14 Buccally displaced upper canines.
Types of malocclusion
The basic types of malocclusion are caused by a combination of any of the following.
- Crowding.
- Protruding upper incisors.
- Prominent lower jaw.
Crowding
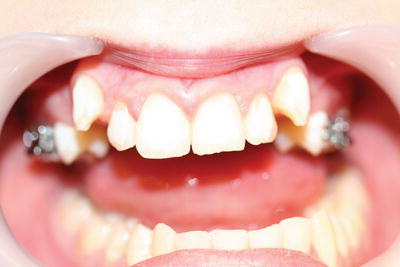
Crowding is caused by insufficient room for all of the teeth to erupt in line and occurs in jaws which are too small to accommodate 32 permanent teeth. The teeth become crooked and overlapping as the permanent dentition erupts, and those which are normally last to erupt cannot take up their proper position in the dental arch as there is insufficient room left. Thus, the upper canines are usually displaced buccally (Figure 12.14), the lower second premolars lingually and the lower third molars are impacted within the bone of the mandible at the ramus.
Figure 12.15 Class II division 1 malocclusion.
Early extraction of carious deciduous molars also contributes to the crowding in these cases. The gap left by an extraction soon closes, as the remaining posterior tooth drifts forward and takes up some of the space required for the permanent successor.
Protruding upper incisors
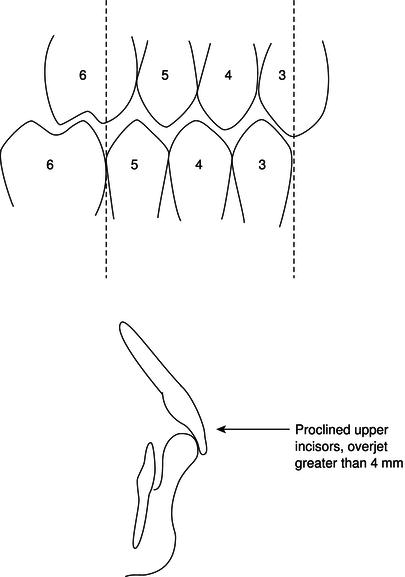
Many children attend for orthodontic treatment because their upper front teeth protrude (procline) between their lips. This condition usually arises from a jaw relationship in which the upper teeth are too far forward relative to the lowers. It is commonly associated with an open lip posture and is called a class II division 1 malocclusion (Figure 12.15).
This tends to occur because the mandible is too far behind its normal position, and not because the maxilla is too far forwards, as may be thought. The maxilla is a fixed bone of the facial skeleton and cannot alter its position during growth, whereas the mandible is the only moveable bone of the skull and its position can alter markedly as it grows and develops.
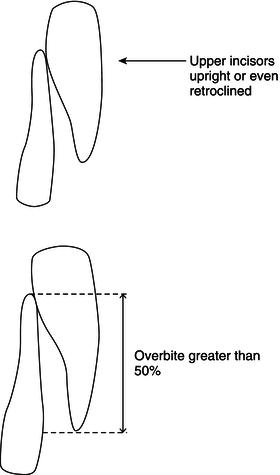
When the mandible is not so far posterior to its normal position, so that the jaw relationship is not quite so severe, the upper incisors become trapped behind the tightened lower lip and erupt upright, or even pulled back (retroclined). This is called a class II division 2 malocclusion (Figure 12.16).
Figure 12.16 Class II division 2 incisors.
Prominent lower jaw
This condition, in which the chin is unduly prominent, is caused by a jaw relationship in which the mandible and the lower teeth are too far forward relative to the maxilla and the upper teeth. It usually results in the incisors biting edge to edge or with the lowers in front of the uppers, instead of behind them. This is called a class III malocclusion (Figure 12.17).
Causes of malocclusion
Stay updated, free dental videos. Join our Telegram channel

VIDEdental - Online dental courses


