Chapter 11
Scar Revision
Introduction
Stedman’s Medical Dictionary defines scar as “fibrous tissue replacing normal tissues destroyed by injury or disease.”1 Every surgeon is very familiar with scar, as it is a consequence of any procedure performed and any injury acquired. Scar is also very frequently encountered and discussed with patients on follow-up visits. Aesthetic and functional outcomes from scar placement are important considerations in planned and rendered treatments. The goal of this chapter is to provide the reader with a guide to the management of scarring in the head and neck. This chapter will discuss scar evaluation, basic principles of repair and restoration, techniques, and special situations unique to the head and neck. Wound healing, pathophysiology of scar formation, and psychosocial implications are beyond the scope of this chapter.
Scar Evaluation
A number of subjective and objective assessment tools and devices have been reported in the literature.2–5 Clinical assessment includes evaluating color, contour and thickness, reflection, distortion, texture, functional deficits associated with the scar, and presence or absence of pain. Postinflammatory hyperpigmentation, for example, can be seen in acne, trauma, inherited and acquired diseases, temperature extremes, sites of allergic reaction, radiation, and sun exposure.6 Hypopigmentation can been encountered iatrogenically with chemical peel, dermabrasion, and laser resurfacing, or with burns, trauma, and infection.7,8
Scar contour exists on a continuum, from depressed to keloid. Keloids present a special problem in treatment and will be discussed separately in this chapter. Among other factors, scar depression results from excessive tension across the wound.
Scar texture and reflection are mainly concerns of esthetics. Scar contracture is a form of distortion, and could have severe implications on function in the head neck. Other forms of distortion include scar tethering to underlying fascia, muscle, or bone. The resulting deformity may be evident with or without animation.
Patients with painful scars may present with allodynia, hyperpathia, or other dysesthesias. This may be related to neuroma formation or perineural scar formation. Scars in the midline are less likely to produce pain.9 Painful hypertrophic scars contain increased density of certain neuropeptides associated with pain.10 Pain may also be related to local factors, such as location and underlying structures.
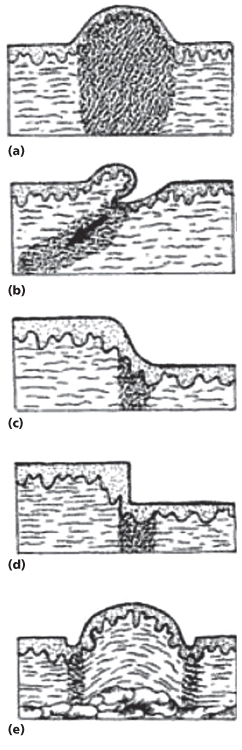
Rosio and Harahap described the “geo-topographic approach” to analyzing scars. The topographic factors include evaluating the scar for elevation, depression, and texture, and the geographic factors include evaluating the layers of skin involved, adjacent regions, and passive and active stressors. Elevated scars, for example, present in different patterns. Hypertrophic scars have thin epidermis and are dome shaped. Partially avulsive or oblique wounds result in contraction at the base of the wound, creating an elevated and inclined scar. Approximated wound edges of different dermal thicknesses result in elevated smooth step-offs. Misaligned wound edges of the same dermal thickness produce elevated scars with abrupt step-offs. Finally, semilunar or partial circumferential wounds produce a “trapdoor” deformity (Figure 11.1). Depressed scars can be related to underlying tissue loss, or may be related to stretch due to increased tension across the wound resulting in an atrophied and often smooth and shiny scar.11
Figure 11.1 Geotopography of elevated scars. (a) Hypertrophic scar. (b) Oblique scar. (c) Approximated dermal edges of different dermal thicknesses. (d) Misaligned wound edges. (e) Trapdoor deformity.
(From Harahap M. Surgical Techniques for Cutaneous Scar Revision. London: Informa HealthCare, 2000.)
Timing for Scar Revision
Timing for scar revision varies from practice to practice and from patient to patient. As a general rule, 6–12 months from injury is an acceptable time frame. In children, scars mature over a longer period, due to an exuberant inflammatory response, and no surgical intervention should be contemplated for under a year. Alternatively, an extended “watch and wait” span is allowed, weighing the psychosocial needs of the patient with the esthetic concerns of the parents.
In adults, minimal interventions such as dermabrasion and shave excision can be performed as soon as 6 weeks from injury on the premise that fibroblast activity is elevated during that time. If one anticipates functional deficits and exuberant scar formation, revision may be undertaken sooner. Injuries and incisions that cross skin tension lines may also benefit from early intervention.12 Steroid injections may be considered as soon as 3 weeks, and may be performed at the time of scar revision. Factors that should delay revision include cigarette smoking, vitamin E, and isotretinoin use.13
Anatomical Considerations
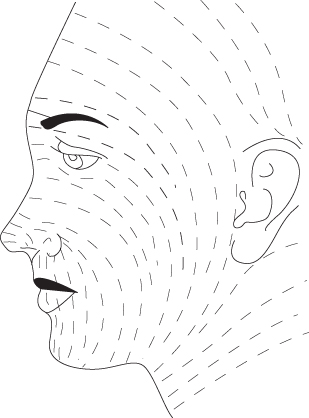
Various skin tension lines have been described in the literature. These include Langer’s, Cox’s, Rubin’s, Kraissl’s, Straith’s, Bulagio’s, and Borges’s14 (Figure 11.2). Borges’s lines, also called relaxed skin tension lines (RSTLs), follow furrows formed on relaxed skin.15 Placing incisions in the direction of RSTLs will produce more aesthetic and functional scars. Borges maintains that there is not a specific number of lines or distinct spacing between them. It is the direction of lines that matters most. In scar revision, reorienting the scar along those lines is critical. Scars that are at right angle to RSTLs mature widely.
Figure 11.2 Borges’ relaxed skin tension lines.
(From Borges AF. Relaxed skin tension lines (RSTL) versus other skin lines. Plast Reconstr Surg 1984;73(1):144–50.)
RSTLs and wrinkles are not always coincidental. Wrinkles are mostly the result of muscle pull over time. Glabellar lines, crow’s feet, and bunny lines, for example, are wrinkles that do not coincide with RSTLs in their respective areas.
Lightly pinching the skin between the thumb and index finger and observing for furrows, if the manipulation is performed parallel to an RSTL, can most reliably confirm RSTLs. If one is oblique to RSTLs, S-shaped distortion occurs. Pinching the skin perpendicular to RSTLs produces humps. If the area scarred is too distorted for manipulation, then contralateral side can be assessed or accepted norms can be followed.15
Another important concept to consider in scar revision is aesthetic units and subunits of the face. Fourteen aesthetic units were described by Gonzales-Ulloa.16 Those are the forehead, upper eyelids, lower eyelids, ears, nose, cheeks, upper lip, lower lip, chin, and the neck17 (Figure 11.3). Additional subunits are extracted from each facial unit, which delineate natural break lines that allow the surgeon to conceal a scar or skin graft placement (Figures 11.4 and 11.5). The division of these units is based on natural breaks formed by shadows, folds, and hair and based on skin thickness, color, and texture. Facial restoration should respect the boundaries of the units and subunits. Any restoration that includes two or more units may result in aesthetic and functional deficits.
Figure 11.3 Aesthetic units and subunits of the face and neck.
(From Fattahi TT. An overview of facial aesthetic units. J Oral Maxillofac Surg 2003;61(10):1207–11.)
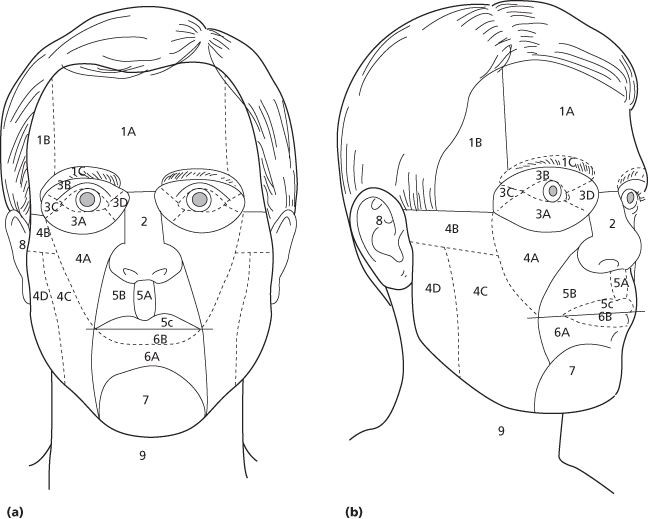
Figure 11.4 Aesthetic subunits of the nose. 1, tip; 2, columella; 3 and 6, alar base; 4 and 5, ala; 7, dorsum; 8 and 9, side wall.
(From Fattahi TT. An overview of facial aesthetic units. J Oral Maxillofac Surg 2003;61(10):1207–11.)
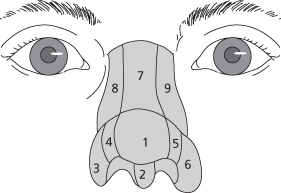
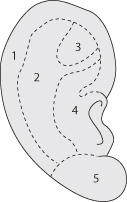
Figure 11.5 Aesthetic subunits of the ear. 1, helix; 2, antihelix; 3, triangular fossa; 4, conchal bowel; 5, earlobe.
(From Fattahi TT. An overview of facial aesthetic units. J Oral Maxillofac Surg 2003;61(10):1207–11.)
Scar Revision Techniques
Z-Plasty
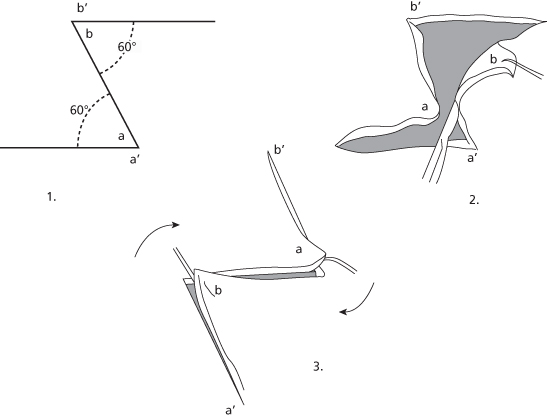
The Z-plasty is one of the most useful procedures employed for scar revision. Introduced in 1854 by Denonvilliers for a case of lower eyelid ectropion in a young man with shrapnel injury, it is interesting to note that the author himself did not realize the novelty of what he described.18 The Z-plasty has three limbs of equal length, with the central limb representing the original scar to be revised.19 The other two limbs must be parallel. Classically, 60-degree angles provide adequate lengthening of scar, at the same time allowing enough transposition for closure without significant distortion. The larger the angle, the more distortion one will have. The smaller the angle, the less lengthening one will achieve, and the less the blood supply to each flap20 (Figure 11.6).
Figure 11.6 The stereometric Z-plasty.
(From Dingman RO. Some applications of the Z-plastic procedure. Plast Reconstr Surg 1955;16(4):246–63.)
Woolf describes overcoming this distortion by converting a two-flap Z-plasty into a four-flap Z-plasty as introduced by Limberg.21 Hence, one can mark a 120-degree angle Z-plasty and divide each triangular flap into equal triangles of 60-degree degrees each. This will maximize length obtained and allow for easy closure (Figure 11.7).
Figure 11.7 The four-flap Z-plasty. 90-degree angles are divided equally here. Note the significant amount of gain in length.
(From Moran ML. Scar revision. Otolaryngol Clin North Am 2001;34(4):767–80, vi.)
It is important to consider the angle before converting a two-flap Z-plasty into a four-flap plasty. Dividing a small-angle triangle into two creates small pedicles that may pose blood supply issues and risk necrosis of flaps. We use 60 degrees as a general cutoff. The four-flap Z-plasty is especially useful in the webbed and functionally contracted neck.
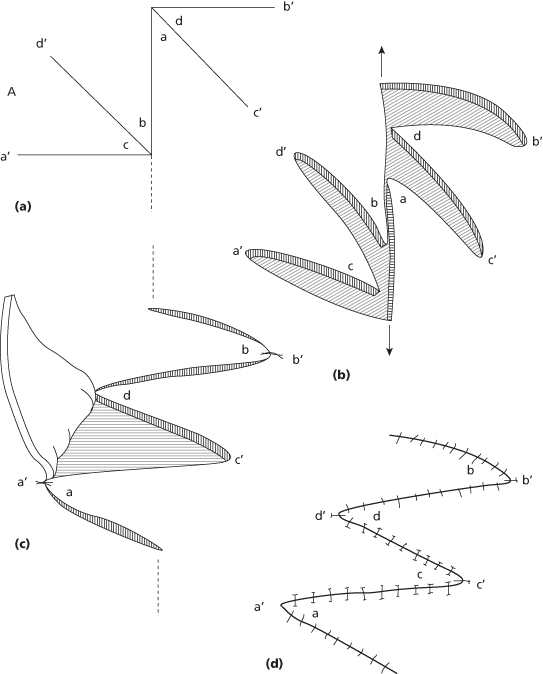
Yet another modification to gain further length is the 90-degree six-flap Z-plasty as introduced by Mir y Mir in 1973, which allows 180% lengthening of the scar22 (Figure 11.8). By comparison, a 90-degree four-flap Z-plasty achieves 111% and a 120-degree four-flap Z-plasty gains 164%.
Figure 11.8 The six-flap Z-plasty. Even more length is achieved as compared with the four-flap Z-plasty.
(From Mir y Mir L. The six-flap Z-plasty. Plastic Reconstr Surg 1973;52(6):625–8.)
Mir y Mir advocates that one start with the simple 90-degree Z-plasty. If excess tension is encountered on transposition, converting to a four-flap Z-plasty is advisable. The six-flap Z-plasty is considered when more length is desired, either after a four-flap plasty is marked and incised or even after a simple 90-degree Z-plasty is designed, regardless of tension encountered.
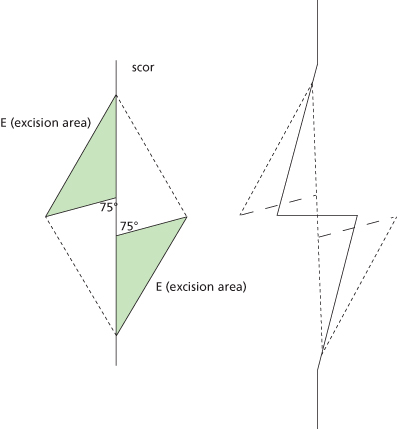
The standard Z-plasty is sometimes called the stereometric Z-plasty since it involves altering the depth, producing elevations or depressions. Another type of Z-plasty, the planimetric Z-plasty, is a modification that avoids these alterations in depth and elongates the scar even more than the standard plasty without having to resort to the four- or six-flap Z-plasty.
The planimetric Z-plasty involves two triangular excisions, which may aid in removing unwanted scar tissue, and achieves a leveling effect. By design, the two arms of the plasty are longer than the central limb, which is compensated for with the two excisions on either end of those arms, and the angles are more obtuse that the standard plasty (Figure 11.9). This modification is particularly useful in gaining length and leveling the scar plane.23
Figure 11.9 The planimetric Z-plasty. The angles and length of the central limb are adjusted to achieve parallelism with RSTLs.
(Slightly modified from Roggendorf E. The planimetric Z-plasty. Plast Reconstr Surg 1983;71(6):834–42.)
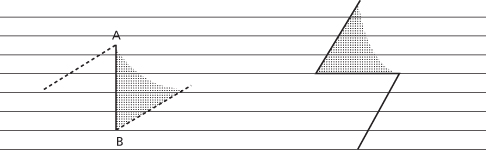
An important principle of the Z-plasty is reorientation of scar to be in plane with RSTLs. A single Z-plasty works best for scars that run directly perpendicular to an RSTL. This will convert a single scar into three; one that runs in parallel to the RSTL, and two that run oblique (Figure 11.10). The final result is more esthetic.
Figure 11.10 The single Z-plasty for scars perpendicular to RSTLs. Horizontal lines represent RSTLs.
(From Borges AF, Alexander JE. Relaxed skin tension lines, Z-plasties on scars, and fusiform excision of lesions. Br J Plast Surg 1962;15:242–54.)
However, if the original scar runs oblique to the RSTL, then the single Z-plasty will only redirect the original scar from oblique to oblique again without any gain in esthetics. On the contrary, the result will be worse, since now the patient has three scars (Figure 11.11). Instead, one designs serial Z-plasties for oblique scars of equal dimensions. This will assure that the original scar is broken up into smaller segments with normal skin and intervening scars that run parallel to RSTLs (Figure 11.12). The same effect can achieved with a single Z-plasty placed within the original scar and not encompassing its entire length, as long as the original scar is of appropriate length to allow for that (Figure 11.13). The larger the number of Z-plasties designed, the more tension is released along the scar.15 Serial Z-plasties can be arranged in continuity and can also be interrupted. These are particularly useful in situations where there is not enough surrounding tissue for transposition if one was to design one large Z-plasty.24,25
Figure 11.11 The single Z-plasty does not reorient scars oblique to RSTLs. Horizontal lines represent RSTLs.
(From Borges AF, Alexander JE. Relaxed skin tension lines, Z-plasties on scars, and fusiform excision of lesions. Br J Plast Surg 1962;15:242–54.)

Figure 11.12 Serial Z-plasties for scars oblique to RSTLs. Horizontal lines represent RSTLs.
(From Borges AF, Alexander JE. Relaxed skin tension lines, Z-plasties on scars, and fusiform excision of lesions. Br J Plast Surg 1962;15:242–54.)
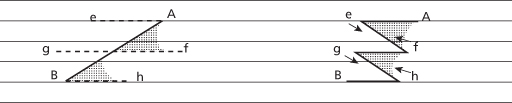
Figure 11.13 The partial-length Z-plasty for scars oblique to RSTLs. Horizontal lines represent RSTLs. (From Borges AF, Alexander JE. Relaxed skin tension lines, Z-plasties on scars, and fusiform excision of lesions. Br J Plast Surg 1962;15:242–54.)

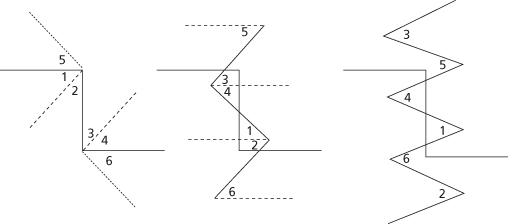
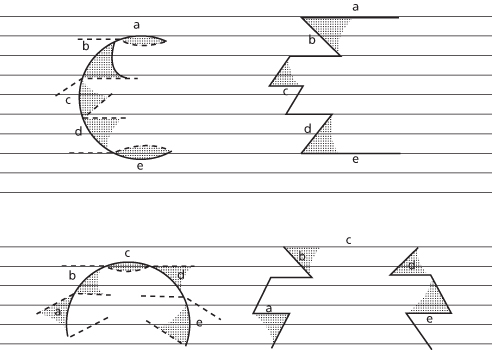
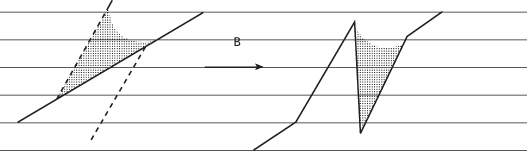
Borges outlines the combined use of Z-plasties and fusiform excisions for U-shaped or semicircular trapdoor defects in detail. Portions of scars that are nearly in line with RSTLs benefit from fusiform excisions, while portions that are oblique or perpendicular to RSTLs benefit from Z-plasties. Generally, the resulting plan includes two fusiform excisions and three Z-plasties for trapdoor defects perpendicular to RSTLs, and one fusiform excision and four Z-plasties for defects parallel to RSTLs15 (Figure 11.14).
Figure 11.14 Z-plasties and fusiform excisions for trapdoor scars perpendicular to RSTLs (top), and trapdoor scars parallel to RSTLs (bottom). Horizontal lines represent RSTLs.
(From Borges AF, Alexander JE. Relaxed skin tension lines, Z-plasties on scars, and fusiform excision of lesions. Br J Plast Surg 1962;15:242–54.)
A common error when designing a Z-plasty is to place the limbs perpendicular to RSTLs, producing three scars that are all perpendicular to RSTLs (Figure 11.15). All limbs have to be parallel or oblique to RSTLs with reasonable angles. Elliptical or fusiform excision may be preferred to a Z-plasty if the original scar is close to being parallel to an RSTL, avoiding triangular flaps with very acute angles.15
Figure 11.15 Z-plasty limbs perpendicular to RSTLs produce unaesthetic outcomes. Horizontal lines represent RSTLs.
(From Borges AF, Alexander JE. Relaxed skin tension lines, Z-plasties on scars, and fusiform excision of lesions. Br J Plast Surg 1962;15:242–54.)
The Z-plasty techniques presented thus far describe two-dimensional flaps. Furnas described the tetrahedral Z-plasty, a three-dimensional technique, and advocates its use in the webbed neck.26 Principally, it turns a cleft into a peak, or vice versa, by incorporating wedges into the transposed flaps.
Other modifications of the Z-plasty include Mustardé’s “jumping man flap,” which is a five-flap technique, Converse’s double-opposing Z-plasty, which is another five-flap technique, Numanoglu’s paired five-flap plasty, and Hirshowitz’s modification, which combines a five-flap technique with V-Y advancement27–29 (Figures 11.16 and 11.17).
Figure 11.16 Five-flap Z-plasties. Jumping man flap (top) and the paired five-flap plasty (bottom). (From Numanoglu A. Paired five-flap Z-plasty. Past Reconstr Surg 1993;92(3):543–6.)
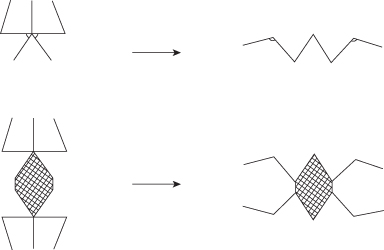
Figure 11.17 The double opposing Z-plasty.
(From Moran ML. Scar revision. Otolaryngol Clin North Am 2001;34(4):767–80, vi.).
Regardless of the technique utilized, meticulous surgical technique is essential for optimal results. Use sharp and fresh blades for all incisions. Incisions are carried into subcutaneous fat along the entire length of the flaps. Flaps raised must be undermined across the entire triangle down to the base. Edges may only be held with skin hooks and with minimal tension, not forceps. All bleeding must be controlled before placement of sutures. Apply pressure dressing when appropriate.24
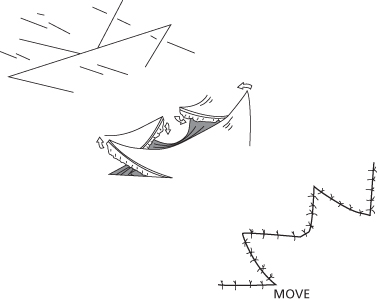
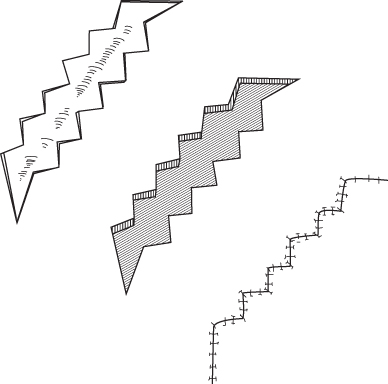
W-Plasty
The W-plasty was coined by Borges because the preoperative and postoperative patterns resemble the letter W.11 This technique is best employed for linear and vertical scars of the forehead, temples, cheeks, and chin. Note that these scar patterns are perpendicular to RSTLs. Principally, the W-plasty breaks a scar into smaller ones reducing tension. Like a Z-plasty, it also redirects a scar to better parallel RSTLs. Moreover, better skin-to-skin edge contact is achieved by separating the cutaneous from subcutaneous components of the scar. Finally, it camouflages a scar by dividing it into many smaller segments with intervening normal skin tissue. Unlike the Z-plasty, however, it does not lengthen a scar.
When designing the W-plasty, the triangles at each end of the scar have their bases perpendicular to the most distal scar edge, with one side of the triangle stopping at that point, while the other bypassing it. Triangles along the scar have their points facing the midbase of the triangles on the other side. Each triangle creates an angle of 55–60 degrees. Further, each arm is 5–7 mm in length (Figure 11.18). All triangles are incised, raised, and undermined to the bases in a subcutaneous plane. A #11 blade is used for all incisions. Finally, it is not uncommon to need fusiform excisions at either end of the running W-plasty to reorient the anti-RSTL line that forms and to excise the dog ear that appears.30
Figure 11.18 The standard W-plasty. Note the regular pattern.
(From Harahap M. Surgical Techniques for Cutaneous Scar Revision. London: Informa HealthCare, 2000.)
Linear forehead scars are well suited for management with W-plasty. Scars crossing the eyebrow />
Stay updated, free dental videos. Join our Telegram channel
VIDEdental - Online dental courses


