Chapter 11 Bonding systems
Learning Objectives
From this chapter, the reader will:
• Understand the purpose of the bonding systems and the principles behind their use
• Understand the chemistry behind bonding systems
• Understand the properties of these materials and the significance of these on clinical manipulation and performance
• Understand their indications, contraindications and limitations
• Have an increased appreciation of how to use these materials to their best effect
• Know the names of currently available commercial products.
Introduction
Probably one of the most significant aspects of dental materials advancement in the past 50 years is the development of adhesives for dental applications. This has greatly increased the options open to the restorative dentist. The advantages of an adhesive approach are:
• Tooth tissue is preserved as restorations which may be bonded to the underlying tooth structure do not require the preparation of any mechanical retentive features
• The bonding process will enhance the retention of the restoration to tooth tissue
• The bonding process may seal the margins of the restoration with the tooth so reducing or eliminating bacterial penetration into the dentinal tubules (microleakage). This in turn decreases postoperative pulpal sensitivity and the potential for recurrent caries.
• Polymerization shrinkage (which occurs when using resin composite) may be reduced. This shrinkage leaves a marginal gap which may be accentuated during thermal cycling and may allow bacterial ingress.
• Bonding to tooth tissue may have a reinforcing effect on the weakened tooth structure.
• Many restorative materials which are bonded are tooth coloured so offering a more aesthetic option.
Principles of Adhesion, Bonding and Sealing in Dentistry
• Adhesion: is the force which binds two differing materials together when they are in intimate contact with one another.
• Dental bonding: is the process of attaching a resin composite-based material to the underlying tooth tissue using some form of intermediate material.
• Sealing: is the achievement of an impermeable barrier between the cavity wall and the restorative material to prevent the passage of bacteria.
The difference between bonding and sealing
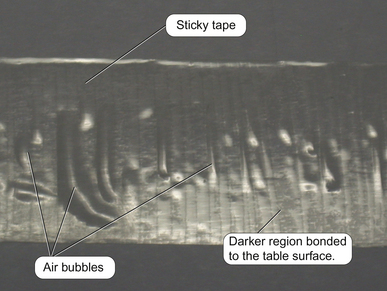
The terms bonding and sealing are commonly used synonymously but they have distinct meanings. Although a material may appear to be ‘stuck’ to another material, every part of the two surfaces may not be in intimate contact with each other. This may be illustrated by considering a piece of sticky tape stuck to a bench (Figure 11.1). Although the tape is stuck to the table surface, small air bubbles and voids are present between the tape and the bench. The tape has therefore not sealed.
Bonding and luting
Further confusion arises when dentists discuss bonding and luting.
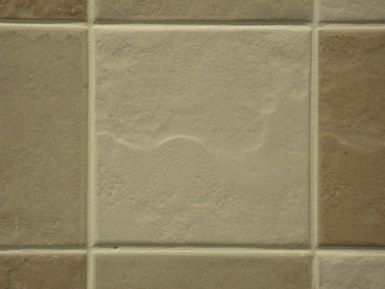
• Luting: is the filling up of the potential gap between a cast restoration and tooth, which is essentially a grouting effect. An everyday example is that of kitchen or bathroom tiles, where the grout (cement) is used to fill in the gaps between the tiles but not necessarily to bond them together (Figure 11.2).

Characteristics of dental bonding
In dentistry, two phenomena can occur in bonding. Firstly, it is a solid–liquid interface that is commonly encountered when bonding a dental material to tooth tissue. The intervening layer (adhesive) is generally applied as a liquid. The advantage of using a liquid is that the liquid will more readily wet the surfaces to be bonded to each other. This will achieve the intimate microscopic contact with the solid surfaces much more effectively than could be achieved with a solid on solid. Increased wetting results in better bonding. However, even with a liquid interface, there may be some limitations, as the viscosity of the liquid will limit the degree to which it wets the surface. This is the effect of surface tension (Figure 11.4).

The aim with dental bonding is to use a combination of these two phenomena. The first surface, the tooth surface, is usually rough and an intervening layer of resin fills these micro- and macroscopic irregularities. The second surface is the restoration, which will be either a cast that may have a relatively rough fitting surface (perhaps achieved by sandblasting or etching) or a direct filling material. This material contains a filler that will provide microscopic irregularities on its surface (Figure 11.5).
Surface tension: is the property of the surface of a liquid that allows the liquid to resist an external force. The higher the surface tension, the lower is the ability of bonding to it. Oil has high surface tension although the oil is heavier than the water (Figure 11.4). Conversely from a bonding perspective, the low surface tension of the intervening layer of water between two sheets of clean glass will hold them together with the glasses only being easily separated by sliding one away from the other. If the water was absent, the glasses would not stay together unless supported.
Adhesion in dentistry
Three types of adhesion are possible at the interface:
Physical
In dentistry, the bonding agent normally infiltrates the substrate. In most cases it does not dissolve into the substrate but will infiltrate any irregularities in the surface. This is how the majority of the dentine adhesives function. It is, however, essential that the surface of the substrate is wetted effectively to achieve this.
Bonding to Enamel
The acid etch technique


Enamel as a substrate
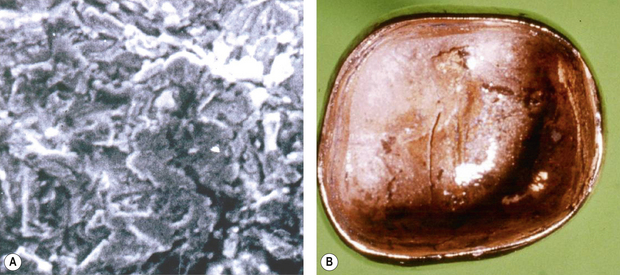
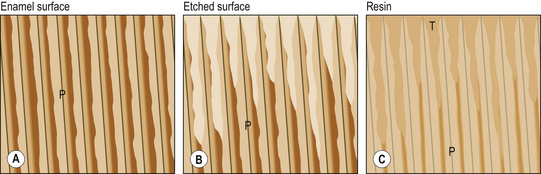
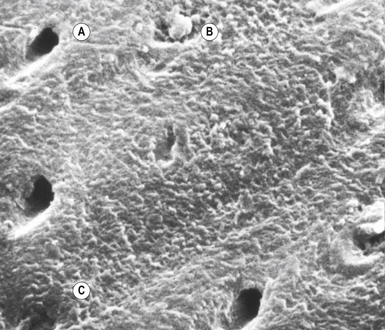
Preparing enamel presents far fewer problems than preparing dentine due to its microscopic structure. Enamel is acellular, which means it is almost totally inorganic in nature (Figure 11.6). Enamel is generally prepared by using an acid to partly demineralize the crystalline structure. This part demineralization process results in preferential and differential removal of the crystallites so that the surface produced has micromechanical irregularities. These irregularities extend into the enamel structure, forming clefts and greatly increasing the surface area for contact by the bonding agent. The microscopic structure produced by etching enamel is shown in Figure 11.8 later in the chapter. The clefts usually penetrate between 20 and 30 μm and are found in the areas where the interprismatic material is present. The crystallites are partly removed. This effect is accentuated in freshly cut enamel and hence it is frequently recommended that enamel is roughened using a bur prior to bonding. The bond formed by acid etching is micromechanical in nature. Etching enamel with an acid will therefore:
• Increase the surface area for bonding
• Increase the surface roughness
• Decrease the surface tension
• Increase the surface energy so the surface is more reactive so more receptive to bonding.
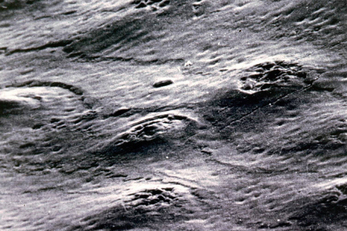
When etching enamel, the dentist needs to look out for a loss of sheen on the etched area, which takes on a frosted appearance (Figure 11.7).

The outer 5 μm of the enamel surface is amorphous and is less susceptible to etching, so the surface preparation of the enamel will ensure that the surface is clean. Pretreatment with a non-organic-based abrasive paste will remove organic smear. Furthermore, the effect of the acid will make the surface more receptive to the placement of a low-viscosity fluid. The nature of the structure of enamel means that it may also be dried sufficiently, so that its surface may be wetted by an intermediate resin without the risk of water forming a barrier between the adhesive fluid and substrate. In order to achieve a successful etch on unprepared enamel, the exposure time should be extended. This is also recommended with older enamel particularly if it has been exposed to fluoride for a significant period of time. The solubility of the enamel will be decreased due to the effect of the fluoride ion. Effective etching still forms a major part of any adhesive system available for dental use.

• The surface of the tooth should be thoroughly cleaning with a pumice slurry (prophylaxis) (Figure 19.49) prior to etching to remove pellicle and plaque.
• Proprietary pastes should be avoided as they contain oils, which can contaminate the surface to be bonded so reducing its wettability and ability to bond effectively.

Problems with etching
Over-etching
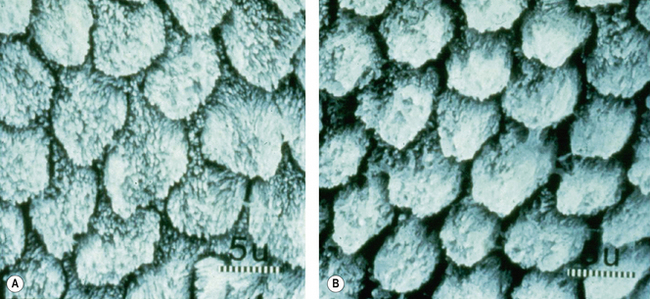
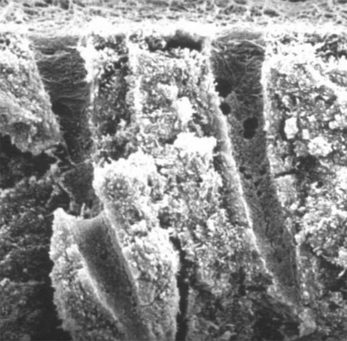
It is possible to over-etch enamel. Note the difference between a 30- and 60-second etch in Figure 11.8. There is a substantially greater removal of the enamel prism sheath after 60 seconds and the porosities produced are not so numerous. This will decalcify the substrate to too great a depth, that is, the etch pattern will be lost, thus decreasing ability of the resin to form tags which may penetrate the etched pattern. The result will be lower bond strength. It is impossible to determine clinically when the enamel has been over-etched, so attention must be paid to the length of time of application of the acid.
Re-etching
Etching can only be done once on the same surface. Repeating the etching process will result in over-etching (see Figure 11.8B). If the tooth surface becomes contaminated by blood or saliva during the bonding process then etching may require to be repeated. This is a common clinical problem when the dentist is working on teeth not isolated by rubber dam. If contamination does occur, then the dentist should re-prepare the tooth and re-etch, removing approximately 50 μm of enamel.
Presentation of etching agents
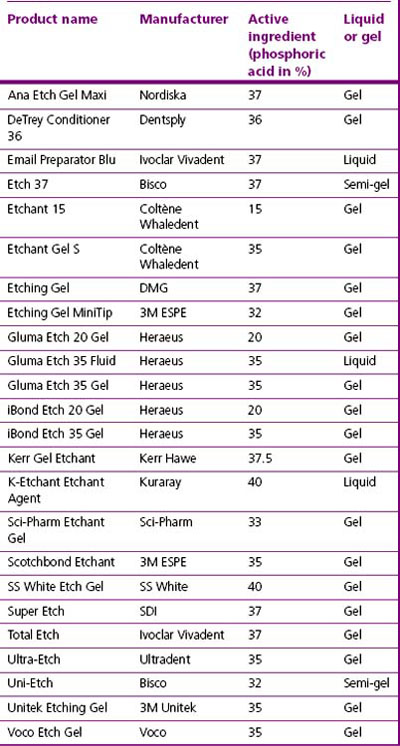
Modern etching materials are available as liquids or gels (Figure 11.9). Liquids are difficult to control as they may run off the tooth surface, causing undesirable etching of enamel that will not be bonded. There is also the potential for causing chemical burns to the gingival tissues. The viscosity of the acid liquid may be increased with the addition of fine particles of colloidal or amorphous silica, which is used in many industries as a thickening agent. This aids localization of the acid solution, which then may be applied precisely to the areas to be etched (Figure 11.10).
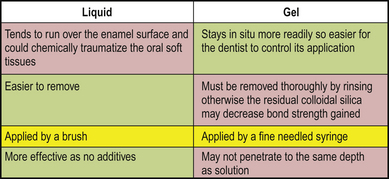
Fig. 11.9 Advantages and disadvantages of a liquid versus gel presentation of acid for etching enamel.
• A balance must be reached with regard to the viscosity of the gel.
• It should be viscous enough to be able to be placed precisely and for it to remain there.
• It should not be so viscous that it cannot penetrate into the smallest fissures.


• It is essential to wash the tooth thoroughly after etching to remove all the acid, the products of etching and the gel thickening agent. Failure to do this may mean that the silica carrier is retained in the enamel clefts, so reducing the bond strength.
• When etching (high acidic) products are being used, the patient and dental team should wear protective equipment such as protective clothing and eye wear. The application of rubber dam is also advisable.
Normally the bonding material is a dilute dimethacrylate resin system with a low viscosity. The most commonly used material is bis-GMA diluted with TEGDMA. Urethane dimethacrylates are rarely used. These materials are applied to the enamel surface after etching and flow into the crevices formed during the etching process. The resin monomer is then polymerized to form a solid polymer. The resin tags impregnate the enamel surface to a depth of about 30 μm (Figure 11.11).
Bonding to Dentine
Dentine unlike enamel is a ‘living’ tissue. This causes problems for bonding, as:
• Its surface is difficult to clean
• It is frequently contaminated with debris from the cutting process (smear).
The process for bonding to dentine consists of three chemical processes:
1. The removal of the smear layer and the etching of the dentine.
2. The impregnation of the dentine by a water-miscible fluid or one which will substitute for the water.
3. The application of a fluid which will bond to both the impregnated material and the overlying restorative or cast restoration.
Since smear layer removal opens the dentinal tubules, the dentinal fluid outflow that follows will always cover the surface of dentine with a thin fluid film. The clinician, therefore, may need to make a choice between (Figure 11.12):
• Maintaining the smear and reducing the amount of fluid (which may interfere with the wetting of the dentine by the bonding agent)
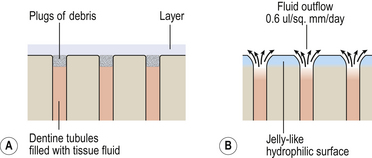
• Removing the smear and allowing fluid outflow from the dentinal tubules (which must be displaced for successful bonding).
Removal of the smear layer and dentine etching
Dentine conditioning agents are generally acids which are designed to remove the smear layer produced by cavity preparation and modify the surface of the underlying dentine. Depending on both their concentration and the time period of application, these materials modify or remove the dentine smear layer and preferentially partly demineralize the intertubular dentine and the periphery of the dentinal tubules. This normally extends to a depth of approximately 10 μm, leaving the collagen matrix intact and uncollapsed. The partly demineralized collagen matrix acts as a scaffolding which may be impregnated with the primer (Figure 11.13). Sclerosed dentine requires a longer exposure time for the same effect to be produced. Some conditioning agents also incorporate glutaraldehyde, which acts on the collagen fibres by fixing them by a process of cross-linking. This is supposed to strengthen the fibres and prevent their collapse.
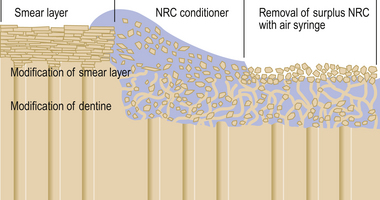
The conditioning process is fraught with problems as the smear layer is of variable thickness at different points on the surface. The time available to treat the underlying dentine is dependent on how quickly the smear layer is removed, making the process less predictable. Figure 11.14 shows the variable results achieved with application of a conditioning agent on a smear layer. The varying thickness of the smear layer has led to differential opening of the dentinal tubules. Figure 11.15 shows a much more aggressive etching process. Here the demineralization has been much more extensive and extends more deeply into the dentine. This may cause an inflammatory response in the pulp if the cavity is deep.

Priming the dentine surface


• Unfortunately there are a number of terms which are frequently defined in different ways by different authors and manufacturers. This can be very confusing to the student and qualified clinician alike! For simplicity the following guide may be helpful:
• Primers are often referred to as dentine conditioners, which are acids used to alter the appearance and characteristics of the dentine surface.
• Coupling agents do the chemical linking but are often described as primers.
• Sealers flow into the dentinal tubules and seal the dentine with a surface layer rich in methacrylates and bond to the resin composite. They are sometimes referred to as the bond, resin or adhesive.
Stay updated, free dental videos. Join our Telegram channel
VIDEdental - Online dental courses


