10: Soft tissue manipulation around implants in the esthetic zone

Soft tissue manipulation around implants in the esthetic zone

image Additional illustrations can be found on the companion website at www.blockdentalimplantsurgery.com

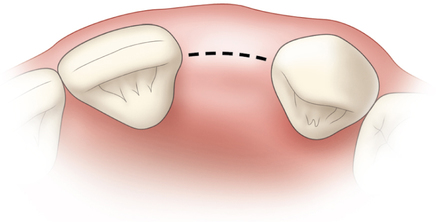
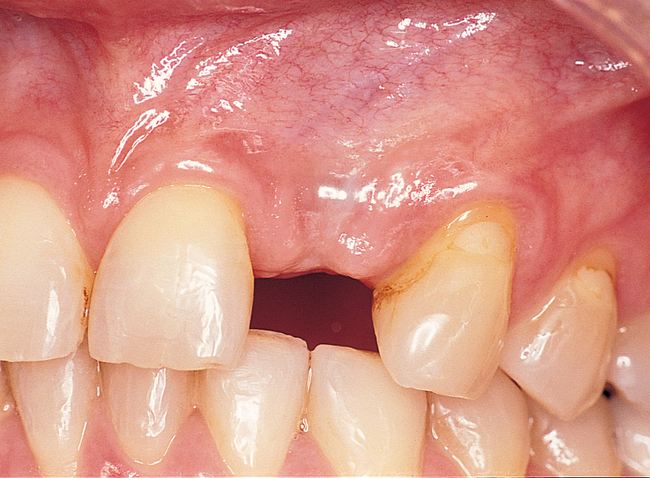
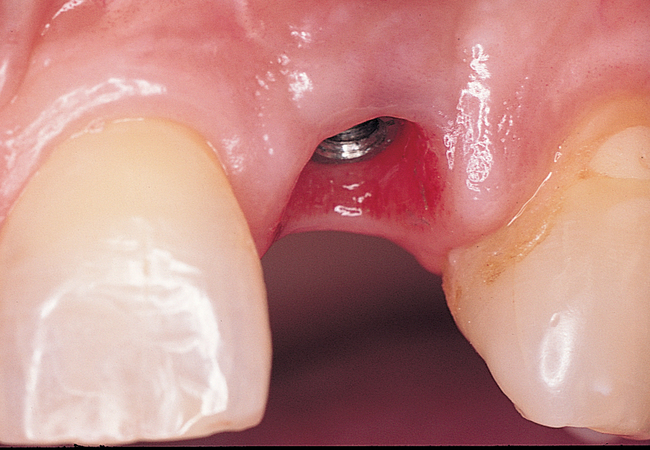
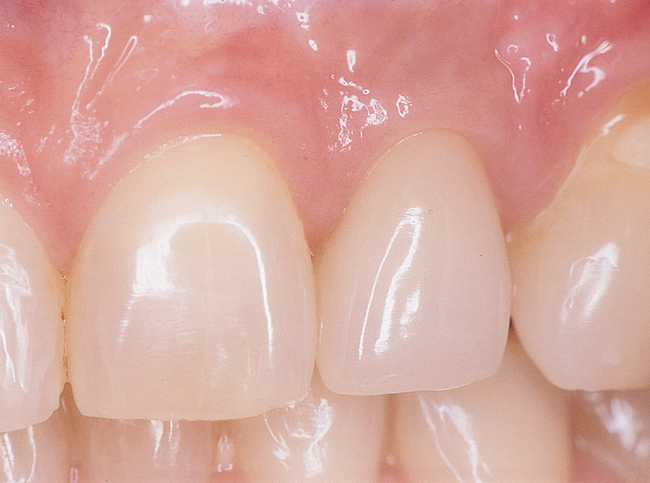
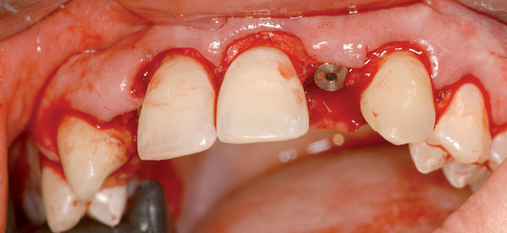
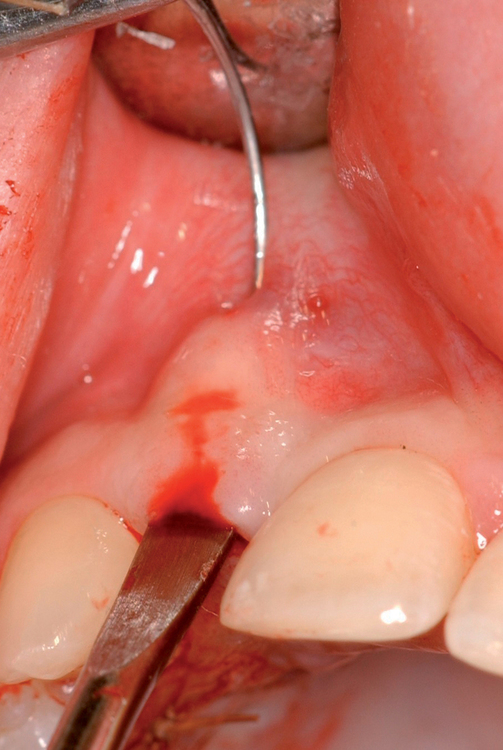
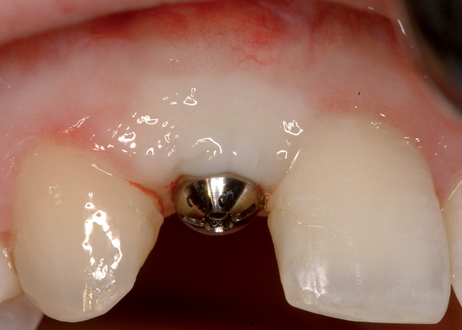
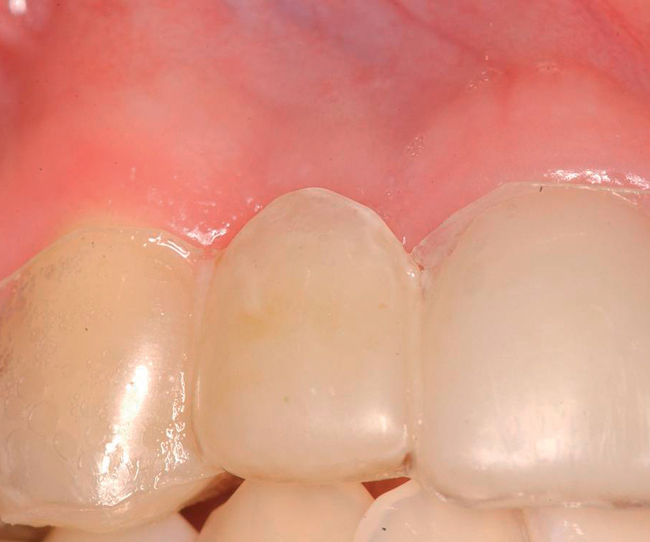
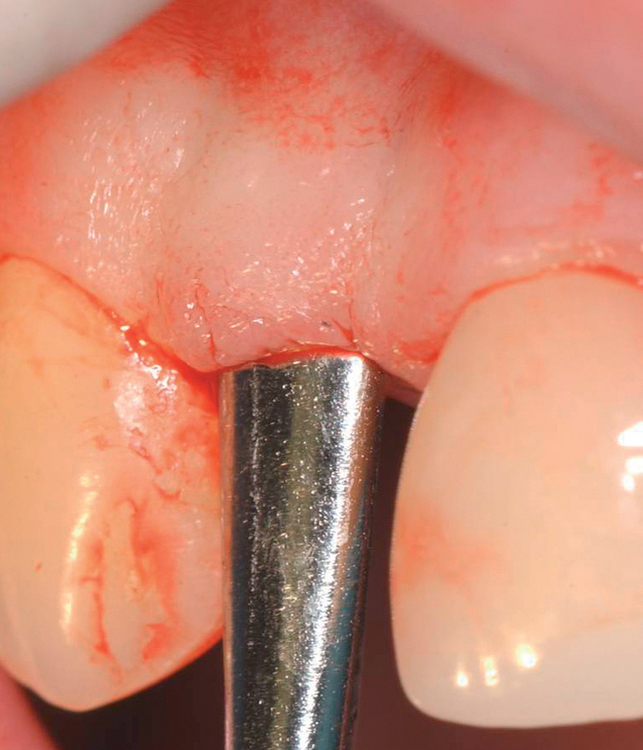
After an implant has been placed and all hard tissue grafting procedures have been completed, the implant site is evaluated to determine the need for additional soft tissue manipulation (Figure 10-1). Adjunctive procedures may be necessary to complete the surgical preparation of the implant site or to modify an existing implant restoration to achieve an esthetic restoration. The initial diagnostic esthetic setup or an esthetic temporary prosthesis can be used to assess the need for further ridge augmentation with soft tissue or for modification of the position of the gingival margin.

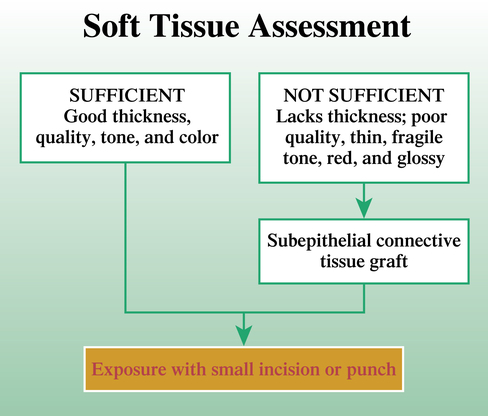
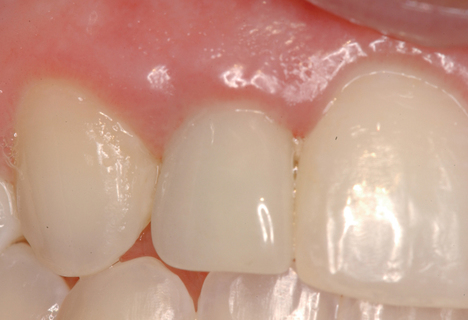
Physical examination of the patient is necessary, with attention given to specific anatomic and restorative details (Box 10-1). After the examination has revealed tissue characteristics that would benefit from an adjunctive soft tissue procedure, the specific soft tissue procedure is performed to correct the soft tissue deficiency or to modify the gingival margins, resulting in symmetry and an esthetic smile. Soft tissue deficiency usually involves thin gingiva, which benefits from increasing its thickness with connective tissue grafting. When the connective tissue thickness is normal or thick, the resulting texture, tone, color, and general appearance become similar to adjacent normal gingiva around natural, esthetic teeth.

The metal of the implant’s cover screw may also be visible through thin gingiva, especially if the implant is labially positioned. The gingiva may appear glossy without its esthetic stippled appearance. A loss of keratinized gingiva (KG) and scars may be seen at the crestal region. These conditions are treated with placement of an interpositional subepithelial connective tissue graft. The timing of the procedure depends on the clinician. To prevent complications from performing multiple procedures simultaneously, the connective tissue surgery is performed as an isolated procedure. When hard and soft tissue grafting is performed in the same surgical site at the same time, a compromised vascular supply and subsequent healing problems may result in necrosis of the graft and gingival recession. Vascularization of the connective tissue graft is critical to a successful outcome. If the tissue graft does not revascularize, it becomes necrotic. After its removal and subsequent healing, the gingiva appears scarred and recessive in height, severely compromising the final esthetic result.

A recommended course is to perform the hard tissue grafting first and establish the hard tissue foundation for the implant site. The implant can be placed at the time of hard tissue grafting (see Chapter 9). The connective tissue grafting can be placed after implant placement as a separate procedure. Six weeks after placement of the connective tissue graft, the implant can be exposed with minimal incisions, usually using a circular gingivectomy. Placement of connective tissue grafts at the time of hard tissue grafting or at implant exposure may yield satisfactory results in select cases, but this timing may also result in an esthetic problem if the connective tissue graft does not become revascularized and, as a result, becomes necrotic.

Approximately 3 months after implant placement, the implant site is examined to determine whether the bone and gingival contour mimic the root eminences of the adjacent teeth. From the occlusal view, it can be ascertained with direct visualization whether the root prominence over the implant site is adequate. If any doubt exists, augmentation is indicated. If the necessary augmentation is limited to 3 mm, 2 mm can be gained from a connective tissue graft, with the final 1 mm obtained through the subgingival labial contour of the final restoration. If the necessary augmentation exceeds 3 mm, it may be necessary to augment the site again with a hard tissue graft because connective tissue grafts more than 3 mm thick in a single-tooth implant site may not revascularize and thus are less predictable. Gingival recession and an esthetic disaster accompany the necrosis of a connective tissue graft. Therefore, the clinician must carefully consider the correct timing of the procedures to achieve the desired result predictably.

Adjunctive procedures are used to augment the alveolar crest to create a convex ridge profile. Soft tissue augmentation procedures include a subepithelial connective tissue graft, a palatal roll-in procedure at the time of implant exposure, and repositioning of adjacent palatal tissue at implant exposure. For most patients, the placement of a subepithelial connective tissue graft as a separate procedure 6 weeks before implant exposure results in adequate tissue bulk and gingival appearance. If approximately 1 to 2 mm of soft tissue is required to reduce gingival translucency, a palatal roll procedure can be used at implant exposure. However, caution is necessary because the thickness of the transposed, denuded palatal tissue may limit the augmentation to only 1 mm.

Soft tissue manipulation for ridge augmentation

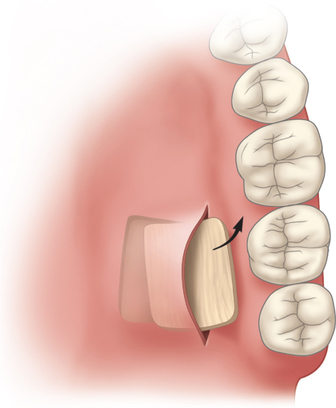
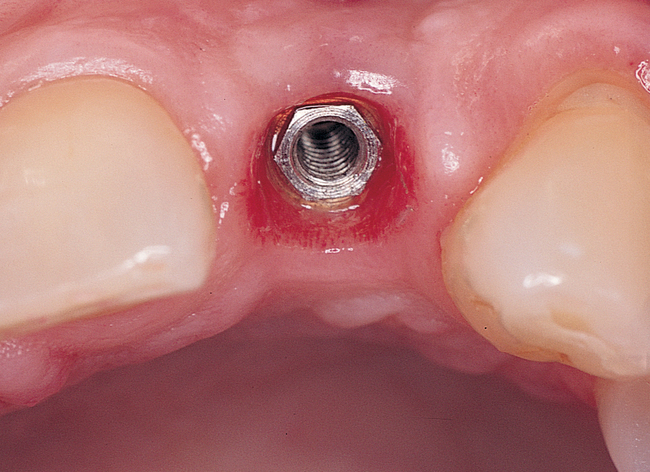
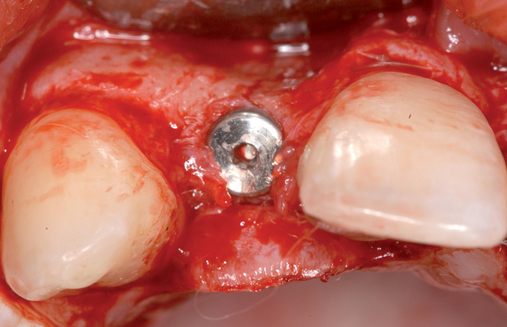
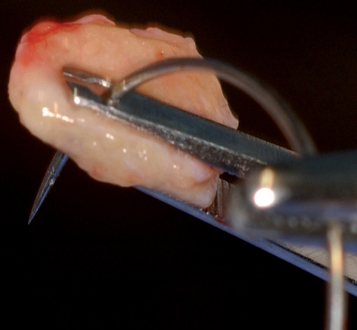
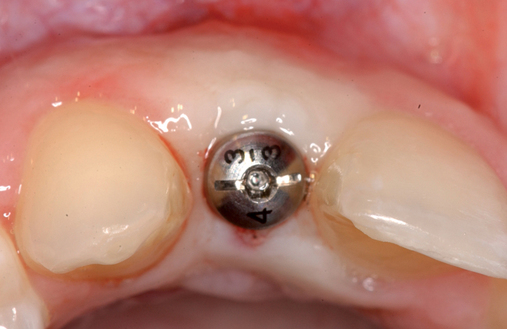
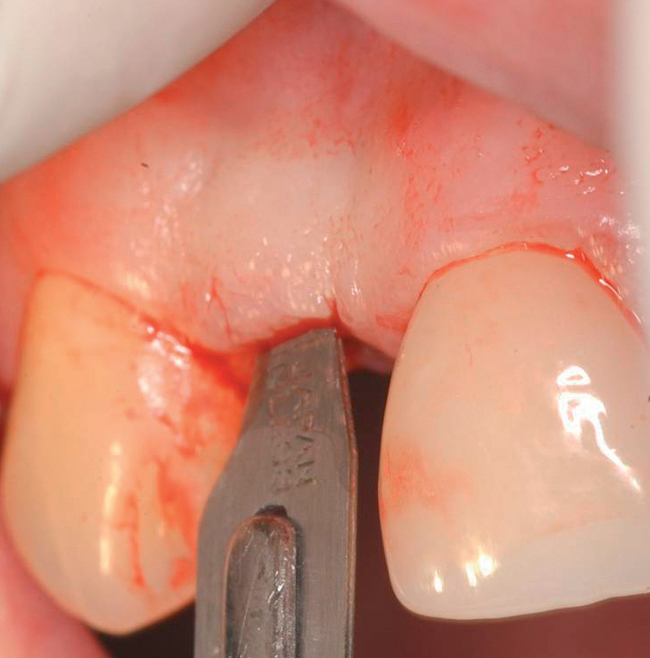
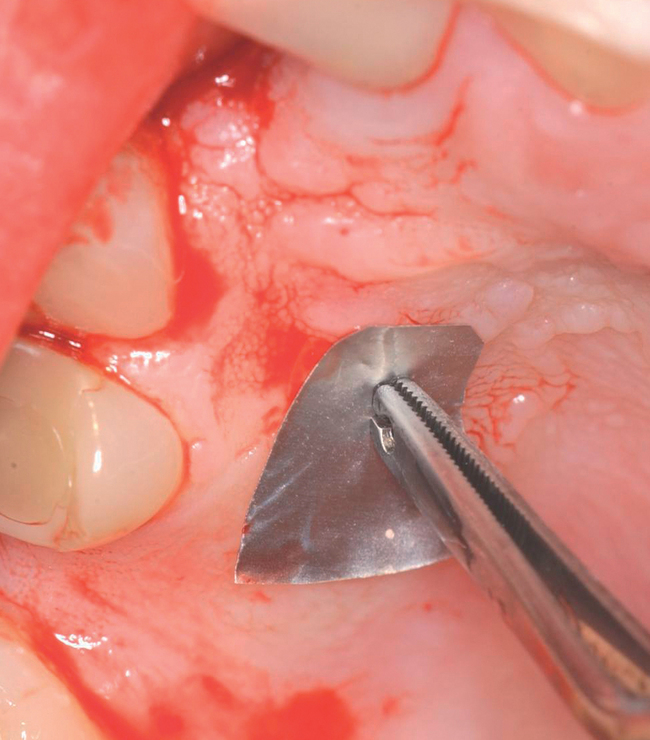
The subepithelial connective tissue graft is a sheet of connective tissue harvested from the palate (Figure 10-2). This soft tissue graft initially was described by Langer et al.

13 to correct ridge concavities and for root coverage, without deepithelialization of the palate.4,5 The connective tissue graft is quite versatile and flexible in its uses. Indications for use of a subepithelial connective tissue graft in dental implant sites include the following:

1. Thickening the gingiva to eliminate metal show from an underlying dental implant. The subepithelial connective tissue graft can thicken the gingiva 1 to 2 mm, depending on the thickness of the graft and contracture or shrinkage of the graft during healing.

2. Improving poor quality of the crestal gingiva. The gingiva’s appearance may be glossy rather than normal, healthy gingiva. The subepithelial connective tissue graft can change the appearance of thin, red, glossy gingiva to thick, pink, and normal stippled gingiva.

3. Increasing the labial convex contours of the soft tissue for a natural appearance of the final esthetic, implant-supported restoration. The 1 to 2 mm of additional crestal width provided by the subepithelial connective tissue graft can allow the restorative dentist to achieve an esthetic and symmetric soft tissue profile on the restoration.

4. Increasing the thickness of the gingiva to allow for sculpting. The restorative dentist can create an ideal gingival form for the esthetic restoration. By using the additional soft tissue thickness, the dentist can carve an esthetic form of the gingiva.

5. Correcting vertical height. The subepithelial connective tissue graft can be placed on the alveolar crest to augment the vertical height of the ridge 1 to 2 mm. The limit of this technique is not known at this time.

Subepithelial connective tissue grafting for ridge augmentation

With dental implants, the subepithelial connective tissue graft is useful for augmenting the labial gingiva. By increasing the thickness of the crestal gingiva, this graft reconstructs the appearance of the gingiva to mimic the appearance of the adjacent gingiva. The thickness and underlying connective tissue quality of normal gingiva often are altered in form when bone and teeth are lost. Thinner gingiva is more glossy and red in appearance, with a loss of its normal texture and general tone. After the subepithelial connective tissue graft has been placed, it can match the adjacent gingiva in form, color, and appearance.

The use of the subepithelial connective tissue graft to augment dental implant sites is based on the premise that after a tooth has been extracted, both the hard and the soft tissues change in form and quantity (see previous chapters for discussions on hard tissue). Interpositional soft tissue grafts can augment approximately 2 to 3 mm of width, but they contract over time and may lose 20% to 40% of their original thickness.6 Therefore, the clinician should expect some shrinkage from these grafts. The exact amount of shrinkage is not well documented and may vary from patient to patient.

Timing the placement of soft tissue grafts

The timing for the placement of interpositional subepithelial connective tissue grafts in the implant site depends on the clinician. Some clinicians place the subepithelial connective tissue graft at implant placement using the sheet of connective tissue in a manner similar to that used with membrane placement. The advantage of placing the subepithelial connective tissue graft at the time of implant placement or at the time of implant exposure is that it eliminates the need for a separate surgical procedure.

The disadvantage of placing the graft simultaneously with implant placement or at implant exposure is the decrease in potential vascular supply to the graft. The subepithelial connective tissue graft traditionally is placed with its future blood supply arising from the underlying and overlying soft tissues. When placed at implant placement or implant exposure, the undersurface of the connective tissue graft may be placed against metal, denuded bone that has just been traumatized by intraosseous surgery, or other graft materials. Thus, the vascular supply to the graft may be compromised. If the graft does not become revascularized, necrosis of the graft may occur. When the connective tissue graft necroses, incision breakdown occurs, and the remnants of the graft are exfoliated from the site. The subsequent healing response results in gingival recession that can ruin the appearance of an esthetic restoration.

Because of this potentially disastrous complication, a conservative approach is to place the subepithelial connective tissue graft as a separate procedure. The surgeon has control of the host tissue bed and can engineer the surgical procedure to optimize the vascular supply to the graft, increasing the chances of success and reducing the chances of graft necrosis.

Placing the soft tissue grafts at the time of hard tissue grafting may result in an excellent result. However, this author has found the incidence of complications to be as high as 25% when the soft tissue graft is placed at the time of implant exposure or at the time of hard tissue grafting.

When is the best time to place interpositional connective tissue grafts? If the clinician’s philosophy is to use soft tissue procedures to fine tune the esthetic result, the procedure should be delayed until later in the chronology of implant therapy. Predictability and an extremely high success rate are critical for an esthetic implant restoration. This author recommends that soft tissue grafts be performed 31⁄2 months after implant placement. When combined with the subsequent 6 weeks’ healing time for the subepithelial connective tissue graft, the total time from implant placement to restoration is usually 5 months.

Palatal roll technique

The palatal roll technique uses local tissue to augment the labial aspect of the alveolar ridge. The palatal roll technique was introduced by Abrams7 as a way to augment edentulous pontic sites for fixed prostheses. Tarnow and Scharf8 described a modified palatal roll technique for smaller ridge defects and for use when implants are exposed. Its use to augment implant sites has also been described by Block.9,10

The palatal roll technique is simple and predictable. An incision is made parallel to the alveolar crest, avoiding the interdental papillae. Two vertical incisions are made toward the middle of the palate. A flap of tissue is developed. It is kept thin and based off the palatal tissue. This dissection exposes the underlying denuded palatal mucosa. Incisions through the periosteum are made along the previous vertical incisions and through the denuded tissue at the base of the flap. A full-thickness reflection is performed, elevating the denuded palatal mucosa off the palate. This mucosa then is “rolled” under the labial periosteum, augmenting the labial gingiva.

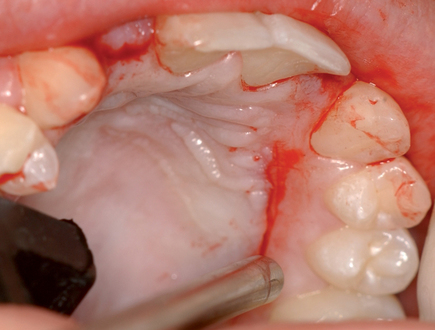
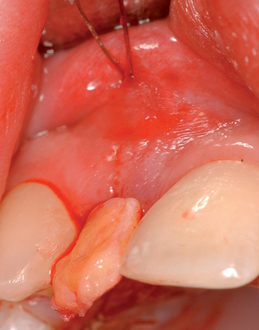
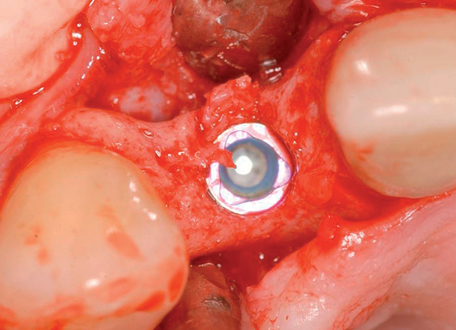
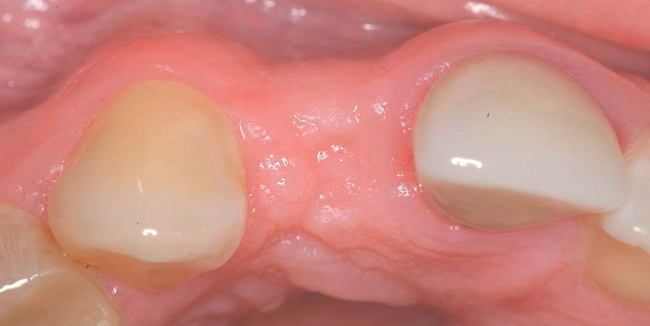
The indications for use of this technique have been narrowed. The use of subepithelial connective tissue grafts with a pouch procedure can predictably result in augmentations 2 mm thick, but the palatal roll may result in a gingival augmentation only 1 mm thick, with an occasional augmentation of 2 mm. Therefore, the palatal roll technique is reserved for small defects that primarily need small increases in gingival thickness to eliminate implant metal show through thin gingiva or for 2-mm horizontal gingival defects (Figure 10-3). This augmentation technique is useful at the time of implant exposure. When it is properly performed, papillae are preserved, and scars from incisions do not show because they are palatal in location with minimal labial reflection. The palatal roll technique is difficult to perform in regions where the palatal rugae are thick, preventing elevation of a thin palatal flap. For patients with thick rugae, a subepithelial connective tissue graft is used.

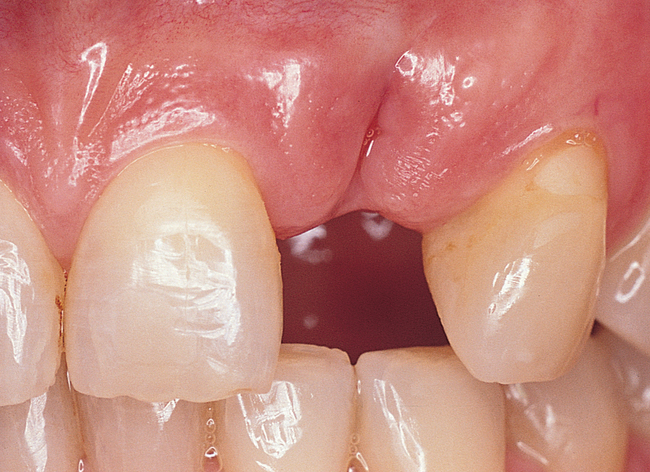
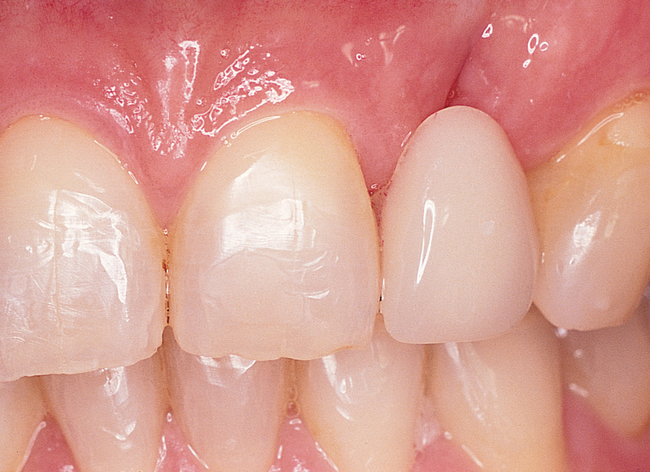
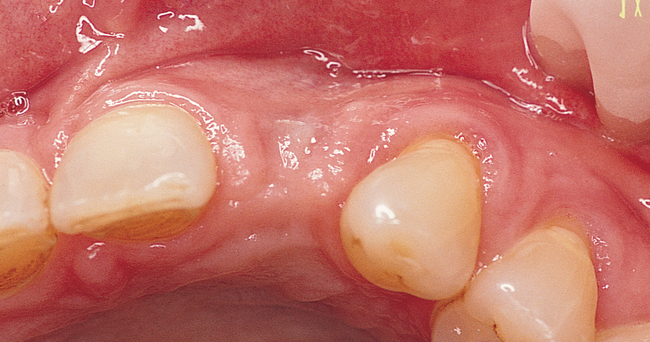
The palatal roll technique is useful after a tooth has been subluxed and lost from trauma without alveolar bone loss. Many of these patients have minor gingival tearing at the time of injury; when the gingiva heals, it is thinner than normal (see Figure 10-3).

Diagnostic examination usually reveals loss of the tooth with limited bone loss. Gingival tears heal with inversion into the extraction site. An esthetic tooth setup is used as the transitional appliance and to provide information for the surgical stent. The patient should approve the esthetic setup and receive a surgical plan, which includes placement of an implant, a period for healing, and a soft tissue procedure either before or during implant exposure.

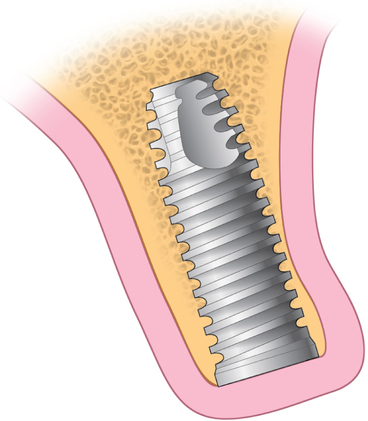
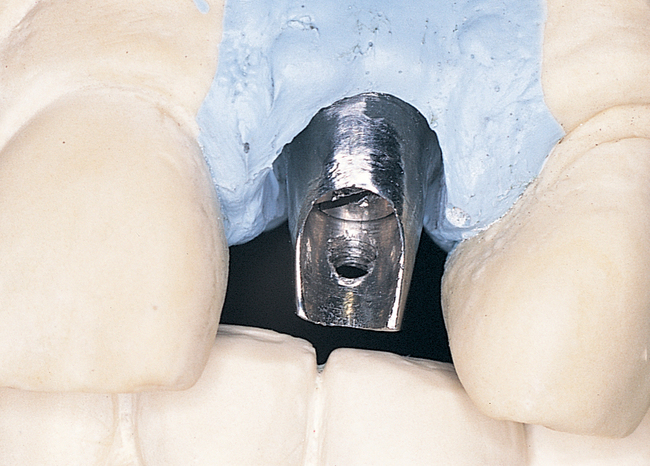
At the time of implant placement, which may be 8 weeks or longer after the injury, the choice of incision design is no different than for any other implant placement. If the contact area between the teeth is less than 6 mm from the crestal bone, a sulcular incision from canine to premolar can be used. If the distance from the contact area to the crestal bone is 6 to 7 mm or more, a papilla-sparing incision is recommended.11 After it has been determined that adequate bone is present, the implant is placed. The esthetic stent is used to guide the surgeon on the vertical positioning of the implant with regard to the planned gingival margin and the labial position of the implant emerging just palatal to the incisal edge of the planned restoration. The implant usually is placed 3 mm apical to the gingival margin of the planned restoration, and the incision is closed without tension.

During the healing period, the gingiva appears thin. Four months after placement of the implant, metal shows through the thin gingiva. The metal shadow seen through the thin, translucent gingiva prevents an esthetic restoration.

The amount of horizontal gingival deficiency may be limited to 2 mm, based on the aesthetic tooth setup. For 2-mm defects, at least 1 mm can be predictably gained from the palatal roll technique, with the remaining 1 mm gained from the labial contour of the final prosthesis. A palatal roll technique can be planned to increase the thickness of the crestal tissue and eliminate metallic show of the underlying implant. The palatal roll technique can be performed at the time of implant exposure and placement of the healing abutment.

After time has been allowed for the infiltrated local anesthetic to take effect, an incision is made slightly palatal to the crest, between but not including the papillae. Vertical release incisions are made toward the palate. A palatal mucosa–only flap is raised with its base on the palatal aspect of the edentulous site. An incision is made into the underlying, denuded palatal tissue adjacent to the base of the palatal mucosa flap. The incision is followed by full-thickness incisions along the vertical edges of the denuded tissue, which allows a subperiosteal reflection of the palatal denuded epithelium. Small vertical release incisions can be made, but these often are not necessary and should be avoided, if possible, to limit vertical scars. The dissection over the labial surface of the implant is subperiosteal, with tenting of the overlying gingiva. By not using vertical release incisions, the clinician prevents vertical scars, which can result in an unesthetic outcome. An appropriate pouch is created by full-thickness elevation of the labial gingiva. The denuded epithelium is folded under the labial gingiva, augmenting its thickness. Sutures are placed to secure and align the gingival margins. One suture is placed through the labial mucosa, engaging the rolled-in, denuded palatal tissue. This retaining suture should be placed with care, avoiding excessive vertical tension, which could result in apical migration of the gingival margin. A temporary healing abutment is placed.

After the healing abutment has been placed into an implant, additional sutures are placed to hold the palatal tissues under the labial gingiva and to set the vertical position of the margin of the gingiva. It is critical to avoid vertical retraction of the gingival margin, which results in a poor final position of the gingiva. Additional sutures are placed to align the edges of the vertical incisions as necessary. The removable prosthesis is modified to avoid excessive pressure on the gingiva.

After the gingiva has healed for 4 weeks, a small gingivoplasty can be performed, if necessary, by the restorative dentist to create an anatomic sulcus. After the gingiva has been allowed to heal, anatomic impressions are taken, and a final restoration is placed.

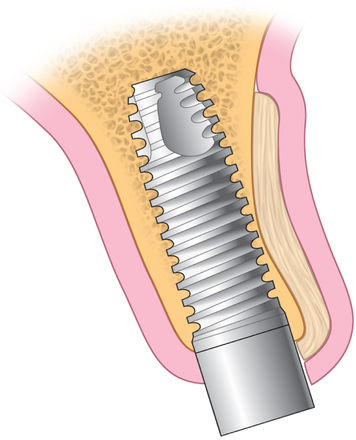
Transposition of palatal tissue for exposure of implants

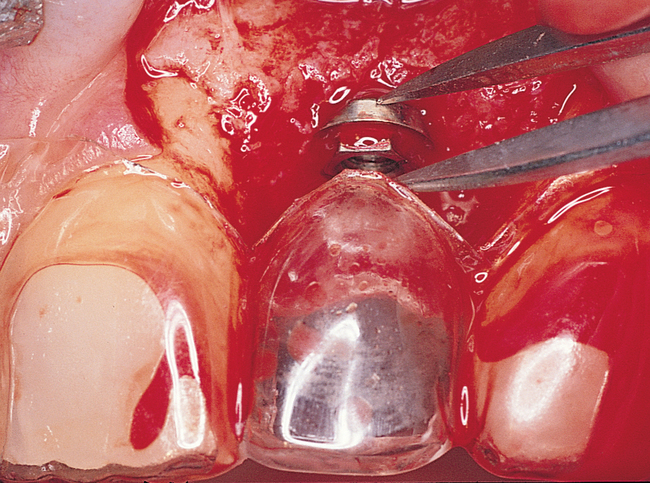
When the patient has adequate bone for implant placement, it is prudent for the clinician to assess whether a connective tissue graft is indicated. Not every patient requires a connective tissue graft for an esthetic result. If the bone support is adequate, the color, tone, and thickness of the overlying tissue may be sufficient for routine exposure, eliminating the need for a soft tissue graft. A crestal incision can be made and the palatal keratinized tissue can be transposed to the labial aspect of the abutment and implant restoration, or a gingivectomy can be used to expose the implant. Papillae can be raised during exposure of the implant only if less than 7 mm of space is present between the proposed contact area and the crestal bone.11

Placement of a subepithelial connective tissue graft as a separate procedure

For the anterior maxillary esthetic site, the goal of placement of the interpositional, subepithelial connective tissue graft is to complete the preparation of the implant site before implant exposure for abutment connection. No incisions are necessary at the exposure procedure when a tissue punch or scalpel is used to remove a small circular patch of the overlying gingiva or when a small semicircular incision is used without vertical release.

Careful attention to the implant site before infiltration of the local anesthetic is critical to determine the necessary size and shape of the subepithelial connective tissue graft. Soft tissue grafting may be needed directly over the crest, along the greatest curvature of the alveolar crest, or along the labial aspect of the ridge. It is advantageous to have the esthetic removable prosthesis available to guide the placement of the soft tissue graft.

Preoperative photographs are taken to document the anatomy of the site. The local anesthetic is infiltrated at the site without excessive “ballooning” of the tissues.

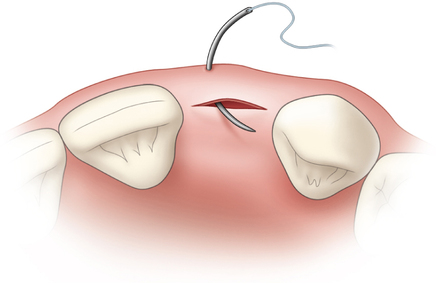
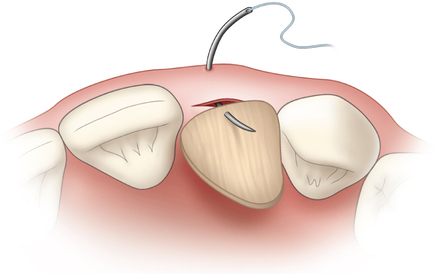
Recipient site preparation: Placement of a subepithelial connective tissue graft

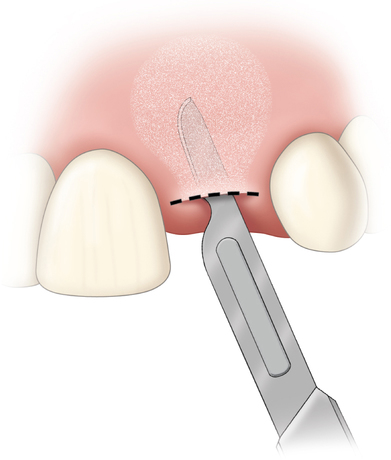
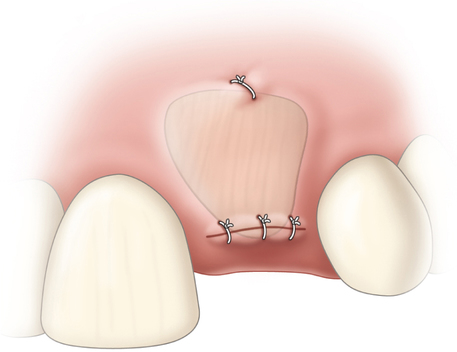
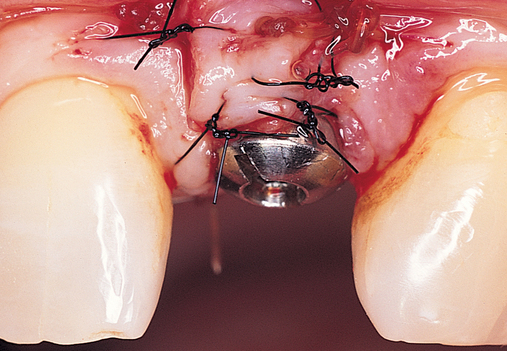
Placement of a subepithelial connective tissue graft without the need for removal of a membrane requires minimal incisions. Vertical release incisions are rarely needed, especially in the hands of an experienced clinician (see Figure 10-2). The goal is the placement of the soft tissue graft without creating vertical incisions, thus preventing scars. If vertical, inverted scars are present from a prior surgery, these scars can be undermined carefully and leveled with the development of the subcutaneous pocket and graft placement. A gingivoplasty of the tissue is performed to remove scar lines after the thickness of the gingiva has been increased to allow the surgical procedure.

After administration of a local anesthetic, a crestal incision is made across the edentulous region. This incision can be made slightly palatal to the ridge to keep it hidden and in the location of the eventual site of the incision or tissue punch for final exposure of the implant. After the incision has been made across the crest, up to but not including the papilla, a pocket is created using sharp dissection with a small (#15c) blade and extending beyond the junction of the attached and unattached gingivae into the vestibule. Extension into the vestibule and crossing the junction of the attached and unattached gingivae is performed by sharp dissection. A subcutaneous pocket is developed over the labial aspect of the implant site. The ideal plane of the dissection is supraperiosteal, but care must be taken to prevent the development of the pocket at the expense of the thickness of the labial tissues. If necessary, the dissection should be kept near the underlying bone to maintain the thickness of the overlying gingiva and to prevent potential soft tissue fenestration of the overlying mucosa. The pocket formed should be slightly larger than the graft, with its lateral extent in the apical region at least to the line angles of the adjacent teeth. The pocket will be pear shaped, with the widest portion apical and the thinner portion coronal.

After the pocket has been developed, a foil template is made. The foil template is placed over the implant site and trimmed to the intended size of the connective tissue graft. The graft should extend to the edge of the papilla and should widen apically to gain potential blood supply. The graft then is harvested. The graft is trimmed to the appropriate contour and shape and sutured into position.

Subepithelial connective tissue graft harvesting

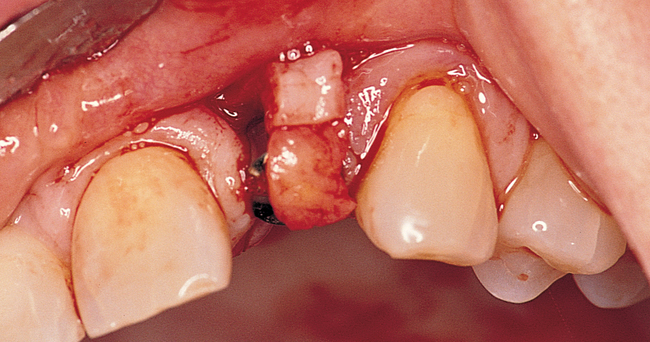
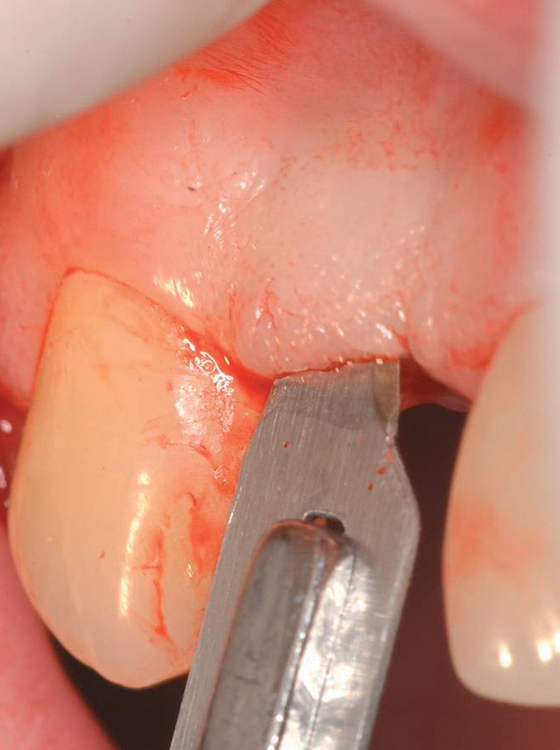
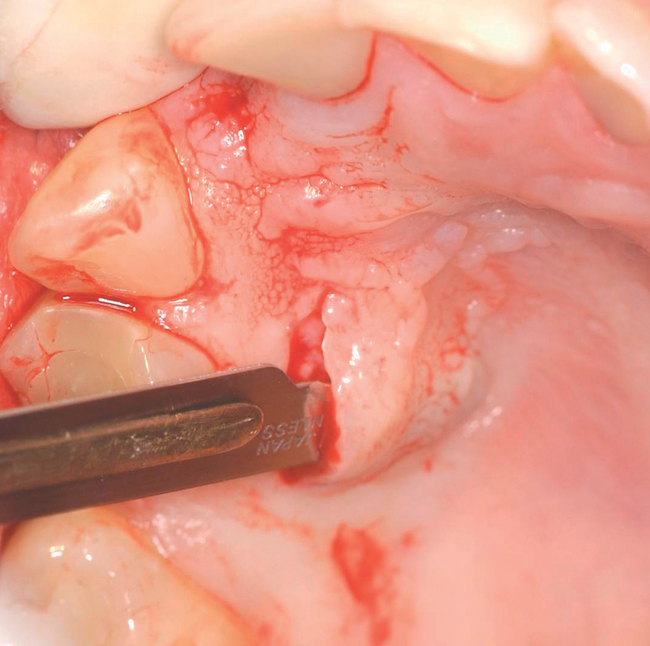
The subepithelial connective tissue graft can be harvested with either an open or a closed technique. The open technique involves elevating a palatal flap of tissue with two vertical and one horizontal incision and excising a sheet of the underlying subepithelial palatal tissue (see Figure 10-2). For the closed technique, the connective tissue graft is harvested without developing a palatal flap. To avoid a flap, a single horizontal incision is made, and the pocket is developed without the vertical incisions, avoiding a flap. The underlying palatal mucosa is harvested after four incisions have been made through the periosteum within the pocket.

Open technique

For the open technique, the palatal mucosa is incised, and a pocket or flap is raised, exposing the underlying submucosal palatal tissue (see Figure 10-2, B). Three incisions are made on the palate. The first two incisions are made only through the palatal mucosa. These two incisions run vertically and determine the width of the graft. An extra 2 mm of width on both the anterior and the posterior vertical edge is recommended to avoid harvesting a graft that is too small. A horizontal incision is made approximately 2 mm from the gingival sulcus of the maxillary teeth. This horizontal incision can be made to bone or superficially to aid in the reflection of the thin palatal flap. To raise a thin palatal flap based on medial palatal tissue, a scalpel blade (typically #15c) is used to undermine the palatal tissue, with the blade kept parallel to the palatal mucosa. The palatal flap should be quite thin because preserving the thickness of the underlying palatal connective tissue is desirable. The palatal flap is elevated, with its base kept intact. From the inside aspect of the dissection, incisions are made to bone along the four edges of the planned subepithelial connective tissue graft. Because the incisions through the connective tissue graft are made through periosteum, a small periosteal elevator is used to separate the graft from the bone. The periosteum is raised and harvested as the undersurface of the graft. The connective tissue graft is removed with minimal instrument pressure placed on the tissue. Hemostasis is achieved with the aid of sutures or pressure. The palatal flap is sutured to its original position with resorbable 4-0 chromic sutures on a tapered needle.

The palatal vessels in the mesial posterior corner of the harvest site may bleed, especially when a large graft is harvested from a shallow palate.4,5 Often the graft’s longer length is taken anteroposteriorly, and the width is oriented toward the medial aspect of the palate, with the edge of the eventual graft kept away from the palatal vessels. If bleeding is encountered, the vessel may be identified and sutured, cauterized, or stick tied through the posterior palatal tissue to gain pressure hemostasis. A collagen hemostatic material can be placed within the confines of the flap. The overlying palatal tissue may become necrotic if excessive pressure is applied.

Closed technique

The closed technique for harvesting subepithelial connective tissue grafts was developed and popularized by Bruno.4,5 The closed technique uses one horizontal palatal incision without the need for additional vertical incisions (Figures 10-4 and

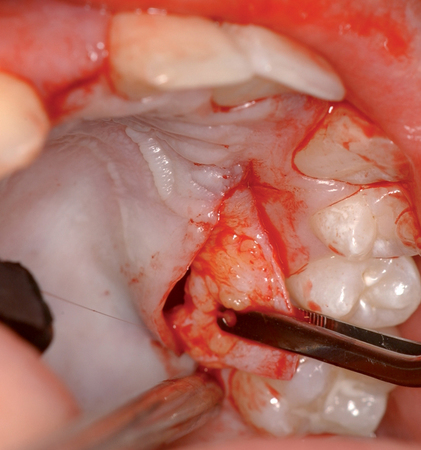
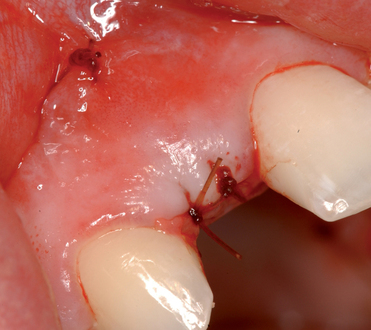
10-5). This technique allows the graft to be harvested with minimal postoperative morbidity. The closed technique results in a graft that is thickest along the edge of the horizontal incision and becomes thinner as it reaches the edge close to the depth of the graft site.

Stay updated, free dental videos. Join our Telegram channel

Jan 5, 2015 | Posted by in Implantology | Comments Off on 10: Soft tissue manipulation around implants in the esthetic zone

VIDEdental - Online dental courses

Get VIDEdental app for watching clinical videos