1: Surgery of the anterior mandible

Surgery of the anterior mandible

image Additional illustrations can be found on the companion website at www.blockdentalimplantsurgery.com

Placement of two to five implants in the anterior mandible

General considerations

Patients who are totally edentulous in the mandible may not be able to consume a normal textured diet because of mobility of their denture. As the jaws continue to lose alveolar height, the dislodgement forces from the perioral musculature become greater than the retentive aspects of the prosthesis. The denture moves on the edentulous ridge, causing discomfort, sores, and trauma to the mental nerve. The placement of endosseous implants into the anterior mandible is an excellent therapy for an implant-supported reconstruction, restoring the ability of these patients to consume a normal-textured diet. An improved diet results in normal nutritional intake, improved health, and greater self-confidence.

The options for the patient include (1) a conventional denture; (2) a tissue-borne, implant-supported prosthesis; or (3) an implant-borne and -supported prosthesis. The conventional denture is a viable option for many patients, especially those with financial limitations. After an initial attempt to wear a conventional denture, many patients look forward to receiving implants. As a result of a denture trial, they become easier to treat because they are confident about the decision to spend the money, dedicate the time, and deal with the perceived morbidity of implant surgery.

The tissue-borne removable prosthesis can be placed over one to five implants. Most often, two or four implants are used for a tissue-borne prosthesis. The implant-borne prosthesis usually requires the placement of four to five implants in the anterior mandible anterior to the mental foramen. For selected patients, six implants can be used with four implants between the mental foramen and one implant in each first molar location. Patients, treatment planned for a crown and bridge type fixed restoration requires further support with placement of two to three implants in each posterior quadrant with four implants in the anterior mandible, resulting in a multi-unit, precision-attached crown and bridge restoration. For posterior mandibular implants, adequate bone must be available superior to the inferior alveolar nerve. Surgical placement of implants for a full arch crown and bridge prosthesis with ceramic teeth requires meticulous planning and placement of the implants to locate them within the confines of the crowns, avoiding the embrasure spaces.

Based on the recommendations of the implant team and considering his or her desires and interests, the patient makes the decision after being informed of the advantages of the different types of prostheses and the financial responsibilities associated with each. After an informed patient has made the decision, surgery is scheduled.

Evaluation of anatomy—physical examination of the patient without teeth

After reviewing the patient’s medical and dental history, the surgeon performs a physical evaluation, focusing on the anatomy of the mandible. The range of opening of the patient’s mouth is recorded. Limitations in opening may affect the treatment plan in extreme conditions. The general health of the intraoral soft tissues is evaluated. Any undiagnosed pathologic condition or dental infection, as well as mucosal infections, must be treated to completion before implant placement.

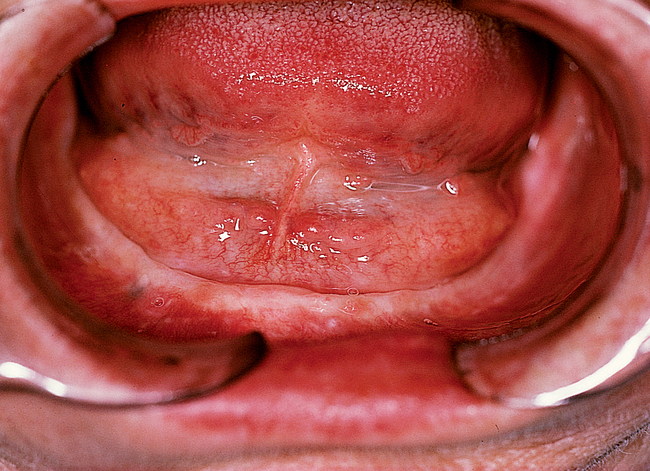
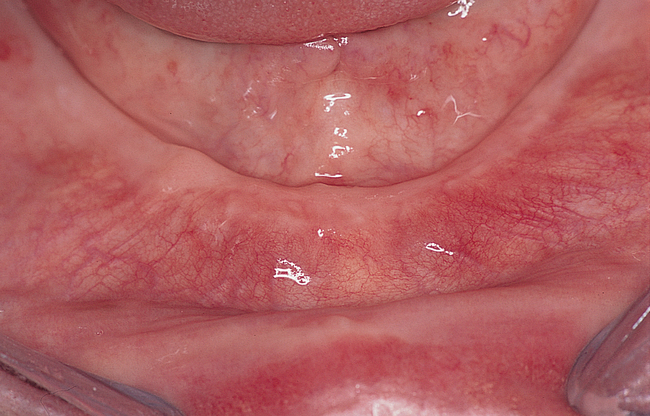
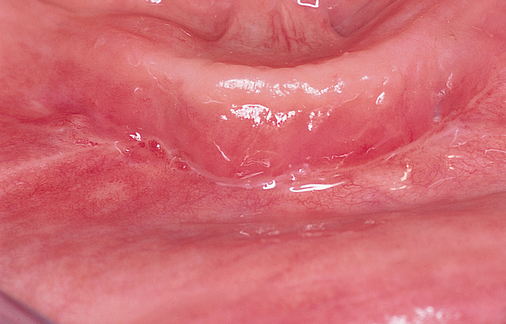
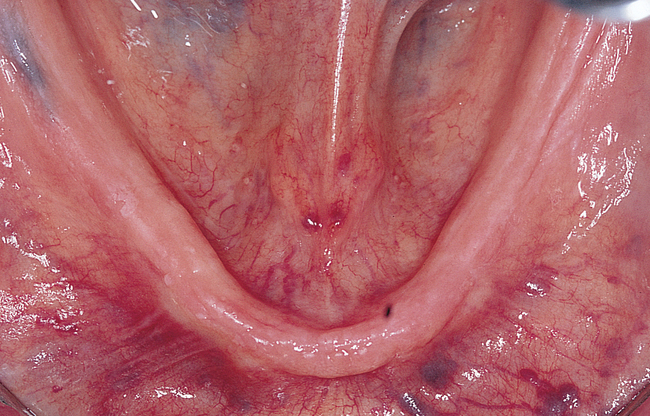
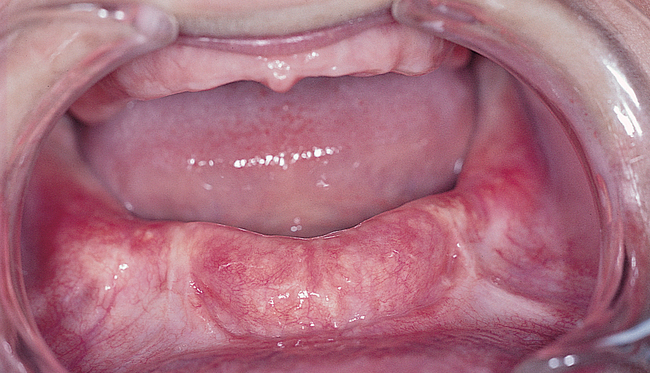
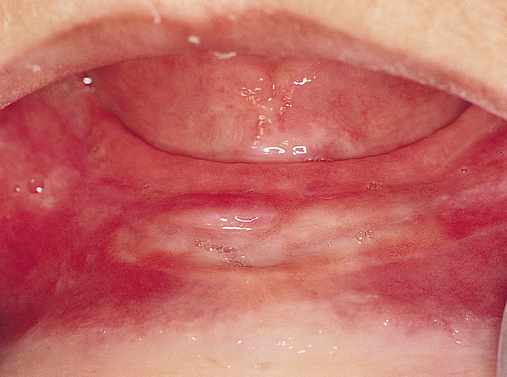
The soft tissue attachments of the floor of the mouth and the mentalis musculature are noted. The width of the band of keratinized gingiva (KG) on the alveolar crest is documented. The distance from the crest to the junction of the attached and unattached mucosa is recorded (Figure 1-1). Examination of the soft tissues is important to determine the need for vestibuloplasty, either before or at the time of implant placement.

The locations of the submandibular ducts are evaluated to ensure that they will not be violated during the procedure. The locations of the mental foramina are palpated and, if necessary, transferred to a diagnostic cast for further planning.

The slopes of the labial and lingual cortices are palpated. The height of the mandible is estimated by palpation of the anterior mandible. The location of the genial tubercles is noted. In a relaxed vertical position of the jaws, the relationship of the anterior mandible to the maxilla is observed to determine the benefits of positioning the implants to correct or mask a class II or class III skeletal jaw relationship. Occasionally, orthognathic surgery is necessary to correct severe skeletal discrepancies before implants are placed. At the conclusion of the physical examination, the surgeon should have a good appreciation of the height and width of the anterior mandible, as well as the slopes of the cortices. The surgeon should be able to discuss with the patient the planned location of the implants and the need for an adjunctive soft tissue procedure, such as a simultaneous vestibuloplasty.

Evaluation of anatomy—radiologic examination of the patient without teeth

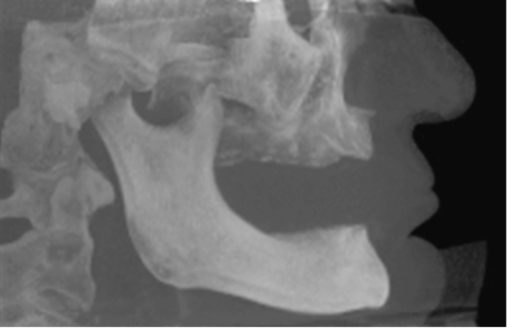
A cone-beam scan is very useful to determine the specific anatomical morphology of the mandible. This scan will show the slope of the cortices, location of the mental foramen, course of the nerve as the nerve enters and exits the mandible from the foramen, and amount of bone present posterior to the foramen. The typical cone-beam scan generates four different frames of reference. One frame contains the lateral and frontal cephalograms of the patient; the second frame contains the axial, frontal, and sagittal slices; the third contains views of the condyle and glenoid fossa; and the fourth are cross-sections from a panoramic-type image (Figure 1-2).

The lateral cephalogram view from the cone-beam reconstruction is very useful by providing an image with minimal magnification with orientation of the mandible to the maxilla. The lateral views show the mandibular plane angle, which is used to assess vertical dimension of the patient. The lateral cephalograms is also useful to demonstrate skeletal class II or III relationships. For a full arch hybrid restoration, these views provide insight in angulation of the implants to compensate for skeletal relationships. In a class II mandible, the implants can be angled forward, and in a class III mandible the implants can be retro-angled to potentially provide a class I dental setup. The anteroposterior view shows asymmetry but also the position of the angles. Patients with prominent angle regions often have parafunctional habits, which need to be taken into consideration when restoring patients.

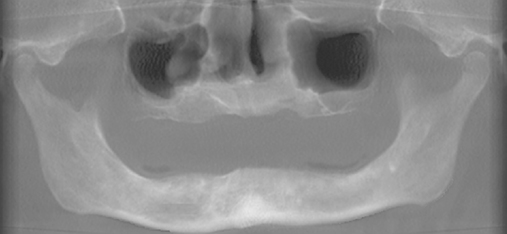
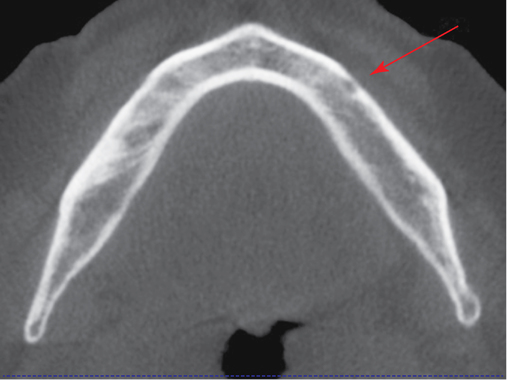
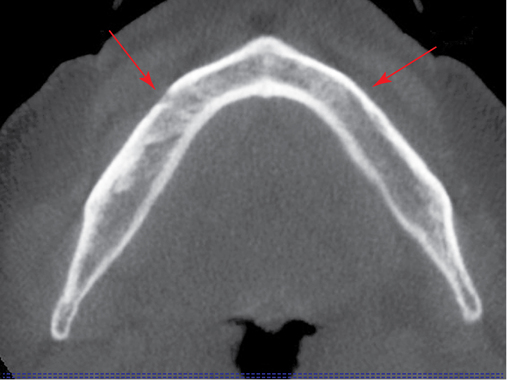
Axial views of the mandible are useful to determine the course of the nerve. By moving through these axial images, one can see the course of the nerve and understand the forward extent of the loop (see Figure 1-2, A, E, F). Each patient is unique, and this view helps avoid nerve injuries. The frontal projections can be used to assess presence of disease in the nasal and sinus regions. This is useful to understand potential problems and general health of the patient. An increase in dimension of the nasal membrane is found in patients with allergies to environmental material. Sinus membrane thickening is often found in patients with poor maxillary dentition. Obliterated sinuses may need treatment by the patient’s otolaryngologist to achieve health.

The temporomandibular joint views are useful to ensure adequate joint stability and to eliminate future problems secondary to erosive condylar morphology associated with osteoarthritis. A patient who is planned for extensive implant reconstruction may have a long history of posterior occlusal loss, which can be associated with vertical dimension changes in the joints. A stable joint will be easier to treat than one with erosive changes. This is important patient information to recognize before the implant reconstruction because vertical changes may be necessary preoperatively or within the provisional prosthesis.

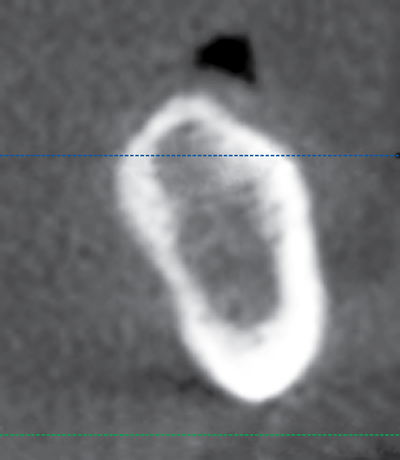
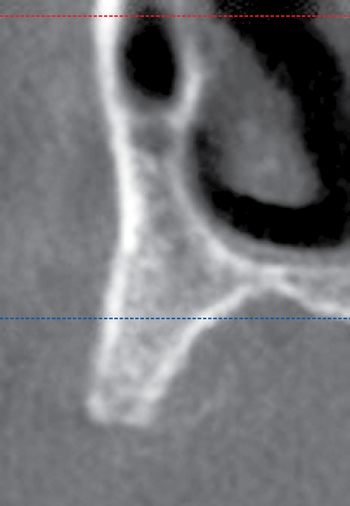
Cone-beam scanners have the capability to generate panoramic reconstructions. On the edentulous mandible, a spline is drawn on the axial view, and cross-sectional images are generated perpendicular to the spline. These cross-sections show the specific anatomy of the anterior mandible (see Figures 1-1 and 1-2). They are used to identify the planned angulation of the implants and whether the planned angulation parallels the labial or lingual cortices. The surgeon can then follow the specific cortical bone to guide implant placement by following the planned orientation using well-defined anatomical landmarks. In a class III mandible, one would angle the implants more posteriorly, often following the lingual cortex of the symphysis. The specific length and diameter of implants to be placed is accurately determined from the cone beam scan, with accuracy reported to within 0.5 mm of the measurements from the scan. This is in contrast to up to 20% magnification error from using traditional panoramic scans.

Surgical treatment for placing implants in the mandible

Incision design considerations. 

​At the consultation visit, the surgeon notes the following when examining the patient:

Based on these findings and the height of the mandible, the surgeon decides which incision to use to expose the bone and subsequently to place implants into the edentulous mandible.

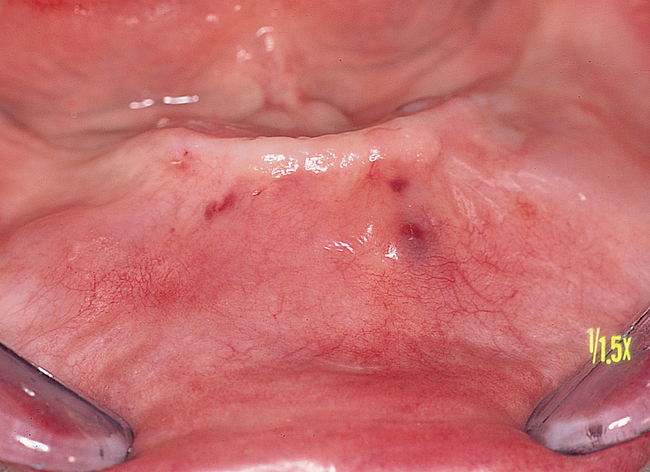
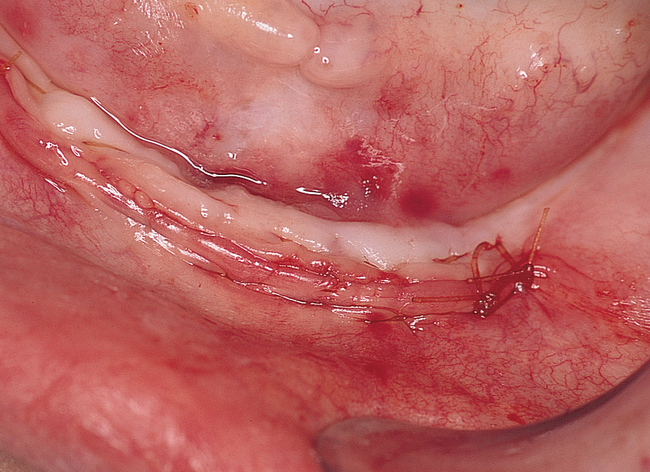
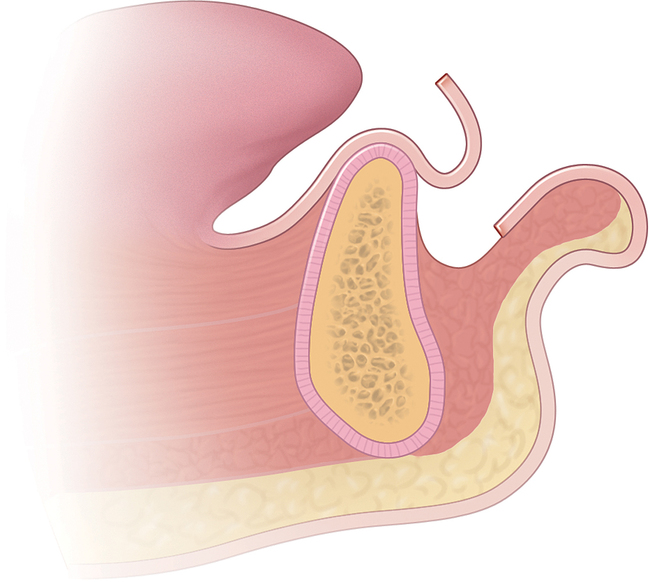
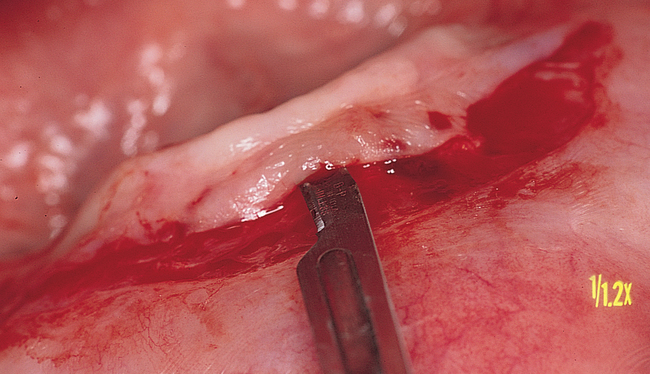
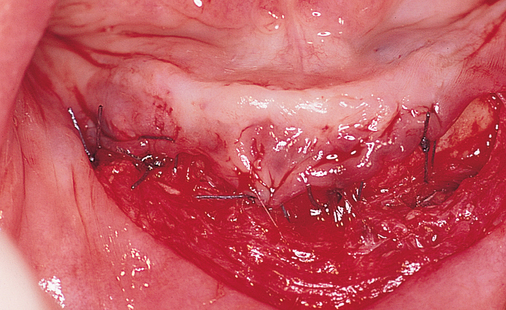
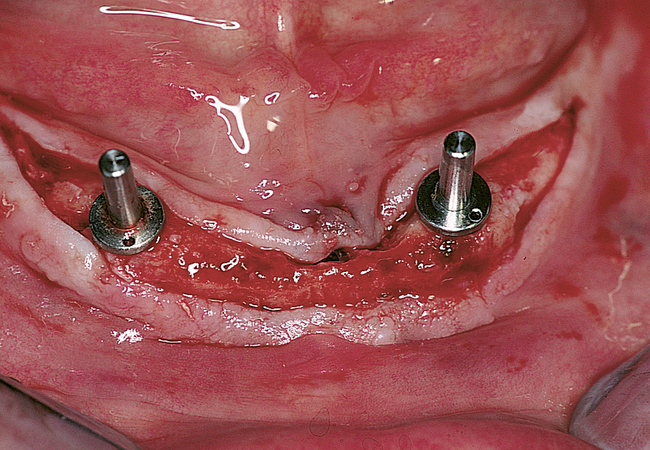
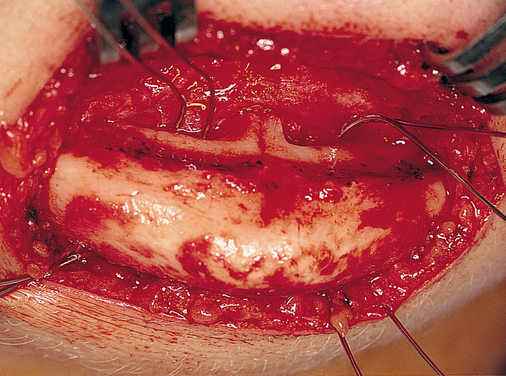
If the attachment of the mentalis muscle is 3 mm or more labial to the location of the attached gingiva on the alveolar crest, a crestal incision can be used (Figures 1-3 and 1-4). If the mentalis muscle is located adjacent to the alveolar crest, which would result in mobile, unattached gingiva directly against the implant abutment when restored, a vestibular incision is used. A type of lipswitch vestibuloplasty (Figure 1-5) is performed to reposition the muscle attachments inferiorly, resulting in nonmobile tissue on the labial surface of the implant abutment complex.

When the mandible is 12 mm or less in height, an incision placed labial to the thin band of KG allows for easier dissection. However, it cannot be accompanied by a lipswitch vestibuloplasty because displacement of the mentalis musculature in an atrophic mandible results in a drooping, soft tissue chin deformity. For the atrophic mandible with 8 to 12 mm of vertical bone height, the locations of the incisions and implants and the location of the incision for second-stage surgery are critical for successful restoration. The incision for placement should be made in such a way as to avoid loss of KG. Therefore, an incision placed at the anterior border of the mandibular alveolar crest, typically labial to the KG, allows for adequate dissection. Often in a patient with an atrophic mandible, the thin band of KG is positioned lingually. Attempts to enlarge the band of attached KG have not been greatly successful because the lip muscles tend to displace the graft from the host bed. The implants must be placed slightly lingual to the crest of the ridge and thus lingual to the attachment of the muscles. If they are flared toward the labial, chronic irritation from the labially flared implants will be a constant source of soreness and will result in an unhappy patient. At the time of exposure, the thin band of KG should be bisected and transposed labially, resulting in KG along the labial surface of the abutments.

For mandibles with a vertical bone height greater than 12 mm, the incision for placement may be made either on the crest or in the vestibule, depending on the location of the muscle attachments. An incision bisecting the KG allows the surgeon the luxury of knowing that the KG will remain on the labial surface of the implant abutment if the incision breaks down prematurely. Premature breakdown of the incision can occur for several reasons, including excessive pressure from the removable prosthesis, a supracrestal profile of the implant with the cover screw in place, surgical trauma to the tissues, or poor tissue quality and poor healing. If the alveolar crest is thin, with the band of KG over the thin portion of the crest, bisecting the KG may make dissection of the flaps difficult because the gingiva will be thin over the thin crest. Careful planning of the incisions and technical dissection without trauma promote long-term gingival health.

A local anesthetic, typically 1% or 2% lidocaine with 1:100,000 epinephrine, is infiltrated into the labial and lingual tissues. Infiltration includes the labial aspect of the inferior border of the mandible, the lingual cortical plate (to anesthetize branches of the mylohyoid nerves), and along the crest. Infiltration anesthesia on the crest creates a hydropic dissection, which aids in the subperiosteal dissection. Bilateral inferior alveolar nerve blocks are not necessary.

After several minutes have elapsed to allow the anesthetic to take effect and to be absorbed in the tissues to reveal the pre-injection anatomy, an incision is made. Typically, a #15 blade is used.

Crestal incision and dissection. 

​The crestal incision should bisect the band of KG. Bisecting the KG is important because this prevents a potential soft tissue problem if the incision opens during the healing period. The incision should extend along the alveolar crest posterior to the mental foramen. When the mental foramen is on top of the crest, secondary to severe bone resorption, the incision should be stopped anterior to the foramen. After the periosteum has been reflected, the mental foramen is visualized, and the crestal incision then can be extended posteriorly along the lingual crest; this prevents trauma to the nerve. Occasionally, vertical release incisions can be used posteriorly. A midline vertical release incision is avoided because it causes increased patient discomfort during the first 2 weeks of healing.

After the incision has been made through the periosteum to the bone, a periosteal elevator is used to reflect subperiosteal flaps both labially and lingually. A clean subperiosteal dissection is important because it results in minimal bleeding, and lingual blood vessels can be avoided. If muscle attachments are found inserting into the crest, the surgeon severs them cleanly with a scalpel rather than tearing them, which can increase bleeding and trauma to the soft tissues.

Reflection of the labial tissues can be tedious because of the firm attachment of the dense, fibrous alveolar crestal tissue or if the ridge is narrow. Great care must be taken to raise an intact flap without multiple tears.

A lingual reflection is performed to allow the surgeon direct visualization of the lingual cortex, which also allows proper angulation of the implant parallel to the lingual cortex, if appropriate, and avoids implant perforation of the lingual cortex. The labial reflection includes reflection of a portion of the mentalis muscle to allow for proper visualization of the contours of the labial cortex. A limited reflection prevents the surgeon from seeing the bone contours and results in implants placed through the cortical plates rather than within them. The surgeon should be able to look directly over the alveolar crest, seeing both cortical plates. It is useful to visualize the implant surgery and anticipate any adverse problems. After the bone is exposed, the implants are placed according to manufacturer’s recommendations. Review of cross-section images from the cone-beam scan may result in less tissue reflection because of prior knowledge of the anatomy.

Vestibular incision and dissection. 

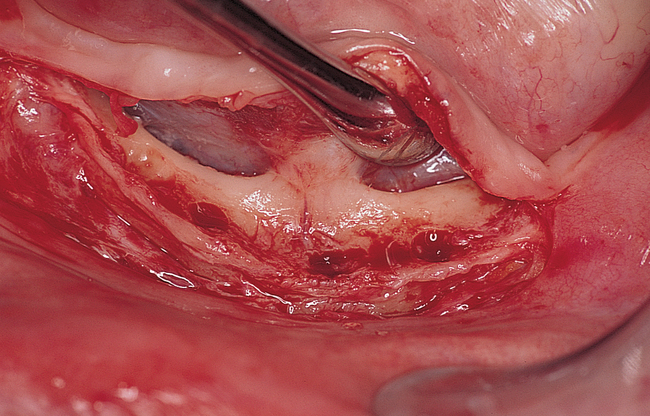
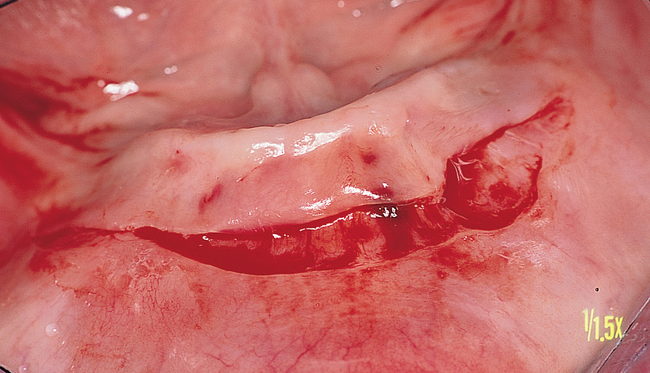
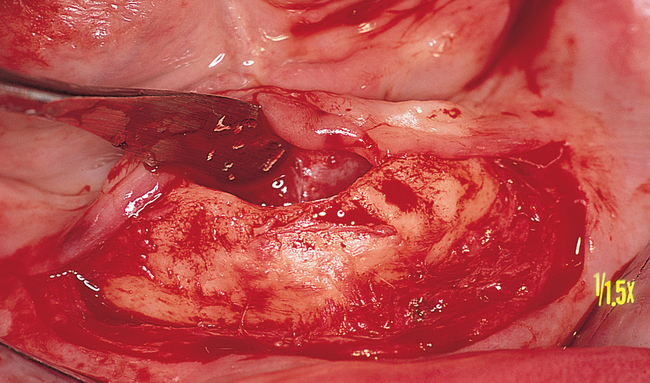
​Vestibular incision and dissection is the approach recommended to relocate the mentalis muscle from the alveolar crest, anticipating the ultimate location of the prosthesis and abutments (see Figure 1-5). The incision typically is placed 5 to 10 mm from the junction of the attached and unattached gingiva. The incision is made through mucosa, not into the underlying muscle. The incision extends from the approximate location of the mental foramen in the vestibule. The incision is made with a #15 scalpel blade and is kept superficial to identify branches of the mental nerves. Direct visualization of the branches of the mental nerve allows a meticulous dissection superficial to these nerves and prevents paresthesia.

After the mucosa has been incised, a mucosa-only flap is carefully dissected from the underlying muscle using either a scalpel or small scissors. The mucosa-only flap is elevated until it reaches the junction of the attached and unattached gingiva. At this location, an incision is made through the periosteum to the alveolar crest. The periosteum is reflected toward the lingual, with the overlying mucosa-only flap attached to the periosteum to expose the lingual aspect of the mandible. The mucosal flap is kept attached to the lingual mucosa and therefore is lingually based. The labial periosteum then is elevated from the bone with a periosteal elevator to expose the labial cortex. The extent of reflection is similar to that described previously for the crestal incision. After the bone has been exposed, the implants are placed according to the manufacturer’s recommendations.

Placement of implants.

Two implants. 

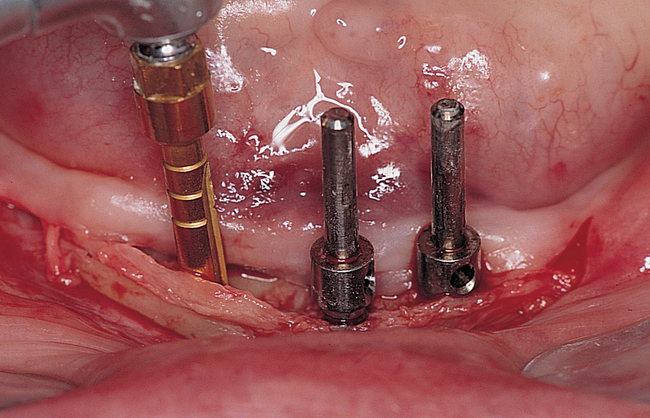
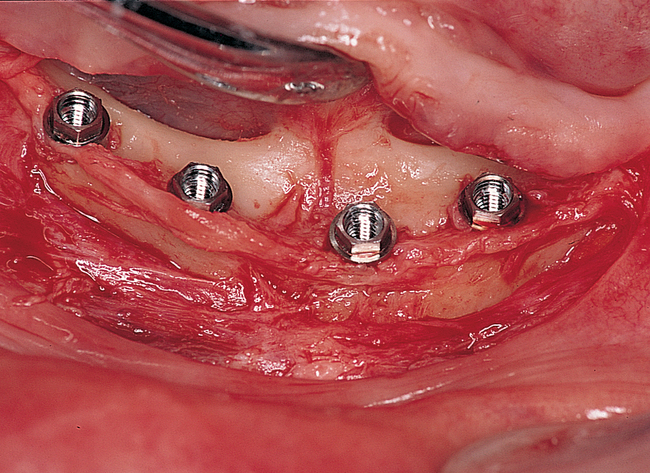
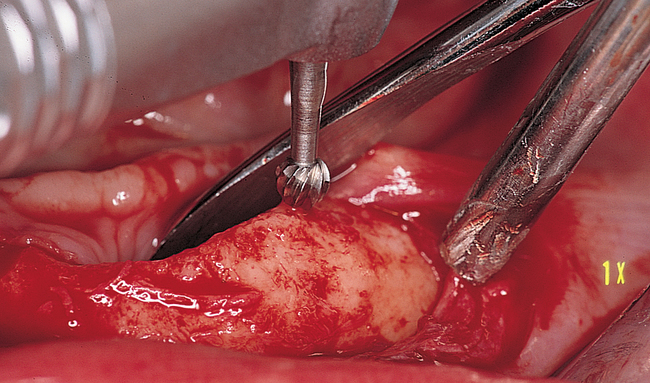
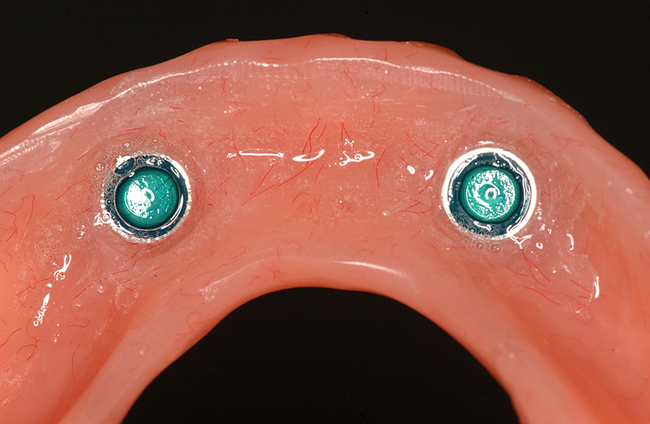
​In general, when two implants are to be placed for an overdenture, the surgeon should consider the potential need for additional implants at a later time; for example, the patient may decide to change from a tissue-borne prosthesis to an implant-borne prosthesis. Some patients prefer the overdenture prosthesis, but they may complain of food being caught under the denture and the mobility of the prosthesis when they are speaking, swallowing, or chewing. They also may want to eliminate the need to change clips or O-rings. For patients who desire the retention of a fixed or fixed-removable prosthesis, two or three additional implants may be placed, resulting in four or five implants in the anterior mandible, which will sufficiently support an implant-borne prosthesis. In light of this consideration, when placing two implants into the anterior mandible, the surgeon locates the implants 20 mm apart, each 10 mm from the midline of the mandible, to allow for later implant placement if needed. A caliper is set at 20 mm, and these locations are marked with rongeur forceps or a round bur (see Figures 1-4 and 1-5).

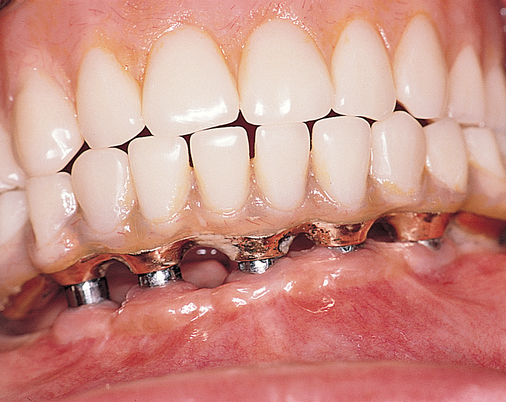
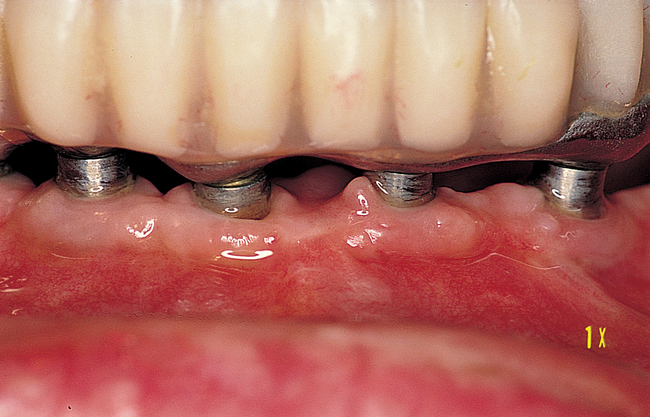
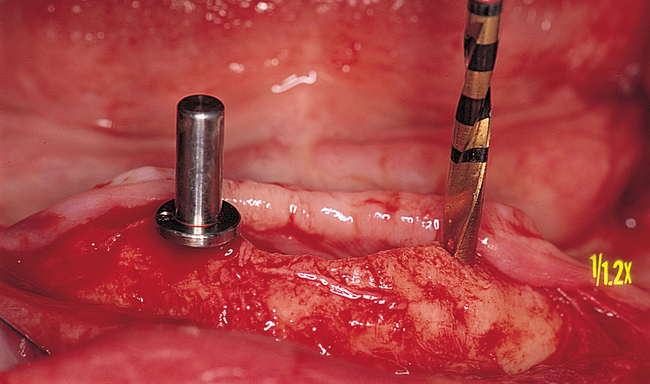
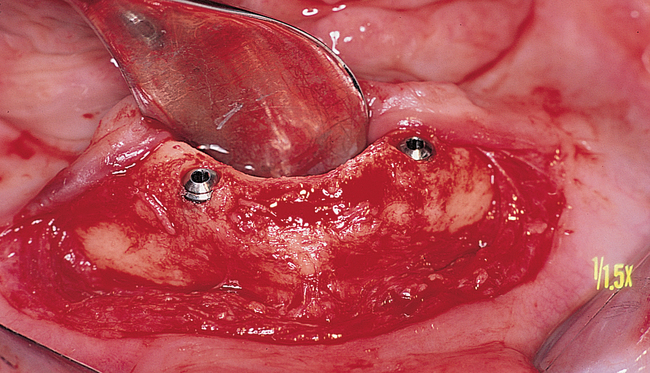
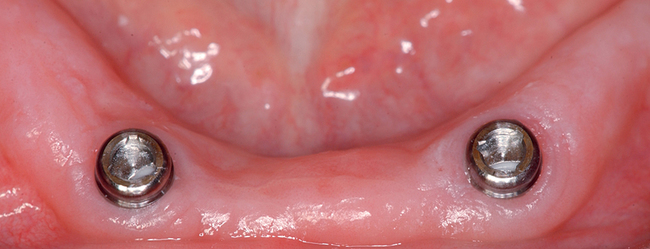
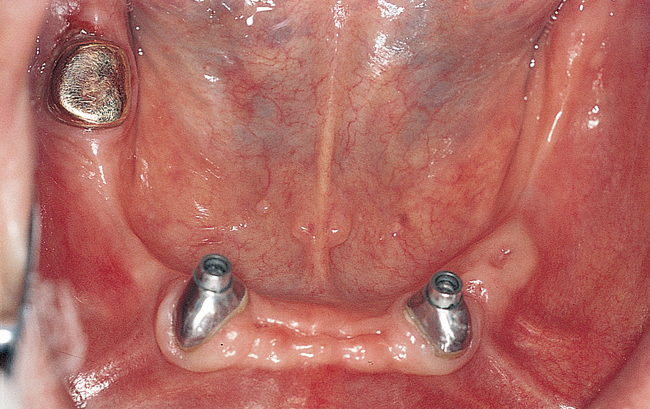
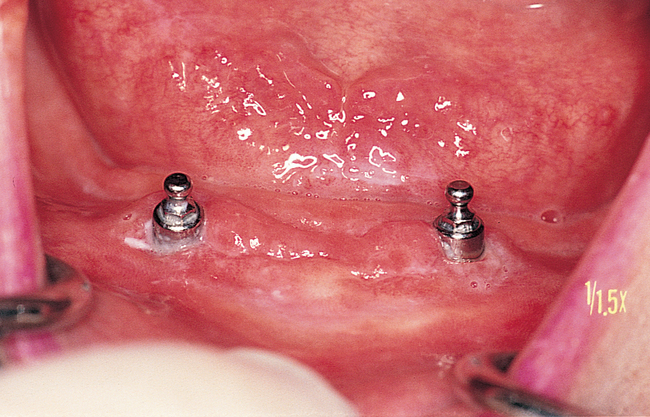
The labiolingual location of the implants in the crest is critical to the patient’s long-term comfort. The implants must be located so as to prevent soft tissue irritation, which can occur if the implants are placed too lingual into the mobile tissue of the floor of the mouth or too labial, causing the mobile mentalis musculature to rub continually against the abutments of the implants, creating chronic problems. Ideal placement of the implants, in the center of the crest, is essential to ensure that the restoration is comfortable for the patient (Figure 1-6 and e-Figure 1-1).

The ridge of the mandible may be uneven or may have sharp contours. This author uses rongeur forceps to reduce the crestal bone when it is thin, sharp, or uneven. The use of rotating burs to reduce the ridge crest may result in bone trauma, with resultant bone loss around the implants. In addition, the rongeur forceps can be used to take a small “bite” from the ridge, creating a small depression that can be easily engaged with the round bur and subsequent pilot drills. Adjacent bone can be removed with the forceps, creating a smooth transition from the implant site to the crest without an unusually tall segment of bone between the implants. The round bur then is used to mark the implant locations, which are placed after the caliper measurements have been confirmed.

After the round bur has been used to mark the sites, the initial drill approximately 2 mm in diameter, depending on specific implant system, is used to create the first site. The surgical guide stent, if available, is used for the surgery. A parallel or guide pin is placed into the prepared hole, and the angulation is checked to ensure that the anteroposterior and medial-distal inclinations are appropriate. The surgeon needs to move to view the guide pin’s orientation from in front of the patient and from the side to make sure the implants are not canted. The surgical guide, if available, is placed into the mouth to confirm that the implants are within the eventual denture base. If the patient has maxillary teeth or a denture, the mandible is closed gently to ensure that the implants are placed within the contours of the incisive edges of the maxillary teeth, not labially. After the correct angulation of the implant preparation has been confirmed or after any necessary changes have been made, the second site is prepared with the pilot bur in the proper axis.

A second guide pin is placed. Careful examination should confirm that the implants would be satisfactory when placed in these positions at these inclinations. The remaining sequence of burs is used as recommended by the manufacturer. If angulation changes are necessary, the next bur, which typically is 2.7 or 3.2 mm in diameter, can be directed to correct the angulation of the implant.

It is important to place the implant at the correct depth in relation to the alveolar crest. If the implant is placed such that the cover screw is superficial to the adjacent bone, creating a small bulge under the gingiva, incisional dehiscence or mucosal breakdown may occur if the patient chews with a temporary prosthesis. An advantageous technique is to place the implants into the anterior mandible so that they are countersunk sufficiently to allow the height of the cover screw to be considered; this results in a flush relationship with the adjacent alveolar bone. This placement, however, may be contraindicated for specific types of implants. The surgeon should follow the guidelines for the specific implant system. For one-stage implants, temporary healing abutments are placed as recommended by the manufacturer.

The anterior mandible may have a dense cortical plate with abundant marrow space, or it may have minimal marrow with an abundance of cortical bone. A smaller or thinner mandible has more cortical bone and less cancellous bone. When dense bone is encountered, it is important to clean the drills often during the drilling sequence to keep the cutting surfaces clean and unclogged during preparation of the implant site. For placement of implants into dense bone, a thread former (tap) is used to create threads in the bone. For self-tapping implants, the surgeon may need a slightly larger bur than customarily used in other areas of the mouth. For example, rather than using a 3-mm drill before self-tapping a 3.75-mm implant, the surgeon may need to use a 3.25-mm drill to achieve greater ease of implant insertion into dense bone. This is implant system specific.

If a crestal incision has been used, the incision is closed with atraumatic needles. Sutures may be resorbable or nonresorbable, depending on the clinician’s choice. If a vestibular incision has been used, the edge of the vestibular mucosa is sutured into the depth of the vestibule on the edge of the periosteum. This leaves a denuded portion of the lip vestibule, which must heal by secondary intention. A resorbable suture can be used. Typically, 4-0 chromic sutures work well in this area and resorb with minimal inflammation.

Four or more implants. 

​When four or more implants are to be placed into the anterior mandible, the incision design is the same as that used for two implants. The subperiosteal reflection should be sufficient to expose the lingual and labial cortices and the mental foramen bilaterally. With the use of cone-beam scanning, less reflection is necessary because of the excellent preoperative knowledge of the shape of the mandible. After completion of the periosteal reflection, the surgeon has an excellent view of the operative site, the contours of the bone, and the location of the mental foramen.

The mental foramen is used as the landmark for locating the distal implants. A caliper is used to mark the alveolar ridge no less than 5 mm anterior to the mental foramen. This distance usually is the anterior extent of the nerve as it loops forward in the bone before exiting at the mental foramen. The extent of anterior “looping” can be easily seen by using the axial images from the cone-beam scan. It is critical to examine the radiographs carefully to confirm the extent of the anterior loop of the nerve within the bone. A small nerve probe can be placed into the mental foramen; however, this procedure is reserved for clinicians with experience in handling sensory nerves.

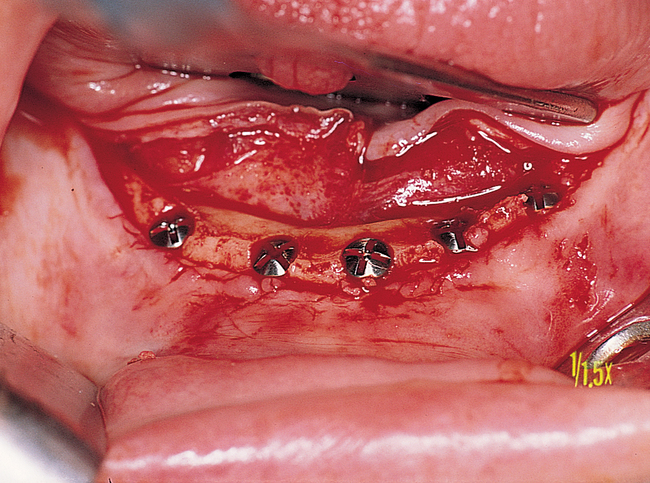
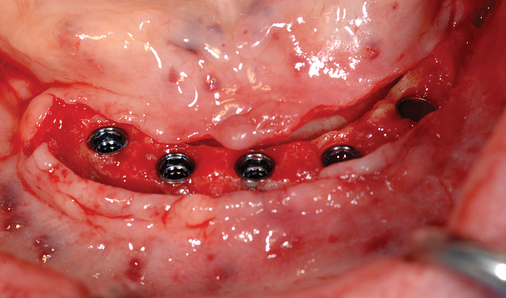
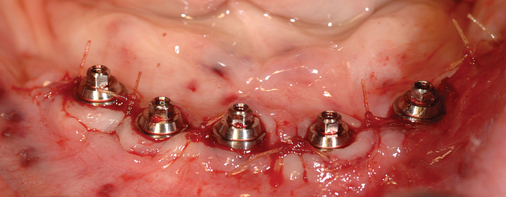
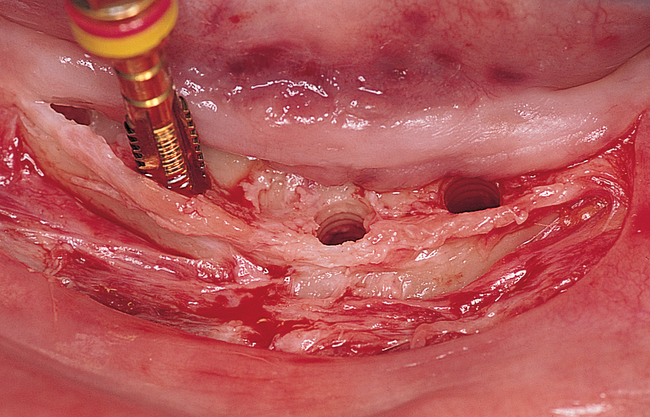
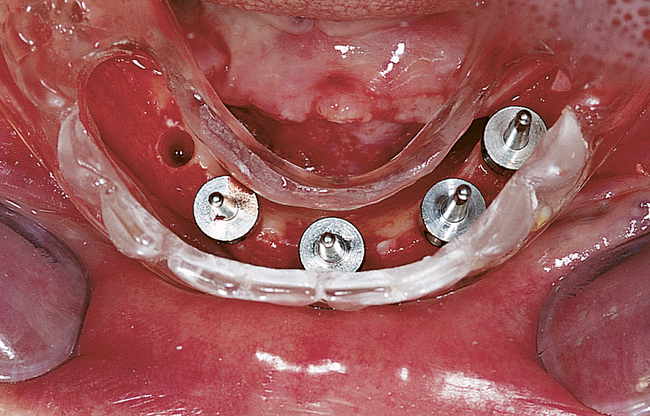
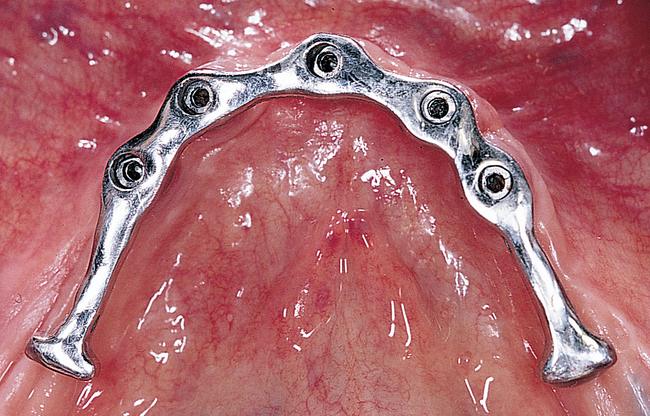
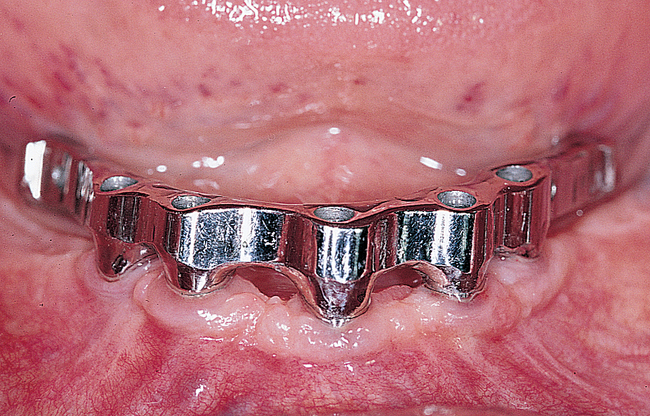
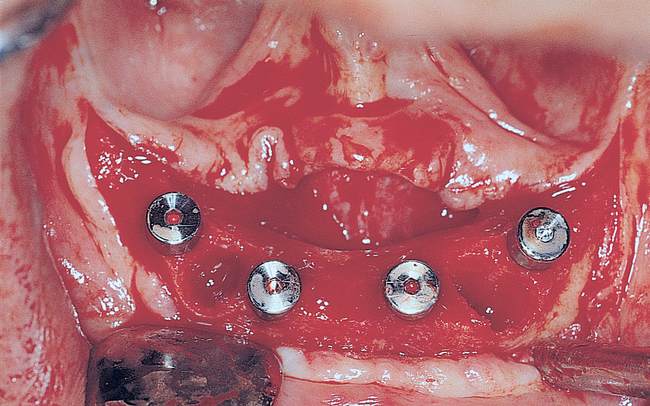
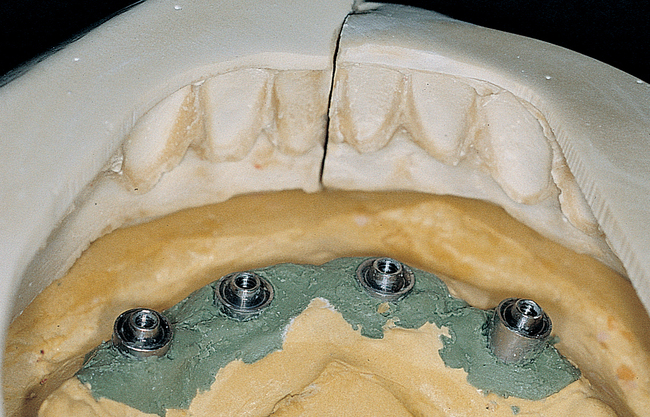
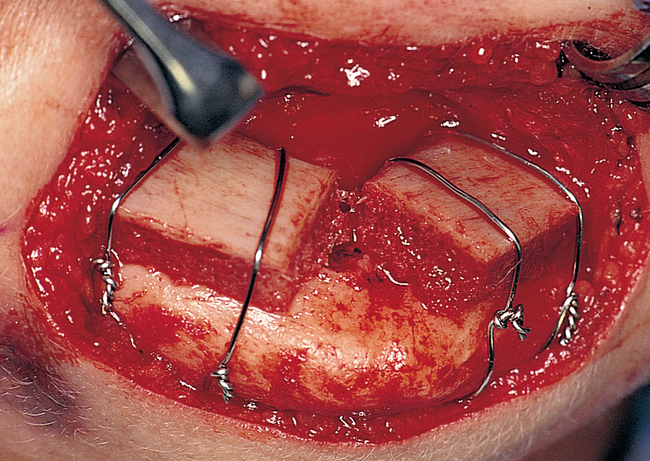
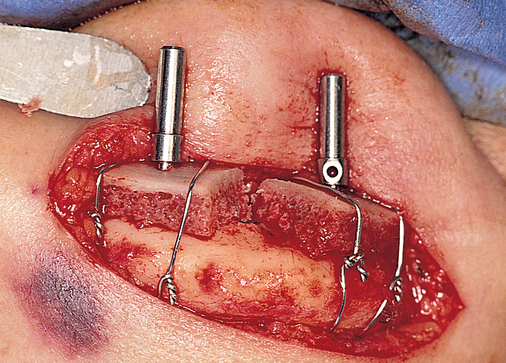
A small, round bur is used to make a depression in the bone to locate the implant site on one side of the mandible. A similar mark is placed on the opposite side of the mandible no less than 5 mm anterior to the mental foramen. The caliper then is set to 7 or 8 mm, and the next implant locations are marked in a similar manner anterior to the two distal locations. If a fifth implant is to be placed, a mark is made in the midline of the mandible. Using the caliper, the surgeon places the implant bodies a sufficient distance apart to ensure adequate space for restoration and hygiene (Figure 1-7; see the companion site for the complete case). For 4-mm-diameter implants, 7 mm of space center to center results in 3 mm of distance between the bodies of the implants.

After the implant locations have been identified, the first drill in the implant drilling sequence is used. If available, a surgical stent is placed to locate the implants correctly in relation to the teeth. For class III mandibles, the implants can be angled slightly lingual; for class II mandibles, the implants can be angled slightly anteriorly; for class I mandibles, the implants are placed vertically in relation to the inferior border of the mandible. Regardless of the angulation of the implants, the crestal location of each is the same: the implants exit the crest midcrestally without excessive labial or lingual location.

Parallel, or guide pins are placed after each pilot drill has been used to confirm the angulation of the implants in the anteroposterior and left-to-right planes. Small errors can be handled during the progression to the next-sized drills.

Common clinical situations. 

​It is common practice to place implants in the anterior mandible soon after dental extractions. Waiting until the bone has healed within the extraction site is one option. However, patients often prefer to wear a transitional removable denture for the shortest time possible.

If the patient has purulent exudate or significant soft tissue hyperplasia and erythema, then the teeth are removed, the bone smoothed conservatively, and the gingiva closed. After the gingiva heals and there are no signs of infection, implants can be placed as early as 2 weeks after the teeth have been removed. If grafts are placed within the sockets, then 3 to 4 months are allowed for bone consolidation before implant placement. To eliminate or decrease soft tissue pathology, the patient can have an oral prophylaxis performed before tooth extraction. The implants can be placed at the same time as tooth removal if there is no purulent exudate present. If the treatment plan chosen does not include immediate implant-borne fixed provisionalization, then the implants should be countersunk slightly to avoid perforation through the gingiva when the patient wears an immediate denture. The ideal scenario is to have the patient delay denture use for 2 weeks after edentulation. However, because of social concerns, patients will wear an immediate denture, which will require the usual adjustments for 3 to 4 weeks before the patient is comfortable.

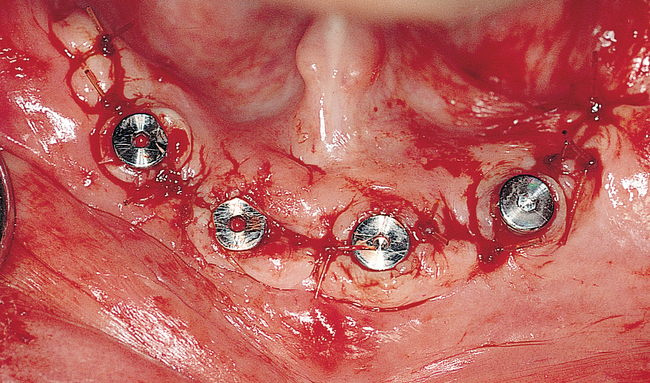
Dissection of the periosteum may be tedious weeks when performed after extractions, especially if the extractions involved a few remaining teeth (e.g., only the canines). The soft tissue invaginations into the extraction sites must be carefully elevated without tearing the flap. The crestal bone irregularities are reduced to ensure that all implants exit the crest at the same vertical level. Canine teeth may be larger than the diameter of the implant. In these cases, the bone height may have to be reduced, a larger-diameter implant may need to be placed, or defects between the implant and the remaining bone may need to be grafted. Reducing the bone with a rongeur forceps is a simple method of dealing with this problem. The implants also may need to be countersunk an additional 1 to 2 mm because of expected crestal bone loss from normal remodeling of the extraction site (Figure 1-8; see the companion site for the complete case).

Another common clinical situation is the isolated bone defect secondary to excessive bone loss from periodontal disease on one or more teeth. The flap is raised, and a definitive bone defect is noted. The thin ridge can be reduced in height until sufficient bone width is available, or a small-diameter implant can be placed in an isolated site with wider implants placed in the other sites. Documentation is necessary so that the restorative dentist can understand the unique location of the implant. For an isolated vertical defect, the implant can be placed at the level of the bone defect. The remaining implants also can be placed at that depth, which requires removal of crestal bone. It is advised to avoid placement of one implant several millimeters lower than the remaining implants because this causes difficulty with restorative procedures. The depth difference is limited to 2 mm, which can be easily handled by using abutments of different lengths.

Prior hydroxylapatite augmentation. 

​Patients who have had previous hydroxylapatite (HA) augmentation can receive implants (e-Figure 1-2). The preoperative evaluation of these patients should attempt to determine the amount of native bone inferior to the HA. If more than 10 mm of native bone is present, the HA can be removed if it is not impregnated with bone. If the HA ridge augmentation was performed 5 or more years before the proposed implant surgery, the HA ridge may be totally encased in bone. If the HA augmentation is more recent, the HA particles may be removed easily because mostly fibrous tissue will be holding the particles in place.

A crestal incision is made, and the tissues are reflected at the level of the HA augmentation. Care must be taken to avoid branches of the mental nerves that may be within the augmentation in the region of the mental foramen and slightly anterior to it. As necessary, the HA particles can be removed with forceps; if encased with bone, however, the implants are placed through the HA and bone mass into the native mandibular bone. A diamond bur must be used to create the implant sites until the final-diameter drill is needed. After the implant has been placed, a normal or slightly longer healing period is recommended.

Augmentation of the atrophic mandible

General considerations

Augmentation of the atrophic mandible for eventual placement of dental implants begins with an assessment of the patient’s general health and an accurate assessment of the height of the anterior mandible. Patients who are debilitated and would not do well with bone graft harvesting from the iliac crest should not have the mandible augmented. If the patient is healthy, the procedure of harvesting a bone graft is a reasonable approach when there is less than 8 mm of bone height present in the anterior mandible. Patients with a bone height greater than 8 mm can do well with implants without bone augmentation.

The decision to perform bone augmentation in the patient with 8 to 12 mm of bone height is subject to other factors, such as the patient’s age and the opposing dentition. The patient with a long life expectancy is more likely to have a long-term benefit from restoration of the mandible to 15 mm of vertical height. However, this has not been proven by clinical prospective studies. Some clinicians believe that the patient with an intact, natural opposing occlusion may place more force on the mandible than a patient with opposing dentures. Therefore, for a patient with an opposing natural dentition, clinicians may be more prone to perform bone grafting in the atrophic mandible. However, the rationale is anecdotal and not well studied in clinical trials. In general, if the clinician can place 10-mm-long implants, then there are minimal reasons to augment the mandible. There are posttraumatic or postablation patients who when reconstructed with bone, including fibular grafts, may benefit from vertical augmentation to provide a vertical ridge form that can have a ridge extension surgery.

In the past, clinicians were prone to use iliac crest corticocancellous blocks to augment the anterior mandible. A hip graft harvest is now reserved only for the extremely thin mandibles. Otherwise, tenting procedures, the application of mesh to retain a graft, the use of titanium reinforced membranes, all with recombinant bone morphogenetic protein (BMP) combined with allograft, work well.

Intraoral incision and placement of autogenous corticocancellous bone grafts

Intraoral incisions for the placement of blocks of bone can be made either crestally or within the vestibule. The crestal incision places the incision over the bone graft, but it also offers the surgeon a better chance of preventing incisional dehiscence secondary to vascular insufficiency. A vestibular incision places the incision away from the bone graft; however, blood supply to the edge of the vestibular incision travels through the dense, fibrous tissue over the crest and thus may be prone to breakdown secondary to vascular insufficiency. Both intraoral incisions and their subsequent release result in obliteration of the vestibule, which then requires secondary soft tissue grafting. It should be noted that the mental foramen often is palpable on the alveolar crest, with some portion of the inferior alveolar nerve dehisced from the mandible secondary to resorption of the alveolar crest bone. Because of the high incidence of complications with intraoral incisions for placement of onlay grafts to the mandible, an extraoral incision and dissection is recommended, especially when placing autogenous bone harvested from the hip.

Extraoral incision and placement of autogenous corticocancellous bone grafts

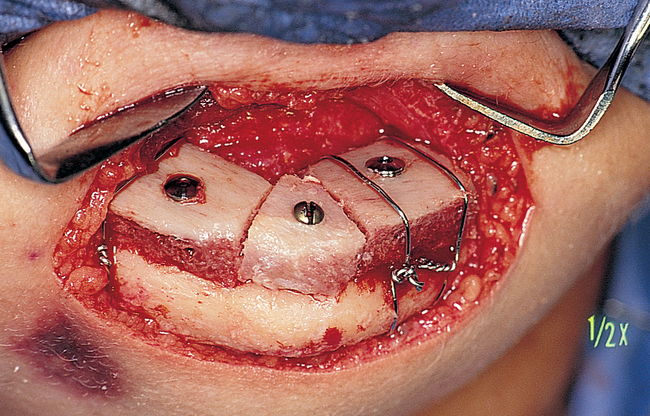
The disadvantages of using an extraoral approach are scarring and difficulty placing implants at the time of graft placement. Most implants are flared to the labial when placed into a bone graft performed through an extraoral incision. The advantages of using an extraoral approach to graft the atrophic mandible are (1) prevention of intraoral incision breakdown; (2) prevention of an intraoral communication with the bone graft and potential infection; (3) maintenance of the vestibular attachments, which may eliminate the need for vestibuloplasty; and (4) ease of reflection of the inferior alveolar nerve from the alveolar crest without incising over the nerve (Figure 1-9).

Before general anesthesia is induced, a marking pen is used to mark an esthetic submental crease, preferably with the patient in a sitting position. Most patients with atrophic mandibles have several creases from which to choose. After an adequate level of general anesthesia has been reached, the skin is prepared with an appropriate skin preparation scrub and solution and then draped. The incision is made, after which a blunt and sharp dissection is made to the inferior border of the mandible. The periosteum is incised at the inferior border of the mandible and elevated carefully over the alveolar crest and genial tubercles. The subperiosteal dissection is carried posteriorly to expose the superior aspect of the posterior mandible. Great care must be taken to avoid making intraoral perforations while performing the flap elevation. After the periosteum has been elevated, the bone graft is harvested and positioned as previously described. The tissue is relocated to its original position and, if necessary, released. The incisions are closed in multiple layers, with care taken to perform a plastic closure of the skin. If a tenting procedure is used, the same dissection is used and the implants or tenting screws are placed with the flaps reflected to the lingual, following the same procedure as described.

Implant placement into the augmented mandible

Most clinicians allow 4 months for healing of the iliac crest corticocancellous bone graft before placing implants. Iliac crest corticocancellous grafts heal well, but they start resorbing after 3 to 4 months. Consequently, the surgeon may need to place the implants at 3 months, depending on consolidation and remodeling of the bone graft, which is determined radiographically. If necessary, a split-thickness dissection can be made intraorally, and a palatal or split-thickness dermis or skin graft can be placed to restore some semblance of a vestibule. At vestibuloplasty, the rigid fixation screws can be removed and implants placed, engaging the inferior border of the mandible. When a vestibuloplasty is performed simultaneously with implant placement, the implants should be countersunk below the level of the periosteum so that the graft can lie flush and is not held off the host tissue bed by the domelike prominences of the implants’ cover screws. If meticulous suturing has been performed, a stent may not be necessary; however, if used, the stent should have a soft lining to prevent excessive pressure on the graft and implants.

Placement of implants into the atrophic mandible without grafting

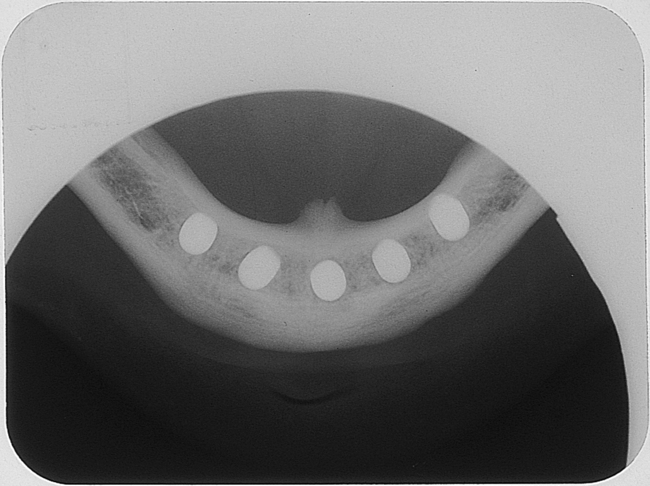
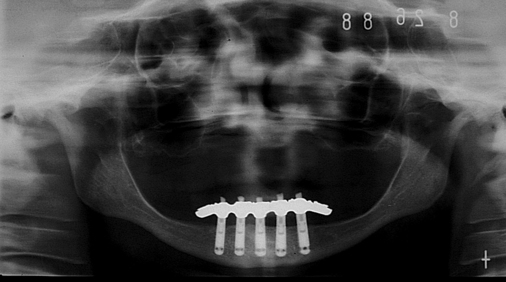
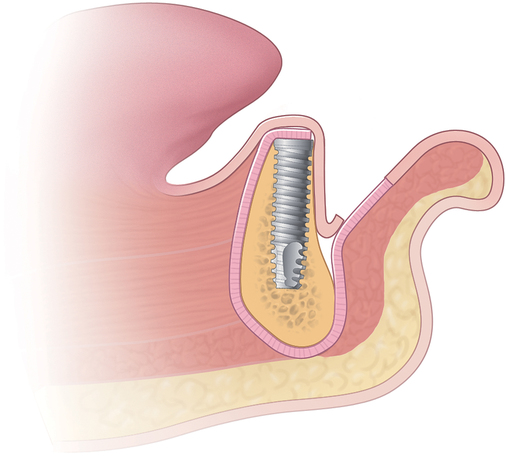
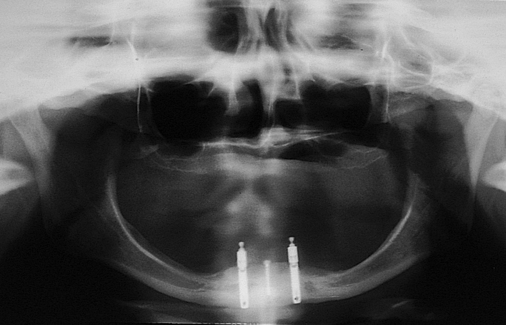
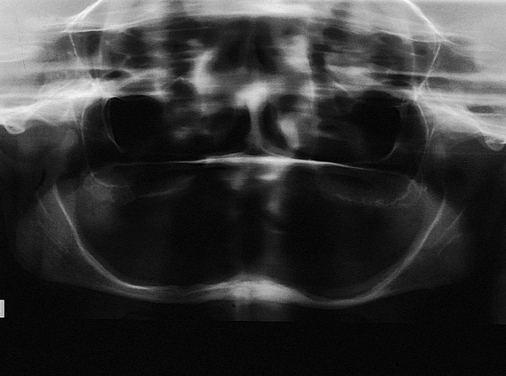
Patients with atrophic mandibles with 5 to 6 mm of bone height but less than 10 mm may not be healthy and thus not candidates for bone grafting because of health-related issues. For these patients, four implants can be placed, with 2 mm of the implant through the inferior border of the mandible and, as necessary, 2 mm supracrestal. It is important to prepare the bone gently and to pretap the implant sites because the mandible may be brittle, have minimal blood supply, and are prone to fracture. The implants should be placed so as to avoid labial protrusion. Long-term follow-up of this method indicates excellent results, with anecdotal evidence that bone formation can occur distal to the implants, presumably in response to tensile and compressive forces on the mandible (Figure 1-10).

Alveolar ridge distraction of the anterior mandible

Distraction osteogenesis is a method that can be used to augment the vertical height of the anterior mandible. The goal of the procedure is to augment the anterior mandible to an eventual height of 10 to 12 mm to receive implants in a functional location. This procedure is most useful in patients who have had vascularized grafts to restore mandibular continuity where a vascularized fibular graft, for example, restores continuity but because of placement of the fibula along the inferior border a vertical defect results. This is often the situation with the concurrent presence of posterior teeth. If the ridge height is increased, then a more hygienic restoration can be made. This procedure is rarely used because there are other methods using shorter implants and hybrid style prostheses, which result in functional rehabilitation without the morbidity associated with this procedure. Interpositional osteotomy with simultaneous elevation of the superior segment is a method that results in immediate vertical augmentation and is very predictable.

Immediate loading of the edentulous mandible

Restoration of the edentulous mandible has been achieved with the use of dental implants and a variety of prostheses that are removable by the patient, removable by the dentist, or fixed in position by cement. For dental implants, the traditional two-stage placement with a stress-free healing period and secondary exposure surgery has been well documented.13 When two-stage implant systems are used, with primary gingival closure after implant placement, interim relined dentures are used to restore function for up to 6 months. However, the first several weeks after implant placement are uncomfortable for patients and limit their function during the entire implant integration period. To minimize the patient’s discomfort and functional disability, treatment options using immediate implant-borne prostheses have been developed. The decision to provide the patient with improved function immediately after implant placement is patient driven. The overall success rate for immediate rehabilitation of the edentulous patient is similar to that for the traditional two-stage method.47

A clinician’s decision about whether to rehabilitate an edentulous patient or a patient who requires that all of his or her teeth be removed immediately is made based on evidence that this method is as successful as traditional delayed techniques. Clear evidence has justified immediate loading of implants placed between the foramina of the edentulous mandible.417

The initial reports on immediate loading of mandibular implants used extra or expendable implants that were placed into function with a temporary fixed restoration at surgery.18 The immediately loaded implants integrated. Following the same approach, Schnitman et al.6 later reported failure of four of 28 implants; these four implants were placed in the posterior mandible and were 7 mm long. Tarnow et al.5 used a provisional approach to restore six mandibles and four maxillas. They reported a high rate of success, with 67 of 69 loaded implants integrating. All of these loaded implants were cross-arch stabilized immediately upon placement to reduce the isolated load on a single implant; the cross-arch connection disperses the load to all the implants.

To minimize treatment time, the final prosthesis can be delivered on the day or within days of the surgery. Brånemark et al.7 used three implants in the anterior mandible and a screw-retained hybrid prosthesis; they reported a 92% to 98% success rate.

Table 1-1 summarizes classic papers on the immediate loading of mandibular implants; these reports verify that sufficient evidence exists that this procedure is acceptable and no longer should be considered experimental. The 14 authors listed results of 240 mandibles involving more than 1277 implants, all supporting immediate restoration of the mandible. The success rates ranged from 84.7% to 100%, indicating that immediate loading of the edentulous mandible is a viable treatment. The lower success rates from Balshi and Wolfinger4 and Schnitman et al.6 have clear explanations for the failures. The remaining references report success rates greater than 95% in the mandible.5,717 The reasons cited for implant failure in immediate loading of the edentulous mandible include placement of short implants into the posterior mandible, bruxism, poorly fitting prostheses, poor surgical technique, and infection of the implants.18

TABLE 1-1 

Literature Review of Immediately Loaded Mandibular Implants

Authors (Date) Implant Location Number of Implants Time to Implant Loading Type of Restoration Length of Follow-Up Success Rate (%)
Balshi and Wolfinger4 (1997) Mandible 130 Immediate (n = 40) Fixed provisional

Only gold members can continue reading. Log In or Register to continue

Stay updated, free dental videos. Join our Telegram channel

Jan 5, 2015 | Posted by in Implantology | Comments Off on 1: Surgery of the anterior mandible

VIDEdental - Online dental courses

Get VIDEdental app for watching clinical videos