Fig. 10.1
Clinical radiographs demonstrating inadequate root canal fillings with or without poor coronal restorations. Note (a) well-fitting post and core restoration with untreated MB2 and poorly treated MB1, DB, and P canals. (b) Well-fitting cast restoration with poorly treated root canals. Suspect furcal perforation to be also present. (c) Poor-fitting cast post restoration with poorly condensed and inadequately treated canals. (d) Well-fitting cast restoration with periradicular pathology associated with both mesial and distal roots. Ineffective treatment protocols likely to have resulted in failure
Healing after endodontic therapy is monitored by strict criteria based on clinical examination and interpretation of periodic radiographs (see Table 10.1). Clinical follow-up studies show that a large proportion of treated cases with chronic apical periodontitis show signs of healing within 1 year of treatment and in some instances as early as 2–6 months [10, 11] (Fig. 10.2). Some studies have demonstrated that follow-up periods of 4 years or longer may be required when determining success of treatment in some cases. Late periapical changes have been observed radiographically more than 10 years after treatment, whereby healing appeared to have been disturbed and delayed by extension of root canal filling material into the periapical tissues. Small radiolucencies around surplus material should not be misinterpreted as failure [12, 13]. Root-filled teeth should be followed up at least a year after completion to determine whether a favourable outcome has been achieved. Absence of pain, swelling and other symptoms including sinus tract, no loss of function and radiological evidence of a normal periodontal ligament space around the root all indicate success [1].
Table 10.1
Endodontic treatment outcomes based on strict criteria assessed by clinical and radiographic signs and symptoms to determine whether the treated case has healed or failed
|
Healed
|
Both clinical and radiographic presentations are normal (Fig. 10.2). No further follow-up is required
|
|
Healing
|
A reduced radiolucency combined with normal clinical presentation can be interpreted as healing in progress (Fig. 10.2). Further follow-up is required
|
|
Failing (uncertain)
|
Radiolucency has persisted without change. Clinical presentation is normal. Further follow-up reviews are necessary to ascertain whether the case has failed
|
|
Failed
|
Radiolucency has emerged, persisted without change or increased in size. Clinically signs and symptoms may be present (Fig. 10.1)
|
Fig. 10.2
Clinical radiographs demonstrating healing dynamics in re-treatment cases. Both cases have been grossly underfilled with the likelihood of ineffective disinfection of residual infection. Note (a) preoperative radiograph demonstrating extensive periradicular radiolucency associated with mesial and distal apices of tooth 46. Crown margin was defective mesially warranting removal and restorability assessment prior to proceeding (red arrow). (b) Re-treatment completed with chemomechanical debridement of all canals using intra-canal calcium hydroxide medicament in between visits. (c) 6-month recall radiograph demonstrating healed case. (d) Preoperative radiograph demonstrating single-cone obturation in tooth 14. Note extensive periradicular pathology. (e) Root canal re-treatment procedure completed through existing cast restoration (periapical changes already demonstrated). (f) 6-month recall radiograph demonstrating further healing at periapex. Both cases were treated with 2 % stainless steel instruments and cold lateral compaction techniques
If radiographic examination reveals the lesion has remained the same size or has diminished but not resolved, then the outcome is considered (uncertain). In this situation the lesion should be assessed until it has either resolved or for a minimum period of 4 years. If a lesion persists after 4 years, then it may be considered to be associated with post-treatment disease and probable failure [1].
During the follow-up period, if the tooth that has been treated exhibits clinical signs and symptoms of infection or a radiologically visible lesion that has either appeared subsequent to treatment or increased in size or if the lesion has remained the same size or diminished but not resolved during the 4-year assessment period, then the treatment can be considered a failure requiring either retreatment or extraction [1].
Scar tissue poses a significant diagnostic dilemma with difficulties to differentiate such a lesion from a radiolucency of pathological origin (apical periodontitis). Clinicians should be aware that although the incidence of this phenomenon is very low, this clinical entity must be taken into account when assessing failure of a treated case. These uncertain cases of healing are demonstrated radiologically by lesions that may have reduced in size but not completely resolved. Provided there are no clinical signs and symptoms, then these types of cases can be monitored for further periods to ensure that no increased lesion size has occurred (which would indicate failure) [1, 14–16].
If root canal treatment has failed, there are usually four possible treatment options, namely, review, retreatment, apical surgery and extraction. Root canal retreatment is often the preferred means of treating a failed root canal treatment, especially when the failure is due to a technical deficiency. The existing root canal filling is removed and the infected root canal system disinfected using irrigants and medicaments. Root canal retreatment is often much more complicated compared to initial treatment, since restorations need to be dismantled and root canal filling materials (including both conventional gutta-percha fillings and unconventional paste fills) have to be removed in order to gain access to the canal system. Iatrogenic errors such as fractured instruments, perforations and canal transportations can further complicate matters. It is imperative to assess that the tooth is restorable prior to embarking on prolonged and often expensive treatment. Longitudinal tooth cracks and fractures that principally occur in the vertical plane or long axis of the crown and/or root can lead to particular uncertainty in terms of diagnostic and treatment decisions. Such cracks and fractures can lead to ongoing symptoms that can often be mistaken for lesions of endodontic origin. Once confirmation of an unfavourable crack or fracture has been made, then extraction will be indicated (Fig. 10.3). If the tooth is deemed unrestorable or unfavourable, then extraction should be considered with suitable replacement if indicated [17].
Fig. 10.3
Clinical radiograph and photographs demonstrating longitudinal fracture in tooth 26. Note (a) preoperative radiograph showing previously root-treated tooth. A periradicular radiolucency can be seen with the MB root (red arrow) and in the furcation (black arrow). Probing profile at time of presentation was within normal limits. Root canal re-treatment or extraction with prosthodontic replacement was discussed and the patient decided on the latter. (b) and (c) Longitudinal root fractures associated with the MB root (dotted red line) and furcation region (dotted black line). Root canal re-treatment would have been a pointless exercise in this case
The decision to gain direct access through an existing restoration or dismantle first must be based on the vulnerability of recontamination during root canal retreatment. It is crucial that the coronal seal be maintained both during and after endodontic treatment to prevent reinfection of the canal space. It is well documented that if coronal leakage occurs (especially when a poor coronal restoration is combined with a poor root filling), then failure is likely to occur [18–20]. If the crown is judged to be of good quality (both clinically and radiographically) with no obvious marginal discrepancies macroscopically, then retreatment can be carried out with a conservative access preparation which can be sealed using either adhesive or amalgam Nayyar core restorations upon completion [21]. In a laboratory study using incisor teeth, cutting an access cavity resulted in a 15 % reduction in relative strength, and subsequent amalgam restoration resulted in a 5 % reduction in relative strength [22]. Restoration of a crowned tooth with a plastic restoration following completion of endodontic treatment ensures that coronal seal is maintained not requiring replacement of the crown.
Dismantling of the coronal restoration is necessary if crown margins are defective or undermined by caries. Retaining such a restoration risks jeopardising further success in the future due to reinfection. For temporary crown and bridge, the restorations can be removed easily using either a scaler or large spoon excavator. Various methods used for permanent crown removal include sectioning, using lifting devices and ultrasonics and can be classified according to whether the method is deemed conservative (prosthesis remains intact), semi-conservative (minor damage to the prosthesis but can potentially be reused) and destructive (prosthesis is damaged and not reusable) [23, 24] (see Table 10.2).
Table 10.2
Classification for crown and bridge disassembly
|
Conservative
|
Richwill Crown and Bridge Remover
Ultrasonic
Sliding hammer
Matrix bands
|
|
Semi-conservative
|
WAMkey
Metalift Crown and Bridge Remover System
|
|
Destructive
|
Crown and bridge sectioning using tungsten carbide burs
|
Post removal has been shown to be a predictable procedure using appropriate techniques. Methods for removal of cast, preformed and ceramic posts include ultrasonics and use of post pulling devices (Ruddle post removal kit, Masserann Kit, Eggler post remover, Thomas post remover) [23–31]. Fibre posts may need to be drilled out [32, 33]. Risks of post removal include root fracture [34] and generation of excessive heat causing necrosis of the surrounding bone [35].
Historically numerous materials have been advocated for filling root canals including gutta-percha, gutta-percha carrier devices, synthetic polymer-based polycaprolactone thermoplastic material (Resilon), silver points and endodontic pastes/cements [36] (see also Chap. 7).
Gutta-percha can be removed mechanically using hand or rotary instruments aided by heat or solvents or with the use of ultrasound. Methods employed are dependent on the quality (poorly condensed or well condensed), method of gutta-percha root filling (cold lateral, warm lateral, warm vertical or single cone technique), type of sealer used and personal preference [37–40].
Solvents have been advocated to soften gutta-percha and sealer pastes and assist in its removal. Several solvents have been proposed including chloroform, eucalyptol, rectified turpentine and orange solvent. In general, all solvents are toxic to some degree, and their use should be limited and handled with care [41–45] (see Table 10.3).
Table 10.3
Properties of commonly used gutta-percha solvents
|
Chloroform
|
High efficacy in dissolving gutta-percha and root canal sealers
Antimicrobial
High toxicity if inhaled or extruded beyond confines of the canal
|
|
Eucalyptol
|
Low efficacy in dissolving gutta-percha and root canal sealers
Antimicrobial activity unknown
Low toxicity if inhaled or extruded beyond confines of the canal
|
|
Rectified oil of turpentine
|
Low efficacy in dissolving gutta-percha
High antimicrobial activity
High toxicity if inhaled or extruded beyond confines of the canal
|
|
Orange oil
|
High efficacy in dissolving gutta-percha and root canal sealers
Antimicrobial activity unknown
Nil toxicity if inhaled or extruded beyond confines of the canal
|
Gutta-percha carrier devices such as Thermafil were traditionally comprised of gutta-percha moulded around a plastic or metal carrier. A variety of techniques have been proposed to remove Thermafil obturations including mechanical instrumentation with solvents, heated pluggers and rotary instrumentation. Success of retreatment depended more on the ability to remove the carrier than the technique of gutta-percha removal [46–49]. Recently the manufacturer of Thermafil (Dentsply, Tulsa Dental Specialties, Tulsa, OK) has developed a carrier-based system using a proprietary cross-linked gutta-percha core instead of plastic carriers. GuttaCore can be removed with greater ease than other carrier-based systems. Unlike normal gutta-percha, this core material does not readily dissolve with solvents and is not amenable to plasticising with heat. The manufacturer recommends the use of NiTi instrumentation such as ProTaper retreatment files for the removal of this obturating material [50–52].
Resilon a synthetic polymer-based alternative to gutta-percha can be thermoplastically condensed and combined with a resin-based sealer to create a “monobloc” root filling. Its removal in retreatment is similar to the removal of condensed gutta-percha [53].
The “dirty fills” of endodontic pastes and cements have a poor track record and should be considered obsolete primarily due to their inherent properties of shrinkage, provision of an inadequate seal and serious risk of adverse reactions if inadvertently extruded beyond the confines of the canal system. Non-setting pastes/cements can be easily removed using a combination of solvents, hand and rotary instrumentation and ultrasonics. Hard-setting pastes such as resorcinol-formalin root filling (SPAD, Traitement SPAD, Quetigny, Les Dijon, France) also known as “Russian Red”, due to the colour, sets extremely hard. Tags are formed within the dentinal tubules making retreatment very difficult if not impossible. The use of ultrasound is necessary to remove the hard-setting cement without overzealous preparation or perforation risk compared to the use of burs or drills. The use of Endosolv R (Spécialités Septodont, Saint-Maur, France) is available to aid in the removal of such pastes although clinically its effectiveness is limited with very little effect, if any [54–59].
Silver point fillings although once popular are now considered obsolete. Although ductile enabling easy placement and radiographically appealing, these fillings resulted in voids due to cross-sectional round silver points attempting to obturate a three-dimensional root canal system relying on a sea of sealer to plug the gaps. Over time sealer dissolution and silver point corrosion products as a result of tissue-fluid contact resulted in failure and their ultimate demise. Retreatment cases occasionally require the removal of silver point fillings. Successful removal of silver points is dependent on the ability to expose the silver point during disassembly without avoiding further fracture, loosening the silver point from the surrounding cement casing and gaining an adequate purchase in order to extract it from the root canal. If the head of the silver point has been exposed correctly and not fractured at the level of the root canal, then a surgical haemostat, artery forceps or Steiglitz forceps can be used to grasp the silver point and aiding removal. If the silver point is flushed with the root canal orifice, then the use of ultrasonics, Masserann Kit (Micro-Mega, Besancon, France) or Cancellier Kit (SybronEndo, Orange, CA, USA) may be advantageous in trephining and engaging the silver point for removal purposes [60–63].
Chemomechanical preparation and disinfection protocols used for the management of primary untreated cases can be applied to previously root-treated teeth. Multi-visit appointments with the use of intra-canal inter-appointment medicaments are mandatory since the time to properly disinfect the root canal system in a single visit is often impossible. Dismantling of existing restorations and previous root-filling materials and renegotiating canals to length are time-consuming procedures requiring proper disinfection procedures to be postponed until the second appointment [64].
The outcome of endodontic treatment is generally better than root canal retreatment, and this difference may be attributed to both the nature and location of the infection and treatment difficulties encountered when trying to rectify previous treatment errors. A systematic review of 17 studies published between 1961 and 2005 reported that the pooled success rates of root canal retreatment ranged between 70 and 80 % [65]. A systematic review of 63 studies published between1922 to 2002 reported the pooled success rate of root canal treatment ranged between 68 and 85 % when strict criteria were used [66]. The major difference between the outcomes of primary and secondary root canal retreatment resides only in the ability to predictably access and negotiate the root canal system to the (residual) apical infection. Outcome data offers a very favourable prognosis for non-surgical root canal retreatment provided it is performed to acceptable guideline standards [67].
A few studies have compared non-surgical retreatment and endodontic surgery. A Cochrane review concluded that the short-term healing rates might be higher in the surgically treated cases [68]. The two randomised controlled trials comparing outcome of non-surgical retreatment vs. surgery hypothesised that the surgical treatment resulted in a more rapid bone fill but was associated with higher risk of “late failures” [69, 70]. The most recent meta-analysis comparing the outcomes of non-surgical root canal retreatment and endodontic microsurgery concluded that the latter was a reliable treatment option with favourable initial healing and a predictable outcome [71]. Bearing in mind that the cause of failure is usually residual infection within the root canal system, then non-surgical root canal retreatment should be the treatment of first choice. In cases where apical anatomy has been altered (canal transportation or blockage), whereby rendering re-treatment procedures ineffective or impossible, then surgery may be the only alternative treatment option. An informed decision by the patient should be reached based on careful case assessment and known prognostic factors that may influence treatment outcomes. One must also take into consideration the estimated cost-benefit analysis for all options including extraction and replacement when considering any treatment. A typical example is an anterior tooth with a well-fitting cast post and core restoration where dismantling is not only a costly exercise but also carries the risk of potential root fracture. Such cases may be more amenable to a surgical approach rather than non-surgical retreatment.
10.2 Disassembly Techniques for Crown Removal
Gaining access to root canals for non-surgical root canal retreatment procedures may involve the removal of existing restorations, cores, crowns, posts and materials from the orifice of root canals. Successful treatment depends on achieving this goal, which can be complex and challenging with additional risks of failure if incorrect dismantling techniques are employed. Longevity of the tooth will be dependent on preserving the remaining sound tooth structure and minimising further losses when attempting to re-enter the canal system. Financial implications are also of primary concern for the patient particularly if they have already made a costly investment by way of a cast restoration following completion of primary root canal treatment previously.
If the existing cast restoration is deemed to be good in quality, i.e. clinically and radiographically there does not appear to be any marginal discrepancies, then the crown may be retained. Root canal retreatment can be carried out by way of a conservative access through the existing cast restoration and subsequently sealed following completion of treatment (Fig. 10.4). The patient must be warned, nevertheless, the inherent risks when working through crowns including the risk of fracture (porcelain), debonding and the possibility of removal and replacement if microscopic evidence of microleakage is evident during treatment.
Fig. 10.4
Clinical radiograph and photographs demonstrating root canal re-treatment procedure through a well-fitting cast restoration. Note (a) preoperative radiograph demonstrating poorly treated tooth 26 with peri-radicular pathology in relation to the mesial root. A serrated post was noted in the palatal canal. (b) and (c) Access preparation through the existing cast restoration. Once the core was revealed, ultrasonics were used instead of burs to prevent post fracture and retrieval difficulties. (d) Post located and (e) removed using ultrasonics. (f) Final obturation completed. Note minimal access cavity has been restored with an adhesive restoration to ensure coronal seal is maintained
If the crown has an obvious defective margin or has been undermined by caries, then removal is indicated. Retaining a compromised restoration will only serve to reinforce failure in the future by way of microleakage and reinfection. Removal of the restoration will allow for a careful assessment of remaining tooth structure and restorability prior to endodontic retreatment. Additionally removal allows improved vision and accessibility, particularly in cases where there is obvious crown-root misalignment.
Methods employed to remove cast restorations include conservative (where the prosthesis remains intact), semi-conservative (where minor damage to prosthesis occurs but it can potentially be reused) and destructive (a new cast restoration will need to be fabricated).
Conservative methods
- 1.
The Richwill Crown and Bridge Remover (Richwill laboratories, Orange, CA, USA)
A water-soluble thermoplastic resin is available that can be softened in hot water and then placed on the tooth undergoing treatment. The patient is asked to bite down and compress the resin block to about two-thirds of the original thickness. When the resin has cooled, it will set hard and the patient is instructed to open their mouth quickly, resulting in lifting or loosening of the existing restoration. The patient must be warned of the risk of loosening or removing the opposing restoration (see Fig. 10.5).
- 2.
Siqveland matrix band placement
This involves the application of a Siqveland matrix band over the crown, which is burnished into the undercuts and then pulled vertically. This can be a relatively simple successful method for the removal of some crowns, particularly if they have been temporarily cemented in place.
- 3.
Sliding hammer crown and bridge remover
A suitable tip is selected to engage the crown margin, and then a weight is slid along the shaft of the instrument in a series of short successive taps aimed at loosening the restoration. This method can be uncomfortable for the patient and if forces are incorrectly directed pose risk of considerable damage to the underlying tooth and core. The use of this technique should be reserved for metal cast restorations where these are not risk of porcelain fracture.
Semi-conservative methods
- 1.
Wamkeys (Dentsply, Weybridge, UK)
Fig. 10.5
Clinical photographs demonstrating the use of the Richwill crown and bridge remover. Note (a) preoperative view of teeth 24, 25, 26, and 27 which were treatment planned for replacement crowns. (b) Following crown preparation and cementation procedures, the patient complained of pain and tenderness associated with tooth 25. Acute apical periodontitis was suspected and the patient referred for endodontic treatment. The prosthodontist had cemented tooth 25 with temporary cement to ease crown removal prior to endodontic therapy. (c) The water-soluble pliable resin crown remover. (d) The remover is placed in warm tap water (145° F) for 1–2 min. The remover is ready when it compresses slightly when a firm force is applied between the thumb and index finger. (e) The remover is placed directly under the occlusal surface of tooth 25 and (f) the patient is asked to bite down. (g, h) Once the resin is cooled down, the patient is asked to forcefully open their mouth quickly resulting in (i) successful removal of the restoration
These are key-like instruments available in 3 sizes. A hole must be cut through the crown bucally or lingually parallel to the occlusal surface and at an imaginary level of the underlying core. A key is then inserted and rotated 90° resulting in a force in the path of insertion of the crown resulting in loosening or dislodgment. Care must be taken during initial hole preparation and rotation with porcelain crowns due to the risk of porcelain fracture.
Destructive methods
- 1.
Sectioning
Sectioning the crown with a suitable tungsten carbide bur is an effective way of removal. A groove needs to be cut extending from the mid-buccal gingival aspect to the occlusal aspect of the crown. A similar groove is made on the mid-lingual aspect. The two sides are then connected by a further groove on the occlusal surface of the crown. Care must be taken to ensure that the groove does not extend beyond the margins of the crown to the underlying core with inadvertent risk of unnecessary tooth damage. Following groove preparation a suitable instrument such as a flat plastic can be inserted into the groove and rotated in order to separate the crown into two fragments. Occasionally a further groove may need to be created in a mesial-distal direction if the restoration proves to be very difficult to remove. It is important to ensure that the restoration is severed at the gingival margins otherwise prising the crown apart will be very difficult (Fig. 10.6).
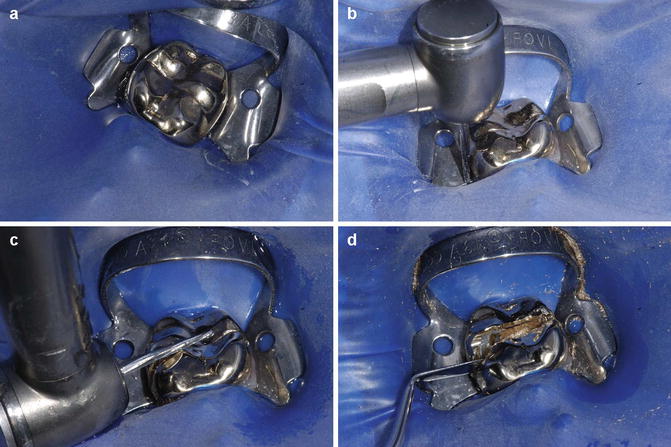
Fig. 10.6
Clinical photographs demonstrating destructive method of removing a cast restoration. (a) Preoperative view of the tooth, (b) gingival-occlusal reduction of cast restoration, (c) occlusal reduction, and (d) the use of a flat plastic instrument to separate two halves of sectioned crown
10.3 Disassembly Techniques for Core Removal
Underlying cores are generally constructed from amalgam or composite. The Nayyar amalgam core has been advocated as a means of restoring posterior teeth without the placement of posts. Amalgam is normally packed 2–4 mm into the coronal portion of the root canals. Removal of amalgam cores in the coronal 1/3 of the root canal should be carried out under direct visualisation using a dental operating microscope. Core material should be removed with the use of ultrasonic tips, and burs should not be used due to risk of iatrogenic damage and perforation. Composite core material can be effectively removed using ultrasonic vibration, although visualisation can be hampered if the colour of the core is similar to the surrounding dentine. Intermittent use of water spray within the access cavity may help distinguish between core material and adjacent dentine with differing translucencies when observed under the microscope. The CPR2, BUC1 and ProUltra2 tips are diamond coated and effective at removing amalgam and composite.
10.4 Disassembly Techniques for Post Removal
Post removal has been shown to be a fairly predictable procedure provided appropriate techniques have been employed. The two main risks when removing posts are the potential for root fracture and periodontal ligament damage. The former may result if inappropriate techniques are employed, and the latter may occur as direct damage from overheating when using ultrasonics. All patients should be informed of the relative low risk of root fracture following post removal. Periodontal ligament damage is preventable by ensuring the ultrasonic unit is set at a low power setting and the assistant is able to provide a constant spray of water coolant to the ultrasonic tip/post to dissipate and counteract the heat generated.
Post removal devices
- 1.
Ultrasonics
The use of ultrasonics has been shown to be highly effective when attempting to remove posts. The post must be separated from the core ensuring that the margins are undermined and any obvious cement lute is removed (Figs. 10.7 and 10.8).
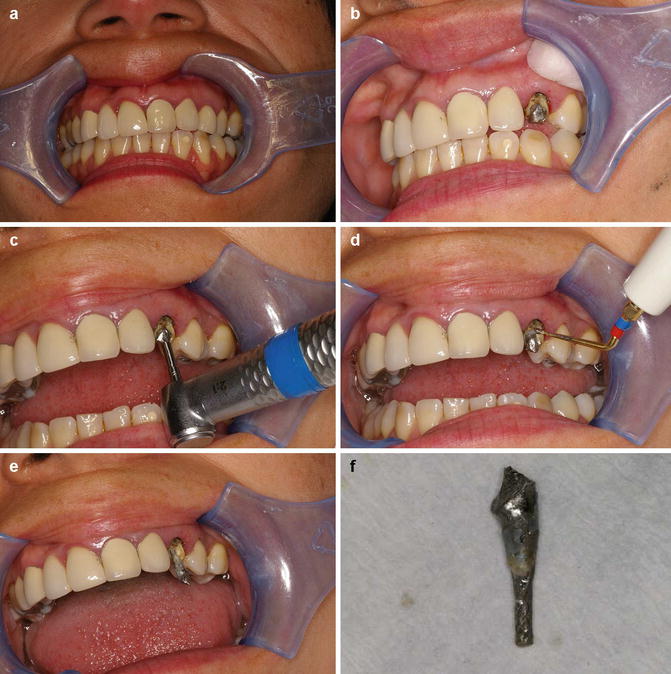
Fig. 10.7
Clinical photographs showing cast tapered post and core restoration removal using ultrasonics. Note (a) preoperative view of tooth 23 ceramic post and core restoration. (b) Removal of ceramic crown reveals underlying post and core restoration. (c) Core reduced in size. (d) Application of ultrasonics ensuring all visible luting cement has been disrupted. Constant water cooling with 3 in 1 used throughout the procedure to ensure no damage to the periodontal ligament occurs. (e) Post vibrated out and (f) post and core restoration dismantled
Fig. 10.8
Clinical radiograph and photographs showing dismantling of failed endodontically treated tooth 36. Note (a) pre-operative view demonstrating marginal discrepancy (white arrow). Parallel prefabricated post present in distal canal with peri-radicular radiolucency noted. (b) Pre-operative clinical view of full gold crown restoration. (c) Following sectioning of crown and placement of rubber dam. (d) Underlying cast post and core restoration sectioned into mesial and distal halves. (e) Removal of mesial cast post using ultrasonics. (f) Distal cast restoration and post. Care needs to be taken to avoid post fracture to the level of orifice which will increase difficulty when attempting removal. (g) Following dismantling of core, cemental lute is removed and post vibrated using ultrasonics. Cotton wool is placed in the mesial canals (red arrow) to prevent potential canal blockages from occurring during the post removal procedure. (h) Final crown, post and core restoration removed
The ultrasonic tip can be applied to the post head and vibrated out requiring an average time of 10 min. Well-cemented posts may be difficult to remove, and if there does not seem to be any evidence of movement after sufficient time (5–15 min approximately), then alternative methods of removal may need to be used.
The clinician should always endeavour to work at the lowest power setting that will efficiently and safely accomplish the task at hand. The selected ultrasonic instrument is initially moved circumferentially around the post to ensure that no remnants of cement lute are present. Specific ultrasonic instruments designed to transfer energy directly to the post are available ensuring optimal energy transfer required to promote cement/bond failure and post dislodgement. The instrument is energised and moved around the post. As stated earlier the by-product of ultrasonic energy is the production of heat and countermeasures should be taken.
If a screw or metallic post is present, the ultrasonic tip can be worked around the post in an anticlockwise direction to help loosen and unscrew it (Figs. 10.8 and 10.9).
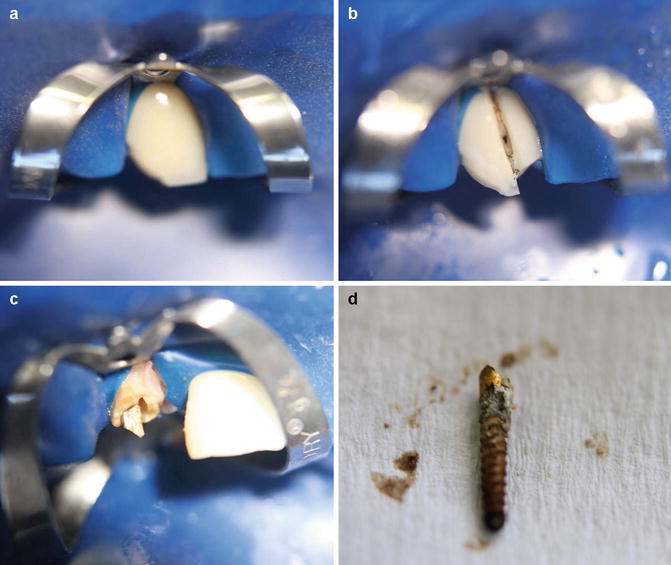
Fig. 10.9
Clinical photographs demonstrating (a) preoperative image of fractured screw post-retained ceramic restoration, (b) crown sectioned, (c) cement lute removed from around the screw post prior to (d) removal
Removal of the fibre post is generally specific to the post system, with different manufacturers supplying different removal kits. Often a pilot hole needs to be created followed by drilling through the entire post using increasing diameter drills. When hollowing through the post, the removal drills must be orientated centrally to reduce the risk of possible perforation or initiation of vertical fractures.
- 2.
The Ruddle post removal device
This system was devised to mechanically engage and remove different kinds of posts and intra-canal obstructions whose cross-sectional diameters are 0.60 mm or greater. The kit consists of extracting pliers, a trans-metal bur, five trephines of varying diameters, five corresponding tubular taps whose internal diameters range from 0.6 to 1.60 mm, a torque bar, tube spacers and a selection of rubber bumpers. Prior to using this system, complete circumferential visualisation of the post within the pulp chamber is essential.
Core material is first reduced in size to ensure that a trephine drill from the kit can be used to mill the post core into a cylinder. The trephines are rotated in a latch-type slow handpiece at 15,000 rpm in a clockwise direction. The trephine is used to machine down a 2–3 mm length of the most coronal aspect of the exposed post. A rubber bung is fitted onto the shaft of the remover and used to rest on the root surface thereby protecting it. The tubular tap is then screwed onto the remains of the post that has been previously milled by the trephine bur in a counterclockwise direction. The jaws of the extracting pliers are placed between the head of the remover and rubber bungs and opened by rotating a screw. As the jaws open a force is exerted along the long axis of the post enabling its removal (Figs. 10.10 and 10.11).