, Y. Natalie Jeong1, Robert J. Rudy1 and Daniel K. Coleman1
(1)
Department of Periodontology, Tufts University School of Dental Medicine, Boston, MA, USA
In order to control dental diseases, the daily removal of dental plaque/biofilm by the patient is essential. As mentioned previously, patients must be concordant to perform the techniques of plaque removal, they must know how to perform the appropriate techniques to completely dislodge plaque from the teeth or dental prosthesis, and they must have the access to reach the surfaces exposed to the oral environment. The techniques to remove the biofilm are tailored to each patient with respect to their periodontal biotype and their manual dexterity. It is not a “one size fits all” technique for plaque/biofilm removal, and in fact, there might be different techniques used in different areas of the mouth for a single individual. The aim of this chapter is to discuss techniques of plaque removal by the patient and integrating concepts of motivation. Because the color of plaque blends with the tooth and is not easily seen by the patient or in many instances by the clinician, this chapter will begin by discussing how to visualize dental plaque.
3.1 Detection of Dental Plaque with the Use of Disclosing Agents
-
A liquid or tablet dye is commonly used to disclose plaque, and (Fig. 3.1) disclosing tablets are generally chewed and retained in the mouth in the saliva for 30 seconds and swished through the mouth after they are dissolved and then expectorated. In a liquid form, the disclosing solution can also be applied to the tooth with a brush (Fig. 3.2).
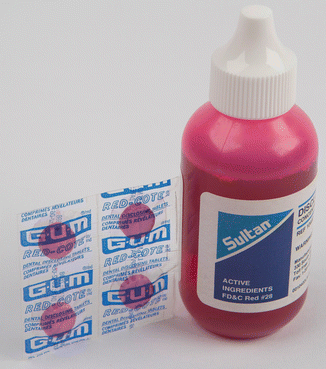 Fig. 3.1Disclosing agents in tablet and liquid forms
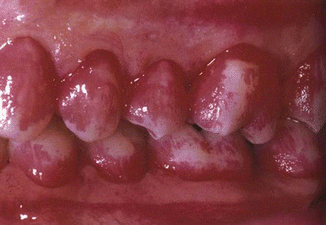 Fig. 3.2Disclosed plaque can be much more easily seen by the patient and the clinician
 -
As unstained dental plaque is not easily seen by the patient or the clinician (Fig. 3.3), disclosed plaque is helpful to the patient and the clinician for plaque removal instruction (Fig. 3.4).
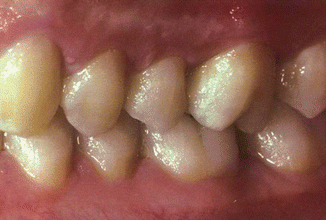 Fig. 3.3Calculus stains more lightly than plaque
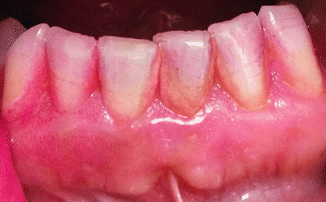 Fig. 3.4Coaching a patient with brushing techniques is more easily done when the plaque is disclosed than when disclosing solution is not used
 -
Disclosing dyes will not disclose dental plaque subgingivally as the molecules of the stain are too large to enter the gingival crevice and there is an outflow of gingival crevice fluid from the sulcus/pocket. Thus, if cervical plaque is seen supragingivally, it must be assumed that there is subgingival biofilm on the tooth, as a toothbrush bristle or dental floss/tape cannot thoroughly remove biofilm subgingivally and still leave it undisturbed supragingivally. However, it is common to remove supragingival plaque without removing subgingival plaque with a scrub type of brushing technique, or interproximally if the patient does not take the dental floss/tape into the gingival crevice and uses the floss only to remove food particles.
-
Stained plaque is more difficult to visualize interproximally in the posterior sextants than in the anterior sextants due to less visibility and wider teeth buccolingually and stained calculus tends to stain lighter in color than plaque (Fig. 3.5). Although disclosing tablets can be utilized by the patient at home to help visualize plaque, they have limitations. The patient cannot visualize, without a mouth mirror, the lingual surfaces, and posterior molar surfaces, and interproximally. Additionally they cannot see subgingivally with or without a mouth mirror. Thus, the use of disclosing tablets at home can lead the patient to a false sense of security that the plaque is all removed, as the patient is visualizing the areas that are most easily cleaned with a toothbrush or dental floss.
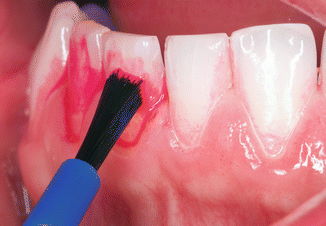 Fig. 3.5Plaque is difficult to see on the facial of the posterior teeth as it blends with the tooth color
 -
When the clinician is performing a professional prophylaxis and/or scaling and root planing, disclosing is best utilized at the outset of the visit. The stained plaque on the teeth, with the clinician’s assistance, will greatly assist the patient’s visualization during the oral hygiene technique instruction (Fig. 3.6). Later on in the appointment, clinician’s ability to determine the location of dental biofilm (plaque) when doing the professional cleaning will be enhanced.
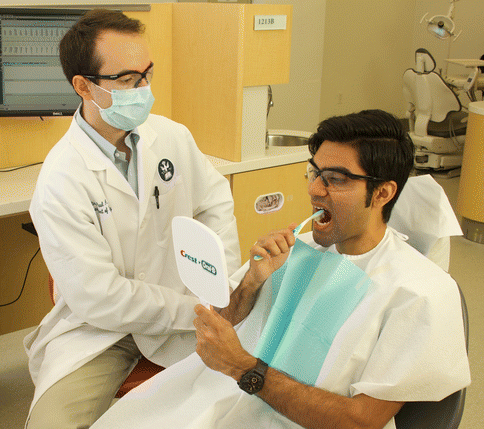 Fig. 3.6Plaque can be disclosed in a local area by painting it on the tooth or teeth
 -
When instructing with dental floss/tape, it is best to have a freestanding mirror in order to enable the clinician to have their hands available to help guide the patient’s hands. With a front delivery system, a hand mirror can be attached to the bracket table with masking tape while the handle of the mirror can be placed in the handpiece holder bracket. The mirror then can be placed in front of the patient with the patient in a sitting position. This will simulate a mirror in the patient’s bathroom, where they likely will be doing their flossing and brushing (Fig. 3.7). It is also important to have good lighting intraorally, and often the operatory light can be used directly in the patient’s mouth or indirectly through the freestanding mirror into the patient’s mouth.
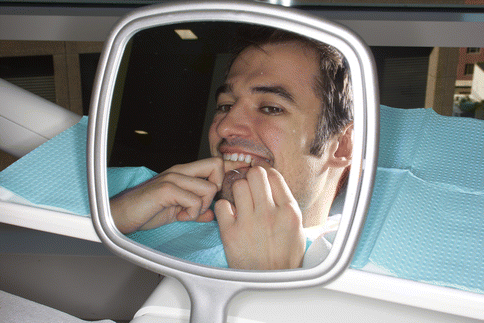 Fig. 3.7A freestanding mirror is necessary in order for the clinician to assist the patient. This hand mirror is taped to the bracket table for stability
 -
Using a mouth mirror to demonstrate plaque on the lingual surfaces will enable the patient to better visualize stained plaque through their hand mirror. A most commonly missed area when brushing is the cervical-lingual of the mandibular molars, as the toothbrush bristles need to be angled a greater than 45° angle to the tooth (Fig. 3.8).
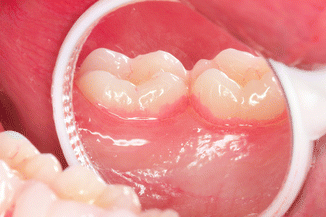 Fig. 3.8The use of a mouth mirror to demonstrate stained plaque or calculus is helpful in coaching the patient
 -
The use of a digital intraoral camera is even more helpful than a mouth mirror to demonstrate the presence of stained plaque or calculus for the patient in areas difficult to see with direct vision. Recent innovations of intraoral cameras use a wand with a camera, which can be used intraorally to show to the patient in real time the location of dental plaque or as in Fig. 3.10, bleeding on probing of the palatal gingiva (Figs. 3.9 and 3.10).
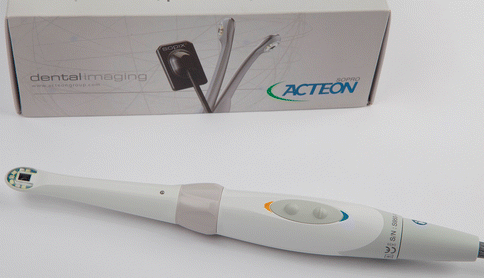 Fig. 3.9An intraoral camera is useful in demonstrating plaque, calculus, and toothbrush position
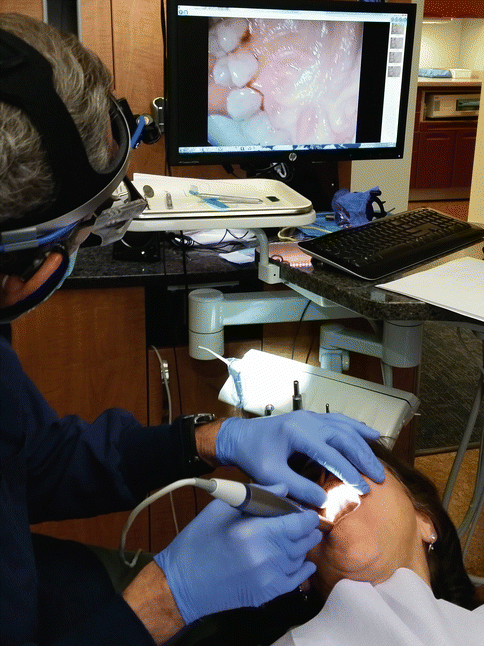 Fig. 3.10The intraoral camera wand can easily take pictures, which then can be shown to the patient to explain periodontal diseases and the causes of it
 -
When it is difficult for the patient to visualize the stained plaque on a tooth or to show it with a camera wand, employ a periodontal probe or explorer to scrape the plaque from the tooth and demonstrate interproximal and cervical plaque on the blade of the probe or explorer to the patient (Fig. 3.11).
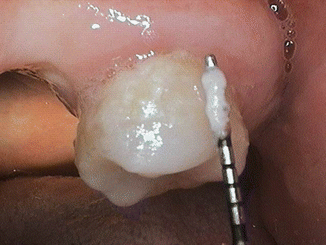 Fig. 3.11Showing the patient plaque collected on a periodontal probe from an area that the patient cannot visualize will assist the patient in knowing where to concentrate their plaque removal techniques
 -
It is helpful to redisclose following the mechanical debridement and polishing for the clinician to evaluate the completeness of their therapy.
3.2 Bleeding on Probing (BOP)
-
Bleeding on probing is indicative of gingival inflammation; however, it does not differentiate between gingivitis and periodontitis. Any chronic inflammation, gingivitis or periodontitis, can be systemically harmful. Demonstrating bleeding to a patient will help to reinforce to the patient the association of subgingival plaque and inflammation (infection) (Fig. 3.12).
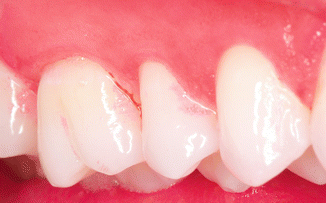 Fig. 3.12Horizontally, drawing the periodontal probe in the sulcus will best define bleeding, which is a sign of inflammation
 -
When a circumferential step probing technique is utilized, the probe should remain in the sulcus, which improves the accuracy when demonstrating BOP. Showing subgingival plaque to a patient with the use of a periodontal probe tip in the sulcus using a horizontal sweep technique also effectively elicit BOP, perhaps even more than with step probing. The sulcular circumferential sweep method described for detecting subgingival plaque is done by placing the probe gently into the pocket/sulcus until it reaches the epithelial attachment, and then drawing the probe horizontally with the tip remaining at the base of the pocket/sulcus.
-
Measuring the number of tooth surfaces exhibiting bleeding on probing when doing an examination is a helpful index to document a patient’s periodontal inflammatory status and can be helpful to show the improvement with periodontal therapy. Heavy bleeding is indicative of greater intensity of inflammation than light bleeding (Fig. 3.13).
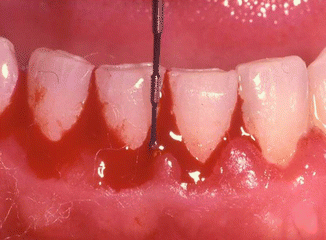 Fig. 3.13A blunt probe will not cause bleeding with the use of light pressure, and the heavier the bleeding the greater is the intensity of the inflammation
 -
As the tip of a periodontal probe is blunt, advise the patient that bleeding on probing is not the result of cutting the tissue with the use of a sharp instrument; however, the gingival bleeding is a sign of infection. Discomfort when probing with light pressure is due to the ulcerations in the gingival sulcus.
-
In smokers, where there is a constriction of the blood vessels, bleeding will be less visible, less intense, or may not be seen. Thus, the lack of intensity with gingival bleeding in a patient who smokes is not indicative of the intensity of the inflammation.
3.3 Using BOP for Motivation
Demonstrating the BOP to a patient utilizing a hand mirror or an intraoral camera is effective in demonstrating gum infection. Patients generally do not relate bleeding from their gums to a disease and feel that it is “normal.” Explain that as it is not normal to have bleeding when they clean their hands with a hand brush, neither is it normal to have bleeding when they brush their teeth (Fig. 3.14). Bleeding from sulcular gingival ulcerations is due to the engorgement and proliferation of blood vessels resulting from the inflammatory process. With advanced gingival inflammation, bleeding might even be provoked by mastication or occlusal trauma on severely loose teeth.
Fig. 3.14
Bleeding from the gingiva following brushing is a sign of gingival inflammation
3.4 Supra- and Subgingival Calculus
3.4.1 Calculus
A mineralized form of dental plaque, which contains soft plaque on its surface. The basic chemicals are calcium phosphate salts.
-
There are two types: supragingival (salivary) and subgingival (serumnal). Salivary calculus is light yellow or tan in color except in heavy smokers where it could have a dark brown color (Fig. 3.15). A light coating of supragingival (salivary) calculus has a light creamy color and is often difficult to visualize for the patient and the clinician.
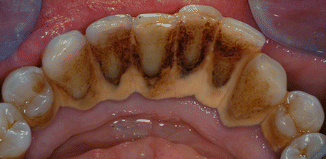 Fig. 3.15Salivary or supragingival calculus is often light tan in color except in heavy smokers or betel nut chewers. This patient smokes cigarettes
 -
Serumnal calculus becomes darker in proportion to the length of time calculus is exposed to the inflamed adjacent gingiva. Subgingival (serumnal) calculus can appear black, which is actually very dark red due to hemosiderin pigment from the breakdown of hemoglobin from red blood cells as a result of the gingival inflammation (Fig. 3.16).
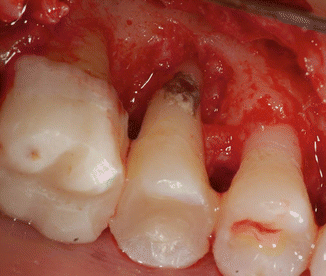 Fig. 3.16Subgingival calculus appears black due to the hemosiderin pigment as a result of bleeding due to the inflammation
 -
With thin gingiva, sometimes moderate to heavy amounts of serumnal calculus can be visualized through the gingiva (Fig. 3.17)
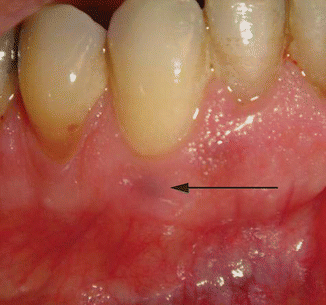 Fig. 3.17Dark serumnal calculus can at time be seen through thin gingiva
3.4.2 Attachment of Calculus to the Tooth Surface
-
Calculus is mineralized dental biofilm (plaque) which is initially attached to the salivary pellicle. The composition of calculus has been determined by x-ray diffraction to contain: brushite (CaHPO4.2H2O), octacalcium phosphate Ca8H2(PO4)5H2O, magnesium-containing whitlockite Ca9(MgFe)(PO4)6PO3OH, and carbonate containing hydroxyapatite Ca5(PO4)3(OH). The surface of calculus is porous and harbors plaque-forming microorganisms seen in this photomicrograph (Fig. 3.18).
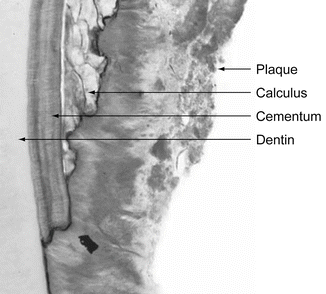 Fig. 3.18A photomicrograph of calculus attached to a tooth showing its porous surface, which collects biofilm
 -
Toxins from the bacterial plaque on the surface of calculus usually elicit an inflammatory response.
-
Calculus on the enamel surface is more easily dislodged than calculus on the root surface, as the enamel is usually smooth and the root surface is porous due to the presence of cementum. Cementum tends to be porous having previously contained Sharpey’s fibers (either gingival fibers or periodontal ligament fibers). This porosity helps to retain calculus (Fig. 3.19). The purpose of subgingival scaling and root planing is to remove calculus and to smooth the cementum and underlying dentin. This then allows for effective subgingival plaque removal by the patient, which if done daily will help to prevent calculus formation (calculus removal will be discussed in detail in Chap. 5).
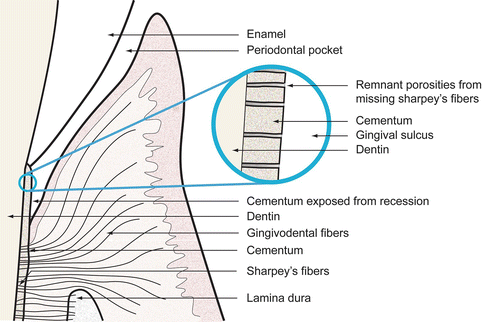 Fig. 3.19As Sharpey’s fibers are embedded into the cementum, with periodontitis the cementum has porosity due to the loss of the fibers
 -
Calculus on the root surface denotes either active or past periodontitis, where it is attached to the cementum or to the dentin if the cementum had been previously removed.
3.5 Detection of Supragingival Calculus Including Instruments, Materials, and Techniques
3.5.1 Supragingival Calculus Detection
As calculus has plaque on the surface, disclosing solution can be used to help detect supragingival (salivary) calculus (see Fig. 3.5). It can usually be detected visually and is best visualized when the teeth are dry. After professional hygiene therapy (scaling and polishing), the teeth should be dried with an air syringe to detect any thin remaining supragingival calculus, which often blends in color with the tooth when wet with saliva and is not detected visually. It is often found on the lingual of the mandibular anterior teeth. In order to detect residual calculus, place a 2×2 gauze square folded into quarters into the lingual anterior vestibule, direct a stream of air to dry the mandibular anterior teeth, and use a mouth mirror to reflect light on the lingual surfaces. A chalky white appearance of calculus might then be visualized indicating incomplete calculus removal (Fig. 3.20). This calculus can provide a rough surface allowing for a rapid collection of plaque and future calculus accumulation.
Fig. 3.20
The color of calculus can blend with the tooth, and air drying it can make it more visible
3.5.2 Subgingival Calculus Detection
Subgingival calculus (serumnal) is best detected by a periodontal explorer. There are a variety of explorers. For this handbook, we will show two, The Tufts #17 and the Old Dominion 11/12. The explorers are generally used for subgingival calculus in an apicoocclusal direction. A complete description of the use of these explorers is found in Chap. 4 (Fig. 3.21).
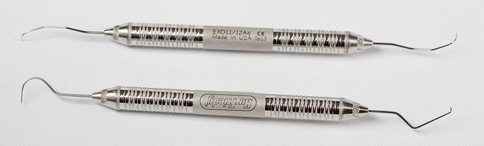
Fig. 3.21
Supragingival and subgingival calculus is detected with the use of the TU-17 or the ODU 11/12 explorer
3.6 Toothbrushes: Manual
Toothbrushes come in a variety of sizes, shapes, styles, handle designs, bristle designs and composition, bristle end designs (rounded or tapered), and bristle composition (natural or synthetic) (Fig. 3.22). There is little research evidence to determine if one brush design is superior to another. The bristle hardness relates to the diameter of the bristle, the length of the bristles, the number of filaments in the tuft, the proximity of the tufts to each other, and the material of which they are made. How often should a toothbrush be changed? Some studies have been done to determine the frequency of changing a toothbrush; however, they are inconclusive. The American Dental Association recommends every 3–4 months; however, that will depend on the technique used for brushing and the force applied to the toothbrush. A recent study showed that a scrub technique of brushing causes more toothbrush deformation than an intrasulcular non-scrub technique. The theory of plaque displacement by a toothbrush bristle is that two objects cannot occupy the same place at the same time and the object of the greater mass will displace the object of the lesser mass. A toothbrush bristle must access the gingival crevice, and its shape (straight) at the end third guides it into the gingival crevice. Thus, it appears that the shape of the toothbrush bristle tip is critical in its efficiency to displace the biofilm subgingivally. With use, the tip of a toothbrush bristle loses its shape, and thus, the brush becomes less effective. A brush used twice a day for 3 months will show deformation, which could limit its subgingival effectiveness in plaque displacement.
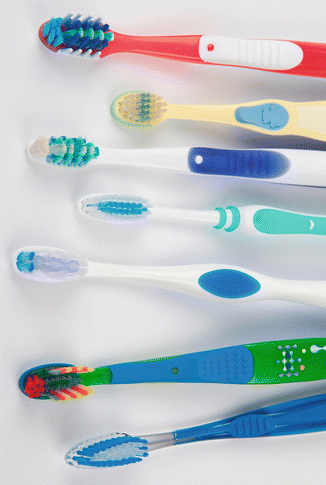
Fig. 3.22
There are a great variety of designs and bristle configurations on the market
The clinician’s determination of what brush type to recommend for an individual will depend upon the patient’s:
1.
Manual dexterity including handicaps
2.
Their gingival biotype
3.
Their alignment of the teeth
4.
The shape of their arch
5.
The number of teeth present (presence of third molars)
6.
The number and position of missing teeth (spaces between the teeth)
7.
The types of fixed prostheses.
In 1943, a physician, Dr. C. C. Bass, former Dean of Tulane Medical School stated, “A clean tooth will not decay. Periodontoclasia does not occur about a clean tooth.” Between 1948 and 1956, he described the Right Kind® toothbrush, a soft multitufted nylon brush with bristle ends that were rounded (Fig. 3.23). In that era, many dentists prescribed an extra-hard natural bristle toothbrush. In the mid-1970s, the Bass brush and technique were accepted by the American Dental Association. The basic Bass idea of using a soft nylon multitufted brush is widely prescribed today with many variations and handle and brush head configurations.
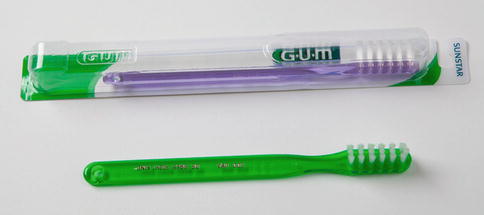
Fig. 3.23
The original design of the Dr. C. C. Bass Right Kind® toothbrush
C. C. Bass’ specifications for the Right Kind® of toothbrush (Fig. 3.23):
1.
Straight handle
2.
Six inches length, 7/16 inch width
3.
Three rows of bristles, 6 tufts per row evenly spaced
4.
Nylon bristles, 80 per tuft, .007 inch diameter, straight trim 13/32 inch length
5.
Hemispherical ends of bristles with no sharp points
6.
Children’s brush similar: 5 inch length, .005 inch diameter bristle, 11/32 inch length
The American Dental Association provides a seal of acceptance by evaluating evidence presented to their Council on Scientific Affairs on the safety of a brush using the following criteria:
1.
All of the toothbrush components are safe for use in the mouth
2.
Bristles are free of sharp or jagged edges and endpoints
3.
The handle material is manufacturer-tested to show durability under normal use
4.
The bristles won’t fall out with normal use
5.
The toothbrush can be used without supervision by the average adult to provide a significant decrease in mild gum disease and plaque
-
Children’s brushes are made to be appropriate for smaller mouths. Adults often can use a child-sized brush more effectively than an adult-sized brush (Fig. 3.24).
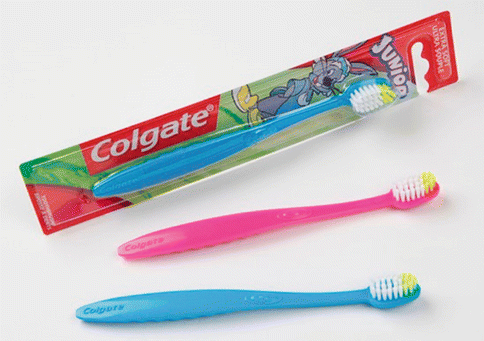 Fig. 3.24The design of the child’s brush is a straight-cut multitufted soft nylon bristle toothbrush
 -
Hand and power toothbrushes are designed for use when fixed orthodontic appliances are in place with the middle rows of bristles shorter than the outside rows (Fig. 3.25).
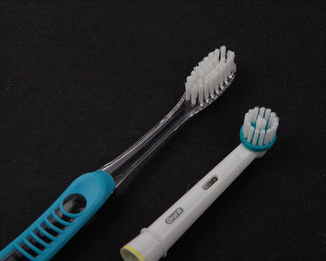 Fig. 3.25Manual and power brushes are made with the middle bristles shorter than the side bristles
 -
End-tuft brushes are designed for specific surfaces of teeth which are difficult to clean due to their position in the mouth or specific anatomical considerations. An end-tuft brush can effectively clean the distal of a terminal maxillary molar where there has been bone loss and there is an exposed class I or II furcation involvement (Fig. 3.26). Creating an end-tuft brush from an adult toothbrush by removing several rows of bristles closest to the handle with a #15 scalpel blade or single-edge razor blade leaving the toe 5–6 rows of bristles creates a custom fit end-tuft brush for individual specific areas (Fig. 3.27).
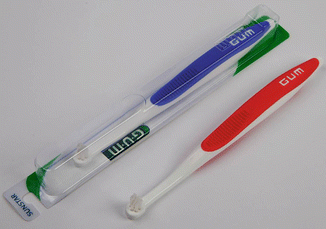 Fig. 3.26Butler Sunstar end-tuft brushes are useful for cleaning proximal surfaces of posterior teeth next to an edentulous area
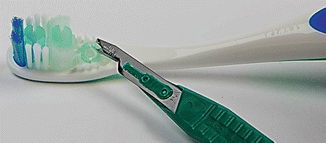 Fig. 3.27The clinician or the patient can create an end-tuft brush by cutting the rows of bristles distal to the toe of the brush
 -
Sulcus brushes or narrow end-tuft brushes with a small diameter of tufts are excellent for cleaning facial or lingual furcations or beneath fixed prostheses (Fig. 3.28).
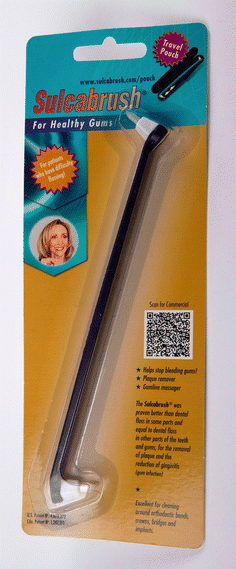 Fig. 3.28The Sulcabrush can be used to clean exposed furcations
3.7 Toothbrushes: Power
It has been shown that whether one uses a hand brush or a power brush, plaque removal can be equally effective. Research demonstrates that power brushes can be more efficient than hand brushes in plaque removal; however, power brushes, like hand brushes, require concentration on the techniques. Patients have a conception that a power brush will automatically do the cleaning for them. There are specific techniques requiring training by a professional when using a power brush, which involve placing the toothbrush bristles into the gingival crevice much like the stationary bristle technique (SBT) to be discussed later in this chapter with a manual toothbrush. An advantage of a power brush is that the technique to use it is not complicated, and the rapid oscillation or strokes makes it efficient. Because of its large handle, it is helpful for those individuals with handicaps or who have problems with grasping small objects to use effectively. Studies also suggest that power brushes enhance consistency.
Stay updated, free dental videos. Join our Telegram channel
VIDEdental - Online dental courses


