, Y. Natalie Jeong1, Robert J. Rudy1 and Daniel K. Coleman1
(1)
Department of Periodontology, Tufts University School of Dental Medicine, Boston, MA, USA
This chapter will take a step-by-step look at the parameters for a comprehensive patient examination and assessment.
Sequence and procedures for a complete periodontal examination:
-
Operatory, Instruments, and material arrangement
-
Patient interview
-
Intraoral and extraoral evaluation
-
Observation of the patient’s plaque control techniques
-
Charting (including but not limited to gingival margin line, mucogingival junction, tooth mobility, fremitus, probing depth measurements, furcation involvement)
-
Evaluation of the presence of plaque and calculus (distribution and location)
-
Dental analysis (restorations, caries, defective restorations, attrition, occlusal analysis)
-
Radiographic findings
-
Intraoral and extraoral photographs
-
Study casts
4.1 Preparation for Patient Encounter: Operatory, Instrument, and Materials Arrangement
Prior to seating your patient, it is important that the operatory is thoroughly disinfected, instruments are sterilized, and the operatory is ready for patient reception.
All contact areas must be thoroughly disinfected and covered with a barrier to prevent cross-contamination between patients.
Any instruments or adjuncts, such as air-water syringe, saliva ejector, or patient napkin that will be used should be positioned in a convenient location for the clinician and assistant.
All instruments should be in a sterilized kit and should remain unopened until the patient is seated. This minimizes the amount of exposure the instruments have to cross-contamination and assures the patient that sterile instruments are being used (Fig. 4.1).
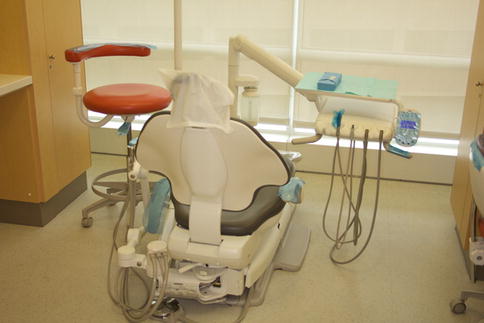
Fig. 4.1
Operatory setup
Prior to seating the patient, make sure that the patient’s dental record, medical history, and most recent radiographs are available to the clinician and have been reviewed.
4.1.1 Patient/Provider Positioning and Operator Visibility
Correct patient position, ergonomics, and visibility decrease the physical strain and fatigue on the operator. Because of the physical nature of dental procedures, it is important for the clinician to have good ergonomics in order to reduce the possibility of developing musculoskeletal disorders. Because most periodontal procedures can be done from a seated position, chair positioning for both the operator and patient are crucial. The objectives of proper ergonomics are to provide physical comfort, proper visibility, efficiency, and protect the health of the patient and clinician.
4.1.1.1 Seating the Patient
-
The dental chair should be easily accessible to the patient.
-
The chair should be low and the back upright with the armchair lowered or opened to allow the patient to sit.
-
Allow the patient to sit.
-
The headrest should be adjusted so that strain is taken off of the patient’s neck in order to ensure patient comfort.
-
Ensure that the patient is given a treatment napkin and safety glasses (Fig. 4.2).
 Fig. 4.2Seating the patient with a napkin and protective eye wear
4.1.1.2 Patient Position (Fig. 4.3)
Fig. 4.3
Patient positioning (a) Upright (b) Semisitting (c) Supine (d) Trendelenburg
There are four general chair positions:
(a)
Upright: This position is used for seating the patient, patient consultation, and the conclusion of the appointment.
(b)
Semi-sitting: The chair is elevated a number of degrees above a level position. This chair position is preferred for instrumentation of mandibular teeth. The chair should be adjusted to approximately 20° with the floor. The patient should have a chin down position for best access to the mandibular arch.
(c)
Supine: The patient is flat, with head and feet at the same level. This chair position is used for instrumentation of maxillary teeth. The patient should have a chin up position for proper access to the maxillary arch.
(d)
Trendelenburg: The patient is positioned with the head below the feet to allow for perfusion of blood to the head and vital organs during dental emergencies.
4.1.1.3 Operator Position (Fig. 4.4)
Fig. 4.4
Seated operator position
-
The operator should be in a comfortable position with seat height positioned low enough so that both feet are flat to the floor.
-
The operator’s feet should be spread apart so that your legs and chair base form a tripod for stability.
-
The operator should be seated back in the chair so that the chair supports the thighs parallel to the floor.
-
The hips should sit at an angle of 90° with the thighs parallel to the floor.
-
The operator’s back should be straight.
-
Both the operator’s head and neck should be upright and follow the contour of the back.
-
The eyes are directed downward to prevent distorting posture.
-
The elbows should be close to the sides and at the level of the patient’s mouth.
-
Forearms while working should be parallel to the floor.
Range of operator positions in relation to the patient: (Fig. 4.5)
Fig. 4.5
Left- or right-handed operator positioning
Commonly the range of clinician positions will be depicted in reference to the position of a clock face.
For a right-handed clinician, the working positions should be between 8 and 1, while left-handed clinicians will work between 11 and 4 (Fig. 4.6).
Fig. 4.6
Operator positioning: Position (a) provides access to tooth surfaces drawn in diagram;(d); Position (b) provides access to tooth surfaces depicted in diagram (e); Position (c) provides access to tooth surfaces seen in drawing (f)
Although the above are guidelines for clinician and patient positions to access and treat specific areas of the mouth, it is important to note that each clinician will develop a comfortable position for patient care that is most suitable for them.
4.1.1.4 Visibility
Maximum visibility is a prerequisite for success in dental procedures. Visibility in dentistry includes both lighting and magnification of the working field.
Lighting
Overhead lighting: The majority of dental providers use an overhead light that is either fixed to the dental chair or fixed to the ceiling above the dental chair. Overhead lighting will help to visualize the working area and prevent musculoskeletal disorders. The overhead light should be positioned to parallel the operator’s line of sight in order to reduce shadowing. In order to parallel the clinician’s line of sight, the light should be slightly behind and to one side of the operator’s head (Fig. 4.7).
Fig. 4.7
Light positioning for maxillary and mandibular arches
Head-mounted lighting: Head-mounted lighting has become very popular in dentistry over the recent years. As technology has improved and head-mounted lighting has become lighter and its battery source smaller, it has become popular for clinicians to wear a “loupe light” throughout the day. The loupe light can be either worn over the head separately from the clinician’s eyewear or can be fixed to its frame. Head-mounted lights can provide high-intensity light to a focused area while approximating the clinician’s line of sight more accurately than overhead lighting. Additionally, this decreases the need for adjustment of overhead or chair-mounted light (Fig. 4.8).
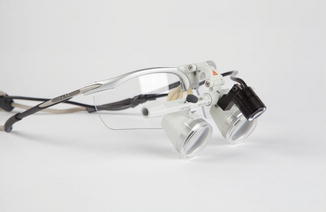
Fig. 4.8
Loupe mounted light
Magnification
Dental magnification has become a standard piece of equipment used by many dental professionals. There are many advantages to using magnification for both the clinician’s well-being and quality of patient care.
Magnification provides the following:
-
Improved ergonomics: Dental magnification reduces the need to hunch, lean, and bend in order to visualize the working area. This allows the practitioner to sit at a proper working distance and reduces posture-related injuries.
-
Improved visibility of the working area: Magnification allows the clinician to see better detail that improves confidence and patient care.
-
Reduced eyestrain: Increased magnification reduces strain on the eyes, preventing the immediate and long-term effects of eyestrain.
-
Improved patient care: The confidence provided by magnification is helpful in providing improved patient experiences.
Available magnification devices include dental loupes, magnification lenses, dental operating microscopes, and procedure scopes (extraoral cameras). Most commonly used for periodontal care are the following:
-
Dental loupes: Loupes are the most frequently used form of magnification in dentistry. Dental loupes come in both fixed-mounted (“through the lens”) and front lens-mounted (“flip-up”) varieties and range from 2 to 6 times magnification. Properly adjusted loupes should allow the provider to visualize the working area while maintaining appropriate posture. This is accomplished through properly fitting the loupes to adjustment of interpupillary distance, declination angle, and working distance (Fig. 4.9).
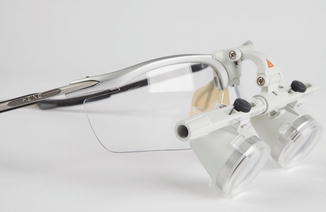 Fig. 4.9Dental loupes
 -
Magnification lenses: Magnification lenses are used when minimal magnification is required. Magnification lenses rarely provide more than two times magnification. They provide a large field of vision, improved visibility over traditional lenses, and are lightweight so they do not strain the head and neck decreasing the risk of work-related injury (Fig. 4.10).
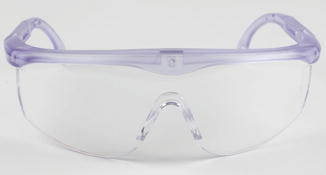 Fig. 4.10Magnification lenses
4.2 Patient Interview and Initial Examination
Initial patient interviews and data gathering are vital to the initial exam. Initial data, medical history, dental history, and social history are commonly gathered through a patient questionnaire and followed by an interview. In this interview, there are a number of questions that should be answered, which include the following (Fig. 4.11):
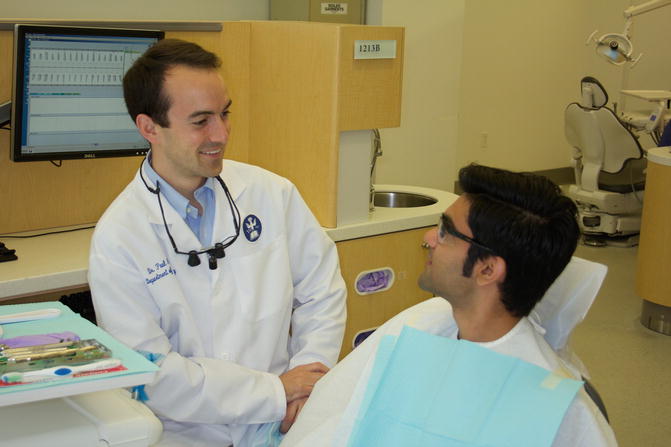
Fig. 4.11
Patient interview
4.2.1 The Patient’s Chief Complaint
-
This is a concise statement of a symptom or group of symptoms for which the patient is seeking care at this moment.
-
“What brings you to the office today?”
4.2.2 Patient’s Expectations
-
“What are your goals and objectives in our office?”
-
“How may we help you?”
4.2.3 Baseline Vitals (Fig. 4.12)

Fig. 4.12
Taking baseline vital signs
-
Blood pressure
-
Pulse
-
Respirations
-
Body mass index
4.2.4 Medical/Social History (Fig. 4.13)
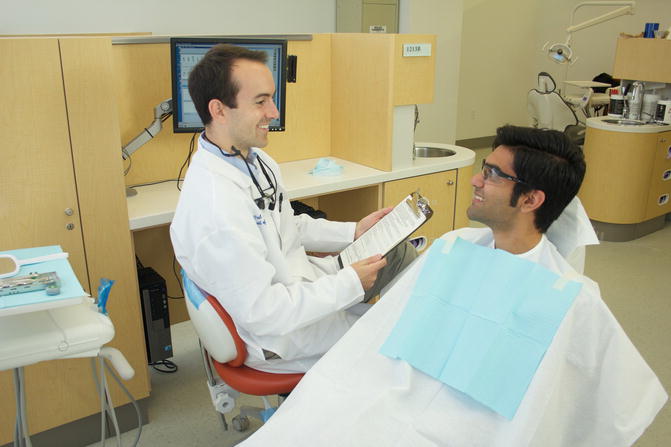
Fig. 4.13
Medical and social history taking
-
Are there pertinent medical conditions that need to be considered prior to treatment (i.e., joint replacement or anticoagulant therapy), and does the patient have any systemic conditions that could contribute to their current disease state (i.e., uncontrolled diabetes)?
-
Obtain a complete list of medications and analyze these medications for drug interactions, contraindications, and interferences to therapy.
-
Any drug, food or other allergies must be obtained and recorded.
-
Obtain a social history of tobacco use and alcohol abuse.
-
Discuss and record patient’s nutritional habits.
4.2.5 Dental History
-
Discuss your experiences with previous dental care
-
Has the patient been exposed to preventive dentistry before?
-
How often does the patient brush and floss their teeth?
-
Has the patient had previous periodontal care? If so what, and how often have they been seen for periodontal maintenance in the past?
-
How long has it been since their last periodontal maintenance visit?
-
A periodontal history should be obtained including history of bleeding gums, changes in tooth position, tooth pain, halitosis, and reasons for previous tooth loss.
4.2.6 Daily Oral Hygiene Habits (Fig. 4.14)
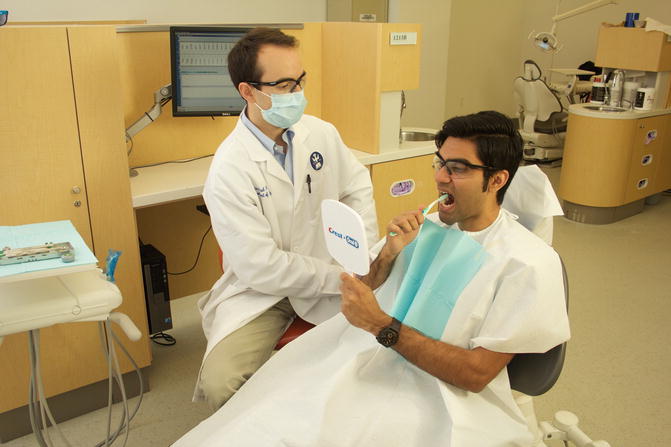
Fig. 4.14
Observation of the patient’s oral hygiene techniques is always done before doing periodontal charting
-
Ask the patient to demonstrate toothbrush and flossing technique so that you have a baseline of the patient’s dexterity and knowledge of their home-care techniques.
-
Ask about the frequency of the patient’s home-care habits and what the patient uses to maintain their oral health.
-
This step is critically important in knowing your patient’s understanding and use of dental hygiene instrumentation.
-
It is critical to do this prior to the intraoral examination so that a baseline of patient home care is obtained, and as the examination is being done, the findings can be related to what was visualized when the patient demonstrated their techniques. Hygiene instruction should follow the completion of the examination.
4.2.7 Oral Habits
Does the patient clench, grind, use toothpicks, suck thumb, etc.
4.2.8 Extraoral Exam (Fig. 4.15)
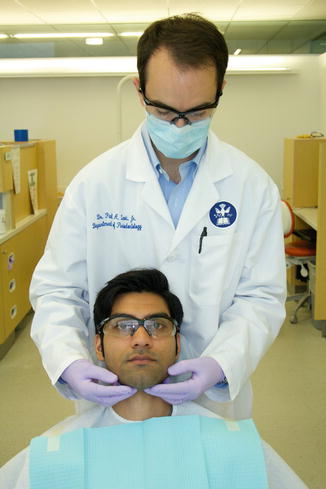
Fig. 4.15
Extraoral exam
-
A visual examination should be observed as the patient enters the office; take note of the patient’s gait, mobility, facial asymmetries, scars, or lesions.
-
The examination of the soft tissues of the head and neck should be conducted to check for asymmetries, lymph node examination, and temporomandibular joint function.
-
If any enlargement, tenderness to palpation, ulceration, or abnormalities are present, this must be noted; the patient must be advised and treated accordingly.
-
Palpation of muscles of mastication for tenderness, swelling or asymmetry.
4.2.9 Intraoral Soft Tissue Examination
-
In order to conduct an appropriate intraoral soft tissue examination, the practitioner must evaluate the lips, labial mucosa, buccal and vestibular mucosa, hard and soft palates, tongue, floor of the mouth, gingiva, and alveolar mucosa.
-
When examining intraoral structures, the practitioner should note color, texture, and degree of salivary flow.
-
Any swelling, ulceration, palpable masses, or tenderness should be noted, taking into account whether those structures are movable or non-movable. The size and location of the lesion should be charted if immediate treatment is not required; prompt follow-up is necessary.
4.2.10 Gingival Tissue Evaluation
Most periodontal diseases are inflammatory in nature. These clinical changes are phenomena occurring due to underlying pathologic changes. This inflammation can be described clinically as changes in color, shape, size, consistency, and surface texture.
Color: Factors that affect gingival color are vascular supply, thickness of epithelium, degree of keratinization, and melanin pigmentation. If tissues are inflamed, they will appear erythematous or cyanotic. A distinction should be made as to the extent of this change. The location of the inflammatory change is important. Are these changes confined to the marginal tissues or have they diffusely spread to the alveolar mucosa (Figs. 4.16 and 4.17)?
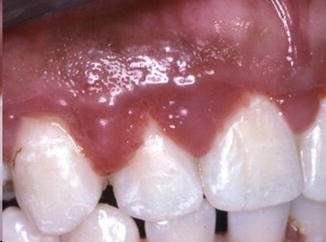
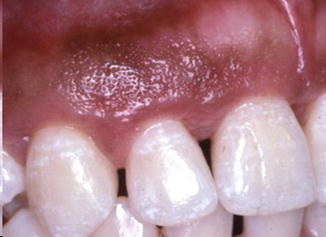
Fig. 4.16
Inflammed gingiva
Fig. 4.17
Healthy gingiva
Size: Inflammatory gingival enlargement consists of infiltration of white blood cells, along with tissue edema, a proliferation of endothelial cells, and a proliferation of connective tissue cells with the production of new collagen fibers and a hyperplasia of the epithelium. At times the gingival tissues may become enlarged due to neoplasms, systemic disease, or systemic drug administration.
Shape: In health, the gingiva should closely adapt to the tooth surface with knife-edged margins. The facial or lingual surfaces of the papilla are flat or slightly concave. With the presence of inflammation, papillas may be blunted, flattened, bulbous, or cratered depending on the disease present, and cervically the gingival margin may appear rolled.
Consistency: Healthy gingival tissue should be firm when pressure is applied with the side of a periodontal probe. Increased fluid in inflamed tissue may cause the gingiva to become soft, spongy, and non-elastic. To evaluate these changes, evaluate both the marginal and attached gingiva.
Surface texture: In health, gingival tissue should appear stippled. As the gingiva becomes edematous, this excess fluid causes the tissues to appear smooth and possibly shiny. At times stippling is not present in healthy gingiva due to the gingival biotype. A thin biotype tends to exhibit less stippling than a thick gingival biotype.
Gingival recession: Under normal circumstances, the gingival margin should be located slightly coronal to the cementoenamel junction. If the gingival margin is located apical to the cementoenamel junction, recession has occurred.
Amount of attached gingiva: Assess the width of attached gingiva through the use of the side of a periodontal probe on the alveolar mucosa and roll coronally to identify the mucogingival junction. The band of attached keratinized tissue is generally wider in the maxilla than mandible; it also follows that the widest zone of keratinized tissue is found in the maxillary incisors and is narrowest in the mandibular premolars.
Biotype: When a periodontal probe is inserted into the gingival sulcus, an assessment can be made regarding tissue biotype. If the probe is visible through the tissues, the tissue is considered thin. If the probe is not visible, the biotype is considered thick.
Occlusal Analysis: This should include recording of fremitus, tooth mobility, centric relation prematurity, tooth contacts in lateral and protrusive excursions, attrition, plunger cusps, overbite, overjet, and maximal jaw opening along with record of temporomandibular joint dysfunction (pain, clicking, cracking, locking).
After conclusion of the patient interview and initial patient examination, a complete periodontal charting must be done.
4.3 Periodontal Charting
4.3.1 Probing Depth Measurements (Fig. 4.18)
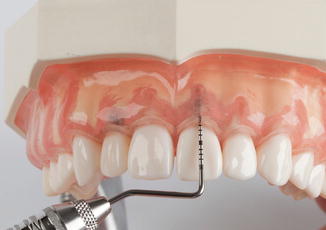
Fig. 4.18
Probing depth measurement
An accurate probing depth measurement is key to the correct diagnosis of a patient’s periodontal status. Without an understanding of the location of clinical attachment loss, the anatomy of the pocket, and tooth structure, proper treatment will not be possible.
4.3.1.1 Defining Probing
Probing refers to the gentle use of a thin metal or plastic ruler, known as a periodontal probe, to identify the level of the junctional epithelial attachment on a tooth surface. For this text we will show the UNC 1-15mm probe. A further discussion of periodontal probes is found in Chap. 5.
Probing gains insight into soft tissues, presence of bleeding, bone loss, bone architecture, presence of calculus, furcation involvement, and root anatomy.
4.3.1.2 Important Distinctions in Definitions
Probing depth: A measurement in millimeters obtained by using a periodontal probe.
Sulcus depth: A physiologic (non-inflamed) space bounded by tooth surface, the junctional epithelium, and the free marginal gingiva (generally 1–3mm)
Pocket depth: A pathologically deepened sulcus (often greater than 3 mm)
Clinical attachment level: The distance of exposed root structure from the CEJ to the most coronal level of the junctional epithelium
Generally, six areas are recorded for each tooth in a periodontal charting. These areas include mesiobuccal, mid-buccal, distobuccal, distolingual, mid-lingual, and mesiolingual measurements. The deepest measurement from each area should be recorded (Fig. 4.19).
Fig. 4.19
The six areas used when making probing depth measurements
In order to enhance identification of periodontal defects, five positions on the buccal surface of the maxillary and mandibular molars and the lingual of the mandibular molars are recorded (e.g., mesiobuccal, mid-root mesial root, mid-buccal, mid-root distal root, and distobuccal).
4.3.1.3 Correct Periodontal Probing Technique
Probe Insertion
-
Grasp the probe with modified pen grip.
-
Establish proper finger rest position.
-
Hold probe flat against tooth surface.
-
Gently insert probe under the gingival margin.
-
Holding the probe parallel to the long access of the tooth, maintain contact with the tooth.
-
Move probe along the tooth surface towards the apex of the tooth until you reach the bottom of the pocket/sulcus.
-
The bottom of the pocket/sulcus will feel soft and elastic (Fig. 4.20).
 Fig. 4.20Proper probing to the base of both a periodontal pocket (a) and gingival sulcus (b)
4.3.1.4 Interferences/Obstruction (Fig. 4.21)
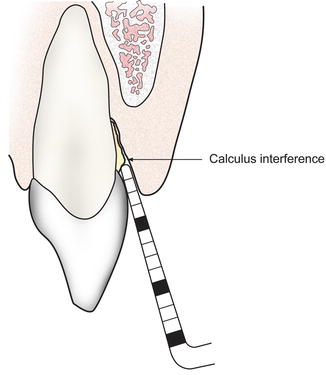
Fig. 4.21
Calculus interference while attempting to probe
-
You may feel interferences or obstruction while probing. The majority of probing interferences are from calculus on the root surface; however, root anatomy, food particulate, improperly contoured restorations, or furcation involvement may also serve as probing interferences.
-
If you feel an interference while probing and do not feel that you have reached the base of the sulcus, lift the probe laterally over the edge of interference and follow it apically until the probe touches the tooth surface and rests on the soft coronal aspect of the epithelial attachment.
-
Always ensure that the probe tip is contacting the tooth surface when in contact with the base of the pocket in order to ensure a proper reading, minimal soft tissue damage, and minimal patient discomfort. In many instances, the weight of the probe will carry the tip to the base of the sulcus/pocket without pressure from the clinician.
4.3.1.5 Pressure While Probing
-
There should be gentle lateral pressure used to maintain contact with the tooth.
-
The pressure must be gentle enough to maintain tactile sensitivity of root anatomy and calculus.
-
At the base of the sulcus/pocket, use enough pressure to provide tactile sensitivity of contact with the attached tissue.
-
Too much pressure will not allow for tactile sensation of the pocket, which can result in incorrect probing depth measurement by probing through the epithelial attachment and causing discomfort to the patient.
-
Appropriate probing pressure should be 25 g. Because a scale for measurement is not generally present, 25 g of pressure generally equates to the pressure needed to depress the pad of the thumb 1–2 mm (Fig. 4.22).
 Fig. 4.22Demonstration of the appropriate pressure while probing: slight depression the thumb pad noted
4.3.1.6 Circumferential Probing
Periodontal probing gives us insight into the subgingival environment and periodontal attachment, and the circumferential probing technique allows us the best opportunity to gain understanding of that attachment (Fig. 4.23).
Fig. 4.23
Circumferential probing
-
Once you have established the base of the sulcus, a “walking” stroke should be used where the probe is moved coronally about 2 mm and then touched back to the base of the sulcus in repetition as you advance the probe around the tooth.
-
Maintain the probe in the sulcus/pocket as you advance the probe.
Avoid spot probing while examining a periodontal pocket. Spot probing only serves as a cursory screening of those minute surfaces where the probe has been inserted.
4.3.1.7 Interproximal Probing (Figs. 4.24 and 4.25)
Fig. 4.24
(a, b) Interproximal probing
Fig. 4.25
Interproximal probing at (a) periodontally healthy and (b) crater defects
Interproximal probing is commonly the most difficult area to probe accurately. Due to the angulation that must be used while probing the interproximal areas under the contact point, there can be inherent inaccuracy in this measurement. In order to minimize a discrepancy in the interproximal measurement, a correct technique must be used as described below.
Stay updated, free dental videos. Join our Telegram channel
VIDEdental - Online dental courses


