, Y. Natalie Jeong1, Robert J. Rudy1 and Daniel K. Coleman1
(1)
Department of Periodontology, Tufts University School of Dental Medicine, Boston, MA, USA
5.1 Principles for Proper Use of Periodontal Instrumentation
5.1.1 Grasp
The term “grasp” refers to how the instrument is held by the clinician. There are a number of techniques to grasp an instrument. They include the pen grasp, modified pen grasp, and the palm and thumb grasp:
-
Pen grasp: The thumb, index finger, and middle finger are used to hold the instrument as a pen is held with each of the fingers engaging the instrument handle.
-
Modified pen grasp: This grasp ensures greatest control in performing intraoral procedures and is used as the primary grasp when using periodontal instrumentation. This grasp allows precise control of the working end, permits a wide range of movement, and facilitates good tactile conduction. The grasp is modified from the pen grasp by holding the instrument with thumb and index fingers at the junction of the handle and shank, while the middle finger rests on the shank of the instrument (Fig. 5.1).
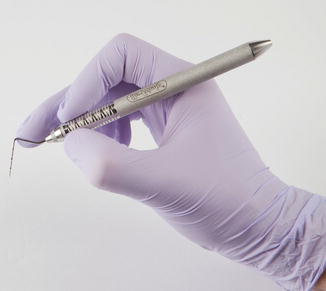 Fig. 5.1Modified pen grasp
 -
Palm and thumb grasp: This grasp is primarily used for stabilizing instruments during sharpening and for manipulating air and water syringes.
-
Palm grasp: The instrument is held securely in the palm of the hand. This grasp is commonly used while using dental forceps.
5.1.2 Wrist Position
In order to decrease the risk of injury and a musculoskeletal disorder, the wrist should always be in a neutral position. In this position, the wrist should be parallel to the long access of the forearm. Maintaining your working area at the level of the elbow assists in a neutral wrist position. The wrists should not be in flexion or extension while working (Fig. 5.2).
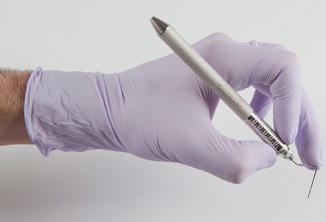
Fig. 5.2
Proper wrist position
5.1.3 Fulcrum (Finger Rest Position)
The support or point of finger contact on a tooth surface, on which the hand turns while moving an instrument. By providing a hand support, a proper finger rest position will allow for more precise instrumentation and tactile sensitivity of the working area.
5.1.3.1 Types of Finger Rest Positions
Intraoral
The intraoral fulcrum is the preferred finger rest position for hand instrumentation. Because of its proximity to the working area and the hard surface stabilization, the intraoral finger rest is the most stable and most precise rest position.
Establishing an Intraoral Finger Rest
-
Apply your finger rest in the same arch as the instrumentation to be performed.
-
Use the occlusal surface of the nearest tooth to treatment as possible; this may be 1–3 teeth from the working area.
-
Use your ring finger to contact the occlusal surface and initiate your rest.
-
Depending on the location of the mouth in which you are working, the occluso-buccal or occluso-lingual line angles of the teeth may be more comfortable rest locations.
-
Keep your ring finger straight with the tip of the finger supporting the weight of the hand.

Other adjunctive intraoral finger rests include opposite arch, cross arch, and finger on finger.
Extraoral
The extraoral finger rest is used when intraoral finger rests are not accessible or when only minimal pressure is required of the instrument being used (i.e., as a rest for a mouth mirror). This is common for the instrumentation of maxillary posterior teeth and the secondary instrument in the non-working hand.
Extraoral finger rests are dependent on broad surface area, adequate pressure, and extended grasp.
Establishing an Extraoral Finger Rest Position
-
Broad tissue surfaces and facial bone support are necessary for adequate pressure to be applied without discomfort to the patient. Common areas to be utilized are the chin, zygoma, and angle of the mandible.
-
Adequate pressure must be applied so that instrument precision can be achieved. Without adequate pressure, the working stroke of the instrument will lack control.
-
Because the extraoral fulcrum point is further from the working area, an extended grasp is necessary while using this technique. The fingers will be drawn back from the modified pen grasp position and with the same orientation of the fingers the instrument will be grasped by the handle.
Disadvantages of an Extraoral Finger Rest
-
When heavy pressure is applied while scaling an extraoral finger rest can cause patient discomfort, instability of the instrument, and less control during instrumentation.
-
Due to potential complications with an extraoral finger rest. The authors of this book recommend that this technique only be used for diagnostic instruments such as support while using a mouth mirror or as a point of stability while giving local anesthesia.
5.1.4 Adaptation
Once you have ensured proper grasp and fulcrum point, it is time to adapt the instrument to the tooth surface. The instrument should be adapted for maximal efficacy of the working surface or blade of the instrument. Depending on whether the instrument is a diagnostic instrument or treatment instrument, this position may differ. No matter what instrument is being adapted to the treatment area, tooth form and anatomic variations should be considered so that the instrument can have maximal effective contact with the tooth surface.
5.1.5 Angulation
Defined as the angle formed between the blade of an instrument and a tooth or tissue to provide increased access and optimal instrument efficiency. Proper instrument angulation is variable depending on the type of instrument being used.
This concept will be discussed in further detail when describing proper instrument technique for universal and area-specific curettes in section 5.4.2.1.
5.1.6 Lateral Pressure
This refers to the pressure exerted on the instrument against the tooth. Lateral pressure is variable depending on the treatment being performed.
-
Diagnostic instruments: Probes and explorers use light but definitive pressure for maximal tactile sensitivity.
-
Scaling and root planing instruments: Use controlled moderate to heavy pressure for complete crown and root surface debridement.
-
Sonic, ultrasonic, piezoelectric instruments: Use light but definitive pressure for complete removal of calculus without damaging the tooth surface.
-
Cleansing and polishing instruments: Light to moderate pressure should be applied while using these instruments to ensure application of paste or polish without allowing the instrument to slip off of the tooth surface.
5.1.7 Strokes (Activation of the Instrument)
Once again, the stroke performed is dependent on the treatment being rendered and will be covered in detail under the description of each of these procedures.
5.1.7.1 Types of Strokes
-
Pull stroke: The pull stroke is the most common stroke performed for calculus removal by hand scalers and curettes (Fig. 5.5).
 Fig. 5.5Pull stroke: in an apico-occlusal direction
 -
Push stroke: Used primarily with the use of a chisel scaler.
-
Combine push and pull stroke: Used while walking an explorer or probe through the sulcus.
-
Walking stroke: Used with explorers and probes for diagnostic information (Fig. 5.6).
Strokes may be performed in vertical, horizontal, or oblique motions.
Fig. 5.6
Walking stroke
5.2 Periodontal Instrumentation: Armamentarium
5.2.1 Classification of Periodontal Instruments
-
Diagnostic
-
Scaling, root planing, and curettage
-
Sonic, ultrasonic, piezoelectric
-
Cleansing and polishing instruments.
5.2.2 Introduction to Periodontal Instruments (Fig. 5.7)
Fig. 5.7
Instrument nomenclature
-
Handle: The part of a periodontal instrument used for holding the instrument. Handles can come in different diameters and grip styles for comfort and tactile sensitivity.
-
Shank: A cylindrical length of metal located between the handle and the blade of the instrument. The shank is an extension device that increases the length of the instrument. The shank is generally much smaller in diameter than the handle and may taper to meet the diameter of the blade. The shank may be straight, or it may be bent in one or more places to facilitate correct positioning of the blade surface with the tooth. The region of the shank closest to the blade is known as the terminal shank.
-
Blade: The blade or “working end” of the instrument is the terminal length of metal, which begins at the end of the shank. The shank is cylindrical and smooth, whereas the blade is usually flattened or sharpened to facilitate the function of the instrument. The blade end can have many different configurations; some are pointed and sharpened for calculus removal, while others are wirelike for exploring the tooth surface.
The blade is composed of the toe or tip, lateral surfaces, face, back, and cutting edges.
For curettes and scalers, the blade can be further broken down in to the shank 1/3, middle 1/3, and toe 1/3 (Fig. 5.8).
Fig. 5.8
Curette blade nomenclature
5.3 Diagnostic Instruments
5.3.1 Dental Mirror or Mouth Mirror (Fig. 5.9)
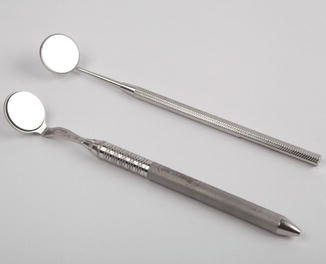
Fig. 5.9
Intraoral mirrors
There are many variants of the dental mirror in different sizes and mirror characteristics. Independent of the mirror selected, the dental mirror is used to provide indirect vision, retraction, and indirect illumination.
5.3.1.1 Indirect Vision
This allows the clinician to view areas of the mouth or tooth that would not be easily seen directly without distorting the body such as occlusal surfaces of maxillary posterior teeth or lingual tooth surfaces.
5.3.1.2 Retraction
This is a common use for the dental mirror and allows for better visual access and instrument access to the working area.
5.3.1.3 Indirect Illumination
Dental mirrors are used as a source of indirect light to the working area. This is accomplished by reflection of overhead light off of the mirrored surface towards the area of interest. Commonly used for maxillary and mandibular lingual surfaces.
5.3.1.4 Transillumination
Used to redirect light through a tooth in order to detect caries or changes in tooth density.
5.3.2 Air/Water Syringe
The air/water syringe can be useful in clearing saliva and debris and drying the treatment area for improved visibility.
-
A dry working area will allow for proper visualization of supragingival calculus. Light-colored calculus deposits can be hard to see when wet. When dried, a light colored calculus deposit will appear chalky.
-
Drying the area will also make it easier to identify carious lesions, calculus, demineralization, and defective restorations.
-
Air application can also be used to access gingival health and pathology such as pemphigus vulgaris.
5.3.3 Periodontal Probes (Fig. 5.10)
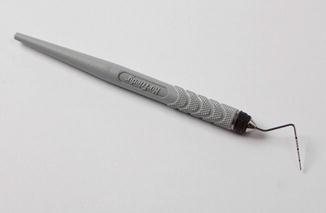
Fig. 5.10
UNC 15 mm periodontal probe
The periodontal probe, introduced to the dental profession in 1925, by Dr. F. V. Simonton, has proven itself to be, over the following decades, an essential component of the modern dental diagnostic armamentarium. While its specific applications are varied, this single instrument has the potential to provide the clinician a vast array of information regarding the clinical health status of the supporting periodontal tissues. Periodontal probes are typically tapered rod-shaped instruments with millimeter markings to aid the practitioner in measuring the depth of a gingival sulcus or periodontal pocket. Flat periodontal probes have also been designed.
Examples of commonly used manual periodontal probes (Fig. 5.11):
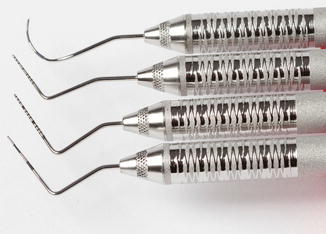
Fig. 5.11
Periodontal probes
-
UNC 15 mm probe: 1 mm markings and color coding at 5 mm, 10 mm, 15 mm markings
-
Marquis color-coded probe: 3 mm color-coded markings
-
Williams probe: 1–10 mm markings
-
Nabers furcation probe: 3 mm color-coded markings and curved blade for adapting to furcation areas
5.3.4 Periodontal Probing: What Is Its Value?
Ten very important noninvasive applications of the periodontal probe are listed below. As all clinicians are responsible for monitoring the periodontal health status of their patients, they must be cognizant of the probe’s importance, be familiar with its applications, and have the knowledge to use it correctly. Furthermore, they must understand and appreciate the significance of the information derived from the careful use of the probe, which will then be coordinated, with the other clinical data gathered at a comprehensive examination, into recommendations to the patient that will best serve their interest in treating and preventing dental diseases. Periodontal probes are primarily used to make a detailed assessment of the periodontal pocket, its depth, and degree of inflammation as evidenced by bleeding on probing. This assessment is critical in determining the severity of gingival or periodontal disease; however, even more information is gathered by the clinician as evidenced by the following ten applications.
5.3.5 The Ten Critical Applications of the Periodontal Probe
1.
Determine the level of the epithelial attachment (junctional epithelium) on the tooth.
2.
Determine the depth of gingival or periodontal pockets.
3.
Determine the presence of bleeding on gentle application.
4.
Determine the presence of subgingival deposits of calculus.
5.
Determine the coronoapical width of the keratinized gingiva.
6.
Determine the coronoapical width of the attached gingiva.
7.
Determine the amount of visible recession.
8.
Determine the amount of attachment loss.
9.
Determine the presence of mucogingival defects.
10.
Determine the three-dimensional architectural details of crestal bony defects and furcation defects.
5.3.6 Functions of the Periodontal Probe
-
Make a detailed assessment of the gingival sulcus and periodontal pocket. This includes pocket depth measurement; shape, consistency, and anatomy of the pocket; bleeding on probing; and extent of inflammation.
-
Measure clinical recession from the cementoenamel junction to the crest of the marginal gingiva.
-
Provide a mucogingival assessment: Assess the margin of attached gingiva by rolling the alveolar mucosa coronally with the side of the periodontal probe, measuring the total width of the keratinized gingiva, and then subtracting the probing depth from the total width of the gingiva.
-
Assess clinical attachment loss by measuring the distance from the cementoenamel junction to the most coronal aspect of the epithelial attachment.
-
Bone sounding used to ascertain the three-dimensional aspects of the bony architecture.
5.3.7 Automated Periodontal Probes
Automated periodontal probes have been designed to try to obtain more consistent probing measurements. Most automated probes do this by taking a reading utilizing a specified probing force. This can be helpful in standardizing probing depth measurements in a calibrated manner especially when doing research projects pertaining to probing depths.
5.3.8 Explorers
Explorers are typically slender curved metal instruments used for tactile sensation and detection of calculus, caries, root anatomy, restorative overhangs, etc.
Functions of the Explorer
-
Detect supragingival and subgingival calculus.
-
Evaluate demineralization, caries, and faulty restorations.
-
Evaluate root form anatomy, root irregularities, and complicating factors to proper instrumentation.
-
Evaluate success and completeness of treatment.
Commonly used explorers in periodontics are TU 17 (Tufts University) and ODU (Old Dominion University) (Fig. 5.12).
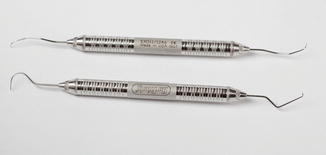
Fig. 5.12
Explorers
5.3.8.1 TU 17–23 (Fig. 5.13)
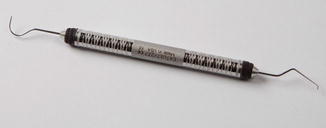
Fig. 5.13
TU-17/23 explorer
TU-17
TU-17: TU-17 is designed as a proximal and subgingival explorer. Its narrow diameter and short blade allow for tactile sensitivity and can be adapted to the line angles of narrow root surfaces without damaging the sulcular epithelium. Due to its short working end, the TU-17 is not ideal for examining pits and fissures.
No. 23
No. 23: Known as the shepherd’s hook explorer for its shape, No. 23 is wide in diameter and rigid in construction. This explorer is ideally used for examining dental caries in pits and fissures and supragingival smooth surfaces. Due to its shape and size, it is not easily adaptable subgingivally.
Stay updated, free dental videos. Join our Telegram channel
VIDEdental - Online dental courses


