5
Prefabricated Implant Abutments
Department of Restorative Dentistry, University of California at San Francisco, CA; Graduate Prosthodontics, Indiana University, Indianapolis, IN; and Private Practice, Roseville, CA
Introduction
Over the past 35 years the number and variety of prefabricated implant abutments has increased significantly. Short span and single teeth replacements with Branemark implants were first reported by Jemt in 1986 using modified abutments. In the same year Sullivan (1986) and Krogh (1986) each published independent papers on treating partially edentulous areas with fixed implants supported prosthesis. This chapter starts with a historical account of the development of prefabricated implant abutments.
Chronological Development of Prefabricated Abutments
The original Branemark abutment was a hollow cylinder with a mated internal hexagonal that fixed over the top of the implant and projected through the soft tissue and was secured with an abutment screw that was tightened into place. This “standard” abutment, also know as a “flat top,” came in a variety of heights and was primarily intended to support a hybrid fixed denture. The prosthesis design incorporated machined gold cylinders that were cast as part of a metal framework intended to receive porcelain that fitted intimately against the standard abutment and was held in place with gold prosthetic screws.
Historically, the first fixed, partial denture, cementable abutment designs were threaded tapered posts that screwed into the body of the dental implant. Manufacturers such as Core-Vent, Calcitek, and Implant Innovations introduced one-piece screw-in abutments to secure cemented crowns and bridges (Niznick and Misch 1988). These components were hand tightened or ratcheted into the threaded recessed area within the implant. Initial designs had no antirotational element incorporated. Some manufacturers did incorporate thread timing so that, if an indexing flat was incorporated on the post, the same orientation could be achieved repeatedly. The post could be modified inside or outside of the mouth to correct minor angulation changes and vertical height modifications. Perfect realignment and orientation was often difficult with these designs and abutment loosening did occur.
Another early approach was to cement the abutment post into a recess within the implant body (Niznick and Misch 1988). Additional modification led to a combination threaded/cementable recess within the implant body. The neck of some of the abutment posts had a smaller diameter waist that would allow bending to alter head angulation. This offered some challenges if the abutment came loose and had to be re-cemented or had to be removed if the neck of the abutment fractured.
Some implant companies created additional “standard” abutments with shorter length sleeves that could be used for crown and bridge applications. Even with these additional components, crown and bridge applications were severely limited from an esthetic standpoint. Since the platform size of the screw in abutment typically matched that of the implant, the resulting emergence profile of the metal-ceramic restoration did not replicate that of a natural tooth. Considerable efforts, however, were made by many clinicians and technicians to overcome this liability with custom milled bars, substructures, and metal-ceramic superstructures.
A significant breakthrough occurred with the development of the plastic UCLA abutment (Lewis et al. 1988, 1992). This design eliminated the need for an intervening component since it engaged the implant hexagonal interface directly. Initially it consisted of a plastic sleeve that could be modified with wax and cast in metal-ceramic to support the porcelain. The component also had a larger securing screw that resisted much higher bending loads. Multiple implant supporting units could be incorporated into a metal-ceramic fixed partial denture (FPD) with a more pleasing natural emergence profile and greater resistance to loosening. The biggest disadvantage of the abutment was the inherent casting error at the implant–abutment interface (Kan et al. 1999; Silveira et al. 2002).
The next logical step occurred when a UCLA-type sleeve was prefabricated into a metal chimney abutment with multiple flats. It served as a stand-alone abutment that would accommodate a PFM-cemented restoration. The resulting restoration has a more acceptable emergence profile and no screw access hole to compromise the occlusal surface. Another significant advantage of the stock preformed metal abutments over the castable plastic abutments is the improved implant–abutment interface fit. This design led others to follow suit with more prosthetic-friendly designs that incorporated slight tapers (2 to 5 degrees) (Byrne et al. 1998).
Clinicians and manufacturers soon recognized that abutments that allowed angulation changes were a necessity (Drago 1991). Implant systems with antirotational implant–abutment interfaces introduced two-piece abutments consisting of an abutment fastening screw and an angled clinical abutment component that changed direction from the long axis of the implant to a specified angle offset. This is most helpful in the maxillary arch where the incisor root axis is at about 60 degrees with the horizontal plane and progresses with a less acute angle posteriorly to the second molar (Chandra et al. 2008).
Since the placement of an implant typically follows the central axis of the alveolar process, the projected implant axis would penetrate the facial or buccal aspect of the clinical crowns. To avoid this, abutments with angulation offsets are available ranging from 12 to 30 degrees. In most instances the prefabricated abutments would still require some modification. Typically it involves a reduction in height and modification of the wall alignment with adjacent abutments to facilitate draw. Initially, the angled abutment could be rotated to six different rotational locations on the hexagonal. Additional rotational capability was made available in some systems by doubling the hexagonal indexing points within the recess, allowing 12 different rotational locations on the implant hex.
With the advent of internal connections, the specific engagement design, be it an internal hexagonal or tri-lobed design, dictates the specific rotational offset.
In addition to incorporating angulation changes, a cervical collar was added to virtually all the prefabricated abutments that allowed for a change in emergence profile. The angulated abutment typically requires an abutment cervical collar that is narrow on the facial and taller on the lingual to accommodate the change in the clinical crowns engagement angle. A variety of collar heights are typically available permitting selection based on mucosal thickness. Also incorporated into the vertical part of most of the abutments is an indexing flat that makes orientation of the crown much easier.
Recent Developments
Today, virtually all of the implant manufactures provide angulation correction abutments in their product line. Depending on the manufacturer, both straight and angled abutments may have straight or flared walls to offset the round implant loading platform and to provide a better emergence profile for the crown restoration. The shoulder of the abutment may also be contoured, changing from a minimal height on the facial to a higher lingual height. A few manufacturers have also increased the facial/lingual width to more closely emulate the ovoid/triangular shape of most teeth in the cervical area. In an effort to have less graying discoloration through thin facial tissues, some manufacturers have gold-colored or light pink-colored abutment surfaces.
One manufacturer has incorporated the implant mount and a temporary cylinder into one integrated unit. The clinician upon placement of the implant into the osteotomy can remove the upper segment and cut off the implant mount and use the lower half of the mount as a temporary cylinder to fabricate a temporary restoration.
More recent advances have been made with the design of posterior abutments. Several manufactures have prefabricated abutments that emulate natural tooth preparations. They typically come available in two heights and three or more collar heights ranging from 0.5 to 3 mm. Examples of these innovative products are the Easy Abutments™ by Nobel Biocare and the Express Abutments™ by Neoss. Corresponding impression components and plastic burn-out casting sleeves, along with healing cap are available and are usually packaged and sold as a unit. Once the abutment has been placed on the implant, the remaining treatment sequence corresponds to that of a conventional crown and bridge. In select posterior cases where this applies, it is cost effective and saves the clinician time with respect to selecting and ordering components.
In comparing costs, prefabricated abutments range from US$85 to $250 depending on the implant system. Laboratory charges for custom zirconium abutments (Atlantis™) currently run at $350 per unit. Custom gold abutments approximate the same cost, depending on the current price of the gold alloy. Laboratory charges for modifications to prefabricated abutments run from no charge to $50 per unit depending on the degree of modification.
Recent histologic evaluation of micro-grooved roughened surfaces (Laser-Lok™ by BioHorizons) on the coronal portion of dental implants have demonstrated connective tissue attachment that emulates sharpey fibers (Nevins et al. 2008). Such a connection inhibits epithelial downgrowth and potentially preserves the coronal bone level and establishes a zone of “biologic width.” Subsequent investigations demonstrated a connective tissue attachment to Laser-Microgrooved Abutments as part of a human histologic study. The clinical question as to what to expect when the healing abutment was to be replaced with a permanent abutment was unanswered. At that time, a continuation of the study replaced the healing abutment with a two-piece permanent abutment. That abutment was later biopsied with the surrounding soft tissue to demonstrate that the apical migration of the epithelium was inhibited after the abutment transfer. The same laser surface has been added to prefabricated abutments (Nevins et al. 2010). The protocol calls for seating the abutment at the time of implant insertion and without disruption during the life of the restoration. Having a soft tissue attachment on the abutment and implant may provide even greater protection for the osseous structures and greater resistance to mechanical and inflammatory insults (Geurs et al. 2011; Nevins et al. 2012).
The increased popularity of implant-supported dentistry in the esthetic area raised concerns of visible discoloration resulting from the titanium metallic color showing through thin gingival tissues (Glauser et al. 2004). Furthermore, greater use of all-ceramic restorations resulted in a need for an abutment that did not diminish their natural translucency and vitality (Heydecke et al. 2002). As an alternative to titanium abutments, all-ceramic abutments were introduced in 1993 (Andersson et al. 2001). These initial non-metallic abutments were made of sintered aluminum oxide (Al2O3).
Soon after, zirconium oxide abutments were introduced (Piconi and Maccauro 1999). Alumina abutments were prone to micro-crack propagation during preparation, resulting in fractures (Kucey and Fraser 2000; Watkin and Kerstein 2008). This inherent weakness was overcome by the tougher mechanical properties of zirconium (Presipino and Ingber 1993). Zirconia also has greater radio-opacity than its aluminum oxide counterpart. The latter, however, is still preferred when thin facial tissue presents in high lip line patients. The cumulative success rate of both materials at 5 to 10 years is reported at 97% (Andersson et al. 2003).
There is no question that prefabricated abutments offer several advantages, including cost. Prefabricated components are easy to use and reduce the laboratory expenses involved in crown and bridge applications. The main difficulty, however, lies with the diameter of the loading platform and the resulting emergence profile. With custom abutments, the transition from the implant to the cervical area of the crown is better controlled. The custom abutment reduces the abruptness of the angulation transition and can be modified to emulate the cross-sectional anatomy of the root at the cervical area. Efforts to overcome this limitation by using an expanding collar flare have improved the emergence profile but it does not always eliminate the entire problem, especially in the anterior esthetic zone. Less critical is the posterior area. Hence prefab abutments have the best application in that area of the mouth. For optimal esthetics, custom abutments should be used in the esthetic zone.
Examples of Prefabricated Abutments
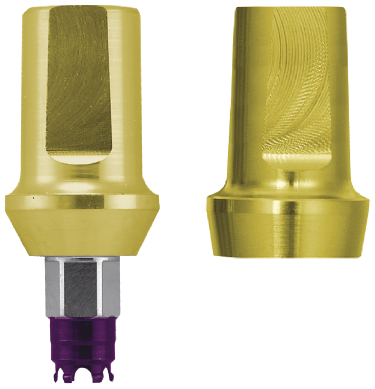
Biomet 3i straight and pre-angled abutments (Figure 5.1) can be altered with rotary instruments in the mouth or mounted on an abutment holder. The gold-colored GingiHue® Abutment is intended to mask gray penetration through the gingival tissues.
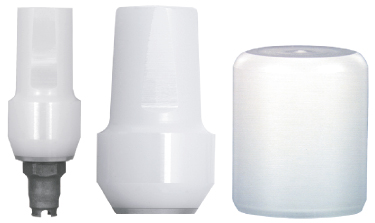
The ZiReal® Abutment (Figure 5.2) is a non-metalic abutment designed for use with all-ceramic restorations. Once seated in the mouth, the abutments can be treated as conventional crown and bridge preparations.
Astra abutments (Figures 5.3 and
Stay updated, free dental videos. Join our Telegram channel
VIDEdental - Online dental courses


