15
Restorative Dentistry
- cavity classification
- temporary and permanent filling materials
- cavity preparation and restoration using filling materials
- the instruments and equipment used in tooth restoration
- the causes of pulp death
- the various non-surgical endodontic techniques available to preserve a tooth
- the instruments and medicaments used in non-surgical endodontic techniques
- the technique of apicectomy
Following a dental examination during an oral health assessment, the dentist may often diagnose the presence of a cavity in a tooth. Cavities are caused by dental caries attacking the hard structure of the tooth, and if left untreated they will cause pain for the patient, and will develop into a more serious dental problem that may result in the loss of the tooth. A cavity will therefore require treatment and once its presence has been determined, a treatment plan will be decided upon based on the following information.
- Cavity size – is restoration of the tooth feasible with a restorative filling alone, or should a fixed restoration (such as a crown) be considered?
- Cavity position – which tooth surface or surfaces are involved, and do aesthetics need to be considered?
- Tooth involved – is a posterior chewing tooth involved, that will require a strong and long-lasting restoration, or is an anterior tooth involved where chewing forces are less but aesthetics have to be considered?
- Extent of caries – is it possible that full caries removal will cause pulp exposure, so that endodontic treatment will also be required?
- Patient’s wishes – is the patient amenable to restorative treatment, or are they likely to be unco-operative, as may occur especially with younger children and some patients with special needs?
Taking into consideration all these points, restoration by filling may be on a temporary or a permanent basis.
- Temporary restoration – in less co-operative patients, and if a fixed restoration is being considered as the final restoration in the short term. The usual materials used are:
- zinc oxide and eugenol cement
- zinc phosphate cement
- zinc polycarboxylate cement.
- Amalgam restoration – in posterior teeth, where restoration strength and longevity are more of an issue than aesthetics.
- Composite restoration – in anterior teeth for aesthetics, although more modern composite materials are suitable for use in restorations in posterior teeth too.
- Glass ionomer restoration – in deciduous teeth (because of its fluoride release) and in certain cavity sites where retention of the restoration is difficult.
The aims of good cavity preparation are the same, wherever the lesion has occurred and whatever restorative material is to be used.
- To remove all caries from the cavity.
- To remove the minimum amount of healthy tooth tissue while doing so.
- To avoid accidental pulp exposure, by poor dental technique.
- To protect the pulp after treatment by using linings or bases as necessary.
- To produce a retentive cavity for restoration, if necessary (some materials are adhesive to tooth tissue).
- To restore the tooth to its normal shape and prevent stagnation areas developing, as these would allow plaque retention and further carious attack to occur.
- To restore the function of the tooth, for adequate mastication.
- To restore the retentive shape of the tooth if it acts as a bridge abutment or denture retainer.
- To restore the aesthetics of the tooth (its correct appearance).
- To alleviate any discomfort or pain experienced by the patient, due to the initial presence of the cavity.
Fillings
Classification of cavities
Cavities are classified into five different types, depending on the site of the original caries attack. This is called Black’s classification after the American dentist who devised the system. In general usage, his classification also applies to the naming of the shape of the fillings inserted in each class of cavity.
- Class I cavities are those involving a single surface, in a pit or fissure, so a class I filling could be an occlusal, a buccal or a lingual filling, for example.
- Class II cavities involve at least two surfaces of a posterior tooth, the mesial or distal, and the occlusal surface of a molar or premolar. Thus a class II filling could be a mesial-occlusal (MO) filling in a premolar, or a mesial-occlusal-distal (MOD) filling in a molar.
- Class III cavities involve the mesial or distal surface of an incisor or canine.
- Class IV cavities are the same as class III but extend to involve the incisal edge on the affected side.
- Class V cavities involve the cervical margin of any tooth. Thus a class V filling could be a labial cervical filling in an upper incisor or a lingual cervical filling in a lower molar.
This universal method of cavity classification enables their accurate recording on the dental chart so that a restoration can be placed, and an example of each type of cavity is shown in Figure 15.1.
Cavity preparation
A permanent filling cannot be inserted directly into a carious cavity. Instead, careful preparation of the cavity is required to ensure that:
- all plaque and soft carious dentine is removed from the cavity margins, although the deepest layer of dentine may be conserved to avoid exposure of the pulp
- as much of the enamel as possible is also conserved
- the filling will be as much a permanent fixture as possible, although its longevity will also depend on the standard of plaque control and good diet that the patient follows
- caries will not recur at its margins due to any restoration overhang or other defect.
Every dentist has their own personal preferences for the instruments used during restorative procedures such as the placement of fillings, and Table 15.1 shows the more usual items and an explanation of their function. They are usually set out on a tray for use, which is often referred to as a ‘conservation tray’ (Figure 15.2).
The vast majority of tooth restoration carried out using fillings will require the administration of a local anaesthetic before proceeding, so that the patient does not have a painful experience. Techniques of local anaesthesia are discussed in detail in Chapter 14.
Retention of fillings
Permanent fillings are meant to stay put permanently and the cavity must be specially prepared to provide maximum retention. Before explaining how this is done, it is necessary to consider the types of filling materials used – plastic and preconstructed.
Plastic fillings are soft and plastic on insertion but set hard in the cavity. They include:
- all temporary cements
- amalgam
- glass ionomer cements
- composites.
Preconstructed restorations are called inlays and are made in the laboratory, after the teeth have been prepared, and then cemented into place.
- Gold
- Porcelain
- Other ceramic materials
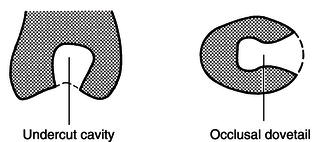
Retention for plastic fillings is obtained by simply cutting tiny grooves in the cavity walls to make the entrance smaller than its inside dimensions, as shown in Figure 15.3. As the materials are initially soft, they can be packed into the cavity easily to fill all the available space but cannot drop out of the cavity once set because they have hardened and are locked into position. For fillings involving occlusal and mesial surfaces, or occlusal and distal, a dovetail effect is produced by grooving the cavity walls to prevent the filling coming out mesially or distally (see Figure 15.3). Note that this diagram is deliberately exaggerated to show more clearly the principles of retention; in reality, sound tissue is not sacrificed for the sake of extensive undercuts. Tiny grooves in the cavity walls are sufficient to provide adequate retention.
Figure 15.1 Completed chart with cavities recorded.
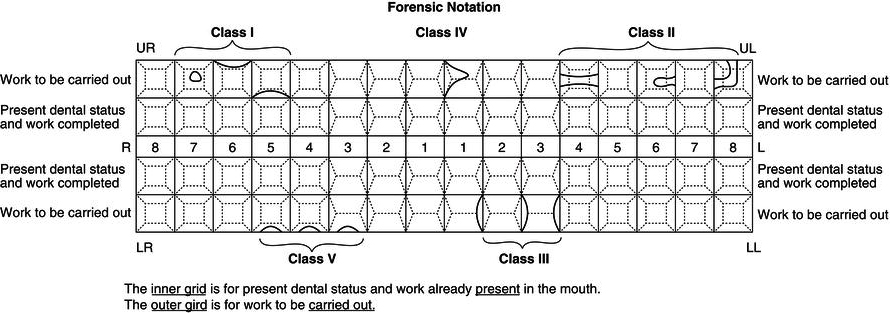
Table 15.1 Some of the instruments used during restorative procedures
| Item | Function |
| Mouth mirror | To aid the dentist’s vision To reflect light onto the tooth To retract and protect the soft tissues |
| Right-angle probe |
To feel the cavity margins To feel softened dentine within the cavity To detect overhanging restorations |
| Excavators | Small and large spoon shaped, used to scoop out softened dentine |
| Amalgam plugger |
To push filling materials into the cavity and adapt them to the cavity shape, leaving no air spaces and forcing excess mercury to the surface of the filling for removal during carving |
| Burnisher | Ball shaped or pear shaped, to press and adapt the restoration margins fully against the cavity edges so that no leakage occurs under the restoration |
| Flat plastic | To remove excess filling material and mercury from the restoration surface, and create a shaped surface that encourages food particles to flow off naturally, rather than becoming lodged around the restoration |
| College tweezers | To pick up, hold and carry various items such as cotton wool pledgets |
| Gingival margin trimmer | To trim the margin of the cavity to ensure no unsupported enamel nor soft dentine remains – their use is becoming obsolete with the wider range of burs available |
| Enamel chisel | To remove any unsupported enamel from the cavity edges – their use is becoming obsolete with the wider range of burs available |
Sometimes it is not possible to prepare cavities which are sufficiently undercut to retain a plastic filling. In such cases they may be made retentive in other ways.
- Self-tapping dentine pins for amalgam restorations.
- Acid etching for composites, to provide a microscopically rough surface on the enamel and allow mechanical locking of the material onto the enamel prisms.
- Chemical bonding for glass ionomer cement onto the dentine surface.
Figure 15.2 Conservation tray instruments.
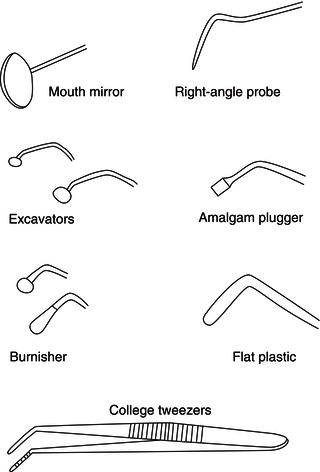
Figure 15.3 Undercutting of cavities.
These methods are covered in the appropriate section of this chapter, for each filling material.
Inlays are hard and rigid when inserted into the cavity, so the dentist would not be able to place and seat them fully if undercuts were present. To prevent them coming out occlusally, they rely on parallel cavity walls to provide maximum retention and the use of adhesive cement to ‘glue’ them into the prepared cavity. As with plastic fillings, a small dovetail effect may be used to prevent dislodgement mesially or distally.
Cavity lining
Before a permanent filling is inserted the cavity may need to be lined. A lining is an insulating layer of cement that is placed on the cavity floor and which has the following functions.
- Protects the pulp from temperature fluctuations that may be transmitted through metallic filling materials, and that are experienced as sensitivity or even pain in the tooth.
- Protects the pulp from chemical irritation of non-metallic materials.
- Seals the pulp from any residual caries bacteria, allowing secondary dentine to be laid down.
Dependent on how deep the cavity is, pain and possibly death of the tooth may occur through failure to protect the pulp tissue by the insertion of an adequate lining.
The linings used are zinc oxide and eugenol cement, zinc phosphate cement, polycarboxylate cement and calcium hydroxide.
The methods of insertion and techniques of finishing by polishing of fillings vary dependent on the material used, and are discussed in detail later.
Moisture control
Adequate moisture control during restorative procedures is one of the most important duties of the dental nurse. Control of moisture – from saliva, blood or instrument cooling sprays – is necessary for the following reasons.
- To protect the patient’s airway from fluid inhalation, especially as the majority of procedures are carried out with the patient lying flat back in the dental chair (supine position).
- To ensure the patient is comfortable during treatment – so that they do not have a mouth full of fluids while lying in the supine position during dental treatment.
- To allow the dentist good visibility to the treatment area, therefore avoiding inadvertent patient injury by catching the soft tissues or the wrong tooth with the drill.
- To allow the restorative materials to set correctly, without moisture contamination.
- To allow the adhesion of cements and linings to the tooth, without moisture contamination.
- To avoid the uncontrolled loss of materials from the cavity during use, such as acid etchant which can burn the soft tissues.
The following methods are used to control moisture.
- High-speed suction.
- Low-speed suction.
- Use of absorbent materials – cotton wool rolls, cotton wool pledgets and oral inserts such as a ‘Dryguard’.
- Use of rubber dam.
- Compressed air drying, using the triple syringe (3 in 1) of the dental unit.
High-speed and low-speed suction
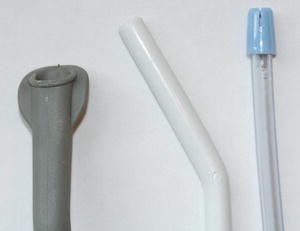
This is provided by either high-speed aspiration (suction), for fast removal of moisture during drilling, or low-speed aspiration for continual moisture control without sucking at the soft tissues. In the case of high-speed suction, the dental nurse uses a wide-bore aspirator connected to the suction unit to rapidly remove fluids, blood and debris from the treatment area. This prevents the patient from choking, as well as emptying the oral cavity of volumes of fluid that would be uncomfortable for the patient to hold without feeling the need to spit out. With low-speed aspiration, the patient holds a saliva ejector attached to the suction unit or aspirator to slowly but continually remove any fluids that have pooled in the floor of the mouth, so that the patient does not have to constantly swallow during the treatment. Many different types of ejector are used but those with a flange to keep the tongue away from the treatment area are particularly helpful. The dental nurse may also use the high-speed aspirator tube as a soft tissue retractor. Examples of aspirators and ejectors are shown in Figure 15.4.
Figure 15.4 Aspirator and ejector tips.
Absorbent materials
Cotton wool rolls or absorbent pads are placed in the buccal or lingual sulcus to absorb saliva and keep the soft tissues away from the teeth. Cotton wool pledgets are used to dab the actual cavity dry, while excessive saliva contamination can be prevented by placing a ‘Dryguard’ over the parotid salivary gland duct. These pads contain an absorbent material similar to that used in babies’ nappies, and can retain considerable volumes of fluid. The cavity itself can be further dried by blowing it with compressed air from the triple syringe of the dental unit. Examples of some of these materials are shown in Figure 15.5.
Rubber dam
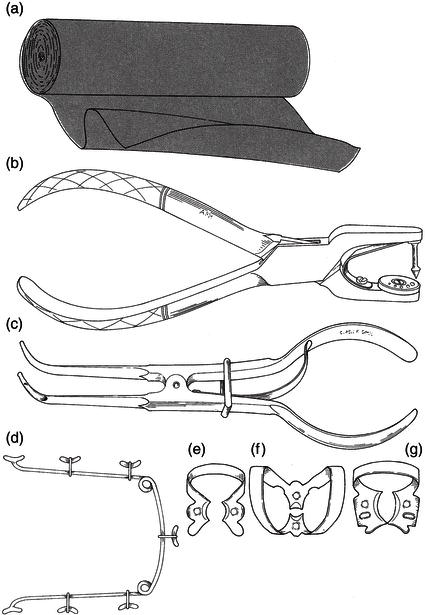
This is the best method of moisture control of all and the various components are shown in Figure 15.6.
A rubber dam is a thin sheet of latex rubber or vinyl material which is placed over a tooth to isolate it from the rest of the mouth. A rubber dam punch is used to punch a small hole in the rubber sheet, which is then fitted on so that the tooth projects through the hole. The rubber dam is kept in place by a rubber dam clamp which is fixed on the tooth with rubber dam clamp forceps. Finally a rubber dam frame is used to support the sheet while in use, so that it remains taut and maintains a clear visual field. A napkin is placed between the patient’s chin and the rubber to make it more comfortable and a saliva ejector may be provided to remove any pooled saliva. Dental floss or an additional piece of rubber dam material is used to work the sheet between the teeth.
A rubber dam may be applied to any number of teeth. It enables the operator to keep a tooth dry and maintain an uncontaminated field during dental treatment, and prevents pieces of filling material, debris or small instruments falling into the patient’s mouth.
This moisture control technique is more comfortable for patients as it prevents water spray or irrigation fluids entering the mouth, and far better for the dentist, as it improves access and visibility by keeping the tongue, lips and cheek out of the way. It also helps prevent cross-infection of patients and chairside staff, by minimising the aerosol of infected debris spread by the use of compressed air and water spray.
Figure 15.5 Cotton wool roll and cotton pledget.
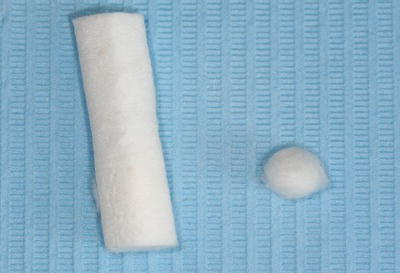
Figure 15.6 Rubber dam instruments. (a) Rubber dam. (b) Rubber dam punch. (c) Rubber dam clamp forceps. (d) Rubber dam frame. (e) Premolar clamp. (f) Incisor (butterfly) clamp. (g) Molar clamp.
The two main uses of a rubber dam are:
- in root canal therapy (endodontic treatment), to maintain a sterile field and prevent inhalation or the swallowing of small instruments
- during the insertion of fillings (especially composites and glass ionomers) to avoid their failure due to saliva contamination.
Ideally, a rubber dam should be used for all fillings but most operators consider it too time-consuming for routine use in all procedures except endodontics. The technique is also not well tolerated by every patient.
Equipment
Handpieces
Cavities are cut by the use of dental burs fitted into the head of a handpiece. The speed of cutting depends on the type of handpiece and the purpose for which it is used. They have a built-in water spray to counteract the heat generated when cutting hard tissue and may also have fibre-optic illumination to aid cavity preparation.
Air turbine handpieces run at very high speeds of up to 500,000 revolutions a minute, and use friction grip diamond or tungsten carbide burs to cut easily through both enamel and dentine. There is a tiny air turbine motor in the head of the handpiece which is driven by compressed air. The advantages of air turbines are the ease and speed of cutting. The disadvantages are that they offer little tactile sensation to the dentist, so excessive tooth removal can occur, and their vibration may be associated with a condition called ‘vibration white finger’ when used over many years.
Slow handpieces run at around 40,000 revolutions per minute, and are driven by air or electric motors at the base of the handpiece. These are much more versatile in their range of speed and uses, varying from low-speed root canal treatment and removal of carious dentine to high-speed conventional cavity preparation. They use latch grip stainless steel or tungsten carbide burs when used on teeth or friction grip stainless steel acrylic trimming burs when used to trim dentures. They are more ‘user friendly’ for the dentist, as the tactile sensation provided is much better. Portable versions of the electric motors are particularly suitable for domiciliary dental treatment (that carried out away from the surgery, often in the patient’s home). An air turbine and a slow handpiece are shown in Figure 15.7.
Figure 15.7 Handpieces.
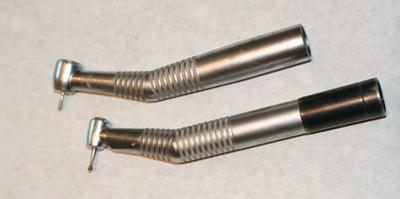
All handpieces, however driven, and of whatever age, are made in two basic designs: contra-angled and straight. A contra-angle is used most often in the mouth as it provides access to every tooth. A straight handpiece is used to trim acrylic denture items.
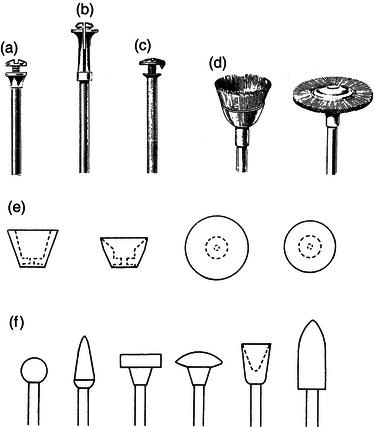
Burs
Burs for low-speed procedures are made of steel. They are used for removing caries, cutting dentine (but not enamel), trimming dentures and other laboratory work. Examples are shown in Figure 15.8.
Burs for high-speed handpieces have diamond or tungsten carbide cutting surfaces and are used for rapid removal of enamel, dentine and old fillings. Examples are shown in Figure 15.9.
Straight handpiece burs have a long plain shank. Burs for low-speed contra-angle handpieces are short and have a notch in the shank which fits by a latch grip. Short burs are also used for air turbine handpieces but they have a plain shank which gives a friction grip (Figure 15.10).
Contra-angled low-speed handpieces with smaller heads, and using even shorter burs, are used on children. They are called miniature handpieces and burs.
The cutting ends of burs are made in many different shapes to allow different types of dental treatment to be carried out (Figure 15.11) but those most commonly used are as follows.
- Round – used for gaining access to cavities and at low speed for removing caries.
- Pear – used for shaping and smoothing cavities.
- Fissure – used for shaping and outlining the cavity.
Figure 15.8 Slow-speed burs.
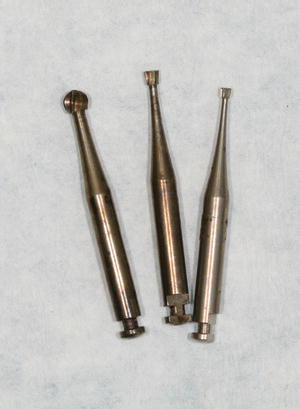
Figure 15.9 High-speed burs.
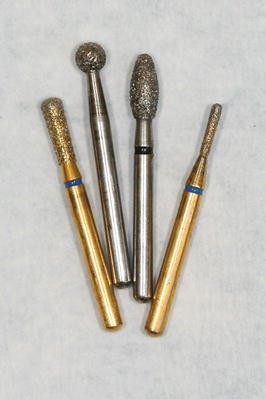
Figure 15.10 Burs. (a) Steel for straight handpiece. (b) Steel, latch grip, for low-speed contra-angle handpiece. (c) Steel, latch grip, for miniature contra-angle handpiece. (d) Tungsten carbide, friction grip, for air turbine handpiece. (e) Diamond, friction grip, for air turbine handpiece.
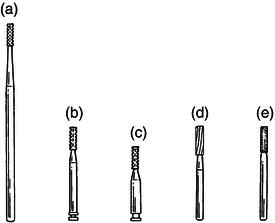
Figure 15.11 Bur shapes. (a) Round. (b) Pear. (c) Flat fissure. (d) Tapered fissure. (e) End-cutting.
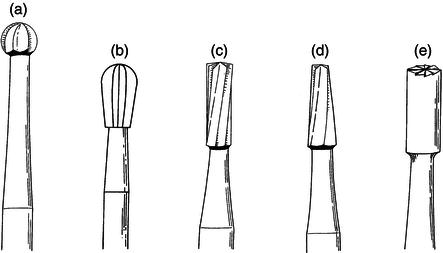
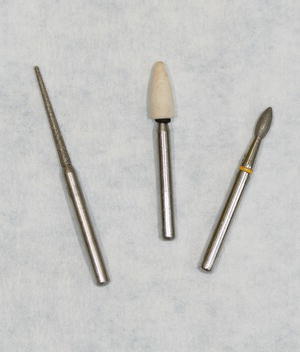
Figure 15.12 Polishing burs.
Polishing instruments
There is a great variety of polishing instruments but they generally comprise fine abrasive stones, wheels, discs and strips, finishing burs, brushes and polishing pastes. Apart from hand abrasive strips, they are all used with a handpiece. Finishing burs and stones are used for smoothing cavity margins and trimming fillings (Figure 15.12). Abrasive discs and strips are used for fine trimming and polishing.
Small abrasive stones, wheels and brushes are manufactured with a shank which fits the appropriate handpiece. Larger wheels, stones and abrasive discs require an independent mounting shank called a mandrel. Wheels and metal discs are fitted on a Huey mandrel, sandpaper discs with a metal centre and Soflex discs use a Moore mandrel, and plain sandpaper discs a pinhead mandrel (Figure 15.13).
Care of instruments
All cutting instruments must be kept sharp because blunt ones are inefficient and painful for the patient. Hand instruments such as chisels and excavators should be sharpened regularly on a small flat oilstone (Arkansas stone) or with an abrasive disc in a straight handpiece. Burs are cleaned in an ultrasonic cleaner and autoclaved after use, although any that become heavily contaminated during use or that are used on known high-risk patients are considered as single-use items and are discarded. These burs, along with all blunt burs, are discarded into the sharps container.
All handpieces must be lubricated regularly according to manufacturers’ instructions before being decontaminated and sterilised. The methods used are described in Chapter 8.
Air abrasion
Modern technology has allowed an old method of tooth preparation to be reintroduced into dental practice. It uses compressed air and a special handpiece to convey a jet of abrasive particles on to a tooth surface, by which it can remove hard tissue, soft carious tissue or surface stains and even abrade metal or composite restorations before cementation or repairs. It is less painful than conventional cavity preparation but has not come into general use as it is rather expensive.
Figure 15.13 Mandrels and brushes. (a) Huey mandrel. (b) Moore mandrel. (c) Pinhead mandrel. (d) Polishing brushes. (e) Abrasive rubber cups and discs for Huey mandrel. (f) Mounted fine abrasives.
Role of the dental nurse during restorations
There are some duties that are specific to the preparation and placement of restorations, and others that are very similar in other areas of dentistry, but the good dental nurse must be competent and proficient in all. The role of the dental nurse during restorative treatment can be summarised as follows.
- Have a good understanding of the procedure to be carried out.
- Be aware of their position in the dental team for the procedure – this may be as the chairside nurse assisting directly with the procedure or as a second nurse available to mix materials as required.
- Have all the patient records, charts, radiographs and consent forms completed and available for the appointment.
- Communicate effectively with the patient throughout the procedure, inspiring confidence and trust.
- Monitor the patient throughout the procedure, ensuring their comfort and well-being and giving reassurance where necessary.
- Assist during the adminisatration of local analgesia – having the correct syringe and needle loaded with the correct cartridge as directed, passing them safely to the dentist for use, then retrieving them after use and safely resheathing the needle using a hands-free device to avoid needlestick injury (unless this is done by the dentist).
- Provide careful but efficient moisture control and soft tissue retraction throughout the procedure, ensuring that no soft tissue trauma is caused.
- Anticipate and pass instruments, etc. to the dentist in the correct order of use during the procedure.
- Be aware of the required lining, base and restorative material to be used for the procedure, and mix each accordingly when directed.
- Be proficient in the four-handed technique of passing instruments, etc. to the dentist as required, ensuring all items are passed safely (and especially not across the patient’s face).
- Follow the infection control policy to fully decontaminate the surgery after the appointment.
- Follow the health and safety policy with regard to hazardous waste disposal, especially in relation to waste amalgam.
- Ensure that all records, charts, etc. are correctly and securely stored for future use after being completed by the dentist, maintaining patient confidentiality at all times.
Temporary restorations
These are placed as a temporary measure, before the tooth is restored permanently, and are used for a variety of reasons.
- As an emergency measure to seal a cavity and prevent carious ingress.
- During endodontic treatment, as repeated access may be required to the pulp chamber over several appointments.
- During inlay construction to seal the preparation while the permanent inlay is constructed.
- To allow a symptomatic tooth to settle and become symptom free, before being permanently sealed.
There are several materials available for use as a temporary restoration, some of which have other uses in dentistry – they are multi-purpose materials. Overall, they are unsuitable for use as a permanent restoration because they are too soft to chew on, are too soluble in saliva, and would not remain intact for long periods.
The key features of all temporary restorations are as follows.
- Quick mixing and placement.
- Cheap compared to permanent restorative materials.
- Easily removed from the cavity when required.
- Not strong enough to be chewed on routinely.
- Have varying degrees of adhesiveness to the tooth.
- Some contain sedative ingredients to help settle inflamed pulps.
A variety of materials is available, under many trade names, but temporary restorations can generally be categorised into one of the following groups of materials.
- Zinc oxide and eugenol.
- Zinc phosphate.
- Zinc polycarboxylate.
- Gutta percha.
Zinc oxide and eugenol
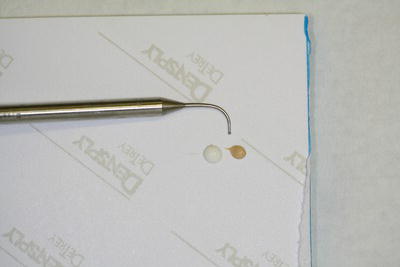
Presented as zinc oxide powder and eugenol liquid (‘oil of cloves’), the cement is made by mixing increments of the yellowy powder to a drop of the clear eugenol liquid on a glass slab with a spatula (Figure 15.14). Older varieties of the product can be thickened if necessary by squeezing in a napkin to remove some of the eugenol liquid, otherwise full setting of the cement produced takes a few hours.
Figure 15.14 Zinc oxide and eugenol cement – to mix.
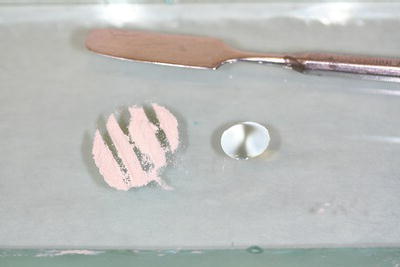
When ready for use, the cement should be able to be rolled into a ‘sausage shape’ with the spatula, without sticking to it or smearing across the glass slab.
Uses of the cement are:
- temporary filling
- non-irritant base for deep cavities
- sedative dressing for painful carious teeth and for dry sockets
- main constituent of some impression pastes, periodontal packs and root filling materials.
The main advantage of the cement over other temporary restorations is that it is soothing and non-irritant to the pulp and can be safely used in deep cavities. The main disadvantage is that it used to be too soft and slow-setting to use as a foundation for a permanent filling in one visit. However, this can now be overcome by using a strengthened quick-setting proprietary brand such as Kalzinol. In this form it is generally regarded as a satisfactory lining for metal fillings.
Other disadvantages are that the cement is not compatible with composite filling materials, and cannot be used as a lining beneath these types of restorations. Manufacturers’ instructions must always be followed in selecting a suitable lining for any non-metallic fillings.
Also, some patients are allergic to preparations containing eugenol, although special eugenol-free alternatives are now available.
Zinc phosphate
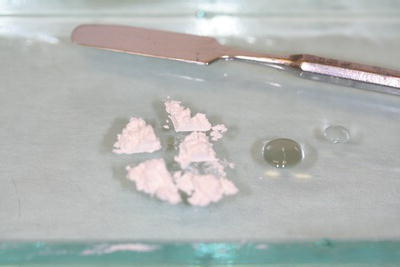
Presented as zinc oxide powder and phosphoric acid liquid, the cement is prepared by mixing increments of the white powder to the clear liquid on a glass slab with a spatula (Figure 15.15). Two different mixes are used.
- A thick mix of putty consistency to use as a temporary filling or a base beneath a permanent filling.
- A thin creamy mix to use for crown and inlay cementation – this is called a luting cement.
Setting of the cement takes a few minutes depending on various factors.
- A warm slab accelerates the setting time.
- A cold slab slows down the setting time.
- A thick mix sets more quickly than a thin mix.
- A dry slab must be used as moisture accelerates setting.
- Powder contaminated by moisture in the air will set too quickly for use, so it is most important to screw the cap on tightly, immediately after using the bottle of liquid.
Figure 15.15 Zinc phosphate cement – to mix.
These various factors can be used to advantage, depending on the particular use of the cement at the time. If a long setting time is required, such as when cementing a bridge, a cold dry slab can be used to give the maximum setting time possible, so that the cement can be loaded into each retainer and then fully positioning the bridge, before it begins to set.
This ability to control its setting time is the over-riding advantage of zinc phosphate cement.
Experience soon teaches a dental nurse how much powder and liquid to set out, but occasionally too little or too much powder will be put on the slab. In the former case, more powder can be added from the bottle, but the mixing end of the spatula must not be used for this purpose as it will contaminate and spoil the whole bottle. Excess unused powder may only be returned to the bottle if you are certain that it has not been contaminated by any liquid or mixed cement on the slab.
A cool thick glass slab should be used for mixing zinc phosphate cement. Thin slabs are warmed by the dental nurse’s hand and can make the cement set too quickly.
Uses of a thick mix of the cement are:
- as a temporary filling
- as a cavity base
- for blocking out undercuts in inlay and crown preparations.
Uses of a thin mix of the cement are as a:
- luting cement to place inlays, crowns and bridges
- luting cement to place orthodontic bands.
The main advantage of the cement is that it sets very hard within a few minutes and therefore makes a sound base for permanent fillings, and also a more durable temporary filling than zinc oxide and eugenol materials. Furthermore, its adhesive nature to dentine makes it satisfactory as a luting cement for prefabricated restorations.
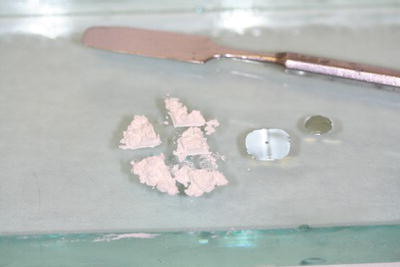
Figure 15.16 Zinc polycarboxylate cement – to mix.
The main disadvantage is that in deep cavities it may be irritant to the pulp, as the acidic nature of the liquid component produces a mixed material with a pH of 2. In these cases, a sublining of calcium hydroxide is inserted onto the cavity floor beneath the zinc phosphate base cement. The alternative is to use a different base material altogether. Zinc phosphate cement is also moisture sensitive and will not adhere to a damp cavity, so good moisture control is required during its use.
Zinc polycarboxylate
Presented as white zinc oxide powder and clear, viscous polyacrylic acid liquid, or as these two components combined in the powder and sterile water as liquid (Figure 15.16). In each case the cement is prepared by mixing increments of the powder to the liquid or sterile water on either a glass slab or a waxed paper pad, with a spatula. A measure is provided by the manufacturer for exact measurement of each increment.
The advantage of using the anhydrous system with sterile water is that only one bottle of material is needed and there is no liquid to deteriorate, to be used up too soon or left over when the powder bottle is empty. Furthermore, as the polyacrylic acid liquid is viscous (thick and ‘gloopy’ in consistency), it can be difficult to dispense from the bottle and also difficult to mix. Mixing with water is much easier and quicker.
Uses of the cement are:
- a thin mix for use as a luting cement with fixed restorations and orthodontic bands
- a thick mix for use as a cavity base
- therefore, an alternative to zinc phosphate cement.
The main advantages of polycarboxylate cement are that it is less irritant than zinc phosphate cement, and far more adhesive to dentine. For these reasons many operators prefer its use to that of zinc phosphate.
The main disadvantage is that it can be rather difficult to manipulate as it is adhesive to stainless steel instruments. Excess cement must be wiped off the spatula and instruments before it fully sets, as it is difficult to remove by manual scrubbing and unlikely to be removed by the action of the ultrasonic bath.
Table 15.2 The main categories of temporary restorative materials and their advantages and disadvantages
| Material | Advantages | Disadvantages |
| Zinc oxide and eugenol | Cheap Sedative to inflamed pulp |
Reacts with composites Eugenol can burn soft tissues |
| Zinc phosphate | Sets quickly Sets hard Adhesive to dentine |
Irritant to pulp in deep cavity Moisture sensitive |
| Zinc polycarboxylate | Most adhesive cement | Sticks easily to instruments so difficult to place |
| Gutta percha | None over other cements listed | Messy to use Poor margin adaptation in cavity |
Gutta percha
The final material in this category is gutta percha, which is presented as preformed cones or sticks (greenstick compound) of rubber material. It only requires heat to become plasticised, but is almost obsolete now as a temporary restoration, as the previous cements described are far superior in this role.
Its main use today is as a root filling material (see later), but it is also used during vitality testing and during border contouring of impression trays during denture construction.
The main categories of temporary restorative materials, with their advantages and disadvantages outlined, are summarised in Table 15.2.
Linings
These are materials placed in the deepest part of the cavity, over the pulp chamber, before a restoration is placed. Their aim is to protect the pulp from thermal and chemical shock, by providing a barrier between the permanent restoration and the living pulp tissue, so that temperature fluctuations in the mouth are not transmitted, nor is any adverse chemical stimulation from restorations.
Technically, thin layers of the zinc oxide materials discussed previously can be said to be linings in cavities, although realistically they are more correctly termed as ‘bases’ because they have to be of an adequate thickness to be placed, whereas a lining, by definition, is a very thin layer of a material used just to cover the inner surface of the cavity. The material universally referred to as a lining in dentistry is calcium hydroxide.
The material is presented in various forms to produce a calcium hydroxide paste on mixing, from a calcium hydroxide powder and resin in a solvent, or as two pastes to be mixed together (Figure 15.17), to a premixed single paste for light curing after placement.
Uses of the cement are as follows.
- Universal cavity lining, as it is non-irritant to the pulp and compatible with all filling materials.
- It promotes the formation of secondary dentine around the outer border of the pulp chamber, so allowing the tooth to attempt to protect the pulp and heal after a carious attack.
- It promotes the remineralisation of hard tooth tissue, by allowing its calcium content to be incorporated as calcium hydroxyapatite crystals.
- Pulp capping (see later).
- Pulpotomy (see later).
- Other root treatment procedures (see later)
Figure 15.17 Calcium hydroxide liner with applicator.
Calcium hydroxide is the best lining material for non-metallic fillings as it has no deleterious effect on them or the pulp. Its alkalinity counteracts the acidity of zinc phosphate, and also helps to kill the bacteria present in carious lesions.
The main disadvantage of the material is that in deep cavities, and especially those with metal fillings, it can only be used as a sublining as it forms too thin a layer to insulate the pulp against thermal irritation. Another base material must be inserted on top of the calcium hydroxide to provide a thicker layer of insulation against the conduction of heat or cold through metal fillings. In shallow cavities, calcium hydroxide alone is a satisfactory lining for metal fillings. A second disadvantage is that it is also soluble in water, unless a light cure product is used.
Permanent restorations
These are the materials used to permanently restore the tooth to its full function and appearance, and they must all have the following properties.
- Set to a hard enough degree to allow normal masticatory function to occur, without fracture of the material.
- Not to dissolve or otherwise deteriorate in saliva over time.
- To be biologically safe, by not reacting with the body’s tissues or giving off any harmful chemicals.
- Capable of being applied to the tooth using normal conservation instruments, in a straightforward manner.
- Have a reasonable working lifespan of years, rather than of months.
- Ideally they should be aesthetically acceptable, although this limits the use of amalgam.
Stay updated, free dental videos. Join our Telegram channel
VIDEdental - Online dental courses


