CHAPTER 17 Stage III: threading the deep tunnels
The all important difference between Plus and the Rx-1 bracket now comes into effect. Overall, Stage III remains the same in principle, whichever bracket is used. The distinction between the two is the power source for the root uprighting. Previous to Plus, individual Side-Winders did the job, generally one to each bracketed tooth, whereas with Plus, a full auxiliary archwire in the deep tunnels performs the same function. So it is a case of uprighting springs versus an uprighting wire. In this, the advantages of Plus will be quickly apparent. In retrospect, Stage III with all the springs did represent an uphill step for our patients to contend with. Although the appearance of the ‘invisible’ Side-Winders was not as conspicuous as the patients feared (unless wearing ceramic brackets) they were always aware of the coils labial to the brackets. These are also more difficult to keep clean and can become distorted by rough use. Although fitting the Side-Winders does get easier for the orthodontist with clinical experience, it is generally agreed, among those who have switched to Plus, that threading the auxiliary nickel–titanium archwire is an altogether more straightforward process. It is quicker too.
The midline approach
This was the original method proposed when the Plus bracket was introduced, and the one used by the author (Figs 17.1–17.4). It is recommended for newcomers to the technique, since the threading is easy to see from the mesial of every bracket. The midline approach requires a preformed nickel–titanium archwire. This should be cut to length before threading, as there is no point threading an excess of wire and then having to cut off a sizeable length at the back. This can best be done by measuring the wire though the main archwire slots and cutting the ends approximately half way along the molar tubes. (When fitted in the deep tunnels, this will equate to the distal of the molar tubes.)
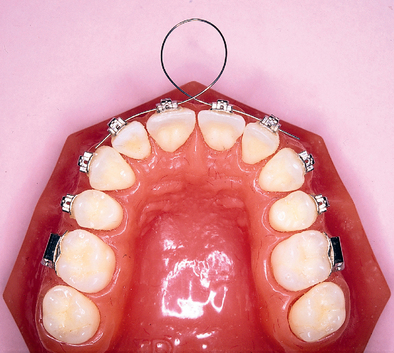
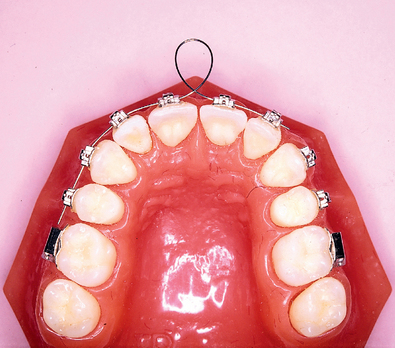
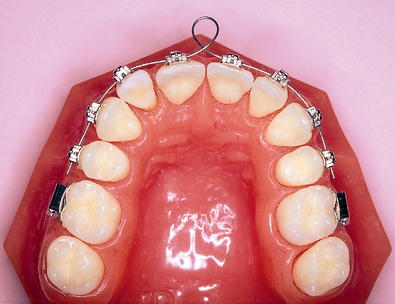
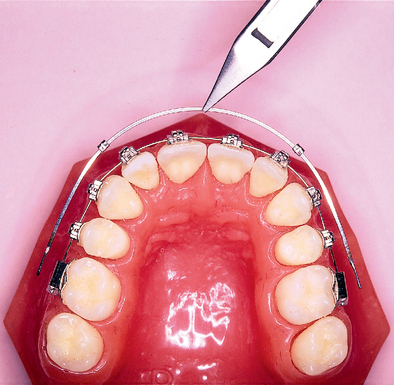
Beginning at the midline, the archwire should be threaded in reverse curvature (Fig. 17.1). This means that the upper left distal end is threaded through the patient’s upper right central and lateral incisors and vice versa. Once the four upper incisors are threaded, the wire retains itself safely in position. There will of course be a large circle of surplus wire protruding at the midline at this stage. Threading backwards through the mesial of the canine and premolars is most efficiently done one side at a time, rather than alternating between sides, during which the midline loop of wire shrinks in diameter (Figs 17.2 & 17.3). Finally, as the uprighting wire is seated fully home, the midline circle ‘flips’ and disappears (Fig. 17.4). It does this as the wire de-stresses by rotating 180 degrees along its length within the deep tunnels. The preformed arch curvature has now conformed to the curvature of the patient. The main arch can now be fitted as per the next chapter.
The distal approach
This requires a straight length of nickel–titanium wire, without a preformed curvature. Trying it for length across the main archwire slots, the wire should be cut slightly longer than with the previous method. This is to allow the last 3 mm of one end to be annealed and bent into a small ‘safety loop’. This will be the free end, which can rest outside the patient’s cheek, without threat to the face, while the end to be threaded is inserted into the distal of the premolar bracket adjacent the molar (Fig. 17.5). Unless using a mirror, this process will be blind, but b/>
Stay updated, free dental videos. Join our Telegram channel
VIDEdental - Online dental courses


