CHAPTER 16 Stage III: setting the torque
How to ‘read’ the torque
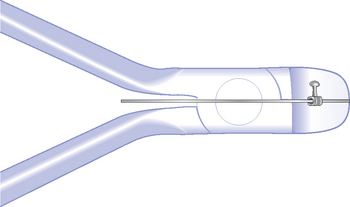
The torque set in any part of an archwire can easily be visualized by holding the prepared archwire within the beaks of a torquing plier, at the point at which torque is to be assessed. Testing anterior torque at the midline, with the archwire held ‘back to front’ (legs towards the plier handles) zero torque will be confirmed when the distal ends of the archwire lie midway between the handles. This simply demonstrates that the angle of the rectangle, at the point held, is aligned parallel to the occlusal plane. Figure 16.1 illustrates zero anterior torque, as tested at the midline.
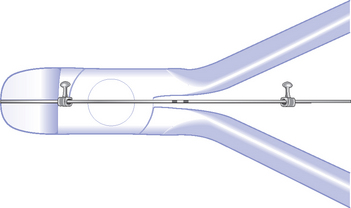
It is just as easy to read the torque in the buccal segments, simply by holding one leg at its distal end. Figure 16.2 demonstrates zero torque at the distal end being held, since the opposite distal end lies midway between the plier handles. Zero torque in the buccal segments is almost invariably desirable, rare exceptions being major arch width discrepancies or skeletal asymmetries.
Torque in increased overbite cases
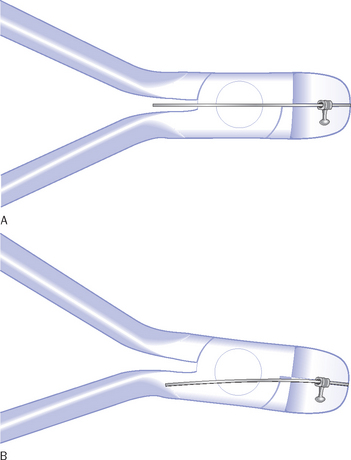
A zero torque archwire setting throughout will still be the aim. However, where overbite reduction has been required in Stage I (and therefore maintained with bite sweeps throughout Stage II) it follows that vertical bite sweeps will be needed to maintain the reduced overbite during the third stage also. This introduces complications, since sweeping a vertical curvature along the buccal segments of any rectangular wire will automatically alter the torque setting at the front, relative to the occlusal plane, producing unwanted incisor proclination. This is shown in a lower archwire which has zero torque when flat (Fig. 16.3A), then after placement of a vertical bite sweep (Fig. 16.3B). It will be seen from Fig. 16.3B that the distal archwire ends no longer bisect the plier handles, but are now below them, denoting labial crown torque, which will cause proclination of the lower incisors.
Pretorqued archwires
These are identical dimensionally to the plain rectangular archwires already illustrated, but come with 5 degrees of lingual crown torque in the maxillary (Fig. 16.4) and 8 degrees of lingual crown torque in the mandibular arch (Fig. 16.5). Used in a case with an initially increased overbite, the purpose of the inbuilt retroclination will be to cancel out the proclination produced by the bite sweep (Fig. 16.6). Because of the continuity of the wire, the pretorque in each archwire extends overall, including the buccal segments (Fig. 16.7) from which it must later be removed. However, this avoids the necessity for the orthodontist to stock an inventory of different arch sizes; tailoring each archwire, and placing the hooks appropriately, allows one size to be adapted to all.
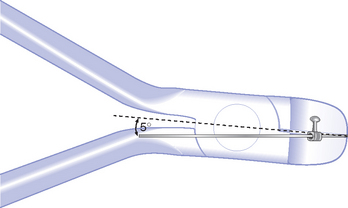
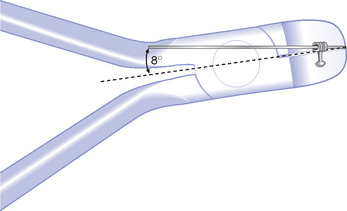
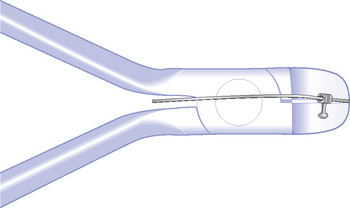
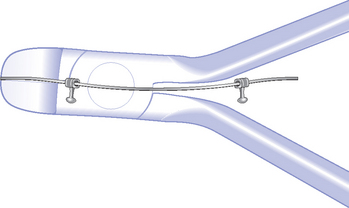
Fig. 16.7 Lingual crown pretorque extends down the buccal segments, where it will need to be returned to zero torque, as shown in Figure 16.12.
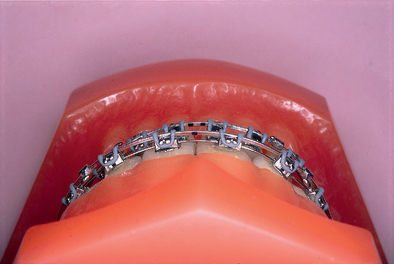
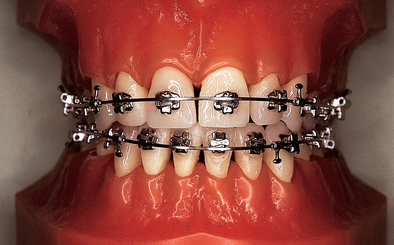
Pretorqued archwires are identified by their centreline markings, which appear on the upper surfaces only. The maxillary archwire therefore carries its single mark on the gingival surface, while the mandibular has double markings, both on the occlusal surface (Fig. 16.8). By this means, both upper and lower centreline markings will be visible to the operator when the archwires are in the mouth (Fig. 16.9) thereby avoiding accidental misfitting of an archwire upside down, which would, of course, reverse the torque.
Wiping the sweep, checking the torque
The sweep comes first. The archwire should be held in a torquing plier, immediately mesial to the hook, and a vertical bite sweep curvature stroked into the buccal segment with thumb and finger, working distally, to produce a reverse curve of Spee in the lower arch and a ‘rocking horse’ curve in the upper. As with the Stage II bite sweep, most of the curvature should be along the canine and premolar regions, but not progressing into the molar tubes. In practice, the effect of the sharp distal end against the thumb or finger prevents this naturally! The same action should be repeated on the opposite side, to create a matching sweep. The amount of archwire intrusion at the front should normally amount to 1–2 mm (Fig. 16.10). A Class II division 2 case may require more, particularly in the maxillary arch.
Now to check the torque. Firstly, check the incisor segment, by holding the wire at the midline, to see if there is zero torque (Fig. 16.6). Small torque adjus/>
Stay updated, free dental videos. Join our Telegram channel
VIDEdental - Online dental courses


