CHAPTER 11 Stage II
Objectives
Aligning the premolars
The premolar brackets should be selected with reference to the direction of tooth tip to be accommodated within the bracket, remembering that the second premolar, in a first premolar extraction case, is the exception tooth that comes the opposite way, with mesial crown tip toward the extraction space. A full guide to selection is described in Chapter 6.
A clinical illustration of the above can be seen by comparing Figure 11.1 with Figure 11.2.
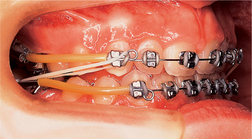

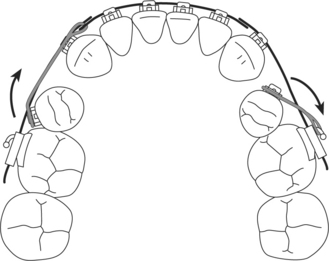
Another way to deal with wayward premolars is elastic thread, which can be tied through the vertical bracket slots and out to the archwire (Fig. 11.3). This is particularly effective with lingually displaced teeth. Rotated premolars can be corrected with elastomeric E-Links or chain: in the case of a mesial rotation, the elastomeric can run from bracket to molar hook, while a distal rotation will be handled in the opposite direction, routing the elastomeric to the cuspid circle (Fig. 11.4). It is seldom necessary to use lingual attachments, although these are a further option for severe rotations.

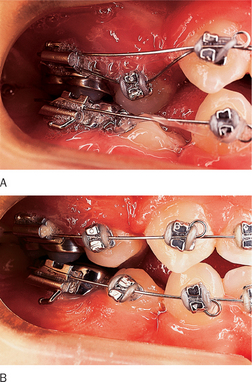
Just occasionally, we all encounter the awkward premolar that has a combination of problems, being lingually displaced as well as rotated. Although rarely necessary, the nickel–titanium ‘underarch’ is worth remembering. This can be used sectionally beneath the main archwire if the problem is unilateral (Fig. 11.5A), or one can use a full auxiliary arch, worn ‘piggy-back’ beneath the main archwire. Either way, the premolars need to align to the rectangular molar tubes, the underarch using the rectangular tube with the main archwire temporarily sitting in the round tube. At the following visit, .020 inch archwires should readily engage the rectangular tubes to begin Stage II (Fig. 11.5B). On no account should a nickel–titanium arch be used to align premolars at the end of Stage I without the security of the stainless main arch, as this would invite loss of control elsewhere, such as relapse of overbite and overjet.
Summary of molar tube usage
Stage II archwires
Space closure
As in Stage I, the cuspid circles serve as traction hooks. Buccal segment spacing can be closed very easily by applying elastomeric E-Links from the cuspid circles to the molar hooks (Fig. 11.6). Space closure is greatly facilitated throughout Stage II by the design of Tip-Edge brackets, as described in Chapter 3, whereby the binding that causes friction with conventional brackets is eliminated. Once again, this is because />
Stay updated, free dental videos. Join our Telegram channel
VIDEdental - Online dental courses


