Fig 18.1 (A) Panoramic radiograph shows reduced subantral bone height because of pneumatization of maxillary sinuses and vertical bone resorption, (B) cross-sectional view of the maxillary sinus showing sinus pneumatization and buccal bone resorption, which leads to reduced bone height and width.
History
To manage these problems and to offer an optimal implant therapy in the posterior maxilla, a sinus-lift procedure was first performed by Dr Hilt Tatum Jr in 1974 during his period of preparation to begin sinus grafting. The first sinus graft was performed by Tatum in February 1975 in Lee County Hospital in Opelika, Alabama. This was followed by the placement and successful restoration of two endosteal implants. After this, suitable instruments were developed to manage the lining elevation from the different anatomical surfaces encountered in sinuses. Tatum first presented the concept at the Alabama Implant Congress in Birmingham, Alabama in 1976 and presented the evolution of the technique during multiple podium presentations each year until 1986, when he published an article describing the procedure. Dr Philip Boyne was introduced to the procedure when he was invited, by Tatum, to be ‘The Discusser’ of a presentation on sinus grafting given by Tatum at the American Academy of Implant Dentistry. Boyne and James authored the first publication on the technique in 1980, when they published case reports of autogenous grafts placed into the sinus and healed for 6 months prior to the placement of blade implants.
The sinus floor elevation procedure is one of the most common surgeries performed in implant dentistry. Since its first description, numerous articles have been published to describe different grafting materials used to graft the elevated sinus floor, modifications to the classic technique, and comparisons between different techniques.
Sinus floor elevation and bone grafting into the sinus has produced predictable results enabling clinicians to place longer implants for more stable prostheses and better long-term outcomes.
Maxillary sinus anatomy
The maxillary sinus is a pyramid-shaped cavity with its base adjacent to the nasal wall and apex pointing to the zygoma. The size of the sinus is insignificant until the eruption of permanent dentition. The average dimensions of the adult sinus are 2.5–3.5 cm wide, 3.6–4.5 cm tall, and 3.8–4.5 cm deep. It has an estimated volume of approximately 12–15 cm. Anteriorly, it extends to the canine and premolar area. The sinus floor usually has its most inferior point near the first molar region. The size of the sinus increases with age if the area is edentulous. The extent of pneumatization varies from person to person and from side to side. Nonetheless, this process often leaves the bony lateral and occlusal alveolus paper-thin in the posterior maxilla. The maxillary sinus bony cavity lined with the sinus membrane, is also known as the ‘schneiderian membrane.’ This membrane consists of ciliated epithelium like the rest of the respiratory tract. It is continuous with, and connects to, the nasal epithelium through the ostium in the middle meatus. The membrane has a thickness of approximately 0.8 mm. Antral mucosa is thinner and less vascular than nasal mucosa (< ?xml:namespace prefix = "mbp" />
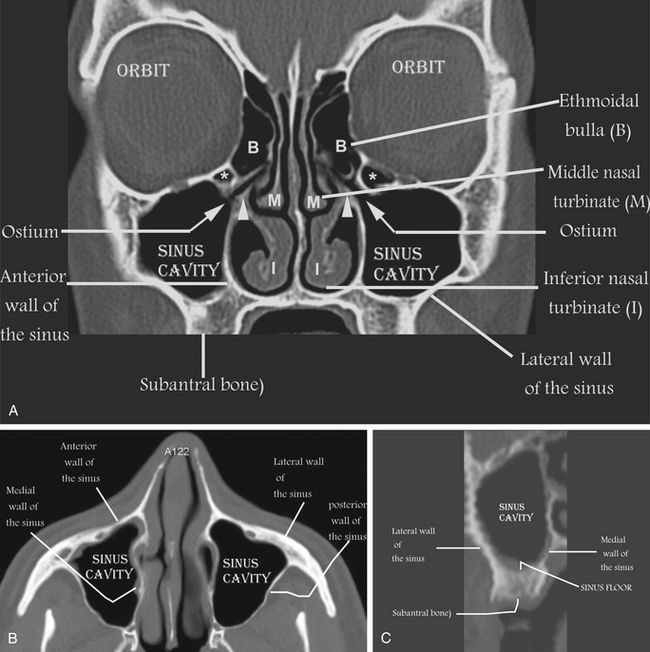
Fig 18.2 (A) Facial, (B) axial, and (C) cross-sectional views of the maxillary sinus region show three-dimensional anatomies of the maxillary sinus and surrounding structures.
The blood supply to the maxillary sinus is primarily derived from the posterior superior alveolar artery and the infraorbital artery, both being branches of the maxillary artery. There are significant anastomoses between these two arteries in the lateral antral wall. The greater palatine artery also supplies the inferior portion of the sinus. However, because the blood supplies to the maxillary sinus area are from terminal branches of peripheral vessels, significant haemorrhage during the sinus-lift procedure is rare. Nerve supply to the sinus is derived from the superior alveolar branch of the maxillary (V2) division of the trigeminal nerve.
Indications for sinus grafting
1. Residual subantral bone is less than 10 mm in height.
2. Residual subantral bone is less than 5 mm in width – sinus lifting and grafting can be performed to insert a narrow diameter but longest possible implant, to gain more implant bone contact area for optimal results in implant therapy.
3. Maxillary sinus is free of any acute or chronic infection (sinusitis) or pathology (cyst).
Contraindications for sinus grafting
1. Heavy smoking – smoking is a relative contraindication for sinus grafting as many studies have shown more failures of sinus grafting and implants in smokers. However, smokers can successfully be treated with sinus grafting and implant therapy but the patient should refrain from smoking at least 15 days before sinus graft surgery and for 4–6 weeks after surgery.
3. Significant recurrent history of chronic sinusitis.
5. Maxillary sinus hypoplasia (MSH) – in these patients, the sinus drainage system is chronically compromised and is associated with malformed uncinate process.
6. Cystic fibrosis (CF) – cystic fibrosis is a genetic disease which represents 92–100% chronic sinusitis rate. Patients with cystic fibrosis exhibit significant rates of sinus polyp formation and fungal sinusitis.
7. Maxillary sinus malignant tumours.
8. Big nose variant – patients having inferior turbinate and/or meatus pneumatization.
Pre- and post-medication for the sinus graft procedure
Antibiotics
1. Amoxicillin–clavulanic acid combination is the drug of choice for sinus procedures (e.g. tab. Augmentin, 1 g) – One tablet twice a day starting 1 day before surgery and continued 5 days after surgery.
2. If the patient is allergic to penicillin, then either cefuroxime axetil (1 tab. Ceftin, 500 mg b.i.d.) or clindamycin (1 tab. Dalacin C, 300 mg t.i.d.) can be prescribed for the patient.
3. Antibiotics like clindamycin (inj. Dalacin-C, 300 mg) can also be added with the graft material used for filling the elevated sinus cavity. It significantly reduces the chances of postoperative infection complications.
Analgesics
Any analgesic combination which contains codeine (tab. Tylenol 3) can be prescribed, one tablet 1 h before surgery and one 1 t.i.d. continued for 5 days after surgery. Codeine is a potent antitussive and so it reduces coughing, which may exert additional pressure on the elevated sinus membrane and can cause its tear and the introduction of bacteria into the graft.
Anti anxiety/sedatives
Sinus grafting is a technique-sensitive and time-consuming procedure; thus a sedative like alprazolam (tab. Alprax, or Valium, 2 mg) should be given to the patient:
1. One tablet in the night before surgery to reduce anxiety, so that patient can sleep comfortably at night before the surgery.
2. One tablet in the morning before the surgery, which reduces the patient’s anxiety so that the patient remains calm and comfortable during the surgery. It also enhances the effect of the analgesia.
3. One tablet at night after the surgery; it reduces excessive movement of the patient, which may cause the complications.
Corticosteroids
A short-term dose of a steroid like dexamethasone (tab. Decadron, 4 mg) can be prescribed for sinus graft patients.
1. Steroids reduce the inflammation of soft tissue and so the chances of postoperative swelling, pain, and incision line opening are reduced.
2. Ensures the patency of the ostium and minimizes any inflammation in the sinus before surgery.
Two tablets (8 mg) (tab. Decadron, 4 mg) in the morning, the day before surgery.
Two tablets (8 mg) (tab. Decadron, 4 mg) in the morning, before the surgery.
One tablet (4 mg) on the next day, i.e. on the morning after the surgery.
One tablet (4 mg) on the third day morning, (48 h) after the surgery.
Multivitamins
Vitamin B complex + zinc + Lactobacillus combination (Cap. BC-Z-LB, once a day) for 5 days after the surgery. It enhances postoperative healing process and maintains gastric flora during the intake of antibiotics.
Antibacterial oral rinse
Chlorhexidine gluconate 0.12% (Periogard mouth rinse) should be used just before the surgery and twice a day for 2 weeks after the surgery. It significantly reduces the microbial flora in the oral cavity and the chances of post-surgery complications.
Conventional surgical techniques
There are two main conventional approaches to the maxillary sinus floor elevation procedure, which have been modified to a large extent with the invention of new armamentariums for safe and effective elevation of the schneiderian membrane.
Lateral approach for sinus grafting
This procedure was first performed by Tatum in February 1975. A crestal incision is given along with two vertical extensions and a trapezoidal mucoperiosteal flap is elevated to expose the lateral aspect of the posterior maxilla. Then the osteotomy is completed by preparing a rectangular/oval window in the lateral bony wall of the maxillary sinus to expose the sinus membrane. The osteotomy can be prepared with the rotary handpiece using a large round carbide or diamond bur. The diamond bur should be preferred over the carbide bur because the carbide bur has more tendency to tear the delicate sinus membrane. The newer piezosurgery unit can also be used for the safe preparation of the window osteotomy and the elevation of the sinus membrane, as it does not cut the soft tissue and thus chances of the sinus membrane tearing are minimized. Once the osteotomy is completed to expose the sinus membrane, the bony window can gently be tapped with the back of the mouth mirror handle, to visualize the complete preparation and to break the small and thin bony bridges still left between the window bone and the surrounding lateral wall of sinus. The sinus membrane is then gently lifted up from the bony floor by using a special set of sinus curettes. Marx and Garg suggested that a cottonoid soaked with a carpule of 2% lidocaine with 1:100,000 epinephrine should be left in the space created for 5 min, to limit bleeding and allow better visualization for further dissection. It is important to free up the sinus membrane in all directions (anteriorly, posteriorly, and medially) before attempting to intrude the sinus elevators medially to elevate the sinus membrane from the sinus floor to the desired height. At the time of sinus membrane elevation, the sharp margins of the curette/sinus elevator should always be maintained on the bony floor to avoid inadvertent membrane tear. The curette should never be placed blindly into the access window. A space is created after the sinus membrane has been elevated by the intruded sinus elevators. This space is then grafted using various bone substitutes alone or mixed with autogenous bone. Care should be taken not to overfill the elevated sinus floor, because it may cause membrane necrosis.
The medial part of the sinus is grafted first. The graft material used can be either an autograft, an allograft, a xenograft, an alloplast, a growth-factor infused collagen matrix, or combinations thereof. After the implants have been placed, the remaining lateral part of the sinus defect is grafted and the window can be covered with a collagen barrier membrane to prevent any soft tissue growth in the grafted sinus.
Armamentaria required for lateral approach are shown in
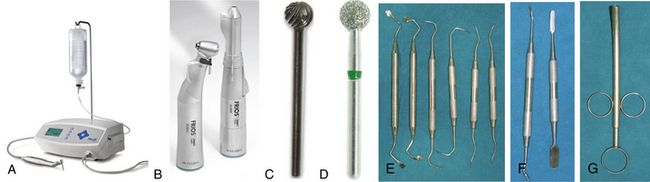
Fig 18.3 (A) Implant motor (physiodispensor) is also used for lateral sinus window preparation. (B) Either contra-angle or straight handpieces (1:1) (C and d) can be used with large round carbide or diamond bur to prepare the osteotomy in the lateral wall of the sinus. (E) A special set of sinus curettes/elevators is then used to carefully elevate the sinus membrane. (F and g) Special instruments can be required to carry the graft into the elevated sinus floor and to fill it adequately and effectively.
Step by step diagrammatic and clinical presentation of the conventional lateral window approach is given in
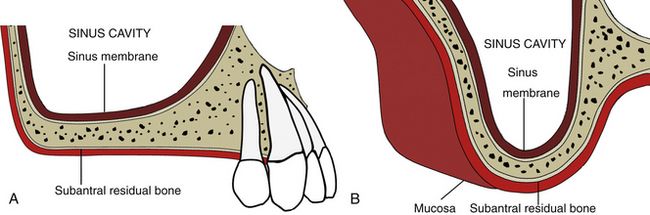
Fig 18.4 (A) Lateral and (B) cross-sectional views of posterior maxilla showing sinus cavity (sinus antrum) and subantral residual bone, which is inadequate in height to insert adequately long implants.
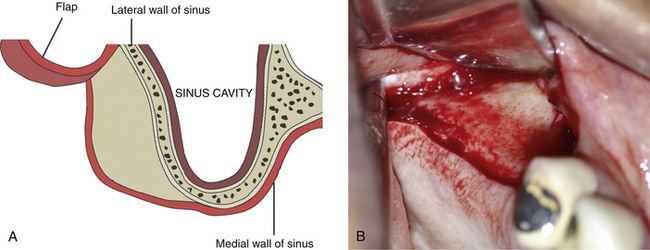
Fig 18.5 (A and b) A mid-crestal incision along with two facial vertical extensions are made and a trapezoidal mucoperiosteal flap is elevated to expose the lateral wall of the maxillary sinus.
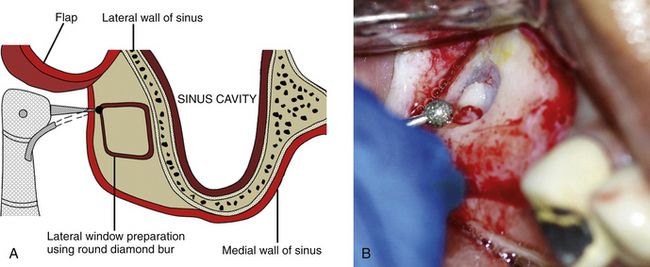
Fig 18.6 (A and b) A rectangular or oval osseous window is carefully prepared on the lateral wall of the sinus using a large round diamond bur to expose the sinus membrane without perforating it.
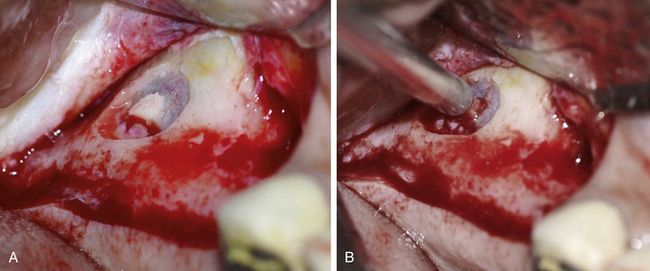
Fig 18.7 (A and b) Once the osteotomy is completed to expose the sinus membrane, the bony window can gently be tapped with the back of the mouth mirror handle to visualize the complete preparation and to break the small and thin bony bridges still left between window bone and surrounding bone.
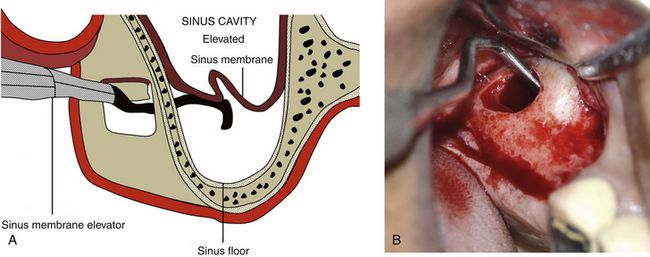
Fig 18.8 (A and b) The schneiderian membrane is carefully elevated to the desired height using a special set of sinus curettes.
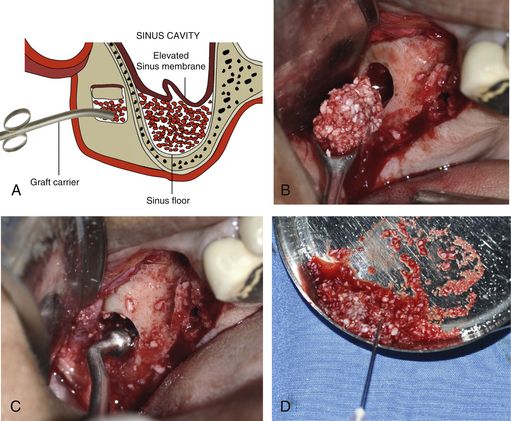
Fig 18.9 (A–c) The elevated sinus floor is grafted through the lateral window using bone substitutes mixed with autogenous bone. A resorbable collagen membrane can be placed under the elevated sinus membrane before filling it with the graft as it protects the sinus membrane from being torn by the graft particles. (D) A parenteral antibiotic like clindamycin can also be mixed with the graft to prevent any postoperative infection.
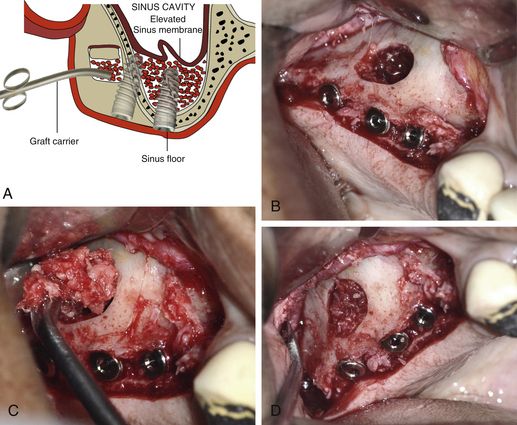
Fig 18.10 Once the elevated sinus floor has been loosely filled with the graft, the implant osteotomies are prepared in the usual fashion and implants are inserted. (A–d) The rest of the sinus is further grafted until it is all loosely packed with the graft. If subantral bone height is inadequate to stabilize the immediately inserted implants, the surgeon can only graft the sinus and choose to go for delayed implant placement when the new bone has regenerated in the grafted sinus floor after 6–8 months.
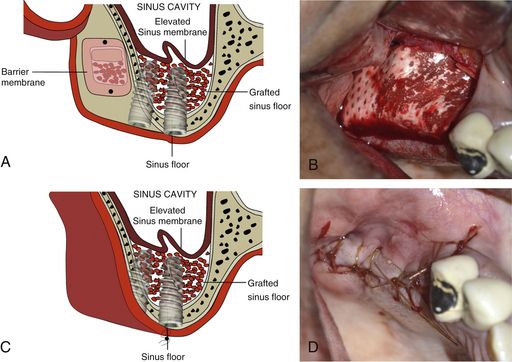
Fig 18.11 (A and b) A resorbable collagen barrier membrane can be placed to cover the lateral window to prevent soft tissue ingression into the grafted sinus. (C and d) Flap is sutured back with a primary closure. Implants are uncovered and restored after new bone formation has occurred in the entire grafted sinus in 6–8 months.
Simultaneous or delayed implant placement
Depending on the residual subantral bone height to stabilize the implant, the implant surgeon may decide either on simultaneous or delayed implant insertion in sinus grafting cases. Implants are placed either simultaneously with the graft (one-stage lateral antrostomy) or after a delayed period of up to 6–12 months, to allow for graft maturation (two-stage lateral antrostomy). The initial bone thickness at the alveolar ridge seems to be a reliable indicator in deciding between these two methods. If the subantral bone height is 4 mm or less, initial implant stability could be jeopardized. Therefore, a two-stage lateral antrostomy should be carried out. If the residual bone present below the sinus floor is sufficient in dimension and quality to adequately stabilize the implant, the implant can be inserted at the time of sinus grafting.
Graft materials for the sinus grafting
Numerous research papers have been published to evaluate the prognosis of implants under various grafting materials. Autogenous bone remains the gold standard in bone grafting. Iliac crest, chin, anterior ramus, and tuberosity have all been mentioned as common autogenous donor sites in maxillary sinus lift. Hydroxyapatite (HA), mixed with autogenous bone or used alone, has also been shown to be a viable alternative. Based on past research and clinical trials, the demineralized bone matrix (FDBM, Grafton), which is osteogenic in nature, can be a viable alternative for autogenous bone if used with Bio-Oss or tricalcium phosphate (TCP). Bio-Oss or HA + β-TCP has shown remarkable results in sinus grafting even if used alone (
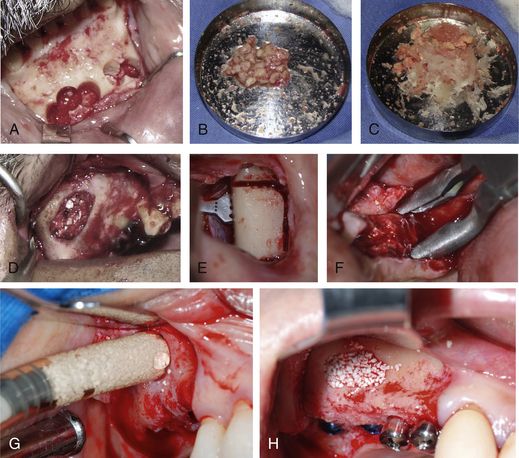
Fig 18.12 (A and b) Autogenous bone can be harvested from the mandibular symphysis using trephines, crushed and mixed with demineralized bone matrix or (C and d) any synthetic graft like HA or HA + β-TCP mixture and used to graft the sinus. (E) The other intraoral sources of autograft can be mandibular buccal shelf or (F) maxillary tuberosity. (G and h) The mixture of the HA (70%) and β-TCP (30%) has also been used to successfully graft the sinus cavity, with predictable success rate.

CASE REPORT-1
Sinus grafting with lateral approach and delayed implant insertion (
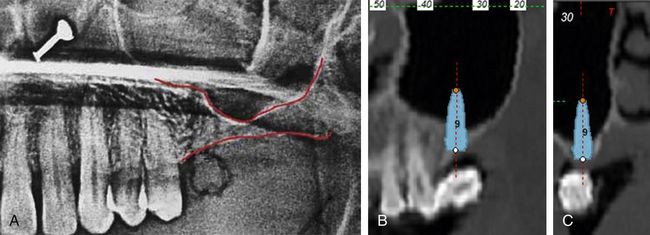
Fig 18.13 (A) Preoperative dental radiograph shows inadequate subantral bone height to insert implant; thus sinus grafting and delayed implant placement are planned to replace missing first molar. (B and c) The lateral and cross-sectional CT images with simulated implant placement show absolute need of sinus grafting procedure for adequately long implant placement.
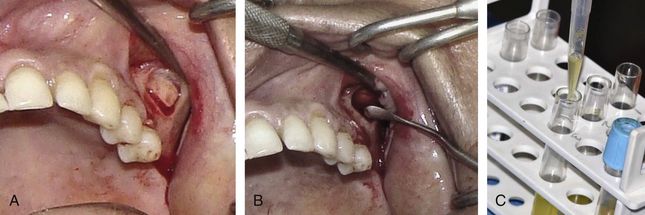
Fig 18.14 (A) A trapezoidal flap is elevated to expose the anterolateral wall of the sinus and an oval window is prepared using a large round diamond bur to expose the sinus membrane. (B) Further, the Schneiderian membrane is carefully elevated using a set of sinus elevators. (C) The PRGF (plasma rich in growth factors) is prepared from the patient’s venous blood.
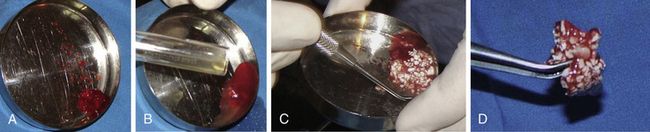
Fig 18.15 (A–d) Autogenous bone, which is harvested from the maxillary tuberosity of the same side, is mixed with PRGF and bone substitute (HA + β-TCP). Besides enhancing the bone regeneration potential of the bone graft, PRGF also binds the graft particles together and improves its handling properties.
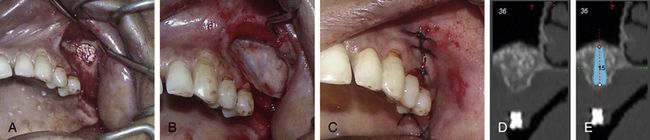
Fig 18.16 (A) Elevated maxillary sinus is grafted and (B) covered with a barrier collagen membrane. (C) Flap is sutured with primary closure. (D and e) CT cross-sectional images show new bone formation in the grafted sinus after 6 months, which seems sufficient for the insertion of an adequately long implant.
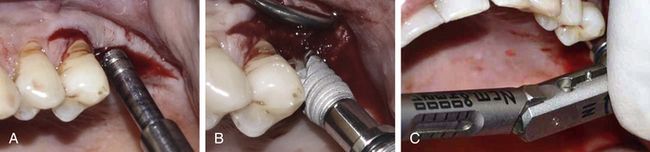
Fig 18.17 (A) The implant osteotomy is prepared after 6 months using only osteotomes to laterally condense the bone and (B) implant (5 × 13 mm) is inserted. (C) Inserted implant shows adequate primary stability evaluated with the torque ratchet (more than 35 Ncm).

Fig 18.18 (a) Clinical view of inserted implant and (b) postimplantation radiograph. (c and d) Implant uncovered and restored after 6 months. (e) Radiograph 1 year after loading shows stable bone around the implant.


CASE REPORT-2
Bilateral sinus grafting with simultaneous implant placements (Courtesy: Dr Ata Garajei, DMD and Dr Amin Yamani, DDS, Tehran, Iran) (
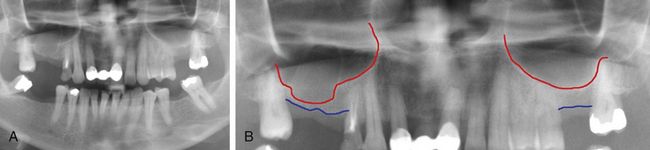
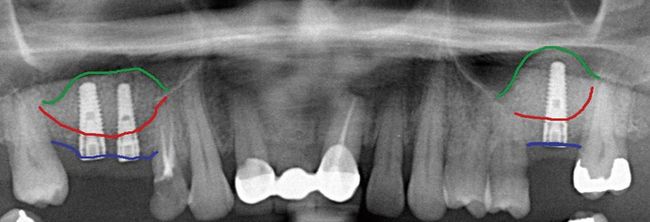
Fig 18.19 (A and b) Long-time missing teeth numbers 15, 16 and 26 have resulted in lowering down of the sinus floor, which in turn leads to reduced subantral bone height insufficient to insert implants; thus, sinus grafting procedure and simultaneous implant insertion is planned.
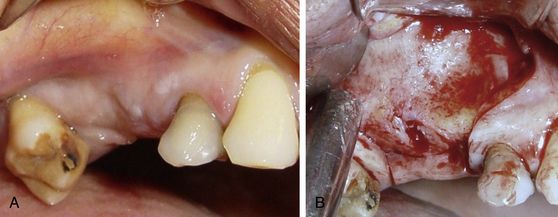
Fig 18.20 (A and b) A trapezoidal flap is elevated to expose the lateral wall of the sinus on the right side of maxilla.
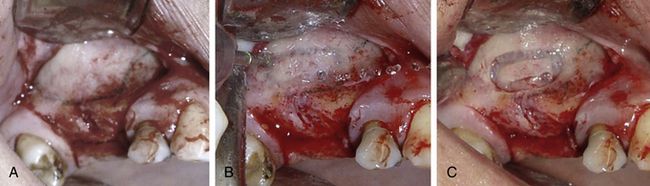
Fig 18.21 (A) The sinus lining path is approximately marked using sterile HB pencil using the radiograph as reference. This avoids the problem of window preparation at an incorrect position. (B) An oval window is prepared on the lateral wall of the sinus using a large round diamond bur to expose the membrane. A (C) greyish colour sinus membrane can be seen through the scored window.
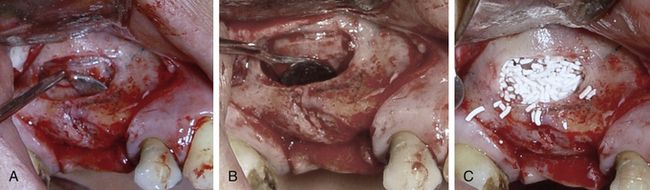
Fig 18.22 (A and b) The sinus membrane is carefully elevated using a set of sinus curettes and (C) the elevated sinus floor is grafted using a mixture of HA and β-TCP.
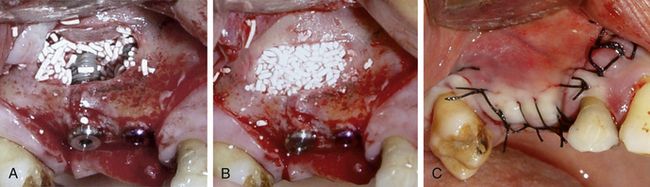
Fig 18.23 (A) The implant osteotomies are prepared and implants are inserted in usual fashion. (B) Graft is further filled into the sinus over the implants and (C) the flap is sutured back.
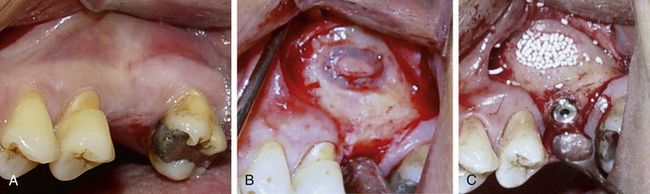
Fig 18.24 (A–c) Sinus grafting and implant insertion are performed in a similar fashion on the left side.

Advances and modifications in the lateral approach of sinus lifting
With advancements in technology and armamentariums, several modifications have been proposed in the conventional lateral sinus window technique, which was originally proposed by Tatum. A few of these advancements, which facilitate easy and safe sinus lifting through the lateral approach are described here.
Lateral approach of sinus lifting using piezosurgery unit
The ultrasonic piezosurgery unit has specifically been developed for cutting bony tissue with minimal damage to the soft tissue. High-frequency oscillations between 24 and 29.500 Hz, modulated with a low frequency between 10 and 60 Hz, enable efficient and controlled use and improve healing of the tissue (
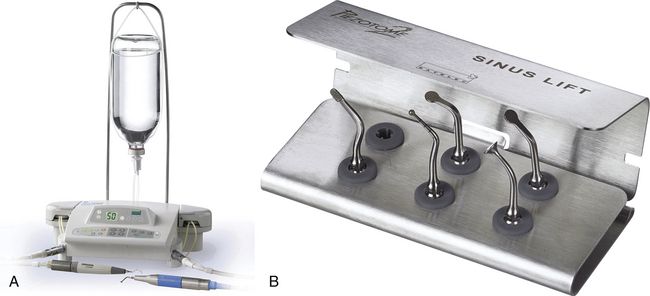
Fig 18.26 (A) Piezosurgery unit (piezotome from Satelec, France), sinus lift kit containing special tips for lateral window preparation and (B) sinus membrane elevation.
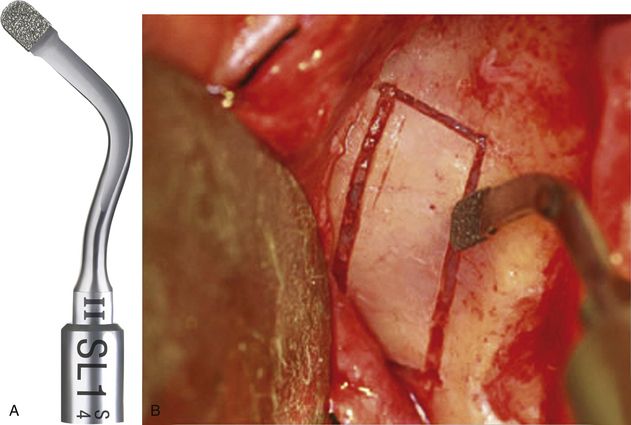
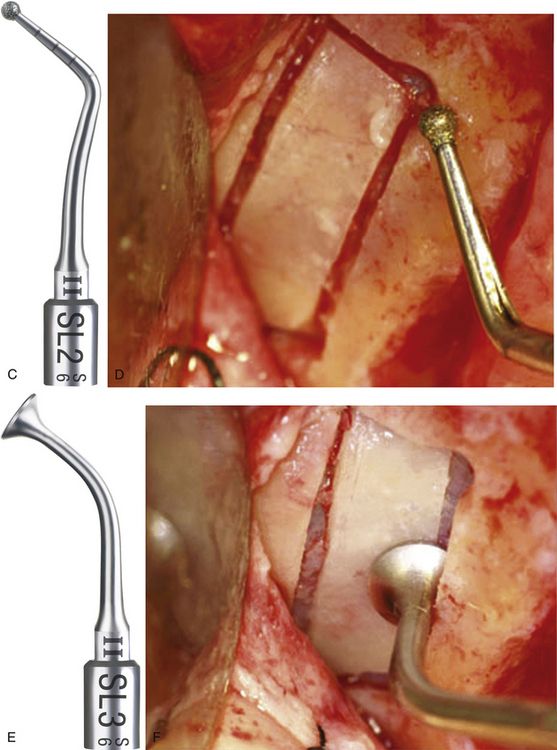
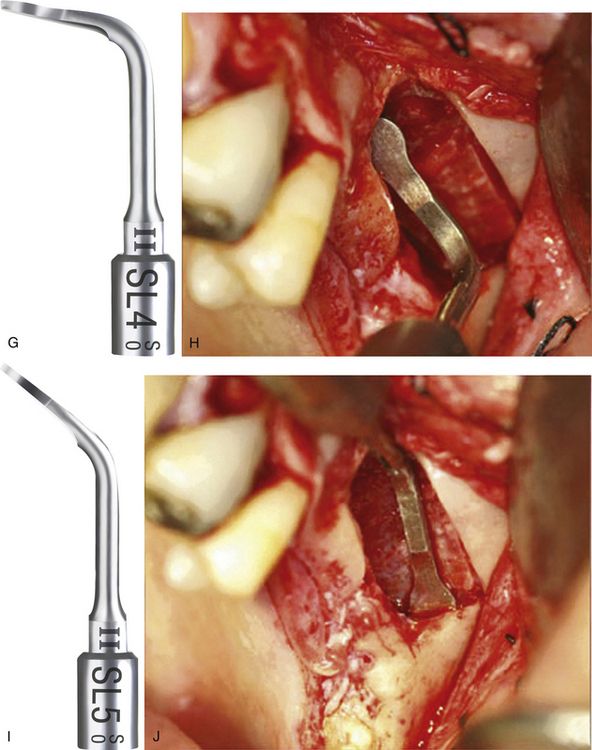
Fig 18.27 Application of the various piezo tips: SL1 Tip is a diamond-coated tip for vestibular bone window cut and for attenuation of sharp angles. (A and b) A rectangular window can easily be scored using this tip, without tearing the sinus membrane.
SL2 Tip is a diamond-coated ball tip for smoothing the vestibular bone window; precise osteoplasty using this tip at the prepared osteotomy corners to remove the sharp bony edges, reduces the chances of membrane tear during elevation. (C and d) Ball diameter: 1.5 mm, laser marked every 2 mm. (E and f) SL3 Tip is a flat-ended noncutting tip used for detaching the Schneiderian membrane from the window edge. (G and h) SL4 Tip is a noncutting spatula, oriented at 90°, used for detaching the Schneiderian membrane inside the sinus.
(I and j) SL5 Tip is a noncutting spatula, oriented at ±135°, used for detaching the Schneiderian membrane inside the sinus and for removing anatomical structures.
(Courtesy: Dr Pierre Marin, Implantologist–private practice, Bordeaux, France)

CASE REPORT-3
Sinus elevation using piezotome with simultaneous implants insertion
A 62-year-old female patient presented with teeth numbers 14, 16, 17 missing and tooth number 15 misaligned and mobile. The patient was medically fit for the sinus grafting surgery. Tooth number 15 was extracted and socket grafting was performed 3 months before the sinus graft surgery (
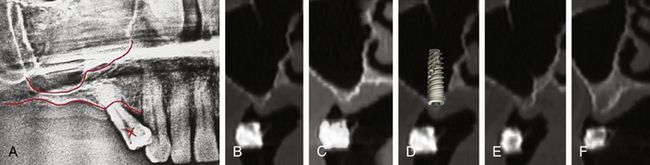
Fig 18.28 (A) Patient’s radiograph shows very limited subantral bone height. (B–f) Cross-sectional CT images of the edentulous area show very limited bone height and ridge width. It indicates need for sinus grafting and simultaneous ridge splitting to insert implants with adequate diameter and length.
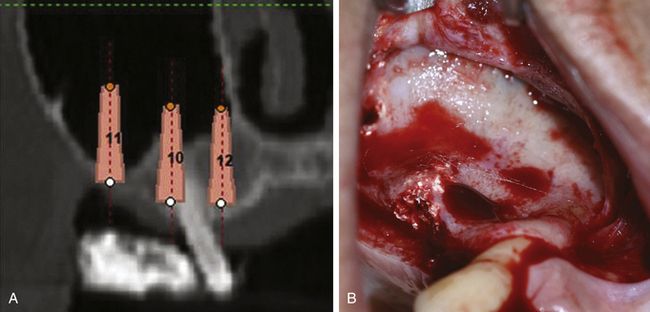
Fig 18.29 (A) Three simulated implants (3.75 × 13 mm) were planned using implant planning software. (B) Trapezoidal flap is elevated to expose the lateral wall of the sinus. The previously grafted socket of the tooth number 15 can be seen.
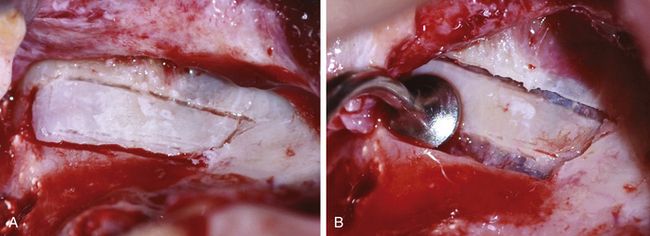
Fig 18.30 (A) A rectangular osseous window is prepared on the lateral wall of the sinus using SL1 and SL2 tips of the piezotome. (B) The SL3 tip is then used to detach the Schneiderian membrane from the window edges.
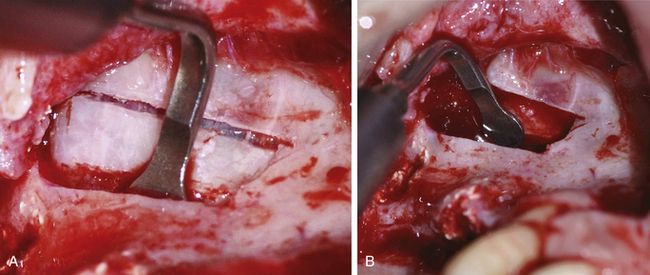
Fig 18.31 (A and b) The SL4 tip is then used to carefully free the membrane from the inferior, posterior, and anterior wall of the sinus, and to elevate it to the desired height.
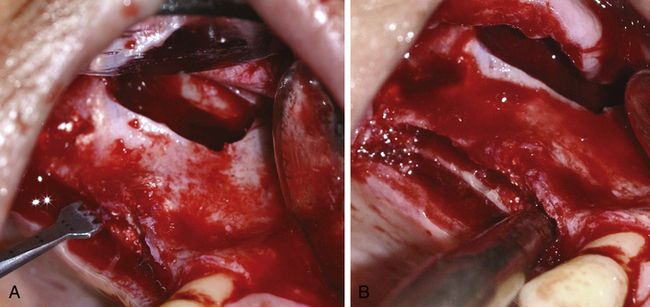
Fig 18.32 (A and b) A mid-crest osteotomy channel is created using the piezo saw and the ridge is splitted to pry the buccal and palatal plates apart, using the razor sharp osseous splitters.
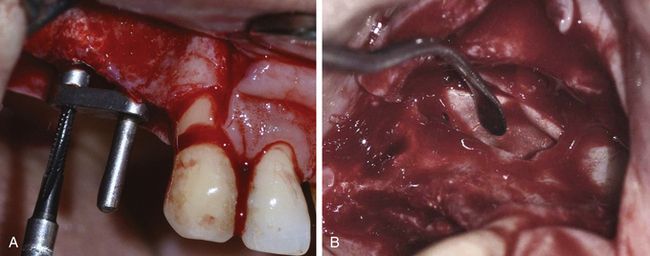
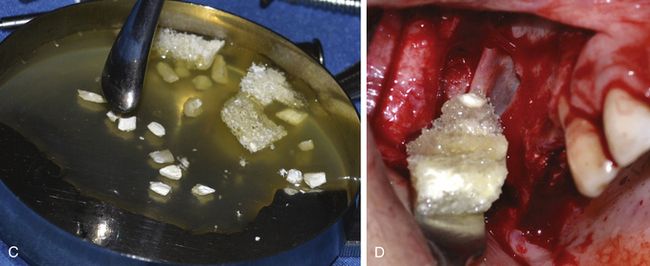
Fig 18.33 (A) Implant osteotomies are prepared using a ParaGuide. (B) A collagen barrier membrane is placed underneath the elevated sinus membrane to prevent its inadvertent tearing during grafting. (C) The corticocancellous allograft is mixed with PRGF. (D) First, the collagenous spongy soft bone is placed under the membrane. It gives a cushion effect against the expansion of the sinus membrane when the patient respires through the nose and prevents membrane tear.

Fig 18.34 (a) The sinus is further grafted using cortical chips and (b) once the medial half of the sinus has been grafted, three implants are (3.75 × 15 mm) inserted.
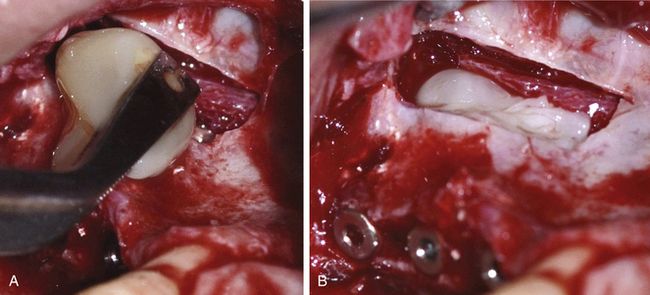
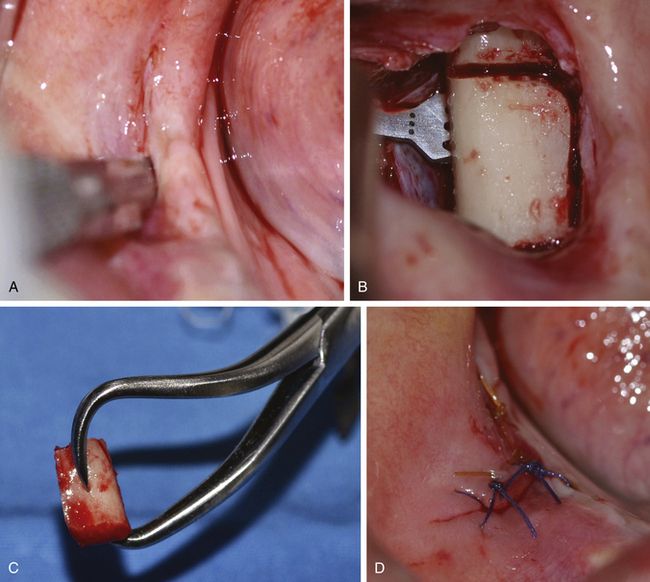
Fig 18.36 (a–d) A vertical incision is given to expose the mandibular buccal shelf region and a corticocancellous block is harvested using piezo saw, and the flap is sutured back.
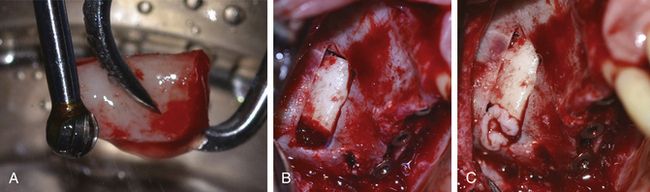
Fig 18.37 (a) The block is shaped to fit the sinus window using a large carbide trimmer. (b) The block is inserted to graft the lateral half of the sinus cavity as well as to close the window. (c) The rest of the window opening is closed using PRGF membrane.
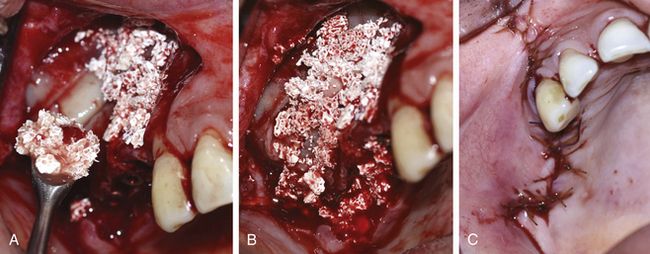
Fig 18.38 (a and b) The synthetic particulate graft (HA + β TCP) mixed with PRGF is used to graft the peri-implant spaces and for lateral bone augmentation. (c) Flap is sutured back with watertight sutures.
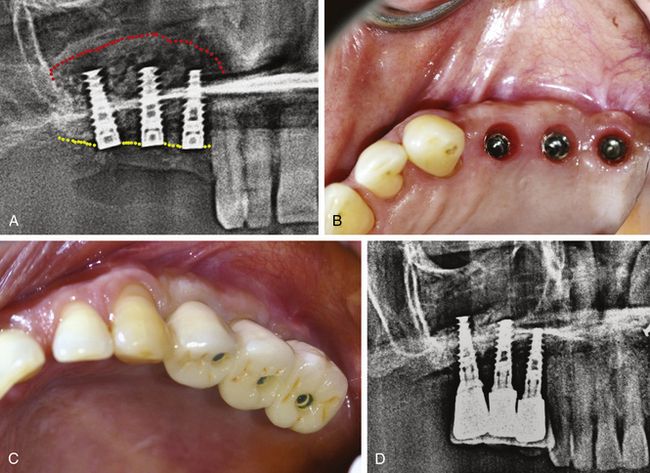
Fig 18.39 (a) Postoperative radiograph shows grafted sinus floor and inserted implants. (b and c) Implants are uncovered and restored after 8 months. (d) Radiograph 1 year after loading shows consolidated sinus graft.

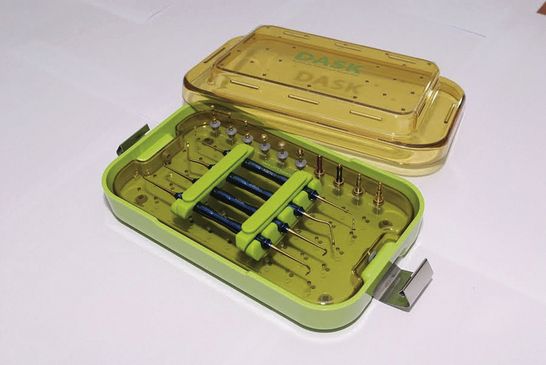
Lateral approach of sinus lifting using DASK
The DASK sinus elevation kit (from Dentium Co. Ltd., Seoul, Korea) contains specially designed tips, which are used with the rotary handpiece to score the osseous window to approach the sinus membrane. It also contains sinus curettes to elevate the sinus membrane (
Step by step diagrammatic presentations of the lateral approach using DASK
Step 1 – scoring the lateral osseous window. There are two techniques for lateral window preparation using DASK:
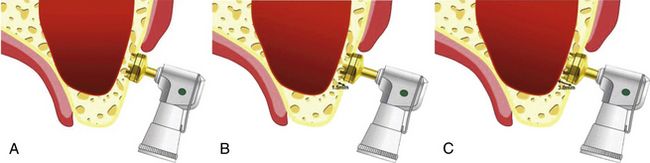
Fig 18.41 (A–c) Wall-off technique- After elevating the mucoperiosteal flap to expose the ridge and lateral wall of the sinus, a special DASK drill attached to a rotary handpiece is used to carefully score a circular osseous window at the lateral osseous wall of the sinus, without any tear to the underlying Schneiderian membrane. Once the drill has reached the membrane, the scored round bony wall is carefully removed (wall-off) from the underlying sinus membrane and the membrane is elevated using a special set of sinus curettes.
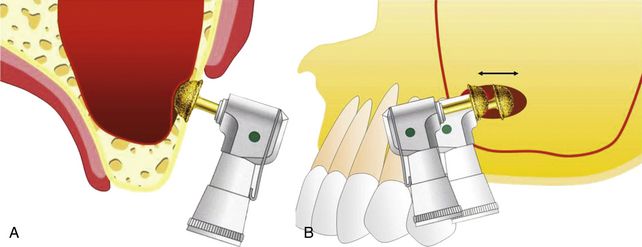
Fig 18.42 (A and b) Grind-out technique- A special large coarse diamond DASK drill is used to grind the lateral wall of the sinus with a sweeping action to reach the underlying sinus membrane. Once the sinus membrane is exposed, it is elevated using a special set of sinus curettes.
Step 2 – sinus membrane elevation (
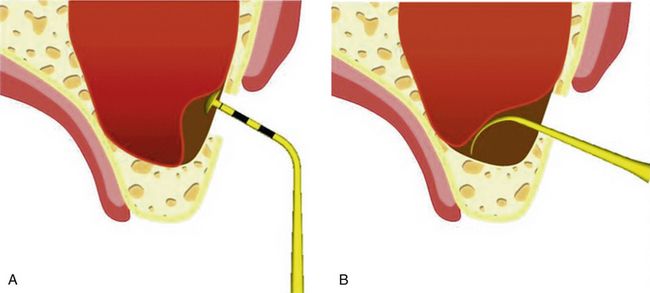
Fig 18.43 (A) After exposing the sinus membrane either with wall-off or grind-out technique, a special DASK tip is used to detach the membrane from the prepared window margins. (B) Once the membrane has successfully been detached all around from the prepared osseous window, a special set of curettes (sinus elevators) is used to elevate the Schneiderian membrane to the desired height.
Step 3 – osteotomy preparation for the implant (
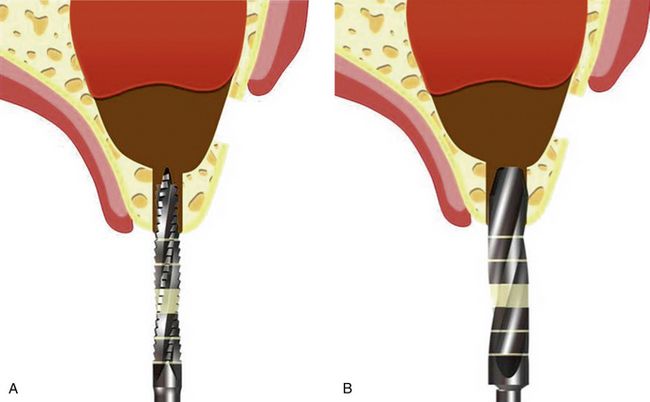
Fig 18.44 (A and b) After the sinus membrane has been elevated to the desired height, the osteotomy for the implant is prepared from the crestal approach using drills of the particular implant system.
Step 4 – grafting of the elevated sinus floor and implant placement (
Stay updated, free dental videos. Join our Telegram channel
VIDEdental - Online dental courses


