Fig. 6.1
Examples of cases of molar endodontics following the principles discussed in this chapter
Clinical procedures outlined in this chapter are selected to serve their purpose in light of the two goals for endodontic treatment that are to preserve the natural dentition for the lifetime of the patient (“retention”) and to treat or prevent apical periodontitis (“healing”). These are not mutually exclusive goals and both are obviously important. Therefore, clinicians should evaluate any treatment step and clinical guideline for their effect for overall outcomes, in both dimensions mentioned above.
There is solid evidence in the literature that, debriding all canals to working length (WL) [3] or achieving patency [1] is efficient in treating apical periodontitis, while committing overpreparation errors [4] or filling beyond the confines of the root canal system [5] is an obstacle in this process. Appropriate clinical procedures should be selected to produce these outcomes.
Molar endodontics is inherently more difficult than root canal treatment for central maxillary incisors for several reasons, notably the more complex anatomy and the location of the teeth in the patients’ mouth, among other factors. Adherence to a routine sequence and sound general principles will increase clinical outcomes; however, a successful clinician will consider the specific patient’s needs and be prepared for the unusual occurrence. The content of this chapter is divided into three parts: root canal preparation, disinfection, and obturation. These steps depend on each other; for example, canal preparation itself partly removes pulp tissue and microorganisms. Similarly, with contemporary techniques, only a prepared canal can be appropriately obturated. Therefore, the objectives for the chemomechanical preparation of molars are to:
- 1.
Create space for disinfection by chemical means
- 2.
Provide conditions for appropriate obturation
- 3.
Minimize damage to coronal and radicular structures
6.2 Shaping the Molar Root Canal System
Current best practices for root canal shaping promote efficient disinfection and prepare a smooth flowing shape for complete fill of the canal system, while preserving the original canal path and retain structural integrity. A systematic approach to molar root canal preparation contains the steps described below:
- 1.
Analysis of the specific anatomy of the case
- 2.
Canal scouting
- 3.
Coronal modifications
- 4.
Negotiation to patency
- 5.
Determination of working length
- 6.
Glide path preparation
- 7.
Root canal shaping to desired size
- 8.
Gauging the foramen, apical adjustment
6.2.1 Step 1: Analysis of the Specific Anatomy of the Case
Elsewhere in this book, the radiographic appearance of molar root canal systems is described in detail. For successful shaping, it is essential to integrate understanding dental anatomy in general with the specific information gleaned from preoperative radiographs as well as direct intraoral visualization. Taken together with an adequate access cavity (see Chap. 5), the clinician can begin to select a general preparation strategy that serves both the immediate need to disinfect and clean the radicular spaces as well as setting up the tooth for long-term retention.
The analysis of the specific clinical situation in molar endodontics will facilitate shaping of the root canal system and help to avoid mishandling of natural difficulties that could create procedure mishaps, which are then more difficult to manage. Specifically the presence of coronal interferences, possible bifurcations, or lateral topographical exits of the apical foramen should be anticipated before bringing an instrument in a delicate root canal.
A root canal that seems to be straight in a radiograph can have multiple curvatures in three dimensions that cannot be captured in a two-dimensional film. A clinician unaware of this fact is susceptible to errors during length determination and can end with canal transportation during the shaping procedures.
Today’s technology, specifically the availability of nickel-titanium (NiTi) rotary instruments, apex locators, the operating microscope, and most recently CBCT, has altered the landscape of endodontics. Sound principles for the use of each technology have been established and should be followed. For example, at the onset of molar root canal treatment, the desired minimal apical preparation size needs to be considered. With current technology, an apical size equivalent to #25 with a minimum taper of .06 facilitates sufficient irrigation with fine irrigation needles, while preventing coronal overpreparation and shaping errors in highly curved canals. Current best evidence suggests that there is no specific apical size that predictably results in complete eradication of bacteria and no specific apical size leads to better outcomes [1]. Consequently, selection of a desired apical size has to be viewed considering multiple factors, such as canal curvature, radicular wall dimension, irrigant flow, and others.
Uniformly outcomes studies described poor results when canal fillings are overextended, therefore preoperative analysis must include the desired apical end point of all shaping and obturation procedures, as described in detail below.
6.2.2 Step 2: Canal Scouting
Right after the access cavity preparation and before the enlargement of the coronal third, it is recommended to scout the canal with a #10 K-file, not with the intention of negotiating the canal to its full length, but merely to orientate the placement of the rotary instrument that is going to accomplish the coronal flaring of the canal. Care needs to be taken here to stay short of significant binding; this step is designed also to prevent ledges during the coronal flaring that will make the step of negotiation difficult to accomplish.
A typical example for a situation where this step is beneficial are mesiobuccal canals in maxillary molars, specifically the so-called MB2, which often exits the pulp chamber toward the mesial under a dentin shelf and then curves toward the distal (see Chap. 1). The management of this curvature with a Gates-Glidden drill before scouting an MB2 canal in an upper molar is a common practice among inexperienced clinicians that often leads to ledges in a small-diameter root canal and prevents negotiation to length; a previous assessment of the initial direction of the canal; using contemporary NiTi orifice modifiers instead of Gates-Glidden drills will help avoiding this common mishap.
6.2.3 Step 3: Coronal Modifications
Frequently in molar endodontics dentin triangles prevent the introduction of files into the canals in a straight line, which would be clearly identified in the previously described clinical step (Fig. 6.2). These dentin triangles may be removed by enlarging the access (see Chap. 5) but considering the goal of dentin preservation, a more conservative approach is indicated. Coronal flaring was historically emphasized to prevent procedural error or fractures with tapered rotary instruments; the procedure blends the access cavity into the coronal portion of the root canal while removing coronal dentin obstacles and relocating the orifice of the canal away from the furcation (also known as “danger zone”).
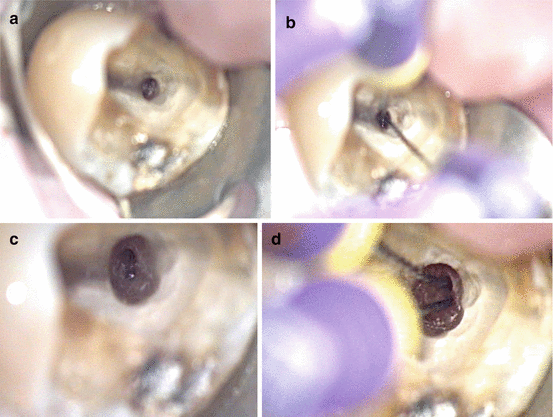

Fig. 6.2
The effect of orifice modification on clinical condition during molar root canal treatment. Coronal flaring allowed the straight advancement of #10 K-files in both MB and DB canals. Note the ability to extend both size #10 K-files deep into the root canals after orifice modification. (a, b) Before coronal flaring. (c, d) After coronal flaring
This is in principle a beneficial practice before negotiating the root canal to its entire length when a canal is constricted, mineralized, or difficult to access. It facilitates tactile control of the instruments responsible for negotiation, diminishing the chances of accidents in the apical third by reducing the contact surface of the instrument with the canal walls. On the other hand, it has been demonstrated that overflaring reduces dentinal wall’s thickness [6] and therefore structural strength.
When done well, early coronal flaring, also known as Orifice Modification, is beneficial for the following reasons [7, 8]:
- 1.
Easier placement of rotary instruments into orifices
- 2.
Minimal working length changes during canal preparation
- 3.
Earlier access of disinfecting irrigation solutions
- 4.
Easier access of files to the apical third
- 5.
Better tactile control of hand instruments during negotiation
Coronal flaring was historically performed with Gates-Glidden drills. These have largely been superseded by dedicated NiTi rotaries that have comparatively larger tapers and small tips. These instruments are laterally cutting and typically have triangular cross sections. Alternatively, specific burs or ultrasonic tips may be used to create a more direct entry into the coronal root canal third.
Only recently the mechanics of lateral cutting of flaring instruments has been discussed in detail. A study compared the cutting efficacy of radial-landed and triangular cross sections and found that triangular designs were more cutting efficient compared to radial-landed design; furthermore, flexible martensitic alloy cut more rapidly than conventional NiTi alloys [9].
6.2.4 Step 4: Negotiation to Patency
In spite of all the new instruments and devices manufactured in recent years to clean and shape canals, negotiation is all about having a profound knowledge and understanding of root canal anatomy (Fig. 6.3). This is probably one of the key factors during cleaning and shaping. If the clinician cannot negotiate the root canal to the terminus, there are a lot of chances of failure in spite of the use of the most modern and expensive devices to clean and shape. Experience enhances the ability to negotiate root canals with difficult anatomy to the terminus. The canal must be explored to patency, that is, until a small negotiation file (#8 or #10) reaches the periodontal ligament, as indicated by a “zero” reading from an apex locator. Recommendations for best practices during canal negotiation include the use of the following:
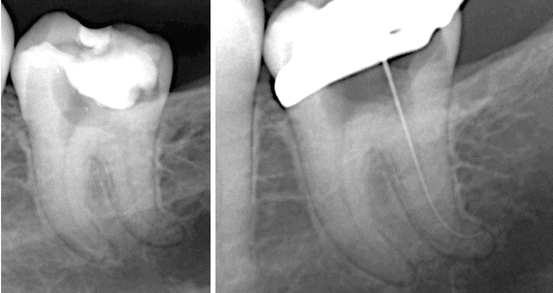

Fig. 6.3
All three root canal thirds, coronal, middle, and apical should be evaluated for possible impediments during canal shaping. This will help clinicians to select best practices for each specific situation. In the case shown, a significant curve in the apical third was managed in a staged approach
- 1.
A viscous chelator during negotiation to prevent pulp tissue blockage
- 2.
An apex locator connected to each instrument to know when the apical foramen is passed
- 3.
Hand movements that preserve apical patency and do not push dentin shavings apically
- 4.
Application of appropriate curves to the negotiation instruments
- 5.
Selection of the shortest file that can realistically reach patency
The patency concept (Box 6.1) has historically been controversial but accumulating evidence both in vitro [10, 11] and in vivo [1] strongly suggests that keeping canals patent is associated with better outcomes. Maintaining apical patency decreases the chance of postoperative pain [12]; while patency in vitro may be connected to small amounts of irrigant to reach the periodontium, maintaining patency does not appear to increase the chance of irrigation accidents clinically [13] and therefore its benefits appear to outweigh possible risks.
Further advantages of this procedure for achieving patency include:
- 1.
Lower risk of loss of length, reduces canal transportation, and other accidents such as ledges [14]
- 2.
Maintaining the anatomy of the apical constriction [15]
- 3.
Improvement of clinicians’ tactile sense during apical shaping [16]
- 4.
Less apical transportation when using a #8 or a #10 K-file to maintain apical patency [17]
- 5.
- 6.
Reduction of gas bubbles that may prevent the advancement of irrigant to working length [20]
However, the mere presence of NaOCl in the apical root canal third does not guarantee the proper cleaning of the root canal, as it will be discussed later in this chapter. It is well known that sufficient time and surface contact is needed for the dissolution of organic matter that NaOCl provides [21].
Negotiation itself is done with a light touch and rotational back-and-forth file movements, also known as “watch-winding.” Precurving the negotiating instrument at this step is not essential but may be needed in cases of moderate to severe curvature (Fig. 6.4); in case the file stops before the estimated working length (see below), either the file should be precurved to be able to bypass an impediment or more space needs to be created midroot or in the apical third. These two conditions are defined by the tactile feedback the clinician gets from the file; a loose resistance indicates the presence of a ledge or acute curve, while so-called rubbery resistance suggests the presence of a tight canal space or the presence of compacted soft tissue that prevents the file from penetrating deeper into the canal.
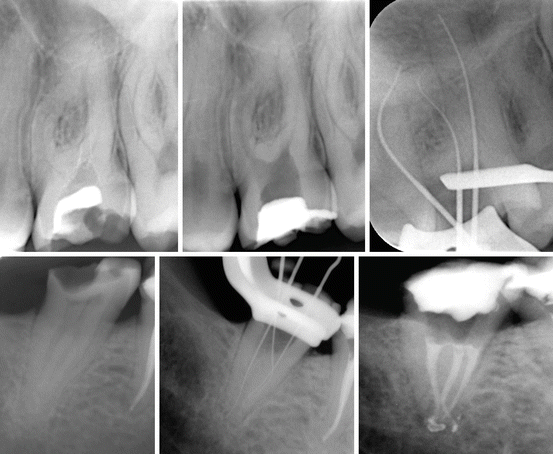

Fig. 6.4
Proper coronal flaring of root canal promotes their negotiation to working length (WL). Top, In this case significant curves in MB and DB canals were managed successfully. Bottom, In this case the instrument was initially not advancing to WL in the MB canal. Additional orifice modification was needed to allow negotiation and glide path preparation of the canal before taking rotary instruments to WL
West [22] differentiates four specific conditions that require technique modifications:
- 1.
Apical blockage
- 2.
Mismatch between canal curve and instrument
- 3.
Too large file tip
- 4.
Presence of restrictive coronal dentin
All these conditions may be remedied by either changing the negotiation file, its curvature, or by modifying the coronal two-thirds of the canal.
Box 6.1
Apical patency
|
According to the AAE Glossary, patency is a “technique where the apical portion of the canal is maintained free of debris by recapitulation with a small file through the apical foramen.” It is believed that with patency, less or no blockage by hard or soft debris exists and the canals are free of ledges or acute curves that subsequent files would not be able to negotiate.
|
|
A patency file, which may be defined as a small and flexible K-file, can passively be moved through the apical constriction without widening it.
|
6.2.5 Step 5: Determination of Working Length
Working length (WL) is defined as the distance from a coronal reference point to a point at which canal preparation and obturation should terminate [23]. Both end points included in this definition are important and require attention in this chapter; however, the apical endpoint of the prepared shape in relation to the apical anatomy has been one of the most discussed topics in the endodontic literature.
The apical endpoint of root canal treatment should ideally be at the apical constriction, the narrowest diameter of the canal. This point is believed to coincide with the cement-dentinal junction (CDJ), based on histologic sections and ground specimens. However, the position and anatomy of the CDJ varies considerably from tooth to tooth, from root to root, and from wall to wall in each canal. Moreover, the CDJ cannot be located precisely on radiographs. For this reason, some have advocated terminating the preparation in necrotic cases at 0.5 to 1 mm short of the radiographic apex and 1–2 mm short [24, 25] in cases involving irreversible pulpitis, although there is no definitive validation for this strategy at present [26].
Best current evidence suggests that incomplete canal shaping and filling may result in clinically acceptable outcomes in vital cases, that is, not bacterially contaminated canal systems, but in the presence of microorganisms working short may well contribute to persistent or recurrent apical periodontitis [27, 28] or posttreatment disease [29, 30].
Using an electronic apex locator has helped clinicians identify the position of apical foramina more accurately and allow safe canal shaping as close as 0.5 mm to the canal terminus.
Best clinical practice for working length determination and maintenance includes:
- 1.
Estimate the working lengths from properly angulated preoperative radiographs
- 2.
Select an adequate coronal reference point for each root canal
- 3.
Determine WL electronically with an apex locator in a canal that contains an appropriate amount of electrically conducting medium (chelator or ion-containing irrigation solution)
- 4.
Verify electronically determined working lengths with a periapical radiograph [31]
While specific manufacturer guidelines may vary, electronic apex locators work best in molars after drying the pulp chamber with a cotton pellet. A small file is advanced until the apex locator marks apical patency and then pulled back about 0.5 mm to determine the working length of the canal. It is best to start with a #8 or #10 K-file depending on the size of the canal and confirm the length with a flexible #15 file. Apex locator can produce irregular signals in large canals and so it is desirable to check the working length with larger files that come closer to binding at the foramen. The better the adaptation of the tip of the instrument to the foramen, the more accurate the length determination (Fig. 6.4).
6.2.6 Step 6: Glide Path Preparation
It is recommended to explore and shape a root canal at least to a #15 size instrument before the use of a rotary NiTi instrument to full working length [32] to create a glide path for the safe advancement of the rotary instrument tip [33]. Such a glide path reduces the contact area between subsequent shaping instruments and the canal wall and therefore the torsional loads induced by shaping rotary instruments [34]. In fact, the presence of a glide path is essential for the predictable use of rotary instruments in canal shaping.
Typically, K-files sizes #10 and #15 are used in watch-winding or balanced-force motion to create and secure the glide path. However, recently NiTi rotary instruments with small tip diameter have been designed specifically to simplify the process of glide path preparation. Due to their limited torsional resistance, these small-diameter rotaries should be used only after a size #10 K-file is placed to working length.
The presence of an appropriate glide path is indicated by the fact that a straight, not precurved size #15 K-file can passively and smoothly travel to working length. This should be tested from 1 to 2 mm off working length, as well as from 5 to 6 mm away.
For long-oval or flat canals, often found in distal roots of mandibular molars, the preparation of two glide paths and ultimately two canal pathways is indicated. These will be located in the far buccal and far lingual aspects of the canal [35]; such a shape promotes canal wall contact, facilitates debridement, and ultimately simplifies obturation.
6.2.7 Step 7: Root Canal Shaping to Desired Size
The process quality of molar root canal treatment has drastically increased since the advent of nickel-titanium instruments, most likely because even in anatomically complex situations, preparation errors are less likely with NiTi files compared to stainless steel instruments [4, 36]. Also, preparation of root canals with ISO hand instruments is tedious and clinicians use to combine them with Gates-Glidden drills and with the step-back technique to increase the canal taper. The resulting shape is overextended in the coronal third debilitating the tooth and making it more prone to subsequent vertical fractures (Fig. 6.5). Shaping with NiTi rotary instruments, the final shape can be more conservative in the coronal third and sufficient in the middle third, enhancing therefore the efficiency of irrigating solutions and obturation. The taper of the last instrument that reaches working length creates a resistance form in the apical millimeters of the root canal that allows a more predictable filling technique than the punctual apical stop created with manual instrumentation (Fig. 6.5).
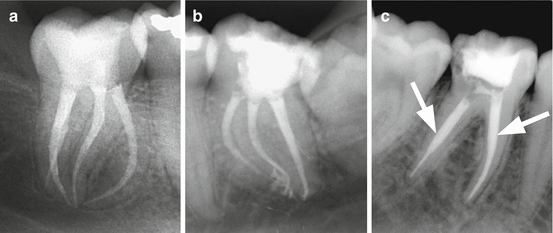

Fig. 6.5
Shapes after NiTi rotary preparation (a, b) and shaping with stainless steel hand files and Gates-Glidden drills (c). Note excessive coronal enlargement (arrows)
In order to successfully use NiTi rotaries, clinicians should understand the details of the specific instrument they are using. A discussion of the alloy and specific instrument designs is beyond the scope of this book and the reader is referred to current endodontic textbooks for further information on this topic. Clinicians are further advised to carefully consider the directions of use for the specific instruments they use. In general, no instrumentation should occur in a dry canal; during shaping with NiTi rotaries, good practice dictates always to have a reservoir of sodium hypochlorite, acting as a lubricant, in the access cavity and the root canal system.
Increasing instrument taper simplified the creation of an appropriate shape with the use of fewer instruments and in a shorter period of time. In vitro data clearly demonstrates that NiTi rotaries are superior to stainless steel files in that they create less preparation errors and this fact translates to better conditions for the treatment of apical periodontitis [4, 36], specifically for molar root canal treatment.
Selective removal of dentin in the coronal canal portion retains more structural strength [37]. Clinicians should consider the use of instruments with a limited maximum flute diameter (MFD), which limit preparation sizes to a conservative dimension. Considering that conditions such as root fracture and nonrestorable carious defects are most frequently cited for the reason to extract root canal-treated teeth [38, 39], retaining structural integrity after completion of root canal treatment determines potential longevity (Fig. 6.5).
6.2.8 Step 8: Gauging the Foramen, Apical Adjustment
The steps outlined above predictably create well-shaped canals; however, there are certain procedural errors that complicate molar endodontics. Ledges and canal blockage, as well as instrument fracture, are such undesirable outcomes (Fig. 6.6).
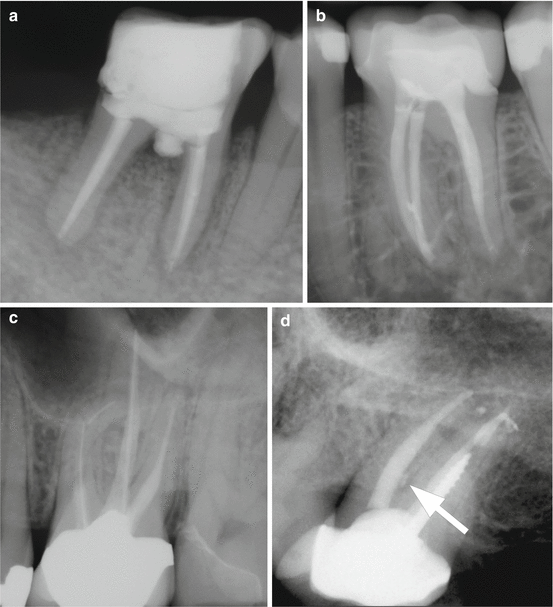

Fig. 6.6
Improper canal shaping may lead to overt preparation errors such as perforation (a), instrument fracture (b), ledge formation (c), and strip perforation (d, see arrow)
The best way to deal with instrument fracture is prevention (Box 6.2) [40]. Working under the operating microscope, using specific ultrasonic tips, and specifically designed armamentarium will help to retrieve broken instruments from the root canal; however, this procedure is often associated with an extensive removal of dentin. In case of a failing endodontic treatment, nonsurgical or surgical procedures may be indicated (see Chaps. 9 and 10).
Every root canal system is unique and therefore desired final canal sizes will vary (see Chap. 1 in this book). Best clinical practice is, after creating an overall tapered shape, to determine apical canal sizes by gently probing to working length with hand files. For example, after achieving an apical size #25, a set of flexible K-files sizes #25, 30, and 35 is used, with rubber stoppers preset to working length. If the canal is fully prepared at size #25, that size K-file will stop just at WL, while the two larger files will stay progressively short of WL. If larger sizes go to WL, additional canal shaping is indicated to facilitate root canal debridement and filling. After final adjustment of the apical preparation, patency is again verified with a precurved size #10 K-file that is gently rotated to break up accumulated dentin debris and probe accessory anatomy. Figure 6.7 illustrates progressive enlargement of molar root canals to appropriate apical sizes and tapers without overpreparing the coronal root canal third or excessively thinning radicular walls. Tactile verification, using hand files, of the apical preparation size and a gradually increasing taper is mandatory to ensure that so-called tug-back occurs in the appropriate place, that is, apically, to avoid the overextension of gutta-percha during filling (see below).
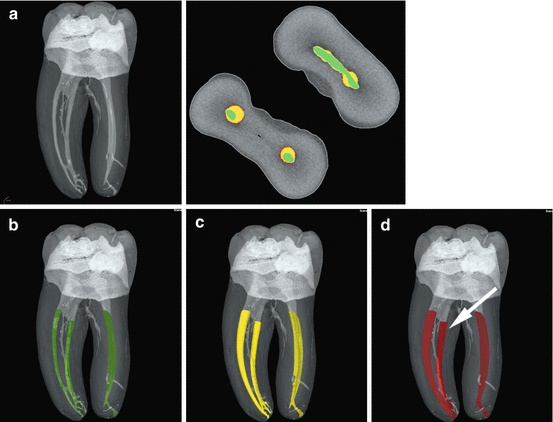

Fig. 6.7
Micro-computed tomography images of molar root canal systems (a). Separate canals are shown before shaping (b, green) and at an apical sizes #20 (c, yellow) and #30 (d, red). Note the different shapes coronally with preservation of coronal structure evident in the canal prepared with TRUShape (Dentsply Tulsa Dental, arrow). Inset shows a cross section in the coronal third with the different stages of canal preparation indicated by colors with the TRUShape-prepared canal to the right in the mesial root, corresponding to images (b–d)
Box 6.2
Recommendations to avoid NiTi rotary instruments fracture are as follows:
|
1. Choose the right strategy and instruments depending on the case.
|
|
2. Understand the characteristics and limitations of the selected instrument.
|
|
3. Avoid cyclic fatigue by reducing instrument diameter and usage time around sharp curves.
|
|
4. Avoid torsional stress with a correct glide path preparation.
|
|
5. Using appropriate settings for rotational speed, torque, and motion is mandatory.
|
|
6. Use gauzes to clean the debris that loads the flutes and reirrigate the canals frequently.
|
6.3 Debridement of the Molar Root Canal System
Despite substantial improvements in endodontic technology in recent years, the outcome of root canal treatments remain substantially similar, likely because of the difficulty in microbial eradication inside the challenging root canal anatomy [1]. This explains why the success rate of a root canal treatment in a tooth with a vital pulp is higher than in a tooth diagnosed with necrotic pulp and periradicular pathosis [1].
Microorganisms that establish themselves in the root canal space are the cause for apical periodontitis. Therefore removal of these causative agents, and organic material that can support their growth, is essential for treatment of disease. However, tooth anatomy and morphology are significant impediments preventing a complete removal of intracanal microorganisms. Canal debridement is done both during mechanical canal preparation and through the application of irrigation solution and medicaments, in conjunction with mechanical preparation as described before.
An ongoing debate exists regarding final apical sizes. Canal size impacts the ability to advance the needle of an irrigation syringe deeper into the root canal, which in turn is relevant for the ability to deposit antimicrobial solution to the apical canal portion. However, there are obvious physical limits to the enlargements of small curved canals of molar teeth. Clearly, larger canal shapes will not result in complete circumferential canal preparation [41]. Indeed, certain aberrations, like lateral and accessory canals, canal curvatures, canal wall irregularities, fins, cul-de-sacs, and isthmuses, make total debridement virtually impossible. Therefore, a realistic objective of cleaning is to significantly reduce the irrigants more, than totally eliminate them.
Current best practices suggest to use small-diameter side-vented irrigation needle; a final canal size and taper that allow that needle tip to be close to WL is appropriate. Shaping to larger sizes may lead to dentin shavings compacted into canal portions that then become inaccessible for irrigation solution.
A systematic approach to molar root canal disinfection contains these following steps:
- 1.
Achieve an appropriate apical size
- 2.
Select efficient antimicrobial solutions and medicaments
- 3.
Maintain irrigant in extended contact with radicular walls
- 4.
Perform activated irrigation
- 5.
Manage smear layer
- 6.
Consider accessory anatomy
6.3.1 Step 1: Achieve an Appropriate Apical Size
Canal preparation, while by itself not sufficient for debridement, significantly reduces intracanal microorganism. No specific size has been shown to be associated with better outcomes, however diameters for irrigation needles and devices suggest an apical size #25 or #30 with at least an .06 taper to be the minimum enlargement that permits placement of a small irrigation needle 1–2 mm short of WL. In vitro studies demonstrate that only very small volumes of irrigant will travel to the apical canal part beyond the needle tip [42], therefore canal preparation through a reservoir of irrigant and frequent turnover is recommended. During rinsing, the needle, loose in the canal, should be moved apical and coronally with constant and slight movements; such movement produces agitation and prevents binding of the needle, that way avoiding extrusion of toxic solution beyond the apex.
The two factors that have been directly correlated with the efficiency of irrigation are the irrigant solution and the delivery system [43]. Therefore, after choosing the correct irrigants for disinfection and smear layer management, attention should be paid to its delivery and activation. The effectiveness of root canal irrigation in terms of debris removal and eradication of bacteria depends on several factors: penetration depth and diameter of the needle, irrigation pressure, viscosity of the irrigant, velocity of the irrigant at the tip of the needle, and type and orientation of the needle bevel. The size and length of the irrigation needle must be related to root canal dimensions for an effective irrigation. Narrow needles require more pressure onto the plunger and extrude the irrigant with higher velocity than large needle sizes, which deliver greater amounts of irrigants but cannot be introduced very deep; however, irrigation tips with external diameters of 0.32 mm (30 gauge) are available and needed in small canals.
6.3.2 Step 2: Select Efficient Antimicrobial Solutions and Medicaments
Solutions used in root canal treatment should be highly efficient against microorganisms in their planktonic state and in biofilms, inactivate endotoxin, be nontoxic when they come in contact with vital tissues, and not cause anaphylactic reactions [44]. Irrigation strategies aim to dissolve both organic and inorganic tissue. Best practice in endodontics is to use sodium hypochlorite (NaOCl) as the main irrigant [45]. Reported advantages of NaOCl, also known as bleach, include the ability of the solution to dissolve vital [46] and necrotic tissue [47], the antimicrobial action of the solution [48], and the lubricating action [49]. In addition, it is inexpensive and readily available [50]. There is no defined ideal concentration of NaOCl, but concentrations ranging from 0.5 to 6 % have been recommended. As an amount of free chlorine determines the action of the irrigant, any decrease in the concentration should be compensated with an increase in the volume.
The use of other antimicrobials, such as chlorhexidine (CHX) or hydrogen peroxide, has in clinical studies not convincingly been associated with better outcomes [1]. It should be considered that irrigants interact chemically with each other and also with dentin substrate. For example, the combination of NaOCl and CHX causes color changes and formation of a possibly toxic precipitate [51].
6.3.3 Step 3: Maintain Irrigant in Extended Contact with Radicular Walls
Considering the complexity of the root canal system and the inability to completely prepare the radicular walls by mechanical means, good clinical practice suggests to bring sodium hypochlorite in contact with the canal wall for as long as feasible. A minimum contact time of up to 40 min has been discussed [52]; such long times require that bleach is available to be moved deep into the canal system and to be replenished regularly. Therefore it is recommended to instrument through a reservoir of bleach whenever possible.
Stay updated, free dental videos. Join our Telegram channel

VIDEdental - Online dental courses


