Fig. 10.1
Preoperatively and from the radiograph (left), this defect appeared localized and perhaps readily managed. However, after raising the flap (right), the full extent of the apicomarginal bone defect became visible (Reprinted from Merino 2009, with permission)
Classic radiographic techniques like periapical and panoramic radiographs are limited in detecting few periapical bone lesions and therefore cone beam computed tomography (CBCT) [5] is now the standard radiographic technique used to prepare a treatment plan in surgical endodontics (see Box 10.1).
Box 10.1. Diagnosis of Bony Defects
|
Findings
|
|||||
|---|---|---|---|---|---|
|
Type of defect
|
Extent
|
Periodeontal probing
|
Radiographic
|
CBCT
|
GBR/membrane recommended
|
|
Small
|
Normal
|
Yes
|
Yes
|
No
|
|
|
“Endo”
|
Large
|
Normal
|
Yes
|
Yes
|
No
|
|
Through-and-through
|
Normal
|
No
|
Yes
|
Yes
|
|
|
“Endo-Perio”
|
Apicomarginal
|
Deep
|
No
|
Yes
|
Yes
|
|
Large periapical
|
Normal
|
Yes
|
Yes
|
Yes
|
|
|
Combinations
|
Large periapical or lateroradicular and Through-and-through
|
Normal
|
Yes
|
Yes
|
Yes
|
|
Combinations
|
Apicomarginal and Through-and-through
|
Deep
|
No
|
Yes
|
Yes
|
10.4 Endodontic Microsurgery Step by Step
10.4.1 Flap Design
Similar to the access cavity in nonsurgical endodontics, which provides access to canal entries and makes the treatment feasible, flap design is the “access cavity” at the soft tissue level that allows good visibility to the bone level. It is also extremely important because it must allow sufficient blood supply to the mobilized and nonmobilized soft tissues [6–10].
Also, all factors, possible incidents, and modifications of the ongoing microsurgery must be taken into consideration before the first incision is made. Therefore, when facing an apicomarginal bone defect, the flap design should be made large enough in order to have the bone donor site under the same flap, moreover, it must allow covering of the bone graft without tension on the flap [11].
Modifications to the flap after the incisions have been made can jeopardize the final result.
Rectangular and triangular flaps are the typical designs for microsurgery in the molar region. The first flap consists of one horizontal sulcular incision and two vertical ones; while the triangular one is similar, but with only one vertical incision.
“The golden rules of the flap design” [12] are critical factors the clinician must pay attention to them all the time, in order to perform an easy, fast microsurgery with less complicated post-op for the patient:
-
The incision must never cross a bone defect. Incisions should be made away from the lesion if possible.
-
Releasing incisions between bone eminences should be over concave bone surfaces and should never cross over convex bone eminences.
-
The end of a vertical incision at the gingival crest should finish at the angular line of the tooth (black line in Fig. 10.2a), perpendicular to the gingival margin (Fig. 10.2b). The other end should never enter into the mucobuccal fold, so a little inclination of the incision (blue line in Fig. 10.2a) is advantageous.
 Fig. 10.2(a) The incision (black line) must never finish on thin buccal tissue or in the center line of the papilla, as this can compromise the fine vascularization and may cause tissue necrosis with a poor esthetic result. The incision can be tilted minimally (blue line) without crossing the next alveolar bone eminence, in order to open the angle and to keep the incision in attached gingiva. It is advantageous to keep the end incision within the attached gingiva and 1–2 mm away from the mucosa. (b) Placing the incision perpendicular to the marginal gingiva toward the base of the papilla is critical to create space for a stitch that will keep the position of the gingival margin stable during the healing process
 -
The base must be as wide as its free edge. Vertical releasing incisions should follow the direction of the vascularization network, which is oriented mainly perpendicular to the occlusal plane in corono-apical direction [13]. Flap blood perfusion is maintained up to the point where the ratio of length to width of the rectangular flap equals 2:1 [14, 15]. Ideally, the shorter the vertical incisions, the larger the horizontal one should be; likewise, the longer the vertical incisions, the shorter the horizontal one.
-
The periosteum must be raised all together with the flap. This makes the suturing procedure easier and speeds up the healing process, diminishing postoperative pain and inflammation.
-
The retractor must always rest on bone, never on soft tissues.
-
All sutures must start by needle insertion through the upper surface of the released tissue, before passing it through the lower surface of the unreleased tissue.
10.4.2 Incision (Low-Power Magnification)
Standard #15 or #15C blades or microsurgical scalpel blades are used and the “Pencil hold” is the most used hand position (Fig. 10.3a, b). Incisions should be made with a firm and continuous movement of the blade at 90° to the bone so that a full mucoperiostal flap is elevated.
Fig. 10.3
(a) Incisions may be made perpendicularly to bone with a conventional scalpel. Alternatively, a microscalpel (b) may be used when making the incision under the microscope. (c) Prichard or Molt curettes are appropriate to initiate flap elevation. (d) Elevation may be started by inserting the elevator at the junction of the vertical and horizontal incisions; vertical force is then applied with a slow, firm, and controlled peeling motion, following closely the cortical bone contour, in order to release the flap to a level completely revealing the extent of the osseous lesion
10.4.3 Elevation of the Flap
The purpose of this step is to raise the already cut flap to allow visibility of the bone. The flap should be elevated in such a way that, when back in place, it will rest passively in the desired position. A sharp, small, straight, or curved elevator, for example Molt 9, P145S, P9HM, or similar (Fig. 10.3c), is placed at the junction of the horizontal and vertical incisions, with its concave surface against the bone (Fig. 10.3d).
10.4.4 Retraction
Retraction is done to maintain the flap allowing maximum access and visibility without causing damage to the flap or neighboring tissues. A correct retraction technique improves ergonomics, reduces the surgery time, and the postoperative pain and inflammation. During surgery, soft tissue management is commonly overlooked because, once the flap is retracted, attention is usually concentrated on the defect (Fig. 10.4a, b).
Fig. 10.4
(a) If a retractor rests on the flap, pressure will compromise the perfusion and causes ischemia within the flap, and causes more postoperative pain and inflammation. (b) Another important detail to pay attention to is the tension on the flap produced by the retractor. This tension also prevents flap perfusion; in order to decrease this tension, changes need to be made intraoperatively, for example a notch can be prepared in bone to secure retractor placement (arrows)
Retractors are one of the most important instruments for surgical endodontics. They must be:
-
Wide enough to hold flap completely (15 mm)
-
Thin enough (~0.5 mm) to improve access
-
Have a serrated working end to prevent sliding
-
Have a matte surface, so light is not reflected
The working end of a retractor should adapt, as far as possible, to the cortical bone plate of the specific surgical area.
10.4.5 Osteotomy Window (Low-Power Magnification)
An osteotomy window approximately 5 mm diameter has to be made in order to allow easy access for instruments and devices to the apex. A round tungsten bur or a 5 mm trephine may be used to create the “access cavity” at the hard tissue level, to the involved molar apices.
The endodontic surgeon can now encounter three different clinical situations:
-
Intact cortical bone table
-
Perforation of the cortical bone plate without periosteum
-
Perforation of the cortical bone plate with periosteum
10.4.6 Curretage (Medium-Power Magnification)
To remove pathological tissues, foreign bodies, and bone particles from the periradicular or lateroradicular areas, curettage provides visibility and accessibility to the apex or lateral canal. Curettage should be performed as clean and fast as possible because the surgical hemostasis is directly related to a complete curettage. Lingual/palatal bone crypt walls are the most difficult areas to clean. A Lucas bone curette, 33 L spoon excavator, and Molt curettes can be used for medium and large lesions. Alternatively, Columbia #13/14, Molt, or Jaquette 34/35 curettes may be used for small lesions and lingual-palatal bone crypt walls (see Fig. 10.5).
Fig. 10.5
(a) Frequently, just removing granulation tissues with a Lucas curette ( sharp edge with concave and convex surfaces) is sufficient to achieve good access to the apex without removing any bone. (b, c) Jaquette 34/35 curette is specially designed to peel away the granulation tissues situated between the root and the palatal-lingual walls of the bone crypt
10.4.7 Hemostasis (Medium-Power Magnification)
Clearly, hemostasis is an indispensable factor for microsurgery because a dry surgical field provides better visualization of the microanatomy, dramatically improves the surgical efficiency, and minimizes root-end filling contamination. Anesthesia (see Chap. 3 in this book) is essential in providing effective presurgical hemostasis; specifically, solutions with 1:50,000 epinephrine should be used if there are no medical contraindications. Both block and buccal/lingual-palatal injections are required to get effective hemostasis. The use of anesthetics during surgery to get surgical hemostasis is typically ineffective.
Topical hemostatic may be achieved with cotton pellets with or without epinephrine (Fig. 10.6) in the osseous crypt; ferric sulfate pellets can be used to achieve hemostasis outside the crypt when applied to bleeding sites on the buccal bone.
Fig. 10.6
Hemostasis in the surgical crypt may be achieved with the epinephrine pellet technique. (a) The first cotton pellet is applied against the bony crypt bottom walls. (b) Several more pellets are placed after until the bone cavity is totally filled. Pressure is applied for 4 min. (c) Then all pellets are removed subsequently, except the very first one that remains in place until final irrigation. This first pellet has two critical functions: it prevents the nicked vessels from reopening during surgery and also it prevents operative debris from lodging into the palatal/lingual bone wall of the crypt that is otherwise difficult to remove
10.4.8 Apicoectomy (Low-Power Magnification for Apicoectomy and Medium- to High-Power Magnification for Inspection)
The apical 3 mm of the root(s) involved are resected (Fig. 10.7), where more complex anatomy exists; this has for example been shown histologically in extracted molars, in electron microscopic studies, and micro-computed tomography data (see also Chap. 1 in this book). Preferably there should be a 0° bevel and a fluted carbide or Lindemann bur should be used with an Impact Air handpiece, under copious irrigation. Current microinstruments like micromirrors, small ultrasonic tips, and micropluggers permit to work with such a small bevel. After resecting the apical root segment, methylene blue dye is used to ensure the resection is complete and for canals and isthmus inspection (Fig. 10.8).
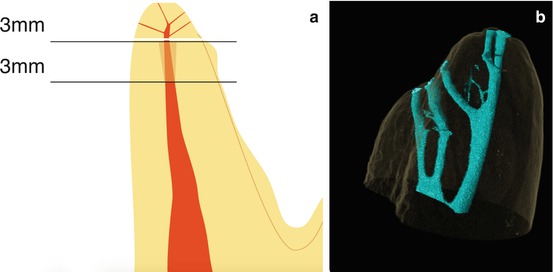

Fig. 10.7
(a) “Rule of threes”: The goal is to remove the apical 3 mm of each involved root by the apicoectomy and another 3 mm of the canal is instrumented and sealed by the retrofill. The final 6 mm of the canal is treated to eliminate or block most frequent communications at the apical third area between main canal and the periodontium. (b) Micro-computed tomography rendering of the mesiobuccal apex of a maxillary molar with multiple apical ramifications, indicating the complex anatomy that may be present in the apical portion of any molar root (Image B courtesy of Dr. O. Peters)
Fig. 10.8
Staining the resected apex with methylene blue dye discloses the presence of connective tissue and can serve to demonstrate that the cut of the root has been complete (360° continuously stained outline) or incomplete (broken outline). This staining step is also important to detect otherwise undiscovered canals, isthmuses, apical fractures, and craze lines
10.4.9 Isthmus
One small detail left uncorrected can render the whole procedure ineffective. In this context, the “micro tissue” within the isthmus is as important as the “macro tissue” of the main canals.
Although an isthmus is an important structure in endodontic microsurgery, it was ignored in dental textbooks or scientific literature until 1983 [16]. It represents the communications that normally exist, at different levels, between two canals inside a root (Fig. 10.9a), but surgically exposed at the resected apex root area. It contains pulp tissue and should be treated in the same way as the pulp tissue of the canals. Figure 10.9b illustrates schematically how the isthmus should be prepared.
Fig. 10.9


(a) Clinical view of high-power magnification of a prepared isthmus (arrow) in a mesial root of a mandibular molar. Only the complete but dentin-preserving preparation of an isthmus permits adequate disinfection. (b) After the main canals are retrogradely prepared, the isthmus (arrowhead) must be prepared and cleaned with either a round or potentially a blade-shaped ultrasonic tip. Care has to be taken to retain sufficient dentin wall thickness (arrows), specifically along the isthmus in roots with figure-eight cross-sections such as the mesiobuccal roots in maxillary molars and the mesial roots in mandibular molars
Stay updated, free dental videos. Join our Telegram channel
VIDEdental - Online dental courses
