20
Sagittal Discrepancies
Every time we face a sagittal discrepancy on a patient occlusion, a Comprehensive treatment should be required to fully develop aligners capacity to achieve an ideal occlusion.
Several specific features have been developed by Align Technology for this purpose, which are summarized below.
Passive Aligners
Passive aligners designed for the arch with fewer movements, so as to make the number of aligners equal in both arches, in order to be able to use intermaxillary elastics. They are usually placed by default in all treatment options (shown in light blue in the staging bar in Fig. 20.1).

Fig. 20.1 Precision cuts and button cutouts: to hold the intermaxillary elastics.
Precision Cuts
- Class II: on upper canines
- Class III: on lower canines
- Default Hook placement can be modified on Clinical preference #14
- Hooks can be prescribed on the buccal surfaces of canines, premolars and molars
- By default, in cases of incompatibility, optimized attachments will be prioritized based on clinical preference

Fig. 20.2 Precision hooks would equal to archposts in fixed appliances.
Button Cutouts
- Class II: on lower first molars
- Class III: on upper first molars
- Default, button cutouts placement can be modified on Clinical preference #14
- Button cutouts can be prescribed on the buccal and palatal/lingual surfaces of canines, premolars, molars
- By default, in cases of incompatibility, optimized attachments will be prioritized based on clinical preference

Fig. 20.3 Button cutouts allow bonding a metal/ceramic button.
Precision Cuts Versus Button Cutouts
The difference between a precision cut and a button cutout is the effect they have on the rest of the teeth of that arch. The effect of the elastics, whenever they are held in a precision cut, will be on the tipping of the incisor of that arch, whereas if the elastics are attached to button cutouts instead, the elastic will have more effect on the teeth with less impact on the rest of the arch.
For example, in a class II division 2 with lingual tipping of upper incisors, in order to correct the class II with elastics and avoid tipping the upper incisors to lingual, it would be convenient to attach the elastic to a button on the upper canines instead of a precision cut. This would prevent the upper incisor from tipping to lingual creating anterior interferences that could interfere with the class II correction.

Fig. 20.4 Class II, division 2 will benefit from two button cutouts for class II elastics mechanics.
Another option in a class II division 2, is to place the elastic from button cutouts on upper first premolars to button cutouts on second lower molar. If the force is moved to a more distal tooth in the arch, the effect on the upper incisors will be reduced.
In contrast, in a class II division 1 with labial tipping of upper incisors at the beginning of the treatment, the class II side effect of tipping the upper incisor to lingual would be beneficial, so for that purpose the class II elastic from precision cut would be placed on the upper canines to button cutouts on first lower molars.

Fig. 20.5 Class II, division 1 will benefit from canine hook and molar button for class II elastics mechanics.
Rotating Canines with Elastics
For this very same reason, if at the beginning of a class II treatment, the upper canine is rotated mesial‐out, instead of placing the aesthetic button on the labial surface of the upper canine, which would cause an increase in the rotation of the canine during the class II correction, would be better placed on the lingual surface of the tooth: in this way canine rotation will be corrected at the same time as the class II correction.

Fig. 20.6 Mesial‐in rotation of the canine.

Fig. 20.7 Mesial‐out rotation of the canine.
- If the upper canine is initially rotated mesial‐in, place the precision cut from labial
- If the upper canine is initially rotated mesial‐out, bond a button in the lingual surface of the upper canine and place the elastic from the lingual surface in order to provide a mesial‐in rotation at the same time that the class II is corrected
Providing Labial Crown Torque to Upper Canine with the Elastics
- The same happens in narrow arches with 13 and 23 with lingual tipping of the crown
- At the same time that the class II is corrected with the intermaxillary elastic, if an aesthetic button is placed on the lingual surface of the upper canine, both canines can be provided with labial crown tipping and the smile widened at the same time

Fig. 20.8 Whenever a lingual button is placed on the lingual surface of the upper canines, class II elastics will be providing crown tipping and smile widening simultaneously.

Fig. 20.9 Occlusal view of lingual buttons on upper canines.
Pontics: to Substitute a Missing Tooth
- To minimize the appearance of a missing tooth during treatment
- They are placed in anterior spaces bigger than 4 mm
- If adjacent teeth are being moved (i.e. extraction cases) pontics adjust their width automatically together with the clinical widening/shortening
- Preferences for pontics can be modified on Clinical preferences #6
- They can be filled:
- With temporary teeth resin (self‐curing)
- With flow composite (cure the composite from the labial surface of the aligner and not from occlusal because the composite cures toward the light and would get detached from the aligner)
- With tooth‐coloured dental wax

Fig. 20.10 Pontic to cover missing 34.
Pontic Selection Criteria
- In cases of extractions is better to ask for a small pontic or not pontic at all so the aligner wrap around the teeth better and provide a better control of the root tipping. The clinician will need to fill all the aligners, as in this case there is no change to fill one in and ask the patient to use the resin for the whole set of aligners, due to the fact that it is reducing its size during the closure of the extraction space.
- If the missing tooth is a molar, and we have to upright the second molar, not use a pontic and ask for a bar instead, this will enable the aligner to wrap the second molar by mesial and it will help upright the tipped molar.
- Included canines: semipontic by palatal.

Fig. 20.11 Traction of impacted canine using elastic from button in canine to the aligner by labial.
- Ectopic canines: extract virtually and ask for a pontic with its cuspid parallel to occlusal plane, and a big one if it overlaps the lateral incisor.
20.1 Filling the Prescription form for Class II/III Patients
To do this, first define the treatment goal:
- Do you want to maintain the class II?
- Do you want to achieve canine class I?
- Do you want to achieve canine and molar class I?
With that in mind, click whether to maintain anterior–posterior relationship, improve canine relationship only, improve it up to 4 mm or correct to both molar and canine class I.
After this, if a class I is to be achieved, you will have to define how do you want to do it.
For this the following options can be selected:

Fig. 20.12 Interproximal reduction can be performed on upper premolars to distalize, or in lower ones to mesialize posterior sector, after considering lower canine to be ‘unmovable’.
- Posterior IPR: with a maximum value of 0.5 mm on each contact point from 3 to 6
- Class II or class III correction simulation (virtual jump) to simulate the effect of the intermaxillary elastics:
- virtual jump will be shown at the end of the treatment in a single stage shift in the ClinCheck. This should be shown to the patient the result in case compliance on the use of elastics is not enough
- the technician could also be asked to simulate the virtual jump throughout the treatment, instead of doing it in the last stage

Fig. 20.13 With class II or class III elastics use, visualization will be shown throughout the treatment, to simulate the simultaneous AP corrections.
- Sequential distalization: distalizing tooth by tooth the upper arch (class II) or the lower one (class III):
- especially indicated for adults with class II, with adequate torque in the posterior teeth or positive torque, with no constricted arches, without a torque problem in the upper canines or important rotation of first upper molars.
- When the possibility of compensating part of the class II by transversal compensation and mesial‐out rotation of the first molars is not available, sequential distalization is needed to correct the buccal relationship into a class I.
It is suggested that staging of sequential distalization should be moving towards the distal half of the total movement of the first tooth before starting distalization of the following one.
- The upper 7s begin distalizing and when they achieve half of their amount of distalization.
- The upper 6s begin distalizing and when they achieve half of their amount of distalization.
- The upper 5s begin distalizing and when they achieve half of their amount of distalization.
- The upper 4s begin distalizing and when they achieve half of their amount of distalization.
- The upper 3s begin distalizing and when they achieve half of their amount of distalization.
- The incisors begin retracting.
This is shown in the staging tab with an ‘V pattern’ of movements.

Fig. 20.14 From a ‘left 90 degrees view’ the sequential distalization is seen as a ‘V’.

Fig. 20.15 Sequential distalization increases surface contact with molars on their mesial surface.
- The technician should be asked to apply lingual root torque to the upper incisors during all the retraction movement to compensate the loss of upper torque during the retraction
- Extraction of upper (class II) or lower (class III) third molars (there is no need for extraction if they are still growing, as in children)
- Class II elastic until the moment that the second upper premolars start to distalize; AT HBG horizontal attachments bevelled to gingival of 3 mm in the lingual surface of upper incisors can provide extra anterior anchorage during the sequential distalization
Indications for Sequential Distalization
- Teen : full class II with normal or labial torque of premolars and molars (wide arches) where there is little or no possibility of transversal compensation
- Adults : incomplete class II (if patient has a full class II, simultaneous distalization using temporary attachment devices (TADs) can be an option to reduce the treatment time)
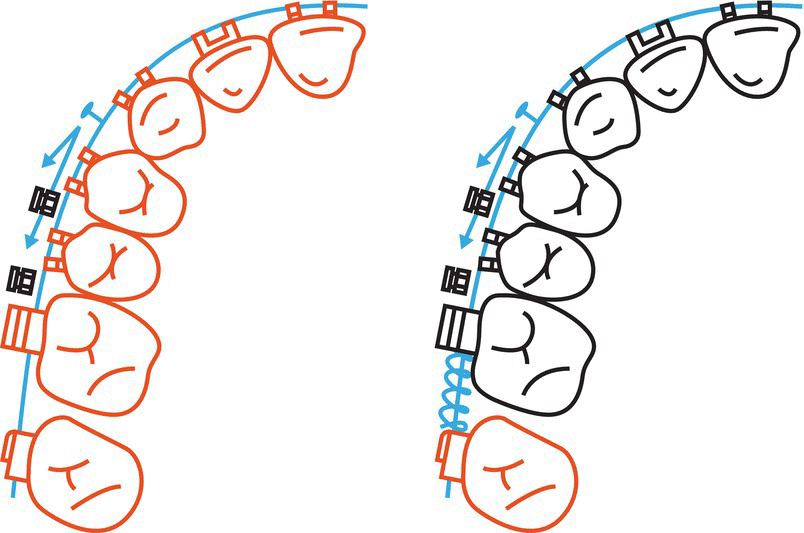
Fig. 20.16 Effect of a coil spring opening space is similar to sequential distalization with aligners.
Considerations for Sequential Distalization
Sequential distalization would be equal to distalization of upper teeth with a coil spring mesial to those teeth.
With brackets and wires this would imply two side‐effects:
- A lack of torque control

Fig. 20.17 Effect of a coil spring opening space would lead to lack of torque control on adjacent teeth.
- Anterior protrusion effect

Fig. 20.18 Effect of a coil spring opening space would lead to anterior proclination.
This last point would be the same with aligners: as aligners increase their ‘size’ every step of the treatment, there is a protrusion effect on anterior teeth, which will have to be considered in the sequential distalization mechanics.
Mandibular Advancement (MA)
This might be selected for growing patients with mandible hypoplasia, as it is one of the latest innovations developed by Align Technology to achieve the same results as functional appliances by advancing mandible position.

Fig. 20.19 Posterior Powerwings on aligner help advancing mandible on growing patients.

Fig. 20.20 Class II profiles will benefit from this feature.
Orthognathic Surgical Simulation
For surgical simulation, we will have visualization at the end of treatment unless requested at the beginning of treatment. It will also be shown as a single‐stage shift in the ClinCheck model.
In which treatments are we going to need intermaxillary elastics?
When asking for correction of the class II with elastic so the technician make a virtual jump to simulate the elastics effect:
- The clinician should start with the elastics as soon as possible, as in this type of correction the number of aligners is reduced by the virtual jump, so it is necessary to have a transversal development of the arches first and enough overjet to begin with the intermaxillary elastics.
- In sequential distalization:
- the clinician should start with the elastics when the second premolars begin to distalize, at the latest.
- In MA cases during the advance phase, with night use,
- this will help to hold the precision wings in place during the night, preventing the patient from opening his mouth and preventing the distortion of the precision wings due to the parafunctional movement of the mandible during the night.
20.2 Class II Cases
Class II malocclusion affects 12–32% of the population, a fact that has motivated the development of several treatment approaches during the last decades, involving removable or fixed appliances with or without teeth extractions.
Sagittal discrepancies are usually named according to Edward Angle’s classification of malocclusions based on the relationship between the upper and lower permanent first molars. Angle’s classification of Class II subjects into Division 1 and 2 groups is still commonly used.
The development of Class II malocclusion might be linked to several factors; hence, accurate diagnosis is important for the selection of the corresponding treatment plan. Among these factors, mandibular retrognathia is considered a dominant one, which makes aligners the best treatment option on growing patients, as mandibular advancement might be performed at the same time as teeth alignment.
There are also several advantages linked to aligners for adults, such as sequential distalization with differential anchorage, which might be combined with the use of elastics, which is almost the only option for distalization with brackets and wires, which have a more limited range of treatment options.
20.2.1 Considerations for Class II Patients
- Favourable skeletal pattern for a class II correction will be a normodivergent or hypodivergent skeletal pattern
- Key to the correction of class II cases is the possibility of transversal compensation: the more constricted the arches are at the beginning, the better the prognosis
- The third upper molars usually need to be extracted if the correction is going to be prescribed by sequential upper distalization
- Appropriate torque of the upper and lower incisors must be ensured before the corrections: overtreat the correction of the torque on the upper incisor up to +17 degrees and to upright the lower incisor up to ‐1 degree. The goal of this overcorrection is to provide positive overjet to correct the class II
- If the anterior overjet is less than the distance necessary to correct the class II in the molars, it will not be possible to achieve a final class I relationship for that purpose before starting using class II elastic enough positive anterior overjet should be provided
- In the class II division 2, the upper incisors torque is essential for the correction. The more retroclined the upper incisors are, the more posterior anchorage will be needed. This is the reason why, in some severe class II division 2, a posterior microscrew is need to provide enough posterior anchorage for the correction
- Sequential upper distalization can be requested, together with the expansion and rotation corrections
- Distalization and protrusion of the incisors should be sequenced to prevent losing posterior anchorage during the distalization; alternatively, distalization can be done simultaneously with proclination movement of the incisors (labial crown torque) and correction of rotation movements of the incisors (aesthetic start)
- Before correcting a class II, the staging of movement on the incisors should be considered:
- Class II division 2: remove first the root of upper Incisor from the cortical bone. First procline and then apply retrusion, intrusion and lingual root torque
- Procline crown (which is eqivalent to taking the root out of the cortical bone)
- Intrusion
- Retrusion + lingual root torque
- Class II division 2: remove first the root of upper Incisor from the cortical bone. First procline and then apply retrusion, intrusion and lingual root torque

Fig. 20.21 Class II, division 2 incisors need treatment sequence like this: procline crown, intrude, retrude. This makes ‘V’ pattern change, owing to anterior incisor movement.
- Class II division 1: First ensure the four upper incisors torque is the same and then apply retrusion, intrusion and lingual root torque. Note that the more lingually torqued the four upper incisors are, the more posterior anchorage we will need:
- The same torque for the four incisors
- Simultaneous movement: Intrusion + retrusion + lingual root torque

Fig. 20.22 Class II, division 2 incisors need a treatment sequence such as: procline crown, intrude, retrude.
Treatment Options for Class II Patients
Our protocol to correct class II cases is outlined here:
- Mandibular advancement (mandibular hypoplasia in growing patients)
- Expansion + virtual jump (teenage patients with narrow arches and incomplete class II)
- Upper sequential distalization (adults with incomplete class II and teenagers with full class II and without many possibilities of transversal compensation)
- Upper simultaneous distalization assisted with TAD (adults with full class II or class II division 2)
- Lower simultaneous mesialization assisted with TAD or Locatelli (adults with mandibular hypoplasia and retruded profile). These will be shown in the multidisciplinary treatments in chapters 22 and 24
Extra Resources for Class II Patients
As with brackets and wires, patient condition might make it more favourable to solve the class II situation just than just upper distalization or lower mesialization. This is summarized in the Table 20.1.
Table 20.1 Extra resources for class II patients
| Resource | Maximum effect |
|---|---|
| Expansion | 0.5 mm |
| Molar rotation | 1 mm |
| IPR | 2 mm |
| Upper distalization | 4 mm |
| Upper distalization + TAD | 8 mm |
| Lower mesialization | 2 mm |
| Extractions | 8 mm |
Expansion
As upper arch expansion is higher on upper arch, arch depth reduction is also greater than in the lower arch, leading to an overjet reduction as a result of the ‘pearl necklace effect’, with an estimated 0.5mm class II reduction.

Fig. 20.23 Upper expansion leads to higher arch depth reduction and resolving of class II.
Molar Derotation
Severe upper first molars rotation can result in these teeth using more space in the upper arch than predicted, leading to an increased class II anterior–posterior relationship. This therefore is a simple way of reducing the amount of class II.

Fig. 20.24 Clinchecks: a 45 degree upper molar derotation solves up to 1 mm class II. For this, a vertical bevelled to mesial attachment or an optimized rotation attachment on affected molars is suggested.
Upper Distalization
This might happen predictably up to 4 mm on upper arch, and can be managed for a full class II patient with skeletal anchorage with TADs as an auxiliary technique. Once again, it is important to understand that without TADs there is always a proclination effect on anterior incisors whenever posterior sectors are distalized.

Fig. 20.25 Intraoral views: a 45 degree upper molar derotation solves up to 1 mm class II. For this, a vertical bevelled to mesial attachment or an optimized rotation attachment on affected molars is suggested.
Lower Mesialization
This is an effect of the use of elastics to lower molars, which make the same mesialization as previously achieved with brackets and wires. For this reason, the use of elastics will have to be based on lower incisor proclination with regard to mandibular bone and cephalometric values, as will be shown in the clinical case later in this chapter.

Fig. 20.26 Lower mesialization is represented in yellow, and results from the use of intermaxillary elastics.
Extractions
Again, classic resources for patients with braces can be used with aligners, while considering different biomechanical approaches because of the differences between techniques.

Fig. 20.27 Biomechanics is the basis of an orthodontic treatment, regardless of which technique is used, there may be similar results, such as a bowing effect after posterior mesialization, resulting from a lack of force from the centre of resistance of the tooth (on the root, not the crown, where the aligners deliver their force).
Extraction of Wisdom Tooth
It is possible to take advantage of the rapid acceleratory phenomenon (RAP) if extracting upper wisdom teeth before starting distalization, which leads to a natural accelerated osteoblastic procedure.

Fig. 20.28 Distalization should start just after wisdom tooth extraction so as to optimizing treatment length.
20.2.2 Mandibular Advancement
Mandibular advancement through the use of functional appliances is considered a popular treatment approach in growing individuals, which makes Invisalign Mandibular Advancement a unique tool for practitioners when facing class II growing patients.
While some researchers have found favourable outcomes based on mandibular growth, attributed to either mandibular length augmentation or effective condyle growth, others distrust the magnitude of these effects. Moreover, evidence indicates that the dentoalveolar changes produced by functional treatment outweigh the skeletal changes attained.
That said, as it is not the objective of this book to cover these aspects, the focus will be on Invisalign Mandibular Advancement device characteristics for these patients, which might benefit from a deep knowledge of its protocols.
Ideal Moment for Mandibular Advancement
When treating growing patients, particularly when the objective is to achieve not only orthodontic, but also orthopaedic changes, timing may be more significant than the appliance chosen for the treatment. Optimal timing depends on the skeletal maturation of each individual, which can be accurately determined by using the CVM method of Baccetti.2

Fig. 20.29 Growth has to be carefully checked before a mandibular advancement.
Baccetti stated that the ideal time to make an orthopaedic treatment was when the patient was in CS3 and CS4 of the maturation in the vertebrae. The protocol we apply when we treat a growing patient with class II is provided in Table 20.2.
Table 20.2 Protocol when treating a growing patient with class II
| CS1 | No Permanent Sagittal Correction | |
|---|---|---|
| CS2 | ||
| CS3/4 | Overjet <3 mm | Class II elastics |
| Overjet 3–6 mm | MA + night wear elastics | |
| Overjet >7 mm | MA + full time wear elastics | |
| CS5 | Overjet <3 mm | Distalization |
| Overjet >4 mm | Extraction or distalization with TADs | |
| Second phase | At least 6 months wearing elastics | |
| Mandibular advancement | Offers better lower incisor control by covering labial surface | |
Features of MA
- Aligner features: compensation for eruption and mandibular advancement plus the normal features of treatment of teenage patients
- Aligners and Power Wings are made of the same proprietary SmartTrack material as Invisalign aligners
- The most characteristic features are the Precision Wings, which are positioned between first molars and premolars
- It is important to consider that in order for the technician to make the precision wing, they need all the premolar erupted or a stable late‐mixed dentition
How Does it Work?
- In exactly the same way as a twin‐block, the precision wings force the patient to occlude in a forward position, advancing and holding the mandible in a forward position. However, during the night, the only way to hold the mandible in position is by placing class II elastics (our method of using the class II elastic is from lingual to the upper first premolar to labial of the lower second molars). In this way, the elastic does not interfere with the precision wings.
- At the same time that we advance the mandible, the teeth can be levelled and aligned.
- We can ask to show the mandibular advancement with only one jump or gradually.
MA Protocol
Pre‐MA Phase (Light Blue Colour)
Purpose:
- Level Spee curve, create >2 mm overjet to allow mandibular advancement
- Other minimal tooth movements to facilitate precision wings placement
Clinical treatment:
- Incisors proclination in division 2
- Anterior intrusion in deep bites
- Molar rotations
- Crossbite corrections
Aligners:
- Standard aligners
- Attachments
- No precision wings
MA Phase (Dark Blue Colour)
Purpose:
- Advance mandible (2mm every 8 aligners)
- Simultaneous tooth movement (limited in teeth covered by precision wings)
- Attachments in molars will be removed
- >26 aligners phase
Clinical treatment:
- Class II correction
- Arch coordination
- Overjet reduction
- Teeth alignment and levelling
Aligners:
- Aligners with Precision Wings
- Limited features under PW
Transitional Phase (Dark Blue Colour)
Purpose:
- Hold the mandible in advanced position while waiting for additional aligners
- No additional tooth movement
- 4 aligners phase
Clinical treatment:
- Hold the mandible in advanced position
Aligners:
- Aligners with Precision Wings
Features of Treatment in Teenage Patient
Compensation of Eruption for Canines or Second Premolars

Fig. 20.30 Eruption compensator in a canine.
These are designed to accommodate the natural eruption of canines and second premolars while the patient is wearing aligners, allowing the necessary room for erupting teeth. These are really important as a light force applied to an erupting tooth might interference in the process, stopping it and altering patient’s natural exfoliation process. In the past this used to occur with conventional devices such as the Schwartz removable appliance but, thanks to an algorithm that calculates tooth movement, no longer happens.

Fig. 20.31 Any contact over 12 g will interrupt the tooth eruption.
Terminal Molar Tabs for Second/Third Molars
The eruption tab extends over the mesial cusp of the terminal molar and helps prevent supra‐eruption of the terminal molars.

Fig. 20.32 Terminal molar tabs prevent molars supra‐eruption creating posterior interference that may lead to an anterior open bite, as used to happen with brackets and wires when wisdom teeth erupt.
20.2.3 Conventional Mandibular Advancement + Aligners

Fig. 20.33 Initial intraoral view.
Diagnosis
A 12‐year‐old patient patient presented with a Normodivergent skeletal class II with mandibular hypoplasia. They had narrow arches, upper incisor proclination, a deep bite, 10 mm of overjet, labial incompetence and a retruded chin.
Treatment Plan
- This case is occurred before the launch of Invisalign MA, so there was a first phase with Herbst appliance and D‐Gainer (started on Jan 2014, finished on Nov 2015)
- After the orthopaedic treatment an Invisalign Lite case was made
- Using two devices can now be avoided because the first and second phase with can be made with the appliance of MA

Fig. 20.34 Pretreatment extraoral and intraoral views.

Fig. 20.35 Initial panoramic X‐ray, teleradiograph and cephalometry.

Fig. 20.36 Intraoral situation after Herbst appliance. After the first phase with Herbst appliance, the mandible had advanced into a class I position. Upper diastemas needed to be closed in the second phase.
Requirements for the Technician
- Maxilla : As it was necessary to close the upper diastemas without losing torque of upper incisors maximum anchorage in the posterior zone was needed; to that purpose molars were not moved and retrusion, intrusion and lingual root torque were applied to the upper incisors simultaneously.
- Mandible : A positive overjet was needed to close upper diastemas, so in order to have adequate anchorage to retrude the lower incisors the lateral zone was not moved; the technician was asked to make IPR on contact points between 33 to 43 and to retrude the lower incisor, applying lingual root torque simultaneously.

Fig. 20.37 Upper and lower ClinCheck views.
Treatment Summary
- After the first orthopaedic phase a dental class I molar and canine was achieved.
- Time of treatment 1 year and 5 months.
- During Lite treatment the upper diastemas were corrected and both midlines centred.
- The patient needed 14 months of Invisalign treatment: 14 aligners, changed every 14 days and another 14 aligners of refinement. Normal overjet and overbite were achieved.
- 12 and 22 had to be proclined with a D‐gainer previously to mandibular advancement with Herbst appliance in order to avoid the interferences for the mandibular protraction.

Fig. 20.38 Comparison of initial (upper row) with final result (lower row).

Fig. 20.39 Initial (left) and final occlusal(right).

Fig. 20.40 Initial (left) and final overjet (right).

Fig. 20.41 Mandibular changes.

Fig. 20.42 Changes in profile.

Fig. 20.43 Initial smile (left), smile at the end of first phase (middle) and final smile (right).

Fig. 20.44 Initial and final lateral X‐rays.
20.2.4 Invisalign Mandibular Advancement

Fig. 20.45 Intraoral initial picture.
Diagnosis
A 14‐year‐old patient patient had class II division 1 with mandibular hypoplasia and a bilateral scissor bite. The had a class II profile with labial competence, centred upper midline, 90% deep bite and a 9 mm overjet.
Treatment Plan
- First orthopaedic phase of mandibular advancement with MA to help the mandible to grow
- Second Invisalign comprehensive phase once the mandible was in a class I relationship

Fig. 20.46 Initial extraoral and intraoral views.
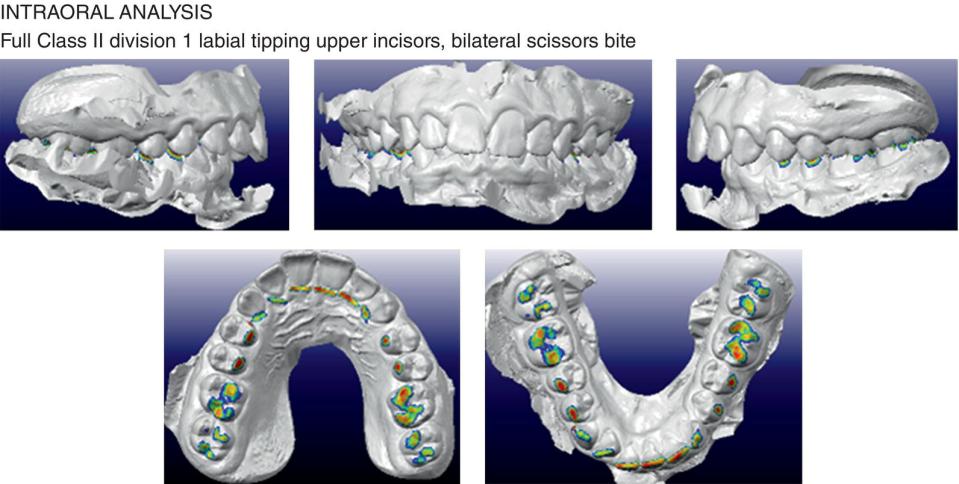
Fig. 20.47 Occlusal contact at the beginning of the treatment.

Fig. 20.48 Initial panoramic X‐ray, teleradiograph and cephalometry.
Requirements for the Technician
- As there was enough overjet, the MA phase was started straight away without a pre‐advancement phase. (As we learned later, this was a mistake, as a pre‐advance phase to level the Spee curve before starting the advance phase is mandatory to avoid future interference when the mandible acquires an advance position and subsequent distortion in the precision wings.)
- Arches to be coordinated in shape, size and torque during the mandibular advancement.

Fig. 20.49 Initial upper and lower ClinCheck views.

Fig. 20.50 Initial right and left ClinCheck views.

Fig. 20.51 Initial frontal Clincheck view.

Fig. 20.52 Goal of treatment: mandibular advancement into a bilateral class I.

Fig. 20.53 Initial occlusion (upper), month 6 of evolution (middle), with aligners/month 6 of treatment without aligners (lower) showing anterior premature contact.

Fig. 20.54 Mandibular advancement in the first six months of treatment.

Fig. 20.55 New ClinCheck, asking to level the curve of Spee before continuing advancing the mandible. A pre‐mandibular advancement phase is used to intrude lower incisors and provide positive torque to upper incisors. During Pre‐MA phase ensure you over‐correct the labial root torque of molars that are going to support the PW.
Treatment Summary
- Total treatment time was 18 months
- Arches were transversally coordinated by the lower expansion after 6 months of treatment
- After the six months, as no pre‐MA phase was performed and the curve of Spee was not levelled, premature contacts were found on incisors and the precision wings had distortion problems that forced the taking of a new scan and additional aligners being required after only 6 months of treatment
- In the time the patient starts the MA phase, it is convenient to indicate class II elastics for night wear, in order to hold the mandible in place during the night in an advance position and prevent the distortion of the precision wings (class II elastics were used from aesthetic buttons attached on upper canines to the second lower premolars)
- Scissor bite was corrected and a bilateral class I was achieved, with normal overjet and overbite and an appropriated anterior guidance at the end of the treatment; the patient also had a better chin projection

Fig. 20.56 Aligner 17 of additional aligners using class II elastics.

Fig. 20.57 Position of class II elastics (from lingual of upper first premolar to labial of lower second molar) to avoid interference with precision wings.

Fig. 20.58 Situation at the end of mandibular advancement phase, before asking for second additional aligners to settle the occlusion.
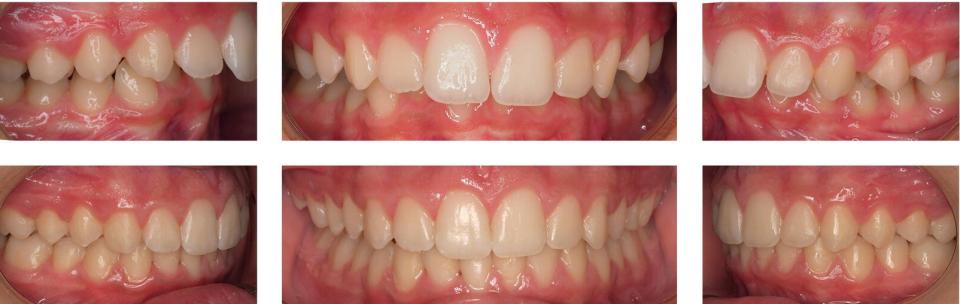
Fig. 20.59 Comparison between initial (upper) and final occlusion (lower).

Fig. 20.60 Final arch development.

Fig. 20.61 Comparison initial and final overjet.

Fig. 20.62 Comparison of initial and final smile.

Fig. 20.63 Mandibular changes after 18 months of treatment.

Fig. 20.64 Comparison in chin projection between initial, before additional aligners and at the end of the treatment.

Fig. 20.65 Final lateral X‐ray.
Tips for Class II Patients Treated with Invisalign Mandibular Advancement
- In the same way that other functional appliances, such as the Herbst appliance, function the correction of class II by MA requires growth potential and patient compliance
- It is necessary a pre‐advance phase to level the curve of Spee, and to expand the arches in order to avoid interferences during mandible protraction
- In class II division 2, the upper incisors need to be procline into a class II division 1 before starting the MA phase
- The average advance is 2 mm every 8 months, the MA phase should have at least 26 to 30 stages to allow the mandible to grow
20.2.5 Class II Corrected by Transverse Arch Development and Intermaxillary Elastics

Fig. 20.66 Initial intraoral view.
Diagnosis
A 17‐year‐old patient presented with mandibular asymmetry, a normodivergent class II profile and retruded chin. The upper midline was centred and the mandible was shifted to the right. They had dental full class II subdivision right, and class I on the left, with narrow arches and negative torque of upper canines.
Teleradiograph analysis: Normodivergent skeletal class II with labial tipping of lower incisors.
Right‐side unilateral chewing.
For the Asymmetric Mandibular Growth
- TMJ examination: irreducible dislocation on the right side with no pain and no movement limitations.
- The functional disability of the right joint was probably one of the cofactors responsible for the asymmetric mandibular growth.
Treatment Plan
- Correction of the mandible asymmetry and the unilateral class II without extraction of upper right premolar to avoid impairing the profile
- Re‐centre the mandible and achieve a more prominent chin projection
Stay updated, free dental videos. Join our Telegram channel
VIDEdental - Online dental courses


