Fig. 1.1
The attachment mechanism of the natural tooth to the periodontal tissues. Note the fiber bundles’ direction and how they connect to the tooth via the cementum (Reprinted from Rose LF et al. Periodontics: Medicine,Surgery and implants (2004). Copyright © 2004, with permission from Elsevier)
With an implant, the attachment mechanism is more of a cellular adhesion to titanium, being hemi-desmosomal in nature. The implant site that develops through healing within a few days is far more fragile in comparison to the tooth connection; it tends to act more like a cuff and is considerably weaker. With implants, there are far fewer connective tissue collagen fiber bundles with no supracrestal fibers.
The fiber bundle direction is predominantly parallel or oblique to the implant surface. In a few instances, horizontal fibers have been described. However, these do not terminate onto mineralized living tissue, as there is no cementum on the implant surface (Fig. 1.2), and these horizontal fibers cannot be considered equivalent to those found associated with teeth, Sharpey’s fibers.
Fig. 1.2
The attachment of the soft tissue as the implant emerges through the body. The collagen fiber bundles run parallel or transverse to the implant long axis. One set of fibers encircles the implant like a “hula-hoop” (not shown). This attachment has taken only a few weeks to develop and is essentially a hemi-desmosomal connection (Reprinted from Rose LF et al. Periodontics: Medicine, Surgery and implants (2004). Copyright © 2004, with permission from Elsevier)
One other major difference between the soft tissue attachment of the natural tooth and the implant is how the soft tissues allow for compartmentalization circumferentially. With the tooth, the fiber bundles attach at multiple sites to the cementum, producing distinct compartments that limit the progression of disease—consider the fiber bundles as being like spokes on a bicycle wheel. The segmentation produced by the fibers is noted by the disease processes that affect teeth such that periodontal disease is site specific. With an implant, essentially only one compartment exists, resulting from the circumferential fibers that encircle the implant, with disease here (peri-implant disease) affecting the full 360° around the implant (Fig. 1.3a, b).
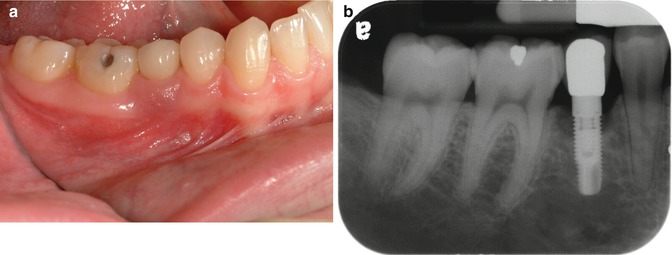
Fig. 1.3
(a, b) This implant site developed peri-implant disease. Initial soft tissue findings were cyanotic tissue that was inflamed. Radiographic examination shows the classic pattern noted with periimplantitis: circumferential bone loss with a crater-type bone defect
The consequences of the biological differences between the soft tissue attachments of teeth and implants can be readily demonstrated clinically as in the following three areas: disease pattern, probing effects, and displacement effects with retraction cord.
Disease Pattern: Biological and Clinical Significance—The Difference Between the Compartmentalization Seen with the Natural Tooth and That Seen Around an Implant
When periodontitis develops around a natural tooth, the bone changes tend to develop in a restrictive manner with distinct localized and angular defects noted. This is in stark contrast to the more generalized pattern of bone loss seen with periimplantitis, where crater- or well-type defects of bone loss circumvent the implant. The following case report describes this pattern:
Case Report #1
A 20-year-old female was referred to a periodontist for implant placement in the area of an existing mandibular right deciduous second molar, the permanent second bicuspid (tooth #29) having failed to develop. The site was evaluated for restorative and anatomical needs revealed by a cone beam computer tomogram with a radiographic guide in situ. An implant (Replace 3.5 mm diameter, 11.5 mm length; Nobel Biocare, USA) was placed by the periodontist according to the diagnostic criteria derived from the scan. The implant was allowed to heal for a period of 3 months and then was evaluated for both radiographic and clinical integrations. The patient returned to her restorative dentist for implant impressions, crown fabrication, and placement of the crown.
Two years’ post-restoration, the patient represented at the periodontist’s office with inflammation around the implant site, as shown in Fig. 1.3a, b.
The periodontist removed the crown and abutment and then removed the implant. On inspecting the implant, cement could be seen around the implant body with deposits of calculus on top (Fig. 1.4). The area was surgically debrided, and a bio-absorbable collagen wound dressing (CollaPlug, Zimmer Dental) was sutured across the surgical site. The area was left to heal for 3 months; then a crestal incision was made to retain the attached gingival and to expose the proposed implant site. The boney defect had filled in, although there was a slight residual buccolingual defect.
Fig. 1.4
The crown removed and implant removed by reverse torque. Calculus was noted on top of luting cement. This case is more completely described in chapter 11—Patterns Characteristic to Cement Induced-Peri-implant Disease (Reprinted with permission by Dentistry Today (Wadhwani and Pineyro 2012))
A new implant was placed along with a small amount of xenograft mineralized material (Bio-Oss, Osteohealth). The implant site was allowed to heal for 4 months; then the patient was sent to the restoring dentist for placement of a definitive crown, with instructions to use a screw-retained prosthesis.
Probing Differences Around Implants Versus Teeth: Biology and the Clinical Significance of the Soft Tissue Attachment—Differences In
To quantify the difference in these two attachments, a comparison of clinical probing forces can be made (see Fig. 1.5). The force advocated for probing around a natural, healthy tooth should be in the order of 0.25 N. In comparison, just over half this force around a healthy implant should be used—about 0.15 N.
The resistance to mechanical disruption of the two respective sites, a tooth and an implant, can be readily demonstrated with a diagrammatic representation of what occurs when the soft tissues are probed with the appropriate force (Fig. 1.5a, b). In the case of the healthy tooth, the robust nature of the fiber attachment is reflected in the manner the probe affects the tissues as well as the depth to which it extends. Compare this to a healthy implant attachment site where penetration is demonstrated, tearing away the hemi-desmosomal connection.
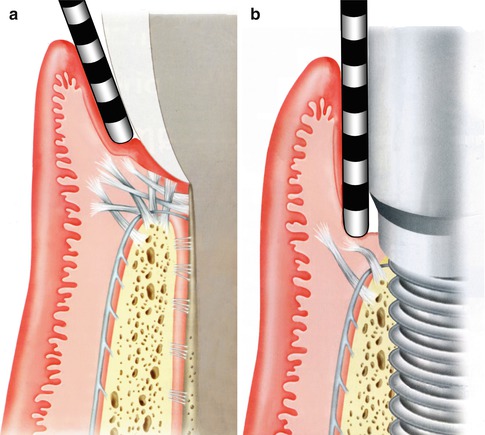
Fig. 1.5
(a, b) Probing: Implants versus teeth (Reprinted from Rose LF Periodontics:Medicine, Surgery and implants (2004). Copyright © 2004, with permission from Elsevier)
Retraction Techniques: Biology and the Clinical Significance of the Soft Tissue Attachment
The use of a retraction cord as an isolation technique, as well as a physical barrier to cement extrusion beyond restorative finish lines, has been advocated, and while it may help prevent excess cement extrusion around healthy, natural teeth, it must be used with caution around implant restorations. The following case reports on the potential detrimental effects of placing a retraction cord around an implant abutment prior to cementing an implant crown.
Case Report #2
(From: Complications of using retraction cord protection of the peri-implant soft tissues against excess cement extrusion—A clinical report.Wadhwani and Ansong Reprinted with permission from Implant Realities 2012).
A 29-year-old healthy female patient was presented for implant restoration of the maxillary left lateral incisor. Six months earlier, an immediate implant (NobelReplace Select, Narrow platform, Nobel Biocare, Yorba Linda, CA, USA) had been surgically placed. This involved a traumatic removal of a retained fractured root remnant, followed by immediate implant placement. A buccal concavity existed on the facial aspect of the implant site; this was dealt with by raising a full-thickness mucogingival flap, placing a xenograft (NuOss, Ace Surgical Co., Inc., Brockton, MA, USA) for augmentation followed by a barrier membrane made of resorbable collagen (BioMend Extend, Zimmer, Carlsbad, CA, USA). The mucogingival flap was closed with sutures, and a 5-mm-tall healing abutment (Nobel Biocare) was placed onto the implant to allow soft tissue healing. Three months after the implant was placed, osseointegration was confirmed clinically by radiograph, as well as auscultation of the implant. The healing cap was removed and a screw-retained acrylic provisional restoration made by using a temporary plastic abutment and a preformed acrylic crown. This was specifically designed to more closely match the soft tissue profile of a natural tooth. Following tissue maturation around the provisional abutment for a further 3 months, the implant was evaluated clinically and radiographically and considered ready for final restoration.
A custom impression coping was fabricated by modifying a stock impression coping by the addition of composite resin that mimicked the soft tissue contours around the implant. An impression was made using an open tray impression with an elastomeric impression material Express (3 M-ESPE, St. Paul MN, USA). A soft tissue gingival mask (Gingitech, Ivoclar-Vivadent, Amherst, NY, USA) was incorporated into a cast poured in type IV stone (Fuji Rock, GC, Leuven, Belgium) to provide the technician information on emergence profile, implant position, and depth, such that an implant abutment could be fabricated. The implant abutment was fabricated using computer-aided design/computer-aided manufacturing (CAD/CAM) by scanning with the Forte scanner (Nobel Biocare) and fabricating a milled zirconia abutment (Nobel Biocare), seen in Fig. 1.6.
Fig. 1.6
The zirconia abutment and crown, prior to placement. Note the color difference between the different materials necessitating subgingival margin placement
For esthetic purposes, the zirconia abutment margin was placed 1 mm below the free gingival margin of the implant site. Once completed, the abutment was fixed to the implant analog within the cast and a crown was fabricated from Lava Ceram (3 M-ESPE, St. Paul, MN, USA). The restorative seating procedure consisted of removing the provisional crown to expose the implant platform. The abutment was oriented as designed, seated, and the abutment screw tightened to the appropriate torque (35 Ncm), as recommended by the manufacturer.
To reduce the effect of gingival fluid contamination, as well as to protect the tissues from excess cement extrusion, knitted retraction cord size 00 (Ultrapak, Ultradent Products Inc., South Jordan, UT, USA) was packed into the sulcus around the abutment. The retraction cord was measured to a length equivalent to the circumference of the abutment, cut, and then packed around the sulcus just apical to the abutment margin (Fig. 1.7).
Fig. 1.7
The zirconium abutment in situ with retraction cord packed around the implant abutment, just apical to the restorative margin
After the crown was tried in, the esthetics and occlusion confirmed as acceptable to the patient and clinician, the intaglio of the crown was cleaned with phosphoric acid and washed in water, and then isopropyl alcohol was used as a saliva decontaminant. The adjacent teeth were isolated with PTFE tape (Oakley Co., Cleveland, OH, USA). The intaglio of the crown was loaded with cement (RelyX Unicem, 3 M-ESPE) and seated onto the abutment. Finger pressure was used to provide the crown seating force followed by light curing the facial cervical area for 10 s. Excess cement was removed with an explorer, followed by further light curing around and over the crown for 1 min. The subgingival retraction cord was located with a fine explorer, which, on removal, came out in multiple pieces with the cement remnants. Further cleanup of the cement margin was accomplished with hand instruments and dental floss. The fragmentation of the cord made measurement difficult; however, it appeared as though all of the cord was removed.
Stay updated, free dental videos. Join our Telegram channel
VIDEdental - Online dental courses


