Dental needs
Child temperament
Drugs (all oral administration supplemented with N2O/O2)
Ultrashort (e.g., extract of maxillary central incisors)
Easy
Nitrous alone (40–50); midazolam alone (0.5 mg/kg)
Difficult
Midazolam (1.0 mg/kg) + nitrous (50 %)
Short (e.g., 1 quadrant of pulps/crowns)
Easy
Midazolam (0.5 mg/kg) + meperidine (1.0 mg/kg)
Difficult
Chloral hydrate (15–20 mg/kg) or midazolam (0.3–0.5 mg/kg) + meperidine (2 mg/kg) + hydroxyzine (0.5–1.0 mg/kg)
Long (e.g., 2 or more quadrants of dentistry)
Easy
Chloral hydrate (15–25 mg/kg) + meperidine (2 mg/kg) + hydroxyzine (0.5–1.5 mg/kg)
Difficult
Recommend general anesthesia
It is important to inform the parent about the sedation process. This can be achieved in many ways including informed consent, instructions, packets of information, and frank discussions during the treatment planning phase. It is appropriate to begin the process of informed consent shortly after deciding on sedation as an option. If the sedation procedure is to occur within the next month, then a signed informed consent at the initial visit is recommended. The informed consent process at this visit is indicated because the parent can have the opportunity to (a) ask questions without the stress of the immediacy of the procedure, (b) ponder the procedure and even seek consultation with his/her physician or another dentist, and (c) review the process and other materials (i.e., preoperative instructions) at home without the duress of the clinical environment and situation on the day of the sedation.
The parent should be adequately prepared and advised regarding the events on the day of sedation. It is advisable that the practitioner develops and has a packet of material to give to the parent (see Fig. 8.1). The packet can contain informative material about sedation as an adjunct to dental procedures, the drugs and monitoring techniques used in the practice, pre- and postoperative instructions, and even a statement of the practice and adherence to recognized sedation guidelines (e.g., AAPD-AAP guidelines).
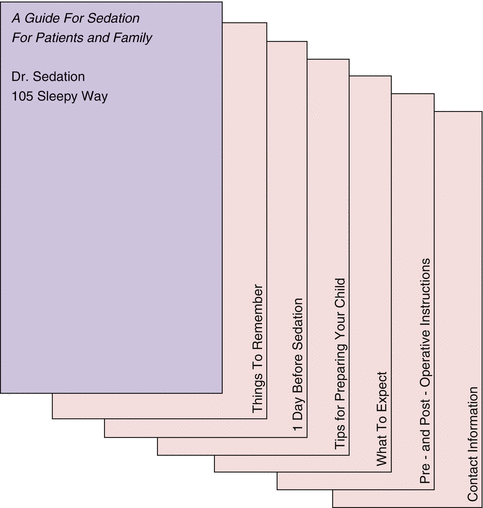
Fig. 8.1
Packet pf material for parent in anticipation of sedation visit
Preoperative instructions are important in facilitating a smooth entry into a sedation appointment. The instructions are meant for the parent/guardian as an explicit listing of details for preparing the patient to safely receive and benefit from the effects of a sedative agent. The instructions should be given verbally at the appointment prior to the sedation appointment date or over the phone the day before the sedation appointment or both. The parent/guardian should also receive a written document containing a listing of the instructions to follow prior to the sedation appointment. The preoperative instructions minimally should contain information on:
-
Feeding requirements consistent with published guidelines (e.g., nothing by mouth for a minimum of 6 h prior to the appointment).
-
Fluid requirements consistent with published guidelines which usually consist of only clear fluids up to 2–3 h prior to the sedation appointment. Clear fluids are fluids that can be held up to a bright light source and the source is seen through the liquid (e.g., water, apple juice); however, any fluids containing particles are contraindicated (e.g., orange or grapefruit juice).
-
Maintaining consistency of normal daily routines including naps, the patient’s usual bedtime, waking hours, and playtime on the day before the sedation appointment.
-
Dressing the child in comfortable but loosely fitting clothing such as a tee or sweat shirt, blouse, and trousers. The clothing should facilitate access to the anterior chest wall or upper arms as needed for the placement of monitors, IV access, or for monitoring breathing parameters and tissue coloration. Dresses that button in the back or are difficult to remove and expose the chest area or can be soiled by vomitus should not be encouraged.
-
Strong encouragement of the parent/guardian to contact your office should the child have conditions that might compromise the child during a sedative experience. Some of these conditions include recent head trauma (i.e., last 2–4 weeks) in which loss of consciousness, dizziness, vomiting, confusion, or guarded monitoring of the child occurred; cold or flu-like symptoms such as a sore throat, fever, lethargy and malaise, vomiting, or rhinitis within a day or two before the sedation appointment; or any other condition affecting respiratory or cardiac functions.
-
Discussion with parent and physician about the daily medications taken for behavioral or other medical conditions, whether they should be taken on the day of the sedation or are contraindicated with the planned sedatives.
-
Time of arrival at the clinical facility.
-
A listing of the practitioner’s telephone numbers including an emergency contact number.
-
The date and time of the sedation appointment.
Day of the Sedation Appointment
On the day of the sedation appointment, the first phase of the procedure is not unlike that which occurred on the day when the decision was made to sedate the child. It is very important to follow a standardized, well-established protocol. Part of the protocol involves reviewing the medical history for the purposes of (a) re-familiarizing yourself with the patient’s medical history and any specific issues to address before proceeding and (b) looking for change in the medical history since the last visit such as recent colds, influenza, recent head trauma, and vomiting episodes. Also, the major systems (e.g., pulmonary) need to be reviewed for any changes since the last visit. The parent should be queried regarding allergies and current medications including over-the-counter kinds such as Robitussin or liquid acetaminophen, ibuprofen, or herbal medicaments. Any new changes to the medical history should be thoroughly investigated to rule out any contraindications to continuing with the sedation appointment.
The dental assistant must obtain the weight of the child. Dosing of sedative agents for children is based on the patient’s weight in kilograms. Observing the interaction between the dental assistant, child, and parent during weighing of the child is an excellent opportunity for the clinician to gain insight into the patient’s temperament. Observation of this process and the child’s response can be informative and possibly aid in predicting their response in the dental operatory during the sedation process. The procedure of weighing the child can be done in one of two ways depending on the child’s behavior (see Fig. 8.2).
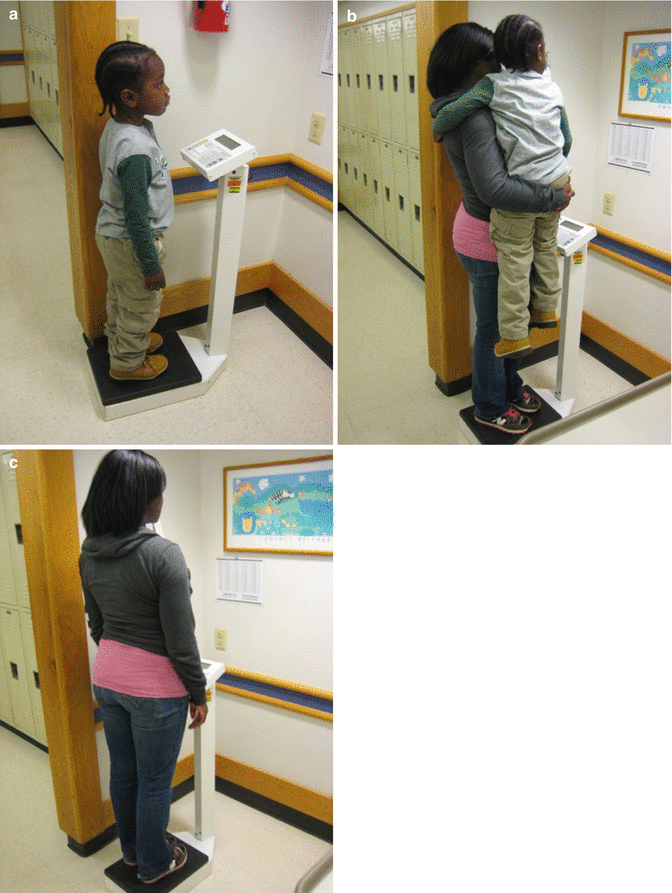
Fig. 8.2
Techniques for weighing child before sedation. The child can be asked to step on the scale and remain still, if the child is cooperative (a). For an uncooperative child, the parent and child can first be weighed together (b), then the parent can be weighed alone (c). The difference between the first and second weighing is the weight of the child
If the child is cooperative, the assistant can ask the child to stand quietly on the scale. If the child is not cooperative, the parent and child stand on the scale together, a weight is obtained, and then the child is held by the assistant while the same parent stands on the scale and obtain his/her weight. The difference of the two weights is the weight of the child.
Most children are brought to the clinic or office in clothes including shoes. Therefore, for a more accurate weight of the child, one should subtract 1 kg from the weight of the child. It is standard medical practice for sedation procedures to obtain the patient’s weight in kilograms and not pounds. Finally, one should be familiar with the general relationship of weight, height, and age of children. Overly obese children are poor candidates for sedation; those children whose weight is between 50 and 90 % should be carefully evaluated and only receive sedatives in doses based on the average weight and height for a child of their age and not on their own weight. Growth curves showing the relationship and percentiles for children’s height and weight by gender are readily available on the web (Fig. 8.3).
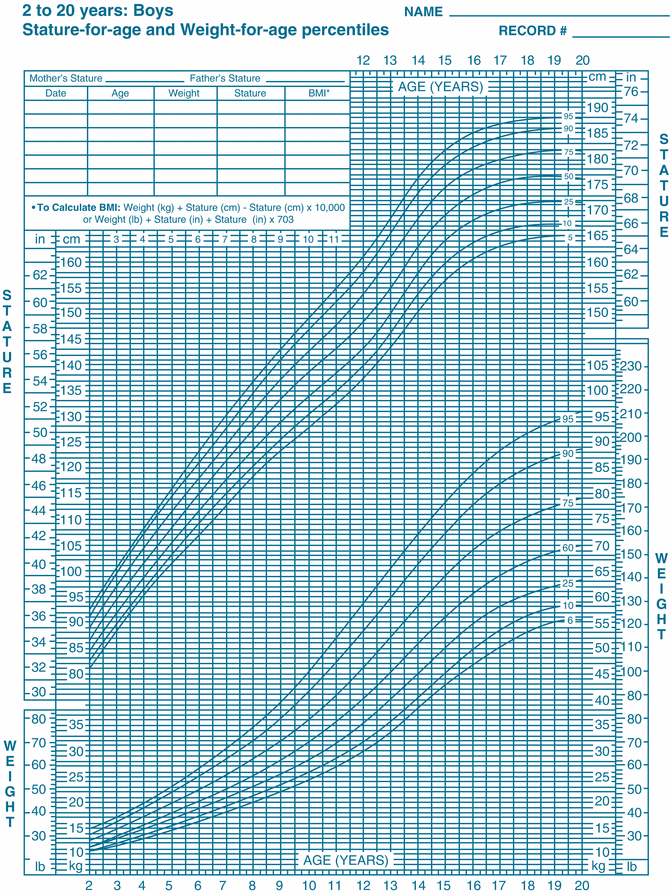
Fig. 8.3
Example of growth curve for boys between 2 and 20 years of age. Source: National Heart, Lung, and Blood Institute; National Institutes of Health; U.S. Department of Health and Human Services
Vital signs must be done preoperatively including heart rate, blood pressure, and oxygen saturation. The interaction with the child in collecting vital signs again will give the practitioner a good feeling for the cooperativeness of the patient, and this sometimes may afford an impression of the outcome of the planned sedation.
Tell-show-do should be used in obtaining vital signs. Vital signs can be obtained from most children often with the use of distraction techniques or playing games (e.g., testing “your muscles”). The values obtained may not be accurate in some patients due to uncooperative behaviors. For example, children in whom vital signs are difficult to obtain often tend to be poor candidates for light sedation. Individual responses to the process of taking vital signs will vary considerably. Some children may extend their arm for the placement of the blood pressure cuff, whereas others may withdraw their arm compressing it against their chest and screaming at the sight of the cuff. Vital signs should be within normal limits for the age of the child; hence, it is important to know the vital signs of children of varying ages. If the child’s behavior makes it impossible to obtain reasonable vital sign data, a note about the behavior preventing or compromising the interpretation of the vital sign values should be placed on the sedation record. Also increased diligence in questioning of the parent about the child’s condition, medical history, and related issues is necessary to ensure a greater likelihood that the child is ready for sedation. For instance, a 3-year-old child may have a recorded preoperative resting heart rate of 205 beats per minute. A resting heart rate for a 3-year-old child of 205 beats per minute is abnormal. However, if the child was screaming, kicking, and tugging away from the monitor during the vitals measurements, then such a high heart rate makes sense. Additionally, the automated blood pressure monitor may search for some time for a good signal, and the prolonged inflation of the blood pressure bladder can become painful to the child making behavior even worse.
Next, the practitioner intercedes and begins the process of checking on the child’s medical history and physical status. The medical history including any recent incident of head trauma, systems review, changes in medications, or allergy status are updated as children’s health and physical status can change rapidly. Any significant change or finding requires attention and the clinician’s follow-up. If behavior was an issue during the taking of vital signs, any hint of a potential problem with the patient’s physical status and systems should be thoroughly investigated through appropriate questioning of the parent. Furthermore, if the issue cannot be resolved satisfactorily or if questions remain, it is best to postpone the sedation and obtain further consultation with the patient’s physician.
The patient should be physically examined to include the head and neck as well as chest auscultation. The general appearance of the child should be appreciated. Attention should be given to symmetry of the head, neck and body, gait, activity, and any unusual clinical findings.
Chest auscultation requires a stethoscope and the tell-show-do technique. The stethoscope should be used to listen to the child’s lung fields and heart sounds. The aim of the auscultation is to rule out any abnormal respiratory or heart sounds. Abnormal respiratory sounds include stridor, wheezing, croup, coughing, or any sounds suggesting congestion of the lung fields. Normal heart sounds should be a simple “lub-dub” without any “swish” or tap or other unusual sound. It is recommended that the reader search the World Wide Web for the topic of auditory pediatric heart and lung sounds of which there are several excellent sites for the practitioner to visit and listen (e.g., http://www.easyauscultation.com/).
An airway examination may be one of the most important processes in preparing and planning a sedation appointment as well as ensuring the safety of the child [13]. Dental procedures involve the airway and can potentially compromise efficient and effective ventilation functioning even during non-pharmacological management. This is particularly the case if soft tissue issues and facial structure increase the likelihood of partial airway blockage. For example, individuals who are mouth breathers can find it challenging at times to undergo dental procedures and unfortunately may not even benefit from delivery of nitrous oxide using dental delivery systems. The addition of relatively large lymphatic tissues (i.e., tonsils and adenoids) can further impact the efficiency of ventilation in the awake state. Pharmacological interventions may cause varying degrees of sedation that influences awareness, decreases airway tone and compensatory mechanisms, and increases the likelihood of partial or complete airway blockage. The airway examination is not unlike that of an oral clinical examination, but focus is directed to the size of the tonsils at the oropharyngeal junction. In a supine position, the jaw and tongue will tend to move posteriorly due to the effects of gravity and sedative drugs. The possibility of blockage of the tongue with the tonsils and soft palate should always be considered. The parent should also be asked if the child snores on a regular basis or when greatly fatigued.
In doing this airway examination, the relatively cooperative patient can be asked to open his/her mouth as wide as they can and, while holding the mouth in an open position, protrude the tongue and say “aahhh.” For the shy, uncooperative child, it is often necessary to do a knee-to-knee examination (Fig. 8.4). In a knee-to-knee examination, the parent and clinician sit facing each other with their knees touching. The child is placed in the parent’s lap facing the parent. The child is reclined onto the legs of the parent and clinician so that the patient’s head is resting in the clinician’s lap. The patient’s legs are wrapped around the waist of the parent who is holding the hands of the patient. Usually the patient is looking up at the clinician facilitating an oral examination.
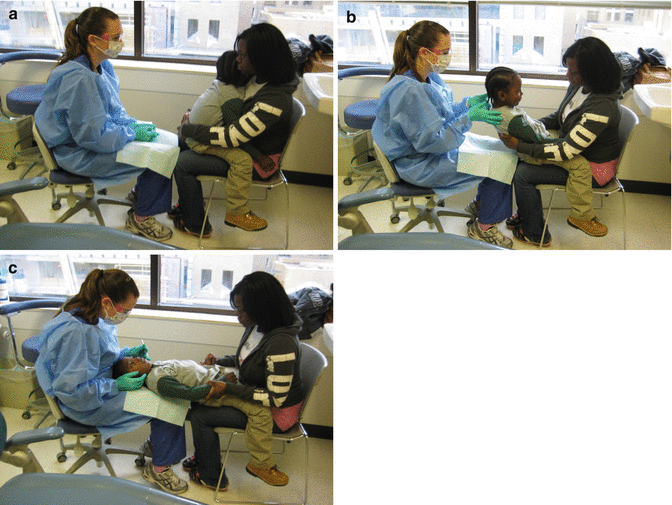
Fig. 8.4
Knee-to-knee examination technique used for visualization of the tonsils in an uncooperative child. (a) The mother and dentist sit facing each other with their knees touching and laps at approximately the same height from the floor. The mother holds the child who faces her with legs wrapped around her waist. (b): The child is lowered onto the dentist’s lap. The dentist aids in lowering patient. (c) The child lies on the dentist and mother’s thighs. The dentist uses his/her hands to stabilize the head and look into the oral cavity. The mother holds the child’s hands to prevent grabbing or movement while securing the child’s legs around her lap
The mouth is gently opened if the child is quiet. Often the child is crying and the tonsils cannot be easily visualized due to posturing of the tongue “high” in the mouth, and a gag reflex may be elicited. One of the easiest methods to elicit the gag reflex is to slide a mouth mirror along the midline of the tongue toward the posterior 2/3rds of the tongue. (Note: always check the mouth mirror to ensure that the mirror is tightly attached to the mirror handle.) The patient’s tongue naturally positions against the mirror in an attempt to deflect it. Slight pressure and a slow movement of the mirror toward the posterior portion of the tongue will elicit a gag reflex without causing vomiting. The practitioner must watch for and analyze the tonsil size compared to the airway open in the area when not gagging. During the gag reflex, the tonsils move toward the midline and superiorly, thus appearing slightly larger than they are. This procedure must be done very quickly and only once as it agitates the child who must be reassured and consoled.
Attention should be focused on the size of the tonsils compared to the airway [1, 13, 19]. Tonsils greater than 50 % of the airway predispose a patient to possible airway blockage especially when a sedative is used that increases the likelihood of loss of consciousness. For example, chloral hydrate, whose active metabolite is an alcohol, is known to selectively inhibit the muscles of the tongue. When a patient is placed in a supine, relaxed position and the musculature of the tongue loses it tone, it will drop posteriorly to contact the soft palate or pharynx causing partial or full blockage resulting in snoring or alternating chest-stomach rocking indicating attempt to ventilate but lack of movement of air, respectively.
An oral examination should be completed and the dental treatment plan reviewed with the parent. Reviewing the previously obtained and signed informed consent which the parent can re-sign and date on the day of the sedation is advisable. This is an excellent opportunity to answer any last minute questions or concerns the parent may have prior to the initiation of the sedation process.
The next phase of the sedation protocol is the decision-making process related to the drug or drugs that will be used. The dose of each drug should be calculated based on the child’s weight in kilograms, temperament classification (i.e., “easy” or “difficult”), and extent of dentistry to be accomplished. Once a decision on the drug(s) and dose(s) has been made, it is highly advisable that the practitioner recruit a dental assistant or colleague to review the steps of dose calculation and dispensing of the drug(s). The practitioner prepares the drug solution. The assistant or colleague can watch and confirm this process to ensure that a dosing error is not made. The calculations and confirmation of amount dispensed should be noted immediately in the patient’s sedation record.
Once the elixir is prepared, it should be flavored to mask any unpleasant taste of the preparation [20, 21]. The liquid formulations of the most popular sedatives require flavoring to aid with their consumption. The child should be encouraged to drink as fast as possible so that the initial distasteful gustatory effect is minimal. Sipping from medicine cups should be discouraged. Unfortunately once swallowed, the lingering effect of the sedations causes an even worse disagreeable aftertaste. To diminish the lingering aftertaste, a small sip of water can be given (e.g., 3–5 ml). There are several means by which to flavor unpalatable drugs as are seen in Table 8.2.
Table 8.2
Agents than can be used for flavoring oral sedative solutions
|
Agent
|
Characteristics
|
Company
|
|---|---|---|
|
Nu-Flavor (alginate flavoring material)
|
Comes in numerous flavors
Two or three drops per 5 ml of solution
2 oz. (57 ml) bottles
|
Lancer Orthodontics
|
|
FLAVORx system
|
Comes in numerous flavors
Comes in kit
30 ml bottles
|
FLAVORx, Inc.
|
|
Children’s MOTRIN
|
Berry flavored
40 mg/ml
|
McNEIL-PPC, Inc.
|
|
Kool-Aid
|
Comes in numerous flavors
Powder
|
Kraft Foods, Inc.
|
The next step is the administration of the sedatives as an elixir. There are three ways to administer an oral elixir to a child depending on their behavioral acceptance of the elixir. The child can be given a medicine cup containing the elixir and encouraged to drink the “juice.” Many children will drink the elixir readily and rapidly, especially if the process involves a game. For example, the parent is given a medicine cup containing colored/flavored water and the child is challenged to “drink the juice faster than Mother on the count of three.” If the child sips the elixir and rapidly decides they dislike the juice refusing to drink anymore, then alternatives for administering the elixir should be considered.
One alternative is to have the parent administer the elixir via a needleless syringe. Often the parent will voluntarily report that he/she gives the child medicines at home using a needleless syringe and believe that would be the simplest and most efficient way to get the elixir administered. This technique is fine as long as the practitioner advises the parent to “squirt the liquid” slowly into the mouth and definitely angled toward the cheeks and not the back of the throat. Many parents will “unload” the syringe rapidly and direct toward to back of the throat inducing choking, coughing, gagging, and possible expectoration of the elixir. Since some sedatives are mucosal irritants (e.g., chloral hydrate), this rapid administration and directing of the fluid bolus to the center of the back of the throat is unadvisable.
Another alternative is for the practitioner to administer the elixir via a needleless syringe using a knee-to-knee position with the parent and partial reclining of the patient. The child may cry which is advantageous to the practitioner who can gently reflect the cheek with his nondominant hand placing a finger or thumb on the retromolar pad (Fig. 8.5). He/she can slowly dribble the solution down his/her finger/thumb which flows over the pad and usually induces a swallowing reflex. The same procedure can be done even if the child does not cry, but resists opening the mouth and remains clenched. This is not a problem as the finger or thumb of the nondominant hand can be inserted into the corner of the lip and slowly moved between the clenched teeth and buccal mucosa to the retromolar pad. Rarely if ever does a child try to bite during this process.
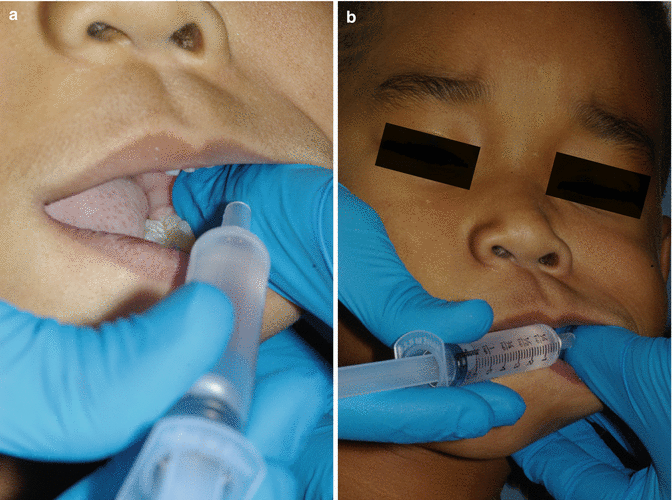
Fig. 8.5
Administration of sedative using a needless syringe. The finger of the nondominant hand is placed on the retromolar pad (seen in a). The plunger of the syringe is gently depressed releasing the contents down the finger that is resting on the retromolar pad (b)
Sometimes the child is not stimulated to swallow and the fluid begins to build in volume in the oropharyngeal area. It is best to stop the administration at this point and ask the parent to help by gently pinching the nose closed. The child will either swallow in order to breathe or expectorate the fluid. The remainder of the elixir in the syringe can then be administered.
If expectoration occurs or vomiting is initiated shortly after this administration procedure, the practitioner should never estimate the amount spilled/vomited in order to readminister the estimated amount of sedative. In fact, it is surprising how often the child will sufficiently be sedated with the limited amount of elixir absorbed through the mucosa and partially swallowed, especially when using the adjunct of nitrous oxide and other behavioral guidance tools (e.g., distraction). Much of this spillage/vomiting problem can be avoided if the practitioner decides, based on parental input and whether the drug(s) are parenterally compatible, that a submucosal injection is a better option. This administrative technique is described in Chap. 9 describing alternatives to oral administration of sedatives. This technique has the disadvantage of administering two injections: the sedative elixir and later the local anesthetic. Regardless of what method of administration is used, it is always advisable to have protective eyewear on the child and the administrator of the liquid to prevent spitting of the liquid into eyes. Finally, if any of these alternatives are unacceptable to the parent or uncomfortable for the clinician, then other considerations for managing the patient’s behavior should be considered. This may include other routes of sedative administration or even general anesthesia.
The next phase after drug administration is that of latency. In this context, latency refers to the duration of time between the drug administration and the attainment of therapeutic blood levels of the sedative(s) allowing the beginning of the restorative phase of the procedure to begin. Average latency periods for commonly used sedatives vary and have generally been empirically established (see Table 8.3), but the practitioner should recognize that not every child will respond in an “average” fashion. If the practitioner is not using common sedatives, they can seek latency period information by searching on a recognized Web site (e.g., Lexicomp) and find the drug and the pharmacokinetic information for the drug focusing on the time period associated with the “time to peak serum concentration.”
Table 8.3
Latency periods for common sedatives and combinations
|
Drug
|
Sedation considerations (timing)
|
|
Chloral hydrate
|
Onset: 30–45 min
Separation time: 45 min
Work: 1–1.5 h
|
|
Meperidine
|
Onset: 30 min
Separation time: 30 min
Work: 1 h
|
|
Midazolam
|
Onset: 10 min
Separation time: 10 min
Work: 20 min
|
|
Hydroxyzine
|
Onset: 15 min
Separation time: 30 min
Work: 45 min
|
|
Combinations
|
|
|
Chloral hydrate
+
Meperidine
+
Hydroxyzine
|
Onset 20–30 min
Separation time: 45 min
Work: 1–1.5 h
|
|
Midazolam
+
Meperidine
+
Hydroxyzine
|
Onset: 5–10 min
Separation time: 20–25 min
Work: 1 h
|
Stay updated, free dental videos. Join our Telegram channel
VIDEdental - Online dental courses


