Chapter 3
Primary incisor restoration
Ari Kupietzky
Early childhood caries (ECC) is usually seen in 18- to 36-month-old children, although it can present even younger. Initially, the maxillary incisors develop a band of dull white demineralization along the gum line that goes undetected by the parents. As the condition progresses, the white lesions develop into cavities that girdle the necks of the teeth in a brown or black collar. Frequently, by the time the child is brought to the dentist, much of the anterior clinical crowns are decayed or lost. In advanced cases, the crowns of the four maxillary incisors may be destroyed completely, leaving decayed brownish-black root stumps (Ripa, 1988). The premature loss or unsightly appearance of grossly decayed primary anterior teeth may be initially of concern to parents; however, as the child matures, it may also affect the patient’s self-image. Treatment of these badly decayed teeth remains a challenge for the dentist. The toddler and preschooler, due to their young age and lack of cognitive abilities, are usually very uncooperative for dental treatment, and their behavior plays a big factor in the choice of restoration. Many appear with poor oral hygiene practices, presenting swollen, inflamed, and bleeding gingiva.
Treatment plans advocated for grossly decayed primary anterior teeth include the following: restorations, crowns, or extractions followed by partial dentures. This chapter presents step-by-step procedures for the placement of bonded resin composite strip crowns, full coverage prefabricated crowns, and the anterior esthetic fixed appliance (modified Nance or Groper appliance).
Pretreatment
When a toddler presents to the dental clinic and is diagnosed with ECC, specific counseling and patient preparation must be implemented before any definitive restorative treatment may be commenced. Changing the feeding practices and implementing tooth brushing with fluoridated toothpaste are the first steps in controlling the disease. Once accomplished, definitive restorative treatment modalities can then be mandated.
Oral hygiene
It is advantageous to obtain ideal oral hygiene before commencement of treatment. Parents should be instructed and convinced that they bear partial responsibility for the success of treatment by preparing their child’s gingiva for the procedure. Inflamed gingiva (Figure 3.1a) may interfere with proper curing of the restorations, resulting in discolored crowns as a result of excessive bleeding during the curing process. Two to three weeks of proper home care is usually enough to achieve healthy, pink, nonbleeding gingiva that will facilitate restorative treatment (Figure 3.1b).
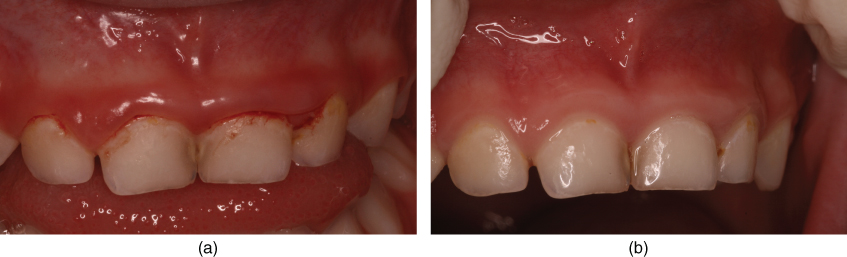
Figure 3.1 (a) The gingival tissue of patients with ECC tends to be inflamed, leading to hemorrhage and compromised aesthetics. Inflamed gingiva may interfere with proper curing of the restorations, resulting in discolored crowns due to excessive bleeding. (b) Three weeks of proper tooth brushing resulted in pink, healthy gingiva, which was necessary to facilitate an aesthetic result.
Indications
Full coronal restoration of carious primary incisors may be indicated when: (i) caries is present on multiple surfaces, (ii) the incisal edge is involved, (iii) there is extensive cervical decalcification, (iv) pulpal therapy is indicated, (v) caries may be minor, but oral hygiene is very poor (high-risk patients), or (vi) the child’s behavior makes moisture control very difficult, creating difficulties in placing Class III restorations (Waggoner, 2002). In addition, the clinician may opt for full coverage in lieu of large Class III restorations: due to the small clinical crown, the relatively large size of the pulp chamber, the close proximity of the pulp horns to the interproximal surfaces, and the thinness of the enamel, repairing interproximal decay in these teeth requires preparations that are conservative in depth with close attention to detail, both to the preparation itself and to the material placement. The technique sensitivity of placing Class III esthetic restorations is very high. Moisture control, hemorrhage control from the gingiva, and retention of the rubber dam are challenges to be overcome to obtain a successful result (Waggoner, 2002); the placement of a full coverage crown will likely be more successful and longer lasting.
Bonded resin composite strip crown
The bonded resin composite strip crown (Figure 3.2) is perhaps the most esthetic of all the restorations available to the clinician for the treatment of severely decayed primary incisors (Webber et al., 1979). However, strip crowns are also the most technique sensitive and may be difficult to place (Croll, 1995). Some simple clinical tips may assist the clinician in achieving an esthetic and superior outcome.
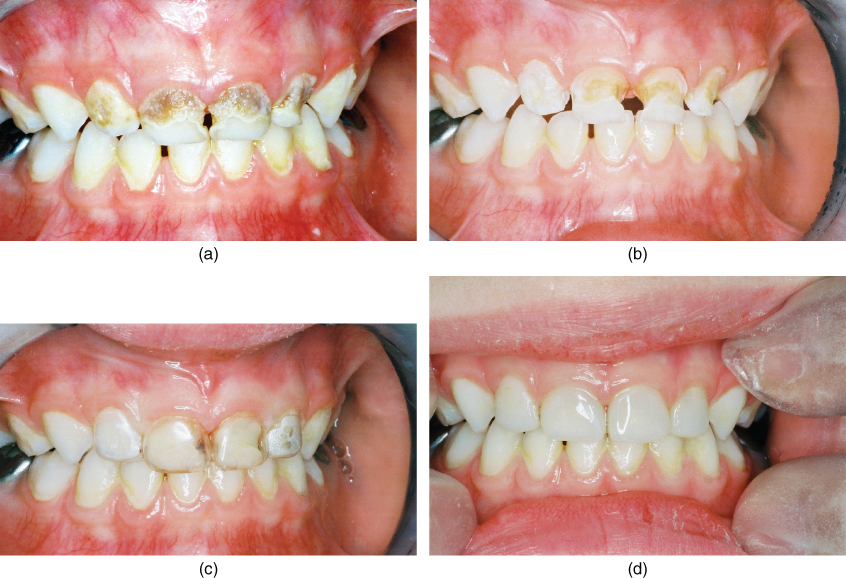
Figure 3.2 (a) The bonded resin composite strip crown is perhaps the most esthetic of all the restorations available to the clinician for the treatment of severely decayed primary incisors. Preoperative view. (b) Caries removal followed by placement of resin-modified glass ionomer cement. Note healthy ginigiva. (c) Try-in of crown formers. (d) Postoperative view.
Strip crown preparation
Preparation of the strip crown may be accomplished before the treatment visit. The crown is pierced with a sharp explorer at the mesial or distal incisal angle to create a core vent for the escape of any air bubbles entrapped in the crown (Figure 3.3a). Care must be taken not to damage the proximal seams of the crown. After vent preparation, sharp, curved scissors should be used to trim the crown gingival margins (Figure 3.3b). To ensure sharpness, only task-designated scissors are recommended for this purpose. If there is any doubt of proximal seam integrity, the crown should be discarded. All crowns may be trimmed to an approximate level and can be fine-tuned chair side during treatment.
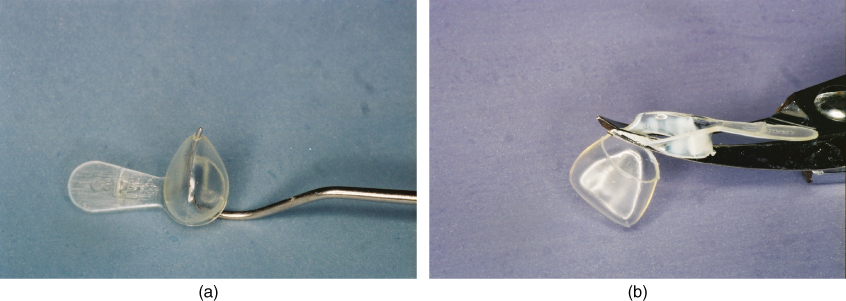
Figure 3.3 (a) The crown is pierced with a sharp explorer at the mesial or distal incisal angle to create a core vent for the escape of any air bubbles entrapped in the crown. (b) Following vent preparation, sharp, curved scissors should be used to trim the crown gingival margins.
Isolation and rubber dam placement
The routine use of ligature ties to deflect gingival tissue and retain the rubber dam in place is not suggested, although this is a valid technique used routinely by many dentists with success (Figure 3.4a). Ligature ties at many times may be the cause of bleeding and discomfort for the patient. Their use may inhibit rapid removal and replacement of the rubber dam during treatment. After curing, the removal of the ligatures, which are situated under the hardened restoration, is often difficult and necessitates the otherwise unnecessary subgingival bur finishing for their complete removal. Therefore, with the exception of a case involving severe subgingival carious incisors, it is suggested to use the slit-dam method (Croll, 1985). The application is rapid, and the desired teeth are completely available for restorative treatment. Two large holes are punched out 1–2 cm apart and are joined by a scissors cut. The rubber dam may be held in place with digital pressure (Figure 3.4b) or with the use of an elastic band extending between the rubber dam frame and wrapped around the patient’s head (Reid et al., 1991). Note that the rubber dam is kept in place only during caries removal; during crown placement, the rubber dam may be removed.
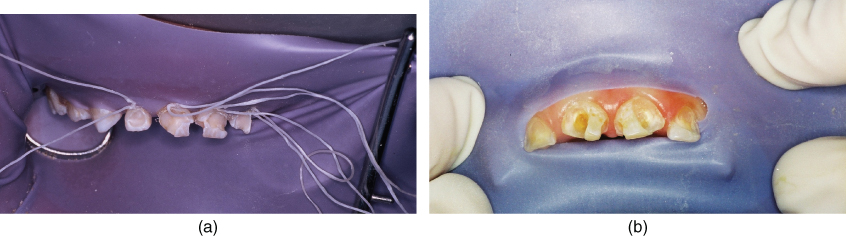
Figure 3.4 (a) The routine use of ligature ties to deflect gingival tissue and retain the rubber dam in place is not suggested, although this is a valid technique used routinely by many dentists with success. (b) It is suggested to use the slit-dam method.
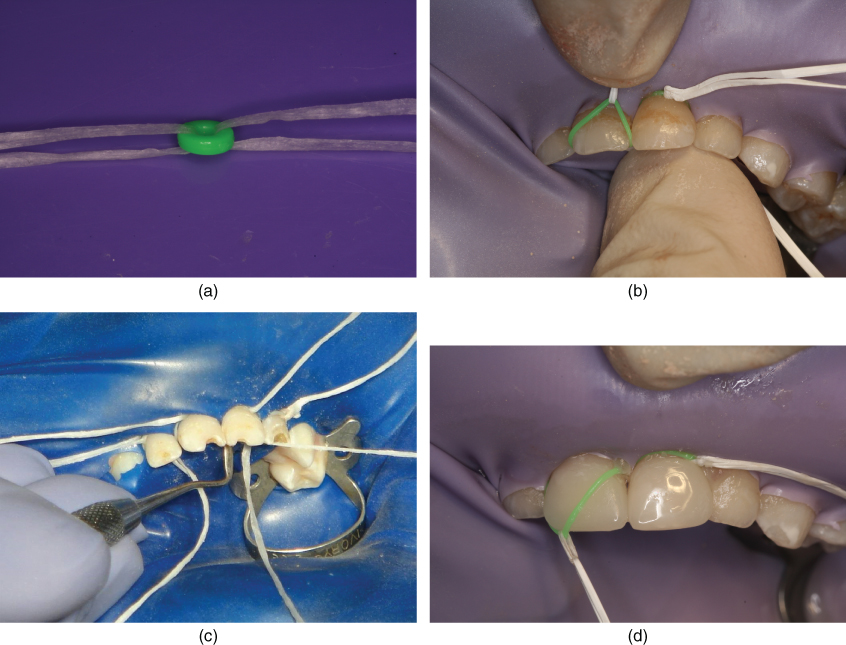
In cases involving severe subgingival carious incisors, it is suggested to use the elastomer method introduced by Psaltis and Kupietzky. Orthodontic elastomeric ligatures are used in place of those for the specific purposes of rubber dam retraction and virtual elimination of the problems of blood and saliva contamination of the operative areas. The success of the technique depends on three key steps as follows:
- Use a rubber dam punched with four holes of the smallest possible size. This allows the tightest fit, eliminates leakage, and enables the elastomers to retract the dam more effectively around the teeth. It is recommended to space the four holes over the center of each maxillary incisor. Placement too close together will result in stretching of the rubber dam between the teeth and subsequent leakage around the teeth.
- Place orthodontic elastomers over each incisor after placement of the rubber dam. This is accomplished by threading two strands of floss through each elastomer (Figure 3.5a) and then stretching it over the tooth (Figure 3.5b). If the interproximal areas are sharp or jagged due to caries, the elastomers may tear during this process. If so, slice through the jagged areas with a thin fissure bur (no. 169 or 1169) to eliminate them. In many cases, the elastomers can be flossed into place by pulling them simultaneously from each tooth’s labial and lingual surfaces. It is also sometimes necessary to facilitate this procedure by using a Hollenback carver or a similar hand instrument that can tuck the elastomer well into the gingival sulcus around each tooth (Figure 3.5c). When the elastomers have been properly placed over a well-punched rubber dam, they will almost immediately begin to contract. Consequently, they will also retract the dam and gingival tissues. If any treatment is to be completed in the posterior segments, it is best to proceed and complete them first to give the elastomers more time to continue this retraction process. Once the elastomers are in place, remove the piece of floss from the lingual side, but leave the labial floss in place.
- Remove the elastomers with the labial floss after the preparation and restoration of the incisors have been completed (Figure 3.5d). It is critical to remove the elastomers, as they will continuously migrate up the conical-shaped root on any of the incisors and, if left in place, can atraumatically and asymptomatically “extract” the tooth. Hence, the facial floss provides an easy way to remove the elastomer and serves as a reminder. The proper use of these elastomers eliminates the tedious tying (and removal) of floss ligatures and virtually eliminates any hemorrhaging to ensure a clean field for placement of the strip crowns.
Stay updated, free dental videos. Join our Telegram channel
VIDEdental - Online dental courses


