A detailed occlusal examination of patients presenting with problems such as unexplained pain, wear, fracture, drifting and mobility (see Chapter 2) is an integral, invaluable part of the dental examination. A detailed occlusal examination is essential when planning any major restorative work to determine, for example, whether this should be provided as a conformative or reorganised procedure and to consider whether any occlusal adjustments are needed before providing definitive restorations (see Chapter 3). The clinical technique for carrying out a full occlusal examination is shown on the DVD.
Do I Need to Do a Full Occlusal Examination?
The answer in most cases is no. The extent of the examination will vary from patient to patient. It is possible to identify isolated occlusal problems without systematically following the procedure shown in the video, but this requires intuition and experience. A systematic approach is usually needed to resolve more complex problems. It is worth practising all parts of the examination when the opportunity arises, particularly techniques such as identifying guidance teeth and finding the hinge axis, so that they become second nature.
Some find it helpful to use a structured record form, but, once you are familiar with carrying out an occlusal examination, the relevant findings can be recorded as shown in Table 8-1.
| Component of examination | What to look for |
|
Separate arches |
|
|
Intercuspal position (ICP) |
|
|
Retruded contact position (RCP) |
|
|
RCP–ICP slide |
|
|
Right lateral excursion (RLE) |
|
|
Left lateral excursion (LLE) |
|
|
Protrusion |
|
|
Loss of vertical dimension |
|
“Good” and “Bad” Contacts
In essence, the occlusal examination allows important tooth contacts to be identified. There are “good” contacts, which support the occlusion and guide jaw movement, and “bad” contacts, which deflect jaw movement during closure or interfere with excursions. It is also important to identify those contacts which would otherwise be good, but which occur on teeth that are heavily restored and poorly equipped to handle the loads that result from guidance or parafunction.
Although most people are not troubled by deflective contacts and interferences, in some patients they are associated with problems such as pain, fracture, mobility and wear. Furthermore, the inadvertent removal of contacts during tooth preparation can give rise to unwanted changes in jaw position and loss of occlusal space, as described in Chapter 3. It is sensible to know in advance of preparing a tooth whether it includes a holding or guidance contact which needs to be incorporated in the restoration. A deflective contact or interference, however, can be eliminated before preparing the tooth, and so avoid reproducing it in the restoration. Detecting such contacts can be quickly and easily achieved with a systematic examination.
Deflective contacts and interferences may occur developmentally, but are often the result of tooth movements caused by extractions, poorly contoured restorations, periodontal disease, periapical inflammation and tooth wear. More unusual causes of deflective contacts and interferences include jaw fracture and tooth movements occurring during pregnancy (Fig 8-1). Whatever the cause, the principles of examining and adjusting the occlusion are the same.
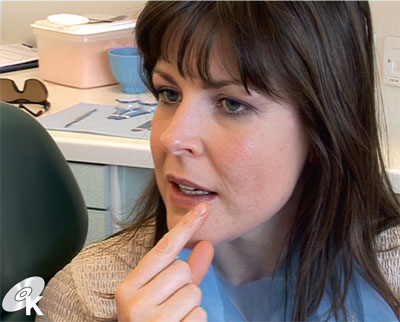
Fig 8-1 The patient shown on the DVD reported a clear history of occlusal changes during pregnancy which, despite an excellent periodontal condition, had not resolved over a year later.
Screening for Parafunction
It is always worth knowing if the patient is a bruxist, as this will help in both the diagnosis of problems of excessive occlusal loading (see Chapter 3) and the prescription of suitably robust restorations. Parafunction is often episodic, and so the detection of faceting and vertical microfractures does not mean that bruxism is active at that time. Clinical indicators of active parafunction include fremitus, tooth tenderness and ridging of the sides of the tongue or cheeks at the level of the occlusal plane.
Screening for Temporomandibular Disorders
As discussed in Chapter 7, it is also good practice to check all patients for signs and symptoms of temporomandibular disorders (TMDs), particularly those patients requiring extensive restorations. Screening for a history of a painful or clicking jaw, muscle and/or temporomandibular joint (TMJ) tenderness on examination, significant joint sounds (bearing in mind that mild clicking is very common) and limitation of jaw movement is appropriate for all patients.
Reserve the full TMD examination (shown in DVD video J) for patients who have a significant problem requiring more detailed diagnosis. A screening check can be combined with a brief occlusal examination.
Performing the Examination
The following sections are intended to be used in conjunction with Table 8-1 and the relevant video clips on the DVD.
What Instruments Do I Need?
Set up an examination tray (Fig 8-2) with thin articulating foils (< 20 μm thick) and shim stock. The foils are much easier to use if held in Miller’s forceps to stop them crumpling. Use one colour, for example black, for ICP marks and another, for example red, for excursive marks. Shim stock is a 10 μm-thick Mylar film and is held in mosquito forceps. It is used as a feeler gauge between occluding teeth. The extent of posterior contact can be quantified as the number of pairs of posterior teeth holding the shim. Some way of measuring the vertical dimension, such as a Willis gauge, may also be useful.
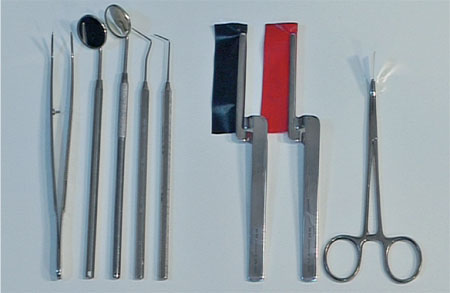
Fig 8-2 Examination tray for occlusal examination, with Miller’s forceps holding black and red articulating foil and mosquito forceps holding shim stock.
What Should ICP Occlusal Contacts Look Like?
Occlusal contacts do not always mark well with thin occlusal marking foils, particularly if the teeth are wet. Sometimes the situation can be improved by first marking the teeth with a thicker paper, which leaves a broad smudge of colour against which the contrasting colour of the finer foil can be seen. The best way of ensuring you can see contacts is by making the teeth dry.
In the young, ICP contacts should ideally be small and discrete, with multiple contacts on each tooth providing occlusal stability (Fig 8-3). ICP contacts that are broad and rubbing, as seen in the patient in the DVD (Fig 8-4), can signify occlusal instability when associated with functional disturbances. Bear in mind, however, that the area of contacts can also increase with normal levels of wear.

Fig 8-3 ICP contacts are ideally small and discrete.

8-4 ICP contacts that are broad and rubbing are sometimes associated with underlying occlusal problems.
Do ICP Tooth Relationships Potentially Affect Anterior Guidance?
Before looking at mandibular excursions, the ICP can tell you quite a lot about guidance. If there is little or no vertical overlap of incisors or canines, the capacity of these teeth to guide jaw movement, with the disclusion of the posterior teeth, will be limited or non-existent. Similarly, if the overbite is incomplete, there may be a considerable delay during excursions before the anterior teeth come into contact.
Rather more difficult to comprehend is the effect of the occlusal plane. On the one hand, a flat occlusal plane with a shallow angle to the horizontal plane – the patient’s Frankfort plane – will dispose to posterior disclusion. On the other hand, a curved occlusal plane, or one with a steep angle to the horizontal, will dispose to clashing of posterior teeth. Cross-bites and scissor bites – the upper teeth occluding buccal to the lower teeth – often cause interferences or deflective contacts.
How Do I Assess the RCP–ICP Slide?
This is one of the most important skills to learn for assessing the occlusion. It is not difficult, but it only comes with practice. Using bimanual manipulation, with the patient completely relaxed and preferably supine, guide the patient into RCP (Fig 8-5a,b).
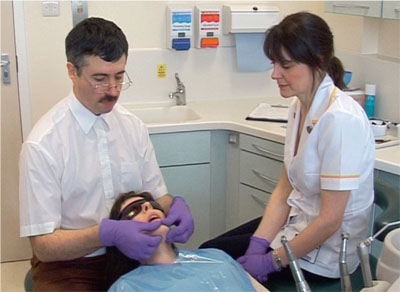
Fig 8-5a Bimanual manipulation is used to seat the condyles in centric relation to examine the retruded contact and the RCP–ICP slide.
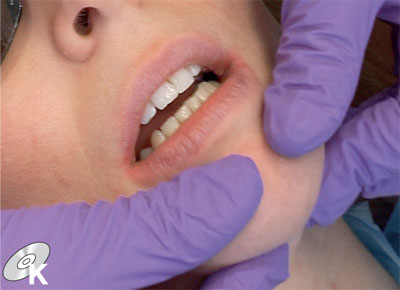
Fig 8-5b Manipulation should take place with the patient supine and teeth only slightly separated.
Ask the patient to point to the contacting teeth and feel how the mandible slides into ICP. Qualitatively, the slide will either be present or absent, smooth or rough, small or large. Quantitatively, estimate how far the mandible deviates forwards or laterally by looking at the relationship between the upper and lower incisors during the slide. Chapter 3 and the DVD illustrate how to do this, looking both from in front and from the side of the patient.
How Do I Detect Fremitus?
Look out for an anterior thrust associated with a deflective RCP–ICP slide. Often, anterior teeth affected by an anterior thrust will exhibit fremitus, as do some teeth involved in guidance. You can easily detect fremitus as palpable vibration by placing your index finger on each of the teeth in turn and asking the patient to tap together. With marked fremitus, the vibrations will be clearly visible. The anterior thrust may also be associated with specific problems with the upper anterior teeth, such as localised palatal wear, damage to restorations or incisor drifting.
What Do I Need To Look for with Excursive Movements?
The important thing is to identify which teeth guide movement and which teeth interfere with it. Excursive contacts, when marked with foil, should appear smooth and unbroken. An irregular, broken or dog-legged appearance suggests an interference, either on the tooth itself or on a tooth distant to it (Fig 8-6a,b).
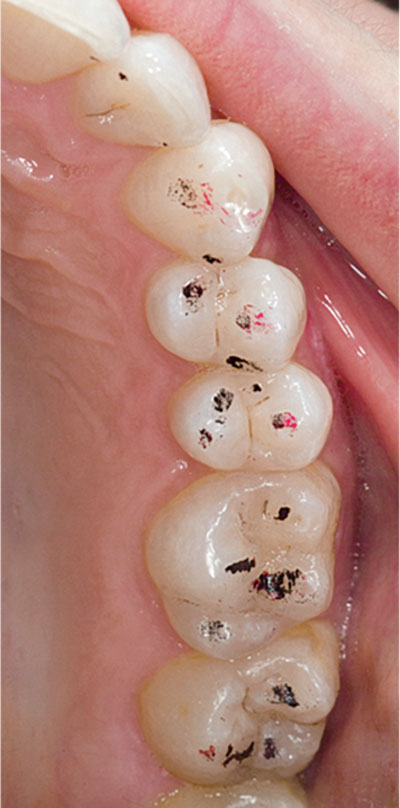
Fig 8-6a Markings for left lateral excursion showing poorly defined guidance on the canine. The difficulty the patient had in making this movement suggested the heavier red marks on the premolars were interferences.
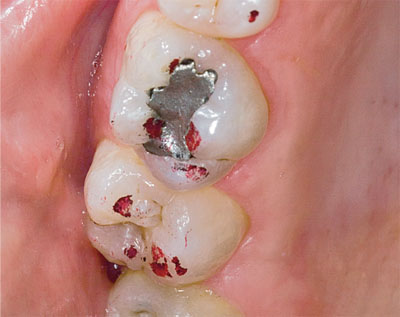
Fig 8-6b There were also non-working-side interferences (again marked in red) on the upper right first and second molars.
In simple terms, the jaws and TMJs comprise a lever system. Forces applied to the teeth by the masticatory muscles diminish as you move anteriorly. Hence, anterior teeth are better positioned than posterior teeth to accept the non-axial forces associated with excursive loading of the mandible. Nevertheless, posterior teeth are often involved in guiding jaw movements. Provided these contacts are in harmony, the system works well.
Sometimes, as shown in the DVD (animation I) and discussed in more detail in Chapter 3, posterior contacts can act as pivots or fulcrums. In making assessments about whether and how such pivots may need to be managed, mounted casts usefully supplement the clinical occlusal examination.
When Do I Need to Assess Vertical Dimension?
The simple answer is, when you might be thinking about changing it. In practice this will be for very few patients. These tend to be patients who appear to have lost occlusal vertical dimension (OVD), either with excessive wear or tooth loss, and where an increase in OVD, and therefore an occlusal reorganisation, is planned. Excessive tooth wear is often compensated for by dentoalveolar extrusion. Even where there is considerable wear, the freeway space may be “normal”, but that does not preclude a change (see Chapter 4).
The usual procedure is to measure the OVD and resting vertical dimension with a Willis gauge. Subtracting one from the other gives the freeway space. With the patient sitting upright, the normal range of freeway space is 2–4 mm. This is notoriously imprecise because of its inherent variability and measurement inaccuracies, arising largely from compressibility of the soft tissues.
Do I Need Mounted Casts?
The answer to this is no, not for routine examinations. They can, however, be invaluable for planning treatment, communicating with the laboratory and explaining treatment to the patient. If you intend to perform irreversible changes to the occlusion as part of a restorative treatment plan, mounted casts are indispensable, both as a baseline record and in the planning of occlusal alterations. Changes to the occlusion often involve trial adjustments and diagnostic waxing (see Sections 8-7 and 8-8). Two sets of casts are therefore recommended, so that one set can be kept unchanged.
8-2 ACCURATE ALGINATE IMPRESSIONS 
Many dentists treat alginate as a humble and somewhat inaccurate material. But accuracy is paramount when articulating diagnostic casts and when preparing opposing casts for indirect restorations. The opposing impression is often the last procedure following successful completion of preparation, temporisation and the working impression, and so it can end up as a bit of an afterthought. The implications of an inaccurate opposing impression are far from trivial. Precious time can be lost adjusting the occlusal surface of a crown because the opposing alginate impression was distorted or carelessly recorded, making for unnecessary expense, and the clinical outcome can be compromised. Simple quality control at this stage can save a lot of subsequent grief.
A high degree of accuracy can be achieved by avoiding common pitfalls and by being prepared to spend a few seconds checking the impression before sending it to the laboratory. Clearly, disinfection, bagging up to avoid drying out and ensuring alginates are cast within a few hours are essential measures.
The DVD shows a number of tips, including:
-
the use of rim-lock trays (Fig 8-7)
-
drying the teeth and smearing material on the occlusal surfaces prior to seating the tray to avoid occlusal air blows (Fig 8-8)
-
pulling unset material over the heel of the tray with a mouth mirror to help keep the impression in the tray on removal from the mouth
-
trimming the impression to allow inspection and reduce distortions prior to pouring up (Fig 8-9)
-
careful inspection of the impression.
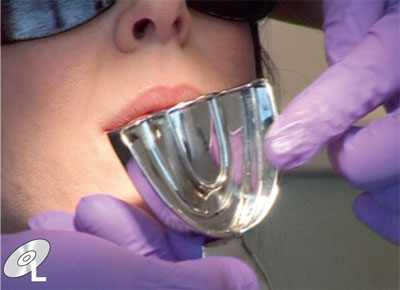
Fig 8-7 Rim-lock trays are a good option for alginate impressions.
Fig 8-8 Reduce air bubbles by smearing alginate onto the occlusal surfaces.
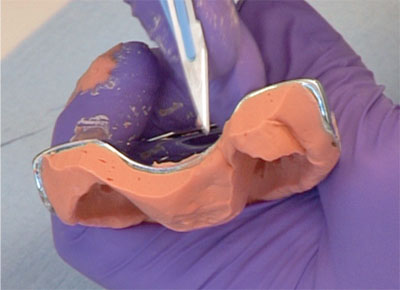
Fig 8-9 Always trim the heel and check the impression has not pulled away.
Perforated stock trays often come in a limited range of sizes and often do not fit well, sometimes failing to cover the most posterior teeth. It is not a problem to extend a stock tray – unless you choose to use wax. Unfortunately, wax distorts easily, and so distorts the alginate it is supposed to be supporting. A better option is to use impression compound (greenstick), which is rigid. The softened material is applied to the upper and lower surfaces of the tray heels and then teased out in sufficient thickness to include all the teeth in the tray. Perforated stock trays can occasionally cause problems when the alginate partly pulls out of the perforations on removal from the mouth. If you do not use adhesive with a perforated tray or you give insufficient time for the adhesive solvent to evaporate, the risk of this distortion is greatly increased. The rule is: use an adhesive and let it dry before the impression is taken.
Rim-lock trays are a good alternative to perforated trays. They come in a good range of sizes and can retain an alginate impression without the use of an adhesive. The disadvantages of rim-lock trays include ensuring their return from the laboratory and difficulties in cleaning prior to decontamination and sterilisation.
Although the cost of material is much higher, it is worth considering a fast-setting addition silicone as an alternative to alginate, particularly when multiple casts are required. Unlike alginate, silicone impressions can be re-poured without significant loss of accuracy. When taking impressions for study models in complex cases, this may prove to be cost effective. The use of a perforated tray is recommended for silicones, as silicone adhesives are more effective than those used for alginates. The set material is also more rigid and, therefore, more difficult to remove from the mouth.
8-3 INTERCUSPAL REGISTRATION
ICP or Centric Relation Registration?
In the previous section, consideration was given to the importance of accurate alginate impressions, both for diagnostic casts and for opposing casts when making indirect restorations. One of the greatest sources of confusion relates to what type of registration should be used to articulate sets of casts. Put very simply, ICP registration is used to construct restorations on working casts, while centric relation (CR) registration is for diagnosis and treatment planning. For any given case, you might start with casts mounted in CR and plan treatment on this basis. You would then decide to conform to what is there, in which case you use ICP records to make your restorations or to reorganise, creating a new ICP in CR.
This, of course, is not absolute. Casts mounted in ICP – even hand-held casts – might provide some useful diagnostic information, but remember they give no information on deflective contacts and, at best, limited information on guidance and excursive interferences. Furthermore, restorations may, on occasion, be made on casts mounted in CR.
Mounting Casts in ICP
The fundamental problem with any interocclusal record used to articulate casts is that there is a substantial risk of the record itself preventing the casts coming fully together. An intervening layer of registration material commonly creates the sort of occlusal error that one is trying to avoid. Often, the best occlusal record is no occlusal record at all. Where one is used, it should be as minimal as is required to locate the casts accurately.
Diagnostic casts are often held in ICP by hand. This is quick and often effective when the teeth locate in a stable position. This approach can, however, mislead diagnosis. Problems with hand-held casts occur when they cannot be easily and reliably located in a stable intercuspal relationship. The reasons may include:
-
distorted casts – undetected impression distortion can result in normal looking casts
-
blebs and faults on the occlusal surfaces
-
a limited number and arrangement of teeth
-
malocclusions, such as open bites (Fig 8-10) or cusp-to-cusp occlusion
-
incorrect assumptions regarding the orientation of the occlusal plane.
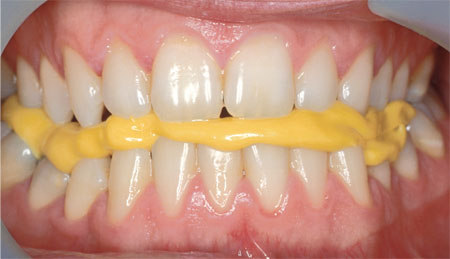
Fig 8-10 Silicone ICP record used for a patient with an anterior open bite – a rare case in which a full-arch record is justified.
All these factors can make it impossible to locate and record a reproducible, let alone relevant, position. In the event of an error, it may be necessary to start again, modify the casts to remove blebs or imperfections, or to use a different approach to registration to allow the casts to be mounted in an articulator. Articulator choice is covered in Section 8-6.
Working casts for indirect restorations are generally mounted in some form of articulator. An interocclusal record is often necessary to achieve this, but not always. The general principle is to limit, where possible, the ICP record to the preparations and the opposing teeth. In this way the unprepared teeth are not prevented from coming into contact by the record. This principle applies whatever material is used.
A full-arch record is almost never needed, perhaps only where there is an anterior open bite and the casts rock; but even then, trimmed localised records may be possible. Less is often more with ICP records.
Materials for ICP Records
The choice of materials for ICP registration is generally between:
-
nothing at all
-
silicone mousse
-
wax sheet, horseshoe or section
-
wax rims
-
acrylic copings and stents.
A combination of materials is sometimes required, as indicated below.
Silicone Mousse
The important thing to remember about this type of material is that it needs to be trimmed, whether it is being used as a sectional or full-arch registration (Fig 8-11a,b). Another important point is that a silicone mousse records surface detail very well, often better than the material used to record the impressions. In other words, the detail recorded by the mousse may prevent the two casts seating in the record. Without trimming, and sometimes even with trimming, the mounting will often feel springy when the registration is sandwiched between the casts. Simply squeezing the casts together with, for example, an elastic band is not the answer, as the material will deform under pressure, resulting in unpredictable occlusal changes. Usually, trimming the record with a scalpel will allow an accurate mounting. It is equally important that bubbles and blebs on the casts are removed.
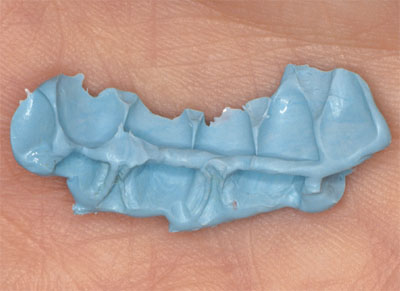
Fig 8-11a Superfluous detail in a record, including embrasures and gingival tissues, can prevent it seating on the casts.
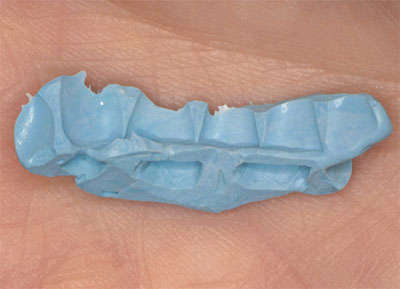
Fig 8-11b Following disinfection, the record should be trimmed with a scalpel to leave only areas essential for location.
Wax Sheet, Horseshoe or Section
A “wax bite” horseshoe or sheet is often used as an intercuspal record. Unlike silicone mousse materials, waxes are not dimensionally stable and are very easily deformed in transit to the laboratory. As with silicone mousse materials, pressing casts into a wax record will result in an incorrect articulation. Wax is occasionally used for sectional ICP records (Fig 8-12).
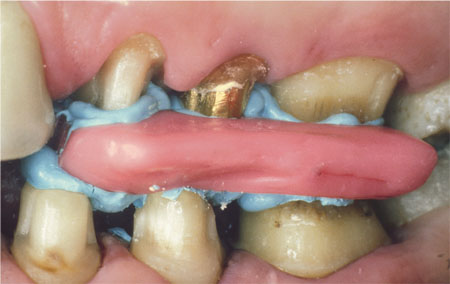
Fig 8-12 A localised wax and registration paste record offers the advantage of keeping unprepared teeth in contact. Again, trim for proper seating on casts.
With this technique, distortion is minimised as there is no cross-arch recording and the record is small enough to minimise the risk of it not seating. The use of a full-arch wax bite is rarely indicated as an intercuspal record as the risk of introducing an error in articulation is considerable.
Waxes are available in various consistencies, ranging from the comparatively soft, through pink modelling wax to hard wax. There is little clinical evidence to support the use of any particular wax.
Wax Rims
Although silicone mousse registrations are surprisingly versatile, large edentulous areas may make it difficult to obtain a stable mounting without using wax occlusal registration rims, as one would use for partial denture construction. Wax rims are, however, supported only by soft tissues, so when patients bite onto a wax rim the baseplate is displaced into the soft tissues. As dental stone is not compressible like mucosa, this results in an inaccurate registration when the rim is transferred onto the cast. To minimise this, trim away the occlusal indentations in the rim until there is firm contact on the teeth and only light contact on the rim, so that it is sitting passively on the mucosa. Then record ICP with a thin layer of registration paste or silicone mousse placed on top of the rim; being fluid, these materials do not displace the rim into the mucosa.
Bear in mind that a baseplate made on the cast from one impression cannot reliably be transferred to a cast poured from another – there are always differences between casts recorded by multiple impressions. If a wax occlusal rim is needed, it is best made on the working cast, not transferred from study models.
Increasing Vertical Dimension, Acrylic Copings and Stents
When a registration is used in the construction of definitive restorations at an increased vertical dimension, the mandibular position is best stabilised during the procedure by using one or more provisional restorations made at the desired dimension. Of course, in such cases the new ICP is also in CR.
Some operators prefer to use acrylic copings to record ICP when managing more extensive cases (Fig 8-13), particularly where opposing arches are being restored simultaneously. These techniques are more involved, but in extensive cases the accuracy they allow can be invaluable. Copings are made either on silver dies or duplicate stone dies to prevent damage to the originals. The advantage is that mounting accuracy can be checked on the articulator using shim stock between both opposing copings and unprepared teeth. Rather than linking opposing copings together, the upper copings are made with a rounded occlusal excrescence, which is coated in petroleum jelly. This excrescence indents into registration material placed on the occlusal surface of the lower coping. Traditionally, self-cured acrylic is used as the registration material, but registration paste can be used. This has the advantages of not setting as quickly or undergoing polymerisation shrinkage, as occurs with acrylic. The paste can be made to stick to the coping by first applying a coat of dental varnish.
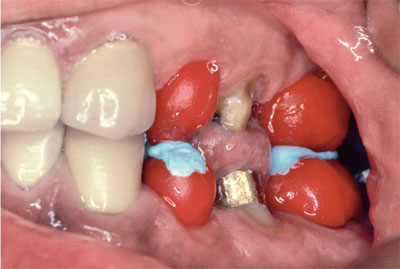
Fig 8-13a Acrylic copings used with registration paste for a posterior reconstruction.
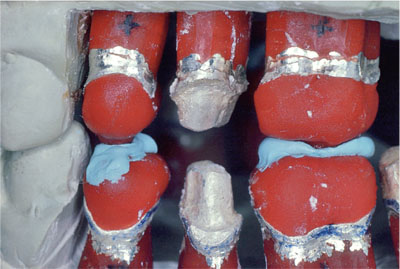
Fig 8-13b Casts with silver dies mounted.
As shown in Fig 8-14, some configurations of teeth can be difficult to register, particularly when teeth oppose on edentulous space. One solution is to construct an acrylic stent or bar; this acts as a rigid vehicle to carry registration material, thereby avoiding the less reliable wax occlusal rims. In situations where you are doubtful about the accuracy of a registration it is worth having a metal try-in, which can be used as a form of registration coping to check and, if necessary, remount before the porcelain is applied.
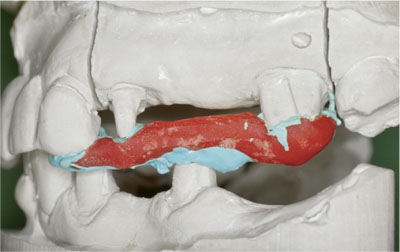
Fig 8-14 “Battlement occlusion” causes difficulty in having no directly opposing teeth for registration. A rigid acrylic stent provides greater reliability than wax rims.
Checking the Registration
A written record of the existing intercuspal contacts can be helpful to the technician to ensure that casts are correctly mounted. Some operators draw a diagram of the pattern of occlusal contacts marked with articulating foil. A simpler alternative is to record pairs of teeth that resist the removal of shim stock.
8-4 CENTRIC RELATION REGISTRATION 
Why Choose CR?
Mounting casts in ICP is common practice. As discussed in the previous section, this is the position used typically for the construction of restorations conforming to an existing occlusion. Casts mounted in ICP can be used for diagnosis, but for the reasons mentioned previously they are wholly inadequate in more extensive cases. In these situations it is necessary to consider occlusal contacts relative to CR. Concerning the planning and construction of restorations, there are two specific situations where you might choose to mount casts in CR:
-
Diagnostic casts where you plan either to adjust or to reorganise the occlusion, including any case where you are planning to change the vertical dimension.
-
Working casts where the occlusion is being reorganised using indirect restorations to establish a new ICP in CR. This may occur when adhesively retained restorations are used to increase vertical dimension, providing the basis of a new ICP at an early stage of reorganisation (see Chapter 4). The new ICP is sometimes termed “centric occlusion”, which is defined as the occlusion that occurs in CR.
In such circumstances, the casts must be mounted to provide an accurate simulation of mandibular movement around CR, particularly during opening and closing. This involves mounting the upper cast on an appropriate articulator (see Section 8-6) using a facebow (see Section 8-5) and then mounting the lower cast with a CR registration.
As with an ICP record, obtaining accuracy to within a few micrometres is necessary if you are to make the most of the technology you are using.
What Techniques Are Available?
Being able to find the hinge axis and then record it is an essential skill in restorative dentistry. This gets much easier with practise. If finding the hinge axis is something you find difficult, then you are not alone. It is something you can practise on any patient. Once you have mastered the technique, it becomes a matter of routine.
The simplest and most frequently used technique involves bimanual manipulation to locate the patient’s condyles in CR (Fig 8-15) and then taking a hard wax record, as shown in detail on the DVD. With practice, this approach works very well for most patients. It has the advantage that you can readily re-manipulate the jaw to assess whether the teeth re-engage cleanly into the indentations (Fig 8-16).
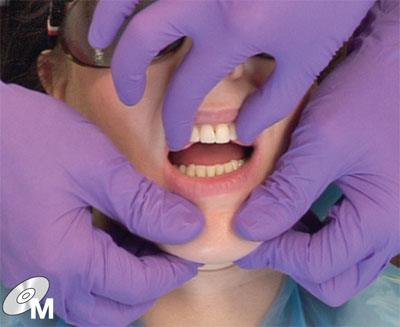
Fig 8-15 The nurse holds the wax record while the dentist uses bimanual manipulation to seat the condyles fully in their fossae.
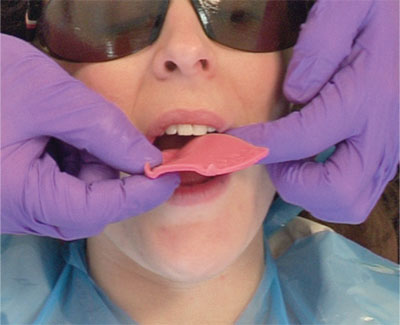
Fig 8-16 Remove the record, chill under cold water, replace and check the teeth close cleanly into the indentations. This gives an indication of reproducibility.
However, this technique is useless in cases in which a patient has mobile teeth, which will displace on closing into the viscous wax. In such circumstance it is better to use a low-viscosity material, such as a silicone registration mousse, or a traditional zinc-oxide eugenol registration paste carried on a gauze frame. The DVD shows how a silicone mousse record can be made.
When using a fluid material, a stable anterior stop is imperative for the mandibular incisors to rest against (Fig 8-17a,b). Otherwise, it is impossible to hold the mandible steady while the material sets, and the patient invariably slips back into ICP. For this purpose, it is helpful to use a Lucia jig at the selected vertical dimension, as described below.
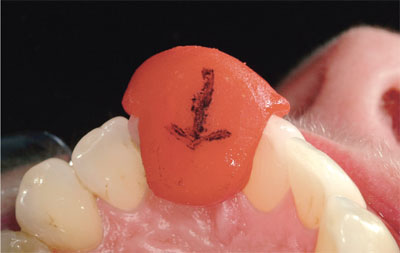
Fig 8-17a Lucia jig showing the arrowhead tracing for a single lower incisor making lateral and protrusive excursions.
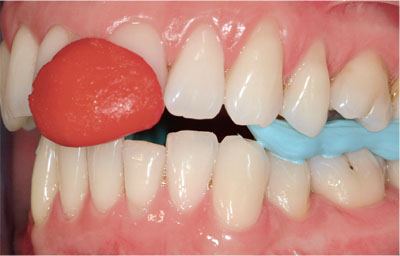
Fig 8-17b Silicone mousse used for jaw registration while the Lucia jig stabilises the jaw in CR. If there is sufficient space, syringe the mousse from the buccal aspects. Alternatively, syringe the mousse onto the occlusal surfaces of the lower arch and manipulate the patient into CR.
What About Patients Who Are Difficult to Manipulate?
The ability to find the hinge axis depends as much on your own demeanour as on the cooperation of the patient. The patient needs to relax, and so does the dentist. Having the patient supine is helpful, as is a calm voice – which you must maintain no matter how frustrated you may have become trying to find CR.
Nevertheless, some patients are difficult to manipulate. You can help such patients relax their mandible during jaw registration by preventing their teeth from closing into ICP for a few minutes by placing either a cotton wool roll or a tongue spatula between the incisors. Alternatively, you can use a slightly more sophisticated approach by forming a simple, flat, anterior jig made of self-cured acrylic – a Lucia jig. The key to success with a Lucia jig is to ensure that the occluding portion lies flat against no more than two incisors. Any indentations in the surface of the jig will only serve to guide the patient repeatedly back to an incorrect position. In essence, the jig, cotton wool roll or tongue spatula encourages the neuromuscular system to “forget” the ICP, the memory of which is reinforced by proprioceptive feedback every time the patient swallows.
Usually, simple techniques for separating the teeth are sufficient to allow successful bimanual manipulation. Indeed, some patients will experience “neuromuscular release”, whereby the mandible, previously affected by muscle splinting, suddenly becomes easy to manipulate. Nevertheless, in a small minority of patients, the muscle splinting consistently returns the teeth to ICP and the mandible remains extremely difficult to manipulate. For such patients you may need to consider, as a last resort, making them an occlusal stabilisation splint to condition the masticatory system before recording CR (see Section 8-10). Paradoxically, a CR registration is normally used for the construction of stabilisation splints, which implies that a certain amount of splint adjustment may be needed after fitting.
Electrical stimulation may be used in an attempt to condition the masticatory muscles prior to recording CR, together with electromyographic instrumentation to determine lack of muscle splinting. At the present time there is no strong evidence base to support such an approach.
How Can You Check a CR Registration?
The easiest way to check a CR registration, as shown on the DVD, is to inspect the mounted casts to see if they simulate the retruded contact and then the RCP–ICP slide. Of course you will need to lift, or possibly remove, the pin in the articulator to do this. Identifying which teeth make retruded contact is easy on an articulator, but it takes practice to determine if the RCP–ICP slide is similar to that in the patient. If the casts cannot be fully interdigitated in ICP, this may reflect a registration inaccuracy or a limitation in the function of the articulator.
Some articulator manufacturers supply devices to check the reproducibility of multiple CR registrations, for example the Denar Vericheck. This resembles an articulator, but with its condylar and fossa elements replaced by styli and paper flags. It requires three separate jaw registrations. Each registration is placed in turn between the casts mounted on the instrument and four styli marks are made – two horizontal and two vertical – representing a notional terminal hinge axis. If the styli marks from all three registrations correspond, you can be confident about the registration. If the marks do not correspond, the registration with the most superior/posterior position of the hinge axis is taken as the best attempt – but bear in mind it may still be incorrect. These are useful teaching and research instruments, but they find limited application in clinical practice.
8-5 FACEBOW RECORD 
As shown on the DVD, a facebow record takes only a few minutes to complete, but it can save you a lot of time when planning restorative cases and when fitting restorations.
What Does a Facebow Do?
All a facebow does is to transfer the spatial relationship of the maxillary teeth and TMJs from the patient to the articulator, enabling accurate mounting of the upper cast in relation to the joints. When the lower cast is mounted, the similarity in geometry between articulator and jaws helps to simulate the paths of jaw movement. Remember that the three main uses of articulated casts are to supplement occlusal examination, to help plan treatment through trial occlusal adjustment and diagnostic waxing and, in the laboratory, to help make restorations that will require minimal adjustment in the mouth. If you plan to undertake any of these procedures, we recommend you use a facebow.
What Are the Main Components?
Some facebows come as two main components – the bow and the bitefork – with a clamping mechanism to join the two together. This type of facebow is cumbersome to transport to the laboratory. Other facebows, such as the Denar Slidematic (Fig 8-18), have three components – the bow, the bitefork and a transfer jig. The advantage of the transfer jig is that the bow remains in the surgery for use on other patients, while the transfer jig/bitefork assembly goes to the laboratory. The DVD shows how to use this facebow clinically. The principles are the same whichever system you choose to use.
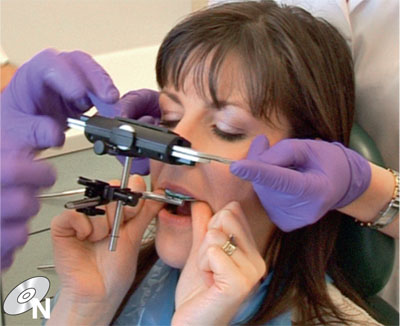
Fig 8-18 A facebow simply transfers the relationship between the maxillary teeth and the TMJs.
What Reference Points Do Facebows Use?
Facebows come in a number of designs. All of them locate to three reference points on a patient. Two of these reference points are the condyles, specifically the hinge axis running through both condyles in CR. Most modern facebows are termed “earbows”, as they use the external auditory meati as stable reference points adjacent to the hinge axis. With some old designs of facebow, the bow locates over the lateral aspect of the condyles, making accurate records more difficult to obtain – the process has been likened to nailing a jellyfish to the ceiling!
The third reference point aligns the bow to the horizontal plane, with the patient sitting upright. Anatomically, this is the Frankfort plane, extending from the tragus of the ear to the infraorbital notch. Some facebows use a pointer specifically to align with the infraorbital notch. Others use different anatomical landmarks. The Whip Mix facebow uses the nasal bridge (nasion), while the third reference point for the Denar is a fixed distance, marked on the cheek with a pen, above the incisal edge of the right lateral incisor (Fig 8-19). There is no mystery to this third reference point, it ensures that the casts when mounted are centrally placed between the two members of the articulator, giving an indication of the relationship between the occlusal and the Frankfort planes.
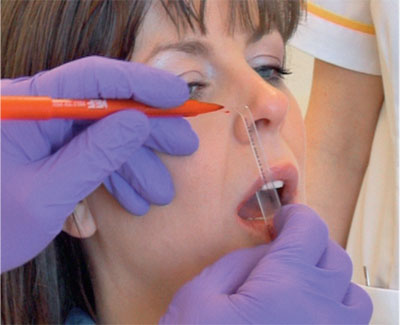
Fig 8-19 This mark, called the “third reference point”, aligns the facebow to the patient’s horizontal plane.
How Accurate Are Facebows?
Facebows need to be used with care, but they do not need to be as accurate in their recording as interocclusal registrations. In practice, facebows are accurate to millimetres while interocclusal records need to be accurate to micrometres. Nevertheless, clinically significant inaccuracies can arise with earbow registrations for the following reasons:
-
failures in recording technique
-
discrepancies between the patient’s hinge axis and the average values used for earbows
-
facial asymmetry
-
laboratory errors.
The Technique
Success with facebows is a matter of being vigilant. All the parts of the bow should be able to move freely before it is tightened. Sometimes, the clamp holding the bitefork becomes too tight because of contamination with molten wax, or an overtightened and distorted clamp makes it difficult to position the bow properly. In such cases, clean off the wax or ease the distorted clamp by loosening off the screw and levering it open. One of the most common problems is that the facebow clamps are not tightened sufficiently, so the bitefork moves before or during mounting. Finally, remember to show your nurse how to guide the earpieces into the ears properly. The bow needs to be pulled forwards as the earpieces are moved inwards. With practice the procedure becomes second nature.
Hinge Axis Discrepancies
There may be a few millimetres discrepancy between the patient’s real hinge axis and that determined by an earbow. This usually does not produce any significant problems, but the rule to follow is to record the interocclusal registration at, or very close to, the vertical dimension required, thereby minimising the impact of any hinge axis discrepancy. This applies both to diagnosis and in the construction of restorations and appliances. You could use a hinge axis locator to make an extremely accurate facebow registration; however, the extra time taken to locate the patient’s terminal hinge axis is of little benefit – unless you routinely use a fully adjustable articulator and fit difficult full-mouth reconstructions all at one time, but not many dentists do that.
Patients with a Facial Asymmetry
When restoring multiple anterior teeth, a facebow helps to define the occlusal plane and avoid having a “run” on the restorations. Should a patient have a significant facial asymmetry, defining the incisal level of the new restorations can be difficult. There are, however, various strategies that can be employed to take account of this.
Laboratory Errors
In the laboratory, the bitefork must be supported during mounting of the upper cast or it will sag. An elegant way of doing this is shown in Fig 8-20.
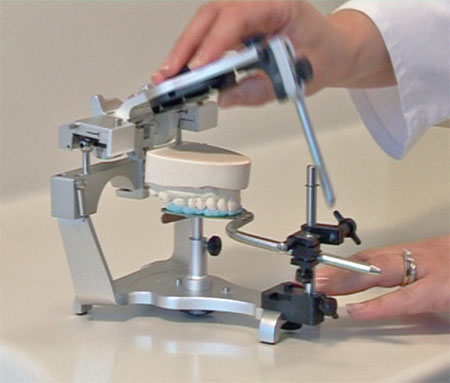
Fig 8-20 The bitefork and black transfer jig are attached to an articulator. Beneath the cast is a supporting device to prevent sagging during mounting.
Do I Need to Buy a Facebow?
Stay updated, free dental videos. Join our Telegram channel
VIDEdental - Online dental courses


