Distraction osteogenesis is a new modality to progressively stretch the bone and the soft-tissue envelope by means of distraction appliances anchored to the bone. After a complete osteotomy the surgical space is filled with collagen fibers that are tightened by controlled progressive pressure; these fibers and undifferentiated mesenchymal cells will mature into their different tissues: bone, muscles, mucosa, periosteum, and so on. This new surgical philosophy treats deformities through calibrated stimulation of the bone and soft tissues; in combination with orthodontics and surgery. This procedure should be in the near future the ideal modality to correct the majority of severe and untreatable deficiencies of the craniofacial region.
MANDIBULAR WIDENING
TRANSVERSE MANDIBULAR DEFICIENCY
Severe dental crowding in a patient is usually part of a micrognathia, which will include a deficiency in growth in all of the three planes with skeletal and dental problems; anteroposterior (AP), transverse, and vertical. Because the functional matrix dictates the development of both maxilla and mandible, it is predictable that most of the cases with skeletal Class II malocclusion and a narrow arch would present a problem with the maxilla. It is imperative to make a three-dimensional (3D) analysis.
Radiographs, photographs, dental models mounted in an articulator, clinical evaluation, and occlusogram should be analyzed to plan the ideal orthodontic and surgical treatment.
CLINICAL INDICATIONS FOR MANDIBULAR WIDENING
- •
Narrow V-shaped mandibles
- •
Severe mandibular crowding to avoid dental extractions
- •
Scissors bite (Brodie syndrome)
- •
Maxillomandibular transverse deficiency (tunnel smile, crocodile bite)
- •
Impacted anterior teeth to allow natural or forced eruption
- •
Retreatment after bicuspid extractions
- •
Congenital missing teeth
DENTAL MODEL ANALYSIS
The amount of widening needed is calculated according to the following variables: available space versus required space, inclination of the incisors (1 MPA = 90 degrees), deep bite or a marked curve of Spee, intermolar width, and size of the incisors.
SOFT- AND HARD-TISSUE CLINICAL ANALYSIS
From the biologic standpoint, there should be a healthy periodontium with at least 1 mm of bone protecting the roots on either side of the osteotomy. Lack of bone at the osteotomy level can lead to delay in healing or periodontal defects. The osteotomy design and site are selected based on bone quantity between roots and inclination of the teeth; a Bolton’s discrepancy analysis is also performed to adequately calculate the amount of widening necessary.
SURGICAL PLANNING
Various devices for mandibular widening have been developed since we first used them in 1987. In our experience the tooth-borne lingual appliance or the uniarm device have been extensively used despite the difficulty with patient’s hygiene, impingement of the tongue, inadequate access for activation, and the fact that it could be dislodged during the surgery. It eases the surgical procedure and lessens the expense; the new uniarm device can be applied on the buccal or the lingual side.
The bone-borne device is widely used, especially in severe crowding and compromised teeth with lingual inclinations; it is versatile, its buccal fixation does not interfere with tongue function, and it is easy to activate. When this alternative is used, the appliance is presurgically adapted to the dental model after drawing the roots of the anterior teeth and the osteotomy line, using radiographs as reference to avoid injuring the roots of the teeth during surgery.
Special attention must be given to the passiveness of the dental-borne appliances as well as the parallelism to the occlusal plane of the bone-borne device, in order to avoid inclination of mandibular segments that will result in asymmetric bone movements and consequent unilateral open bites and canted mandibular planes.
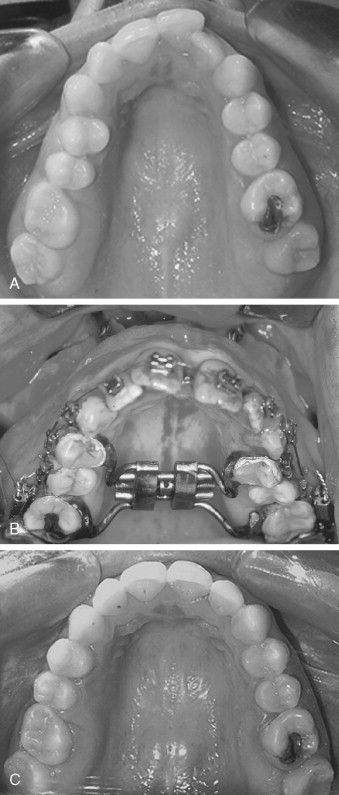
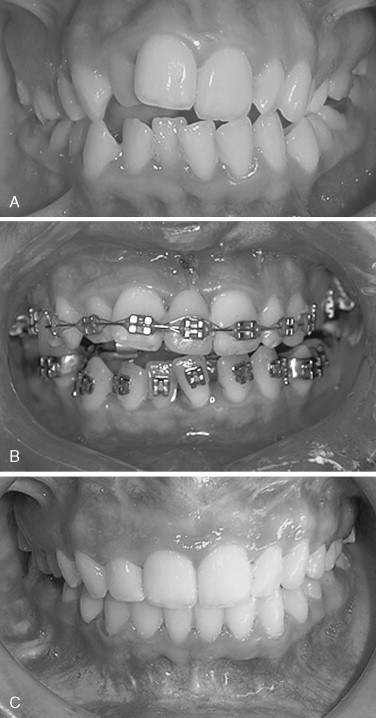
Presurgical orthodontics includes complete upper arch alignment and leveling; the teeth are aligned, diastemata are closed, the molars are verticalized, and ideal maxillary curve of Spee is obtained. Once the maxillary teeth are ideally positioned, a final diagnosis and reevaluation is made to change the mandibular arch to the new maxillary alignment. Up to this moment no appliances have been placed in the mandible; the lower arch dental movements are restricted to obtain an interdental space to perform the osteotomy without damaging the dental roots and to select the mandibular widening device. The orthodontist evaluates and selects the best appliance according to the circumstances already mentioned, checking the variables involved, and, more important, calculates the amount of widening required based on the occlusogram.
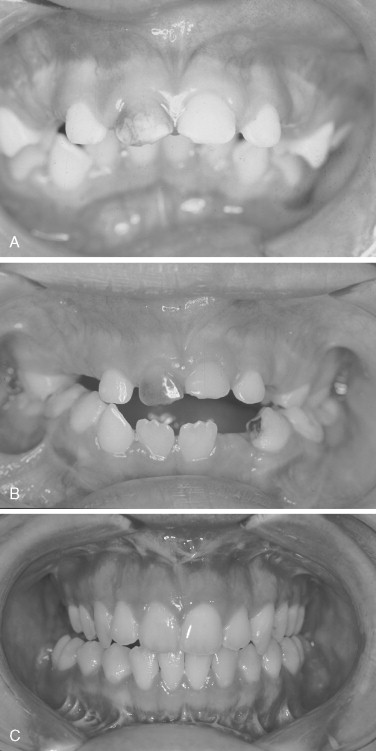
Surgeons and orthodontist are used to an equal maxillary widening with the appliance in the midpalate ( Figure 15-1 ); however, in the mandible the widening is anterior, and as we progress toward the back the distance goes from 7 mm in the incisor region to 0.9 mm at the intercondyle level. Postoperatively we will see a transverse crossbite at the level of the canines and premolars edge to edge at the first molar regions and to a normal transverse bite at the second molar level. As the orthodontist is closing the anterior gap, the lateral crossbite is corrected. The planning must include all the measurements that can be predicted in the models and occlusograms. If the amount of mandibular widening required to align the incisors would create a molar lateral crossbite, a maxillomandibular widening is performed to accommodate the transverse relation at the first molar region and align and level the maxillary and mandibular incisors; that would avoid premolar extractions, improve the smile width, and eliminate the sinking lips look from the profile view, secondary to orthodontics with premolar extractions.
WIDENING THE SYMPHYSIS OR PARASYMPHYSIS REGION
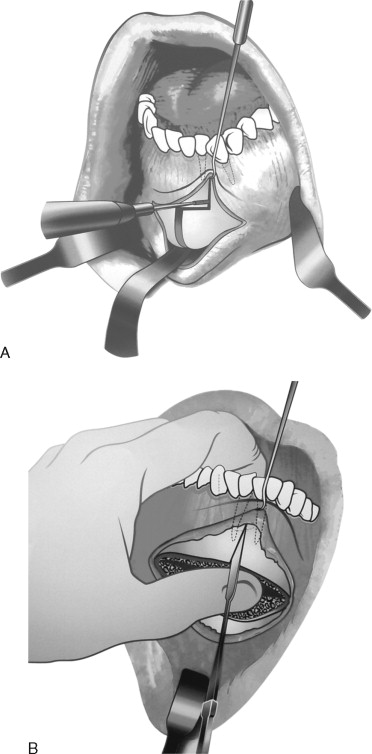
The incision is made 4 to 6 mm labial to the depth of the mandibular vestibule; the periosteum is reflected inferiorly to the lower border of the mandible, where a small channel retractor is placed. It is carefully elevated and meticulously separated throughout the whole procedure, keeping in mind that much of the distraction osteogenesis healing capacity originates from the periosteum. Next, the soft tissue between the mandibular central incisors is carefully reflected superiorly with a skin hook to the alveolar crest with minimal detachment of the neighboring tissues.
OSTEOTOMY
A vertical osteotomy is made through the symphyseal area with a reciprocating saw blade, starting at the inferior border of the mandible through and through, sectioning both cortexes, continuing to the interdental space between the apices of the mandibular incisors. Then, with a straight handpiece and a surgical 701 burr, the cut is continued across the labial cortical plate of the mandible to the alveolar crest. No attempt is made to go with the saw or the bur between the roots of the teeth. This surgical step shows the importance of the proper selection of the distraction site or the need for presurgical orthodontics to avoid injury to the present teeth. The final sectioning is done with a mallet and a spatula osteotome. The forefinger should be used as a guide at all times to avoid tearing of the lingual soft tissues ( Figure 15-2 ).
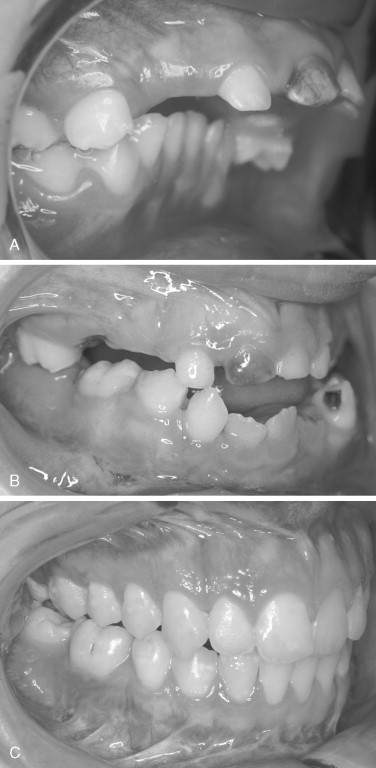
COMBINED MANDIBULAR WIDENING AND GENIOPLASTY
Once the soft tissues have been properly separated, a channel retractor is placed through a tunnel underneath the mental nerve to the level of the first molar. A dental caliper is used to measure the canine out of the lateral cephalic radiograph, and the distance plus 5 mm is transposed to the mandible, measuring from the incisal edge to an area underneath the apex of the canine on either side. Also, vertical lines are marked to serve as reference lines. A reciprocating saw is used to perform a bicortical osteotomy at the inferior border of the mandible, starting at the first or second molar region, coming anteriorly toward the symphyseal midline and passing by the reference lines; in those patients with a severe downward curve, care must be taken not to injure the alveolar nerve, which is sometimes very close to the inferior border of the mandible. The surgeon’s forefinger is used externally to avoid damaging the soft tissue as the saw goes through the bone on the lingual side. The osteotomy must be completed with the reciprocating saw. The use of mallet and chisel or instruments to down-fracture the inferior bone segment is to be avoided, because usually there will be an incomplete irregular border of the mandible fracture, increased bleeding, and postsurgical edema ( Figure 15-3 ).
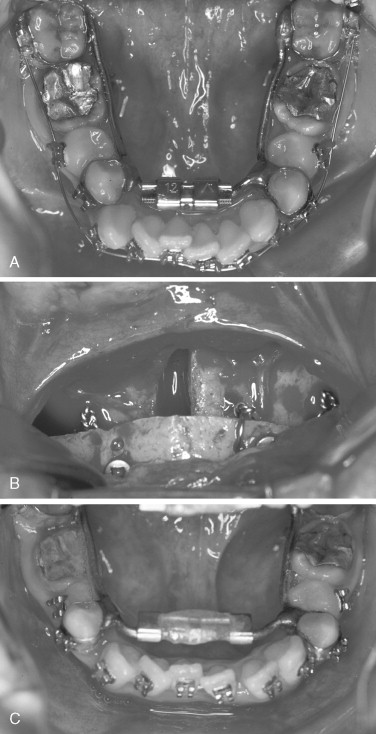
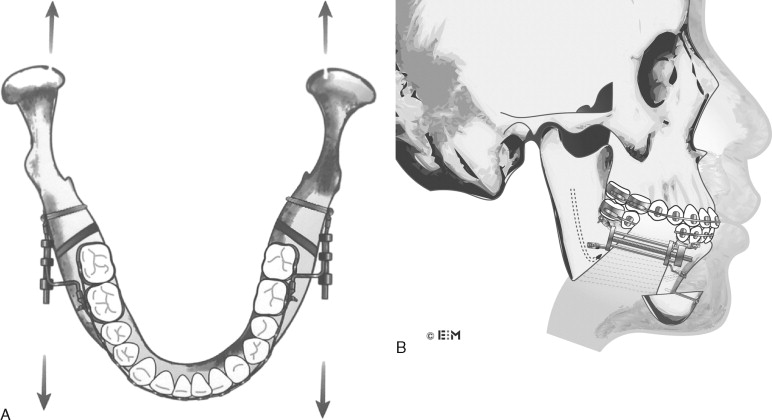
At this point, we have the inferior segment attached to the soft tissues. It is important to maintain this pedicle at all times, limiting the periosteal elevation to the minimum. The rest of the mandibular symphysis is intact. The reciprocating saw is used to perform a vertical osteotomy at the preselected distraction site. The rest of the surgical procedure is done as previously described. For fixation, of the genioplasty to the mandible, monocortical holes are made and wires placed with the required lateral inclination. A periosteal elevator is placed at the basal bone between the two bone segments to be distracted, forcing them open while the wires are tightened. The wires are malleable enough to allow some movement, and the segments are kept apart as the wires are twisted during surgery, obtaining most of the expansion at the inferior aspect of the distraction site but progressively opening the alveolar region after surgery. Then the surgical wounds are closed in the routine fashion. A pressure bandage is used for 3 to 4 days to limit the edema and allow primary soft-tissue wound healing. A liquid diet and pureed diet are recommended for 2 weeks, then acrylic is placed on the distractor to add stability, and a soft diet is indicated. Finally, at 6 weeks the patient may return to regular food intake, avoiding heavy chewing until the twelfth week ( Figures 15-4 and 15-5 ).
DISTRACTION PROTOCOL
A 7-day latency period (no activation) is followed by activation of 1 mm once a day until distraction is completed (activation will be performed by the patient). The clinician should follow the patient at least once a week. The distractors remain in place 60 days for each centimeter of distraction during the consolidation period as a fixation system, waiting for consolidation.
POSTOPERATIVE CARE
At the end of the distraction, acrylic is placed over the distraction’s rod and the wires around the teeth to provide more rigidity and advance the patient to a soft diet. At this time also the orthodontist adds a cosmetic acrylic tooth on the orthodontic arch to prevent the teeth from “walking” into the immature distraction area. After consolidation is achieved, the appliance is removed. The clinician evaluates the radiographs for proper mineralization. The patient is referred to the orthodontist to continue the treatment. The plastic tooth is ground 0.5 mm from each interproximal surface (1 mm) each month to progressively close the distraction gap and finish the orthodontic treatment. The orthodontic treatment is resumed 60 days after surgery and continues for at least 6 months while the distraction chamber is consolidating. The occlusion is carefully finished, and standard retention is indicated.
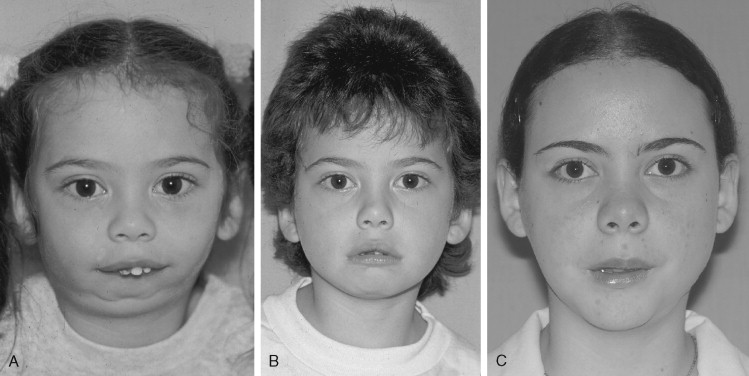
MANDIBULAR LENGTHENING BY DISTRACTION OSTEOGENESIS
To achieve a mandible of normal size and anatomy, complex 3D movements are necessary. Successful use of unidirectional distractors in these cases mandates that the appliance be positioned correctly at the time of surgery. Precise preplanning considering the biomechanical effect of appliance orientation is paramount for predictable widening and lengthening of the mandible ( Figures 15-6 and 15-7 ).

CLINICAL INDICATIONS
- •
Major mandibular advancements
- •
Temporomandibular joint (TMJ) degenerative joint disease as a precondition
- •
Sleep apnea (need for titration of the advancement)
- •
Inadequate mandibular anatomy for conventional bilateral sagittal split osteotomy (BSSO)
- •
Secondary mandibular advancements (relapse of mandibular advancements after conventional BSSO)
- •
Children with severe mandibular deformities
SURGICAL PROCEDURE
A 3-cm full thickness incision is made over the external oblique line; meticulous subperiosteal tunneling dissection is performed to expose the buccal cortex, mandibular angle, and alveolar ridge. The periosteum, muscles, and soft tissues are minimally detached to maintain the best blood supply possible to the area.
Osteotomy
With an inferior border channel retractor positioned between the second and third molar area, a reciprocating saw is used to etch the planned osteotomy into the mandibular surface and transect the cortical bone at the inferior mandibular border. This is osteotomized through both cortexes, the buccal and the lingual, vertically up to within 3 mm away from the inferior alveolar canal. The saw blade is now repositioned to section just the outer mandibular cortex.
Continuing, the saw is placed upside down and the osteotomy is carried through the alveolar crest superoinferiorly to approximately 3 mm superior to the inferior alveolar canal. A periosteal elevator is used to protect the lingual periosteum and guard against lingual nerve injures. At this point the ramus osteotomy has been completely sectioned with the exception of 5 mm of bone around the inferior alveolar nerve. The entire region is profusely irrigated with normal saline to avoid overheating. Care is taken to preserve the dental follicles and the inferior alveolar nerve. Performing the distraction posterior to the third molar is inconvenient because the bone is much thinner, with no cancellous bone between; it is more difficult to place the device, to clean it, and to activate it ( Figure 15-8 ).
Soft-Tissue Closure
The mucoperiosteal flap is repositioned and maintained in place by horizontal mattress sutures, leaving a small opening at the end of the incision to facilitate the vertical chisel that is applied after the distractors have been fixed to finalize the mandibular osteotomy. The surgical wounds are closed to keep the appliances extramucosally. The distractors were measured, bent, and adjusted before surgery; at the time of the operation only minor adaptations are necessary. Once the bone fragments are separated, a single mattress suture is made to close the rest of the wound. This technique ensures primary closure over the osteotomy, eliminates postsurgical food and saliva filtration, and gives the periosteum integrity.
The distractor needs to be parallel to the axis of distraction, as the mandible is wider in the back and narrower in the front. Some adjustment to the appliance is made by creating a step of 5 to 8 mm to compensate for this important variation in mandibular width. If this is not taken into consideration, different problems will appear: lateral torque force against the condyle, loosening of the screws, and bending of the appliance. Also, if bilateral mandibular lengthening is required, one appliance is to be parallel to the other one, and both distractors should be parallel to the axis of distraction ( Figures 15-9, 15-10, 15-11, and 15-12 ).
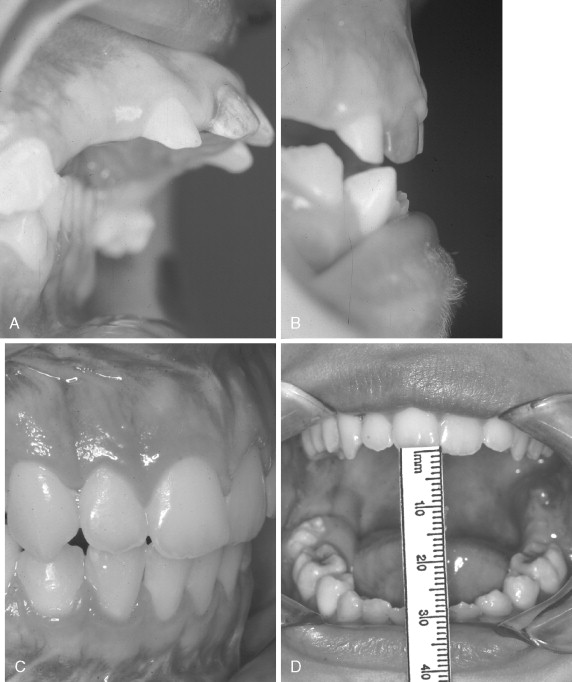
An important issue is the temporomandibular joint. Once the device has been activated, there will be reciprocal forces against the mandibular fossa, causing flattening of the condylar cartilage layer, thinning and perforation of the disk, subchondral bone formation, and loss of suprameniscal and inframeniscal spaces. It is fundamental to unload the joints as the mandible is advanced. This step is planned from the presurgical orthodontics phase, when rectangular surgical orthodontic arches with welded vertical pins are used to apply Class II elastics, 6 ounces per side. These unloading forces will be maintained for the activation period as well as for the consolidation phase; they will be discontinued by the orthodontist.
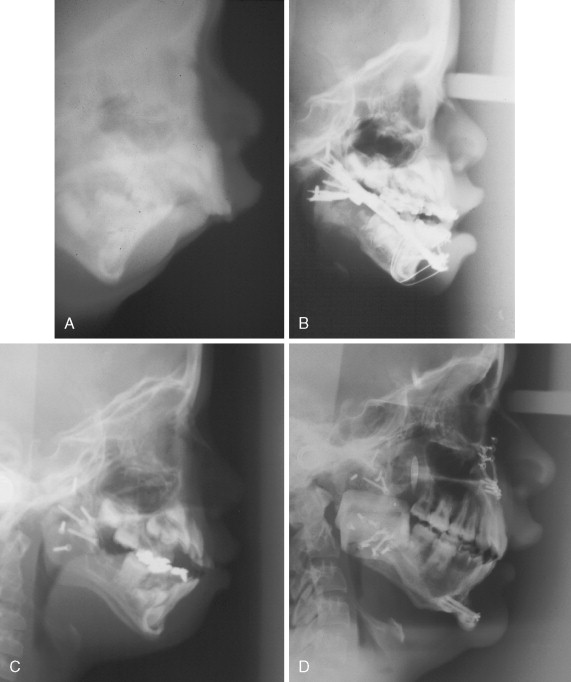
An anterior open bite might develop during the activation of the appliance because of lack of parallelism between the occlusal plane and the distractor rod. Once the appliance is fully activated, the anterosuperior arm is released and the mandible is rotated and replaced in the final acceptable new position. This is performed with the patient under intravenous sedation in the clinic. Lateral cephalometric radiographs are essential to plan and evaluate the bony movements.
Orthodontics will finish the occlusal details after the stabilization period; major discrepancies secondary to poor planning are not to be corrected by teeth movements, which would require reintervention.
POSTOPERATIVE CONSIDERATIONS
The distractors should be removed after proper ossification has occurred. Different variables are involved, including age of the patient, amount of movement, and quality and quantity of bone. Other variables include infection, inadequate stability during consolidation, poor patient selection, and some systemic diseases. The only reliable method is the radiographic evaluation.
POSTSURGICAL ORTHODONTICS
Use of Class II elastics is indicated during both the distraction and the consolidation periods to prevent reciprocal forces to the TMJs.
Once the appliances are removed, the patient is referred to the orthodontist to interdigitate the occlusion and finish the treatment, the surgical arches are removed, and progressive detailing of the ideal teeth positioning is obtained. It is recommended that the orthodontics appliances not be removed before 12 months after surgery to ensure adequate bone consolidation and stability. Good communication within the team is encouraged.
MANDIBULAR LENGTHENING BY DISTRACTION OSTEOGENESIS
To achieve a mandible of normal size and anatomy, complex 3D movements are necessary. Successful use of unidirectional distractors in these cases mandates that the appliance be positioned correctly at the time of surgery. Precise preplanning considering the biomechanical effect of appliance orientation is paramount for predictable widening and lengthening of the mandible ( Figures 15-6 and 15-7 ).

CLINICAL INDICATIONS
- •
Major mandibular advancements
- •
Temporomandibular joint (TMJ) degenerative joint disease as a precondition
- •
Sleep apnea (need for titration of the advancement)
- •
Inadequate mandibular anatomy for conventional bilateral sagittal split osteotomy (BSSO)
- •
Secondary mandibular advancements (relapse of mandibular advancements after conventional BSSO)
- •
Children with severe mandibular deformities
SURGICAL PROCEDURE
A 3-cm full thickness incision is made over the external oblique line; meticulous subperiosteal tunneling dissection is performed to expose the buccal cortex, mandibular angle, and alveolar ridge. The periosteum, muscles, and soft tissues are minimally detached to maintain the best blood supply possible to the area.
Osteotomy
With an inferior border channel retractor positioned between the second and third molar area, a reciprocating saw is used to etch the planned osteotomy into the mandibular surface and transect the cortical bone at the inferior mandibular border. This is osteotomized through both cortexes, the buccal and the lingual, vertically up to within 3 mm away from the inferior alveolar canal. The saw blade is now repositioned to section just the outer mandibular cortex.
Continuing, the saw is placed upside down and the osteotomy is carried through the alveolar crest superoinferiorly to approximately 3 mm superior to the inferior alveolar canal. A periosteal elevator is used to protect the lingual periosteum and guard against lingual nerve injures. At this point the ramus osteotomy has been completely sectioned with the exception of 5 mm of bone around the inferior alveolar nerve. The entire region is profusely irrigated with normal saline to avoid overheating. Care is taken to preserve the dental follicles and the inferior alveolar nerve. Performing the distraction posterior to the third molar is inconvenient because the bone is much thinner, with no cancellous bone between; it is more difficult to place the device, to clean it, and to activate it ( Figure 15-8 ).

Soft-Tissue Closure
The mucoperiosteal flap is repositioned and maintained in place by horizontal mattress sutures, leaving a small opening at the end of the incision to facilitate the vertical chisel that is applied after the distractors have been fixed to finalize the mandibular osteotomy. The surgical wounds are closed to keep the appliances extramucosally. The distractors were measured, bent, and adjusted before surgery; at the time of the operation only minor adaptations are necessary. Once the bone fragments are separated, a single mattress suture is made to close the rest of the wound. This technique ensures primary closure over the osteotomy, eliminates postsurgical food and saliva filtration, and gives the periosteum integrity.
The distractor needs to be parallel to the axis of distraction, as the mandible is wider in the back and narrower in the front. Some adjustment to the appliance is made by creating a step of 5 to 8 mm to compensate for this important variation in mandibular width. If this is not taken into consideration, different problems will appear: lateral torque force against the condyle, loosening of the screws, and bending of the appliance. Also, if bilateral mandibular lengthening is required, one appliance is to be parallel to the other one, and both distractors should be parallel to the axis of distraction ( Figures 15-9, 15-10, 15-11, and 15-12 ).
Stay updated, free dental videos. Join our Telegram channel
VIDEdental - Online dental courses


