Basic Technique for Building Porcelain Layers
The author does not refer to the historical background of porcelain-fused-to-metal concepts in this book. Although difficult to obtain, a natural-looking crown can be achieved if the crown is made accurately following a theoretical background. The background for “Basic Techniques for Building Porcelain Layers” is explained with photographs in this chapter.
Shade with depth in a metal ceramics system can be obtained only with a sufficient thickness of translucent porcelain. The amount of abutment prepared should be greater than that in a full porcelain crown. Otherwise translucency cannot be obtained and direct reflection from the opaque layers occurs.
To produce a natural shade, thickness including metal structure, must be greater than 1.3–1.4 mm in the body portion and 1.5–1.6 mm in the incisal portion; the length must be 1.5–2.0 mm. This relates to the amount of abutment to be removed so the final crown will have the same contour as that of the abutment before its preparation. If a more translucent shade is required, a greater amount should be prepared. In some cases, a thickness greater than 1.5 mm is necessary even in the body portion (Figs. II-1a, b).
Figs. II-1a and b Thickness of the porcelain and metal framework in a ceramometal system.
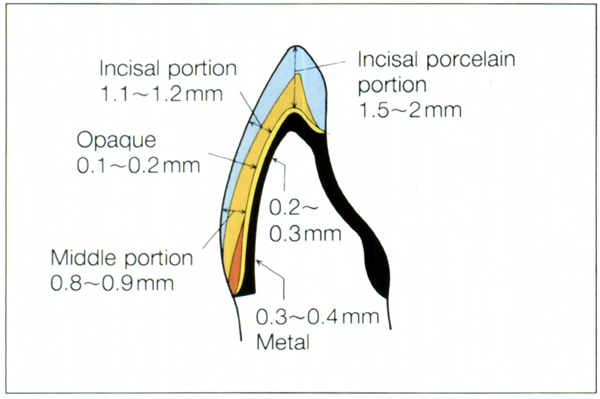
Fig. II-1a The minimum thickness of each part in a porcelain-fused-to-metal system.
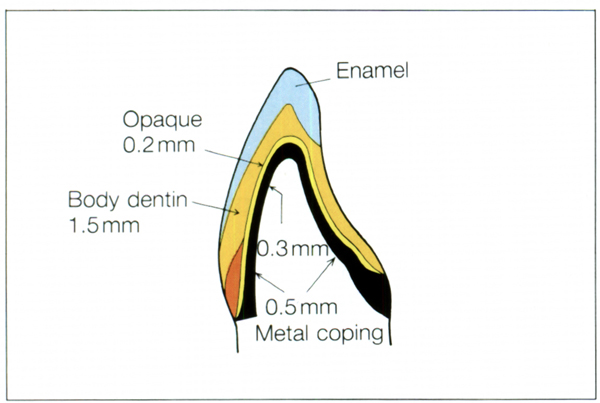
Fig. II-1b Optimal thickness of the porcelain and metal framework. (From McLean, The Science and Art of Dental Ceramics, 1980)
One of the most important techniques in building porcelain is to pack the porcelain which has been spatulated with a liquid binder such as water, in order to minimize inclusion of air in the porcelain particles before firing. This packing process is called condensation. (Refer to Metal Ceramics by Makoto Yamamoto)
Controlling the position, thickness, and contour of the spatulated porcelain to be built up also is necessary in order to construct correct layers. In order to produce a natural shade in a porcelain-fused-to-metal system, it is essential to locate each of the dentin, enamel, and transparent porcelain layers correctly. As described in the preceding section, the cut-back procedure is suited to precise porcelain completion. To make use of this procedure, the morphology of the dentin porcelain after cut-back should be maintained until the crown is completed. In the end, appropriate techniques should be used to avoid mixing the porcelain layers with different colors.
Techniques for building porcelain include the brush additive technique and spatula technique. Characteristics for each technique are summarized in Table II-1.
Table II-1 Characteristics of the brush additive and spatula techniques
| Brush additive technique | Spatula technique |
| ① As moisture is supplied from a brush, the built porcelain material can be kept wet. However, curb the tendency to supply excess water and absorb the excess with tissue paper or gauze. | ① Excessive water is not supplied. Absorption of water is necessary only intermittently. Porcelain tends to dry quickly. |
| ② Building must be gradual. Until the entire mass is completely built up, many coats must be layered which might result in more trapped air. | ② A large amount of porcelain can be built up, so the operation can be performed quickly with less air inclusion. With a spatula used to cut and press the porcelain, the morphology of the crown is easily produced. |
| ③ A small amount of porcelain is easily adapted to the built-up surface since the water is supplied from the brush. Building can be controlled more successfully. It enables delicate operation and is suitable for building enamel porcelain and special color porcelain. | ③ A small amount of additional porcelain is not easily adapted to the underlying layer difficult Adaptation of the layers requires a pressing operation which may easily cause air inclusion. The pressing action also may cause discoloration of the underlying layers or cracking. |
| ④ Condensation must be performed by vibration with a different instrument. | ④ Condensation can be simultaneously performed by tapping or burnishing the surface without changing instruments. |
When building porcelain, there is a tendency to cause small porcelain or color particles to shift resulting in consequent change in porosity and deteriorated shade, or translucency in each porcelain layer if porcelain is repeatedly wet and dried over a long period of time. Building should be performed quickly; but if the speed of the procedure is the highest priority, correct construction of the porcelain layers may be neglected.
The brush additive technique in which porcelain is built up gradually under a controlled condition, is suitable for expression of blended delicate colors. This is effective for building opaque enamel and special color porcelain, after cut back of the dentin porcelain.
In contrast, the spatula technique allows a great amount of porcelain material to be built up at one time, thus the work is finished quickly. It is effective for building dentin porcelain.
These two techniques should be selectively used in individual steps to build up porcelain layers quickly and correctly. It is not necessary to judge the better method. Both methods have advantages and should be selected for individual steps.
The process of building porcelain layers can be divided into two sections. One is the build-up procedure and the other is the porcelain condensation. The build-up procedure is an indispensable process and each technique should be used properly. In contrast, porcelain condensation is just a series of mechanical operations that can be simplified.
Porcelain condensation includes vibration and absorption of excess moisture using paper tissue or gauze. The vibration is essential for condensation and cannot be simplified further. On the other hand, the method of absorption can be changed since it is a fairly simple procedure.
Conventional moisture absorption has some problems associated, listed as follows:
a. During the absorption procedure, rapid water flow occurs and minute particles of opaque or pigment can move within the porcelain layers. A porcelain contains extremely minute particles which help maintain the moisture content within the porcelain layers, especially opaque and pigment particles. As a result, the borders between each porcelain layer are blurred which affects the final shade.
b. Particles of opaque or pigment are absorbed with water. This causes increased discoloration of porcelain and as a result, the crown looks dark after firing. Beginners especially have this tendency because they add and absorb water repeatedly and take more time for porcelain building.
c. While absorbing excess moisture with tissue paper or gauze, the operator may press a finger and deform the porcelain layers.
To avoid this problem and simplify the operation, try not to absorb rapidly or touch the porcelain directly. For this reason, drying porcelain using a hot air source such as a hair dryer is the most suitable method. The author calls this method the “Hot-Air Technique”. NOTE: This method can be substituted for the absorption procedure but NOT condensation.
There is another drying technique for opaque porcelain using a special liquid for kneading but the author’s method uses all body porcelains spatulated with water and dried with a hot air source.
The first step in porcelain build-up procedures, the dentin porcelain build-up, uses a large amount of porcelain and absorption is done using tissue paper or gauze. The building process continues with small amounts of porcelain added such as enamel or translucent porcelain, additional build-up of the interproximal surface, and final condensation followed with the Hot-Air Technique.
When using the Hot-Air Technique, hold the crown on the abutment of the cast or hold it with locking tweezers in the left hand while holding the instruments in the right hand. As excess moisture rises to the surface of the porcelain layers, move the crown over the hair dryer during the building procedures (Figs. II-2a and b). During condensation, vibrate the crown in the left hand and remove excess moisture with the hot air source. NOTE: Do not dry it completely during the build-up process. At final condensation, hold the crown in the warm air and gently vibrate it to continue the condensation process similar to ultrasonic condensation. This method is very effective.
With the Hot-Air Technique, the operator can reduce the build-up time. In addition, the pigment particles do not move because of the reduced moisture flow. The operator does not touch the porcelain directly so this reduces the chances of porcelain deformation or movement of particles within the porcelain layers. As a consequence, the border between the porcelain layers can be made definitively. The porcelain layers are in position and well-condensed, favorable for multilayer porcelain application. This method is very useful for expert ceramists but can be rather difficult for beginners since it requires high technical skills.
Fig. II-2a Hot-Air Technique; final condensation of the crown on the cast. It is not necessary to put the crown in front of warm air each time as shown in the photo. Vibrate the crown until the water reaches the surface, then place it in the warm air source to dry excess water. Remove it from the warm air source and vibrate it again. The operator becomes skilled in this technique and can do it continuously. The nozzle of the hair dry is shown in the upper right side of the photo.
Fig. II-2b Additional build-up at the contact point and condensation. With a conventional method, the operator is required to hone his/her skills at this stage since the porcelain layers move easily if the operator absorbs the excess moisture carelessly. In the Hot-Air Technique, this process is simplified.
a. Instruments Used for Kneading Porcelain (Fig. II-3a):
1. Glass plate: Porcelain is kneaded over the plate.
2. Towel: A towel soaked with water is placed under the glass plate. This is helpful for cleaning the spatula and LeCron carver. It is used to wipe off the porcelain and to cool the glass plate in order to keep it wet so that the porcelain on the plate will not dry up.
3. Water syringe: This is used to add water to the porcelain when kneading.
4. Kneading spatula: This includes metal, glass, bone, and agate materials. A metal spatula is abraded during the kneading of porcelain so the fired porcelain may be discolored. While the latter three materials are not abraded, they are too thick and easily adhere to porcelain, therefore workability is quite poor. A metal spatula is preferable if care is taken to avoid abrasion. A kneading spatula is also used to take porcelain out of a container.
b. Instruments Used for Building Porcelain (Fig. II-3b):
1. Brush: A sable-hair brush is recommended. A no. 6 Winsor & Newton, 7 series is used for regular building and no. 3 is used for delicate building; no. 0 is suitable for staining. A large soft brush is used to smooth the surface of built-up porcelain; it can be an old no. 6 brush.
2. LeCron carver: This is used mainly for building and preparation of dentin porcelain (see Fig. II-13f). To be used effectively, it can be modified to a spoon shape by slightly carving it. The jagged part is used for condensation. A small spoon excavator on the opposite end is used for excavating a groove in which special color porcelain will be embedded or for taking out a small amount of special color porcelain from a container. It is effective for delicate mixing of porcelain as a constant quantity of material can be taken out with it.
3. Porcelain cutter: This is used mainly for cutting back dentin porcelain. For this purpose, the cutter requires proper elasticity and is best made by cutting a razor blade (see Fig. II-13i). Serrating the opposite side of the blade with a disc is helpful for separating the proximal region of built-up porcelain which has been solidly condensed and relatively dried. Stroking the cutter back and forth eliminates excess force from being applied to the porcelain. Thus, built-up porcelain can be safely cut off without separation from the opaque layer or cracking.
4. Locking tweezers: This is used for holding the knob on a crown or bridge during removal from and insertion into a die or during the build-up of porcelain. It is also used for holding work while vibrating during condensation of the porcelain.
5. Small hammer: This is used for tapping a cast for condensation (hammer technique). This technique allows the process of condensation to be viewed directly, and is safe and more accurate than techniques such as striking a cast on a bench.
6. Tissue paper: This is used for absorbing excess amounts of moisture in the first condensation stage. By placing the tissue paper opposite the working surface, this avoids allowing the porcelain to flow. Use a gentle touch when using tissue paper so the fibers do not come off easily. It is ideal for absorbing moisture when a large amount of porcelain is built up with a spatula.
Fig. II-3a and b Instruments necessary for building porcelain.
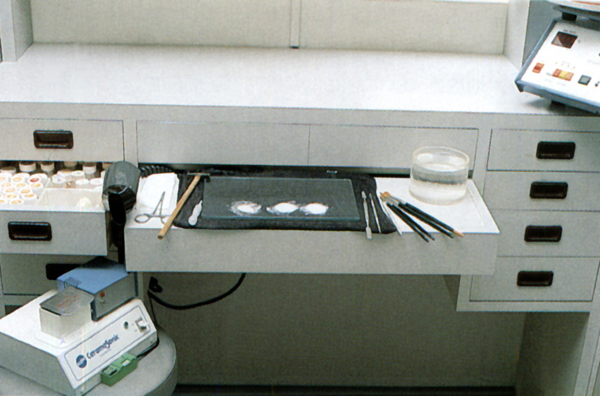
Fig. II-3a Instrument lay-out for kneading porcelain.
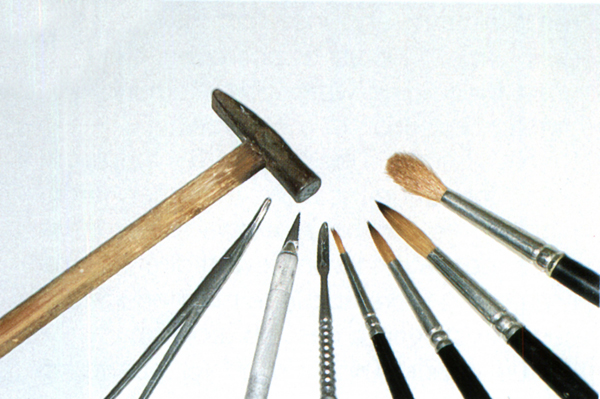
Fig. II-3b Instruments for building porcelain.
The foundation refers to the shade before the body porcelain is built up. Although the shade of the foundation is due to the opaque porcelain, many other factors influence the foundation in a porcelain-fused-to-metal restoration. Opaque porcelain appears devitrified but is not devitrified completely. The color of the metal layer also affects the shade of the fired opaque porcelain. Thus, the foundation shade can be changed and depends on the primer.
With a conventional metal shoulder, excluding the porcelain margin technique, cervical porcelain is used to avoid a strong reflection of the opaque porcelain in the margin area. This is also considered part of the foundation. Even when the foundation is adjusted using primer colors, opaque porcelain, or cervical porcelain, the shade after firing may not result in the desired shade. In this instance, the foundation shade should be adjusted using stains.
As previously mentioned, the foundation is affected by the following four factors:
a) primer color
b) opaque porcelain color
c) cervical porcelain color
d) foundation stain.
On completion of pretreatment of the precious metal alloy surface prior to fusing the porcelain, the labial margin is coated with gold bonding agent to eliminate the black line on the cervical margin. Firing is then performed in accordance with the manufacturer’s instructions.
The most important area is the margin where the metal, porcelain, and dentin come in contact with each other. Since a bonding agent at the tip may flow easily during coating and firing and be lost from this critical area, it is necessary to use body agent dissolved with an organic solvent or dry it slowly at coating and firing. The width of the agent is about 1 mm; it is unnecessary to apply it widely since it is required only at the tip of the margin. Coating the bonding agent also is recommended in cases when the metal framework has a metal collar and when the porcelain margin technique is utilized (Fig. II-4).
Figs. II-4a to c Application and firing of a gold bonding agent.
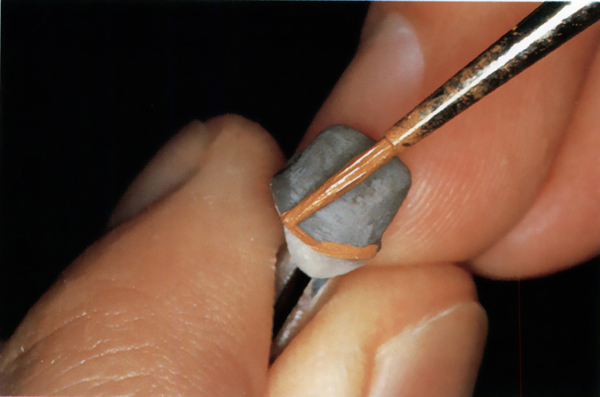
Fig. II-4a The agent is applied with a brush to a width of about 1 mm. The most important area is the edge of the margin. It is too sticky to apply a gold bonding agent with softener liquid (rosin). The author adds carbon tetrachloride in the gold bonding agent and applies it to the margin area.
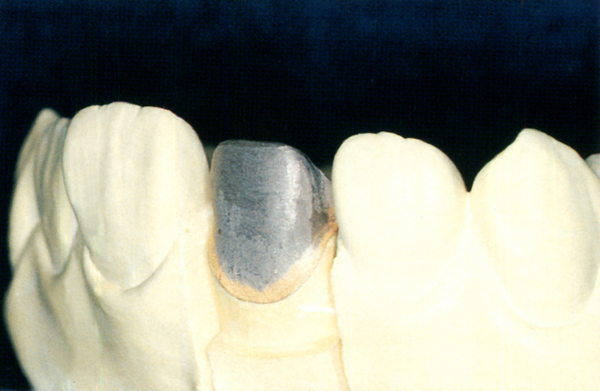
Fig. II-4b The crown after application and firing of the gold bonding agent.
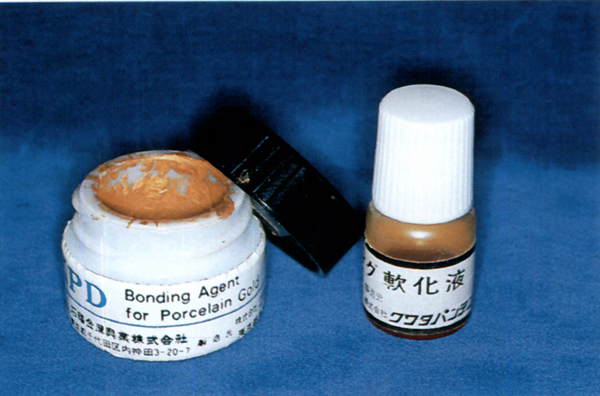
Fig. II-4c Gold bonding agents.
Since the margin becomes golden when a bonding agent is used, only a very thin opaque porcelain is necessary in this area; a non-opaque is necessary at the tip. In contrast, opaque porcelain must be slightly overbuilt to eliminate the black line in a normal margin. This may lead to a highly reflective surface due to exposure of the opaque porcelain layer at the labial margin in a completed crown. It also may cause periodontal disease due to hygienic problems stemming from porous opaque porcelain.
A loss of base metal elements necessary for bonding with porcelain from the thin metal structure at the tip of the margin will lower the bond strength between the metal and porcelain in that area. Cracking or exfoliation of the porcelain may be caused easily by internal pressure or stress during cementation. Application of a bonding agent near the margin serves to assure the clinical bond strength in that area and prevent these troubles (Fig. II-5).
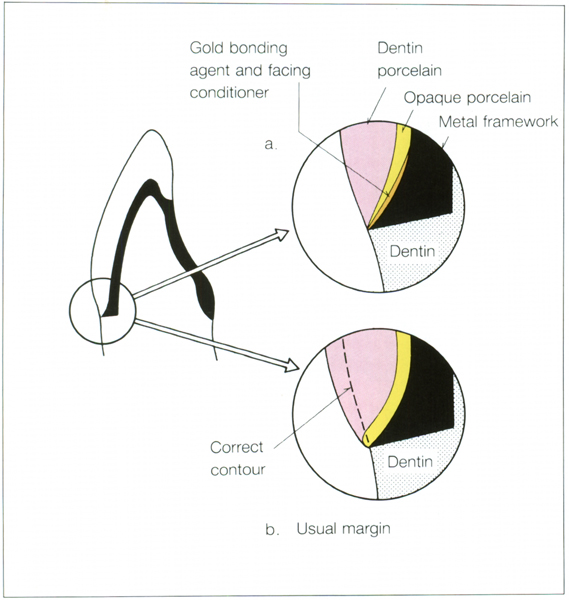
Fig. II-5 The effects of a gold bonding agent and facing conditioner.
a: Application of a gold bonding agent or facing conditioner at the margin eliminates a black line and at the same time, omits the necessity of applying opaque porcelain at the tip so that correct contour and smooth transition of the margin to the dentin can be obtained.
b: In a usual margin, elimination of a black line tends to form a step at the shoulder; formation of a correct contour tends to expose the opaque porcelain.
The black line seen at the cervical margin area of nonprecious metal alloys (Ni-Cr) is more conspicuous when compared to that of precious metal alloys, making it necessary to color the margin gold. However, the method used for precious alloys cannot be adapted since the bonding agent does not fuse to nonprecious alloys. To color the margin area gold, the author uses the following method (Figs. II-6a to h).
Figs. II-6a~h Application and firing of the facing conditioner on the marginal portion with nonprecious alloys (Ni-Cr).
Fig. II-6a After grinding the metal surface. The metal surface should be prepared using a carborundum point after casting and fitting.
Fig. II-6b After microblasting. The metal surface is microblasted with 50–100 micron alumina particles.
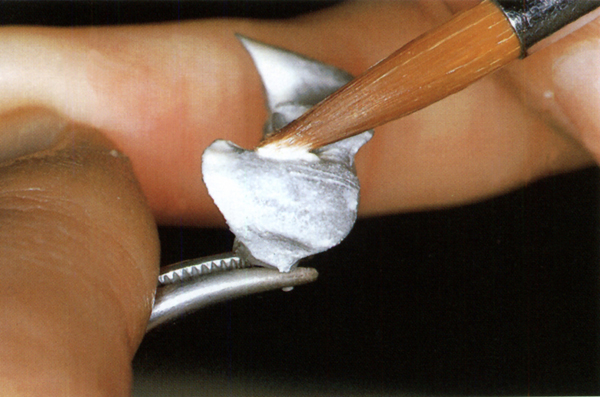
Fig. II-6c Application of the flash coating. The opaque porcelain, any color available, is mixed with kneading fluid. The porcelain is applied in one thin layer on the metal surface. The layer should be thin enough to see through to the metal surface.
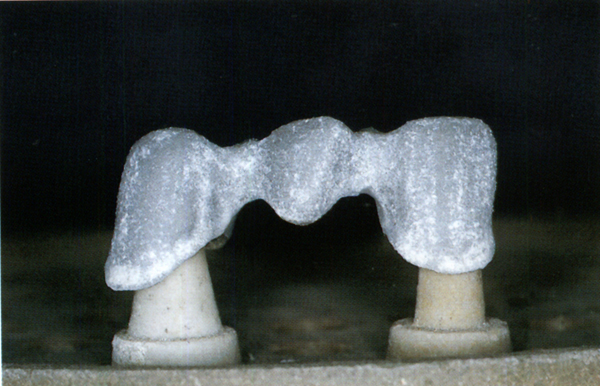
Fig. II-6d After flash-coat firing. The opaque porcelain should be fired 10–20°C higher than the temperature suggested by the manufacturer.
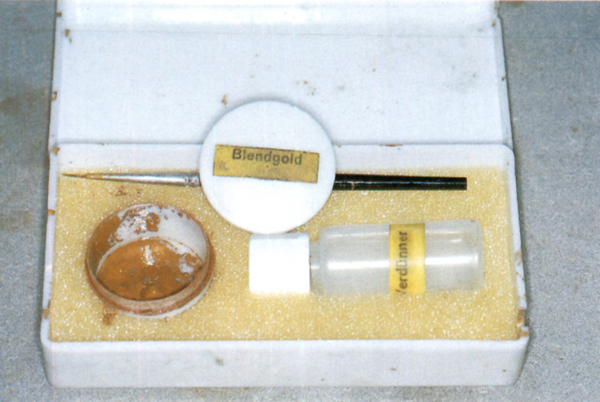
Fig. II-6e New Blendgold (Heraeus) is the facing conditioner used for this technique.

Fig. II-6f Application of New Blendgold. The facing conditioner, New Blendgold, is mixed with the liquid and applied to the cervical margin portion. Apply about 1–2 mm wide and fire according to the manufacturer’s instructions. Be careful to avoid applying the conditioner on the inside of the crown or on the shoulder portion.
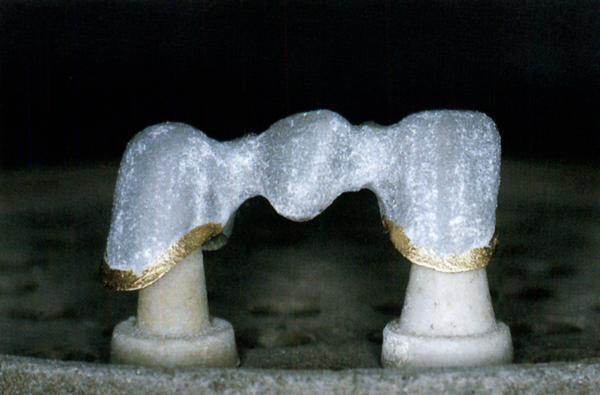
Fig. II-6g View after firing the New Blendgold. The margin portion of the nonprecious metal alloy (Ni-Cr) becomes a beautiful gold color.
Fig. II-6h View after firing the opaque porcelain. After firing the conditioner, New Blendgold, the conventional application and firing of opaque porcelain are completed.
Initially the metal surface is microblasted using alumina particles 50–100 microns, then rinsed. The opaque porcelain is applied to the metal surface and condensed. Fire the metal coping 10–20 degrees Centigrade higher than the manufacturer’s recommendation, the flash coating. After flash-coating, apply New Blendgold (Heraeus, West Germany) to the margin area and fire following the manufacturer’s directions.
The New Blendgold is a facing conditioner with a firing temperature lower than that of the bonding agent mentioned above but almost the same as for opaque porcelain. Follow the conventional method for building the opaque porcelain and fire after firing the New Blendgold.
As referred to in the previous chapter, the opaque porcelain layer creates the basic shade of the crown and shade selection and thickness is important for the degree of transmission of metallic color. In fact, two or three colors should be used to create the shade of the final crown (Fig. II-8a to h).
For example, to obtain the shade of Vita Lumin A2, opaque porcelain materials should be selectively used for each area in such a way that opaque porcelain A3 which is thicker than A2, is used in the cervical region, and opaque porcelain A2 is used in the body portion with opaque porcelain C1 which has a slightly dark bluish gray shade in the incisal portion. The range of each opaque porcelain material to be built up must be within each corresponding shade range in the completed crown (Fig. II-7).
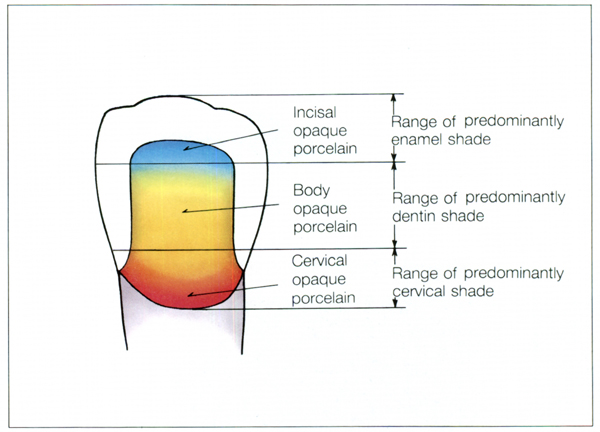
Fig. II-7 Areas for each opaque porcelain to be built up. The range of incisal opaque porcelain to be built up is limited since the incisal area includes a part composed only of porcelain. Each opaque porcelain should be built up with the border blended rather than clearly demarcated.
Figs. II-8a~h Building opaque porcelain.

Fig. II-8a Mixed opaque porcelain materials of the cervical portion (pink), body portion (yellow), and incisal portion (blue).

Fig. II-8b The knob on the crown is held with locking tweezers to wet the metal surface with water.
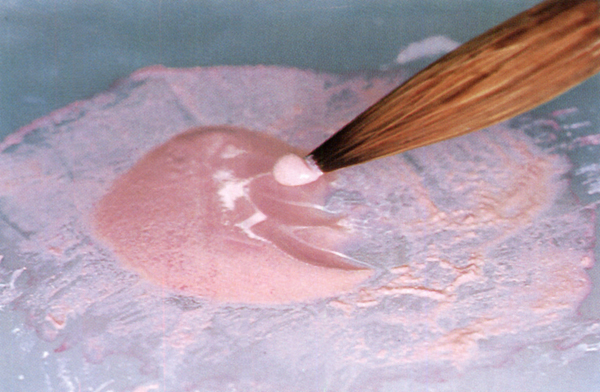
Fig. II-8c Kneaded opaque porcelain is picked up in the form of a ball with the properly arranged tip of a brush.
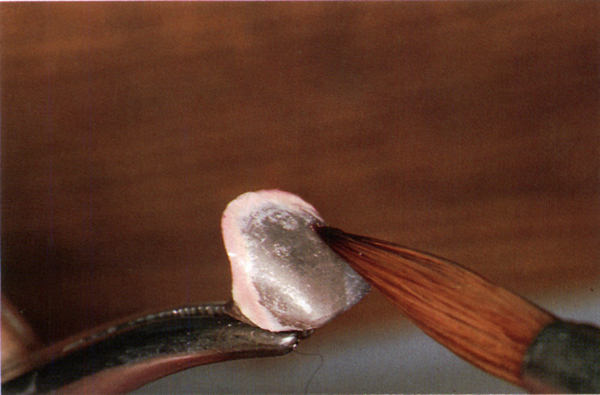
Fig. II-8d Be aware of the areas for each opaque porcelain to be built up. View shows the cervical opaque porcelain built up.
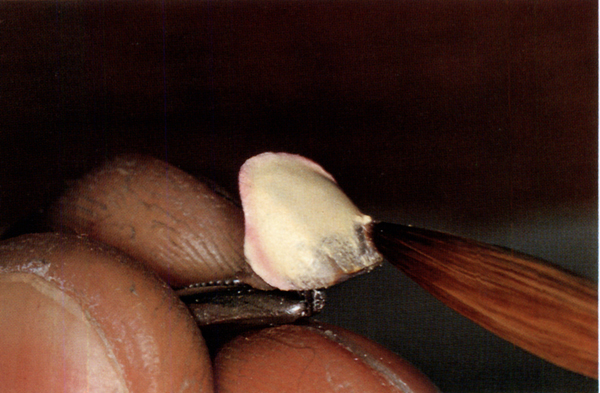
Fig. II-8e The body opaque porcelain is built up.

Fig. II-8f Finally, the incisal opaque porcelain is built up.
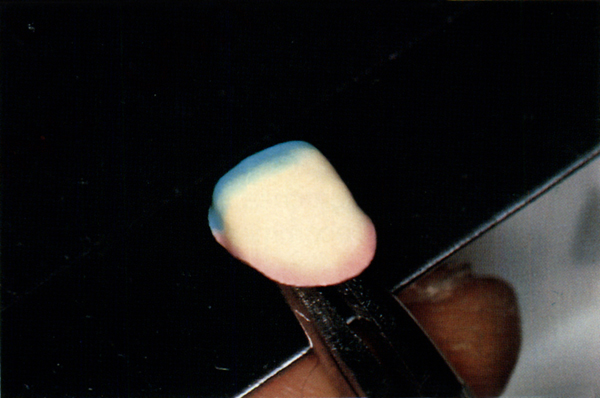
Fig. II-8g Condensation. The initial gentle vibration is applied with the brush, followed by tapping the tweezers with the LeCron carver. Vibration is then gradually intensified by rubbing the tweezers with the jagged part of the LeCron carver and finally using ultrasonic condensation.
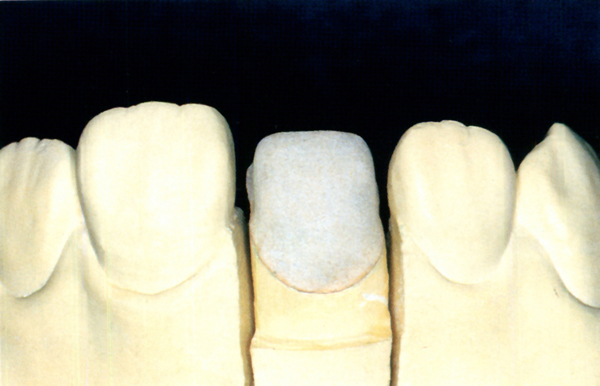
Fig. II-8h View of opaque porcelain after firing. The color changes gradually from the incisal portion through the middle portion of the cervical portion.
The thickness of the opaque porcelain layer should be checked by noting how the metallic color can be seen when water is oozing to the surface after condensation during the build-up procedure. Opaque porcelain should be condensed thoroughly since the degree of condensation in this layer will significantly influence the bond strength and unlike the dentin and enamel porcelain layers, it is in direct contact with the metal surface. Also, bubbles which remain in the opaque porcelain layer will increase in size in the/>
Stay updated, free dental videos. Join our Telegram channel
VIDEdental - Online dental courses


