Fig 2.1 Diagrammatic presentation of subperiosteal implant.
Fabrication. After treatment planning, the buccal and lingual full-thickness flaps are elevated to extend beyond the sulcular depth and an accurate impression of the bony ridge is made, using a hydrophilic impression material (e.g. polyether). The flap is sutured back, the impression is poured with dental stone, and a titanium framework is fabricated over the replica, which has vertical extensions (abutments) emerging out of the soft tissue to hold the prosthesis. After the soft tissue has healed, the full thickness flap is elevated again to the same extent, the titanium framework is placed over the bony ridge and immobilized using fixation screws, and the flap is sutured back with the vertical extensions emerging out of the soft tissue. After a healing period of approximately one-and-half months, the periosteum gets attached to the underlying bone firmly anchoring the framework. An impression of the vertical extensions (abutments) is made and a fixed or removal type of prosthesis is fabricated, and fixed or stabilized over the implant (< ?xml:namespace prefix = "mbp" />
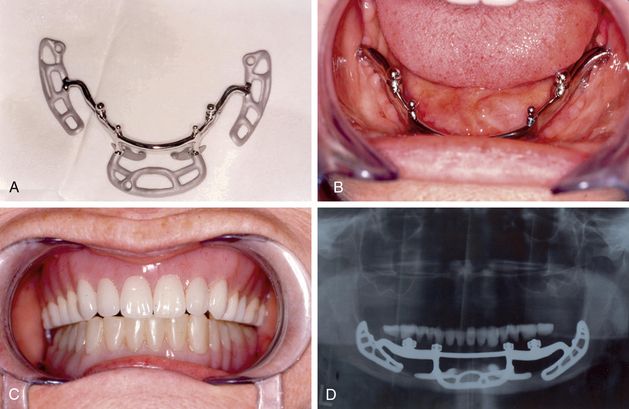
Fig 2.2 (A) Subperiosteal implant (B) placed in the patient’s mouth (C) supporting mandibular denture (D) post loading X-ray.
(Courtesy: Terry D Whitten, DDS)
Endosseous implants
The “implants which are placed within the jaw bone are called endosseous implants,” e.g. blade implants, root form endosseous implants.
Blade implants
Blade implants, which are very useful for narrow ridge cases, are available prefabricated in the shape of blades with an integrated abutment, which emerges out of the soft tissue to support the prosthesis (
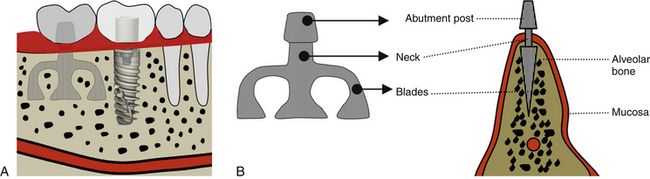
Fig 2.3 (A) Blade and root form implants in the facial view of the alveolar ridge. (B) Blade implant in the cross-section view of the ridge.
Placement. To place the blade implant, a full thickness flap is elevated to expose the bony ridge and a thin sharp diamond bur/disc/piezo saw is used to prepare a horizontal osteotomy conforming to the size of selected implant. The implant is tapped into the prepared horizontal slot and the flap is sutured back, leaving the abutment emerging out of the soft tissue to hold the future removable or fixed type prosthesis. The blade implants are restored 2 to 3 months after placement (
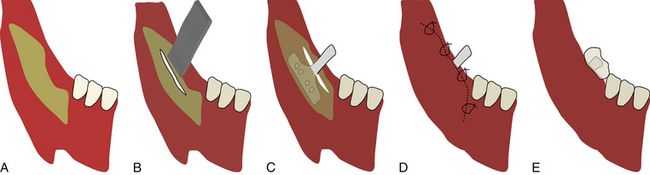
Fig 2.4 (A) To place a blade implant, flap is elevated to expose the ridge crest and (B) a deep mid-crestal horizontal osteotomy is prepared using piezo saw/rotary bur/disc etc. (C) The blade implant with correct dimensions is inserted and tapped to fit into the prepared osteotomy. (D) The flap is sutured back and (E) implant is loaded, once it gets osseointegrated with the bone.
Endosseous root form implants
The two-stage, threaded, titanium root form implant was first invented by Dr Branemark in 1978. These are now the most widely used implants. The root form implant usually has two parts – one part, which is inserted in the bone in the form root, is called the fixture and the other part, which is called the abutment, is immediately or later fixed to the fixture and emerges out of the soft tissue to hold the prosthesis (
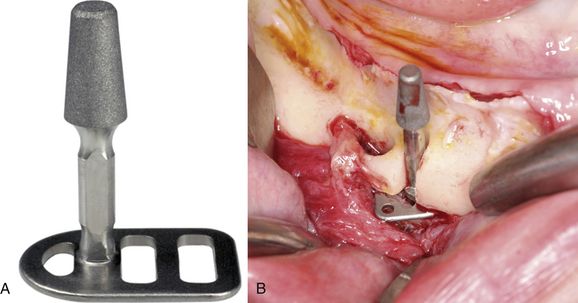
Transosteal implants
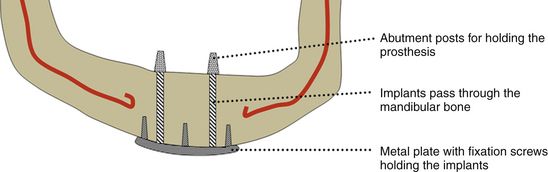
These implants are usually inserted in severely resorbed mandibles where placing the endosseous implant may lead to mandible fracture. They are mostly used to stabilize loose dentures. The posts are inserted through the mandibular basal bone and stabilized with a submandibular metal plate (
Basal osseointegrated implants (BOI)
These implants are integrated to the high-density basal bone or their basal discs are engaged bicortically, to avoid any movement during function. To insert these implants, a lateral bone cutter is used to prepare a lateral slot through the facial cortical plate and an implant of exact size and shape is tapped from the lateral access into the prepared slot. The flap is sutured around the implant abutment, which emerges out of the soft tissue. These implants usually achieve high initial stability and thus can be restored immediately or soon after implantation. These implants, because they have the advantages of minimum inventories and immediate loading, have gained high popularity and are being widly used by many implant surgeons. These implants are very useful for cases with compromised bone volume, limited bone height above the mandibular canal, sinus pneumatization, etc. The only disadvantage with these implants is that their placement needs the lateral approach (
Classification of endosseous root form implants
As described earlier in this chapter, endosseous root form implants are the most widely used implants. Several research projects and clinical trials have been done and continue to be done, to develop an optimal implant design. There are many parameters which differentiate one root form implant from another, and dentists practising or willing to practise clinical implantology should know these features and their benefits to successfully choose the correct implant design. Root form implants can be classified as follows:
Root form implants classified on the basis of surface design
Non-threaded implants
These implants do not have any threads along their body, and thus are tapped into the prepared osteotomy slot. The non-threaded implant offers the advantages of more surface area and more bone implant–surface contact percentage (e.g. the Endopore implant) (
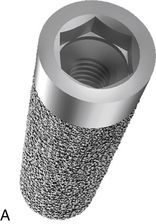
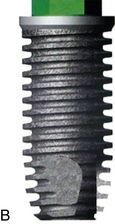
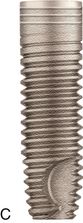
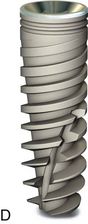

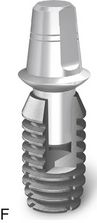
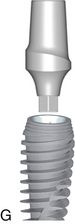

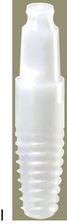
Fig 2.7 Various endosseous root form implants commonly used in practise. (A) Non-threaded implant of Endopore system with hexagonal internal connection. (B) Threaded implant in Maestro, Biohorizons with square threads and hexagonal external connection. (C) Parallel body design of ATID implant with self-tapping thread design from Alpha Bio. (D) Tapered body SPI implant from Alpha Bio with variable thread design. (E) Tapered implant from Nobel Biocare with triangular internal connection. (F) Bicon’s locking (cold welded) tapered internal connection implant. (G) WP implant from Adin with Morse taper internal connection. (H) Soft tissue level single-stage implant from Straumann. (I) White sky zirconium implant from Bredent, Germany. (J) ARRP one-piece implant from Alpha Bio, Israel.
Threaded implants
These implants are the most widely used and contain threads along the implant body. These implants are screwed into the prepared osteotomy site. (e.g. Biohorizons implants, Nobel Biocare implants, etc.) (
Root form implants classified on the basis of body design
Depending on the body taper, root form implants can be parallel or tapered body implants.
Parallel body implants
The bodies of these implants remain almost parallel, without any taper. These implants offer the advantage of more surface area compared to tapered implants of the same diameter. The only disadvantage with these implants is their technique-sensitive placement – if osteotomy for this implant slightly gets widen with the final drill, the primary stability of this implant gets reduced or lost. Further, even in the medium density bone, more no. of drills need to be used for osteotomy preparation when compared to the tapered body implant (
Tapered body implants
The body of this implant tapers as it progresses from the implant platform to the apex. These implants require minimal drilling and achieve high primary stability even in low-density bone. The only disadvantage of these implants is their smaller surface area compared to parallel body implants of similar diameter (
Stay updated, free dental videos. Join our Telegram channel
VIDEdental - Online dental courses


