Correction of Vertical
Discrepancies
Facial esthetics is one of the main reasons patients seek orthodontic treatment. The allure of having a beautiful smile and an attractive profile drives many people toward treatments that often require significant individual sacrifice. Thus, the orthodontic experience should not merely be tooth alignment but a devoted effort to give the patient that entire new image he or she so desires. This chapter discusses some of the challenging vertical discrepancies commonly seen in orthodontic practice and the most effective methods of correcting them in an effort to enhance the quality of patients’ lives.
Deep Bite Correction
The correction of a deep bite is essential to obtaining a harmonious facial profile and a balanced occlusion and must be addressed at the beginning of the leveling phase. Dental deep bite can be observed on both short- and long-faced patients, and its correction is necessary to properly reduce overjet (Fig 6-1a), especially in Class II, division 1 extraction cases. If deep bite correction is not considered during retraction, the palatal aspects of the maxillary incisors could interfere with the mandibular incisors, causing lingual tipping (Fig 6-1b), loss of anchorage, and temporomandibular joint (TMJ) dysfunction.
In Class II, division 2 deep bite cases, the maxillary incisors overlap the mandibular incisors excessively, “imprisoning” the mandible in the maxilla and forcing it to stay back. This tight relationship between anterior teeth limits mandibular function and prevents the jaw from growing normally. In growing individuals, it is imperative to correct maxillary incisor inclinations to make room (overjet) for the mandible to grow and develop normally.
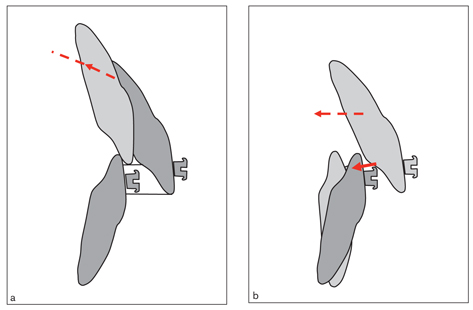
Fig 6-1 Class II, division 1 deep bite. (a) The deep bite should be corrected before or during maxillary incisor retraction to reduce the overjet properly. (b) During retraction, if the deep bite is not considered, the palatal surfaces of the maxillary incisors can interfere with the mandibular incisors, tipping them lingually.
Deep bite can be corrected in a number of ways, depending on the individual needs of the patient and the nature of the problem. Precise diagnosis and careful treatment planning are extremely important for a proper outcome. Some criteria such as vertical growth pattern, inclination of the occlusal planes, incisor-lip relationship, smile line, and vertical proportions of the face need to be considered before planning treatment.
In general, there are three methods of treating a deep bite:
• Intrusion of the incisors and extrusion of the posterior teeth
• Selective incisor intrusion
• Selective incisor extrusion1–6
A straight wire engaged in all brackets tends to intrude and protrude the incisors and extrude the molars. Figure 6-2 shows an occlusal view of a Class II, division 2 case with the straight wire causing incisor protrusion and molar expansion. In the sagittal plane, when the straight wire is engaged in brackets on incisors located below the maxillary occlusal plane, the overbite will be corrected mainly by incisor protrusion and intrusion (Fig 6-3). The maxillary occlusal plane inclination, however, may not be fully corrected because the canines and premolars will erupt as the incisors intrude and flare. If this had been a deep bite case combined with a gummy smile, the esthetic goals would not have been completely met because the smile line would not have been raised.
If incisor protrusion is indicated to correct Class II, division 2 malocclusion, then straight wire is the proper choice. However, some Class II, division 2 deep bite cases combined with severe crowding require extraction of maxillary premolars. In this instance, one should start treatment with canine retraction to make room for the crowded incisors, using a segmented arch to prevent flaring of the incisors and the problems associated with it, such as gingival recession and tendency to relapse. When the canines distalize, the incisors tend to move in the same direction by means of the transseptal fibers—which collectively form an interdental ligament that connects all the teeth of the arch—and the crowding often resolves spontaneously. Then brackets can be placed on the incisors and their intrusion can be accomplished with a continuous intrusion arch. After the deep bite is corrected, a straight wire can then be engaged to finalize leveling.
If one starts the treatment with a straight wire, the case will be converted from Class II, division 2 to Class II, division 1, owing to the incisor protrusion. The incisors must then be retracted to reduce the overjet. Protrusion followed by retraction may cause resorption of the incisor roots from “round tripping” (jiggling). Therefore, straight wire should be avoided in Class II, division 2 cases when extraction is necessary.
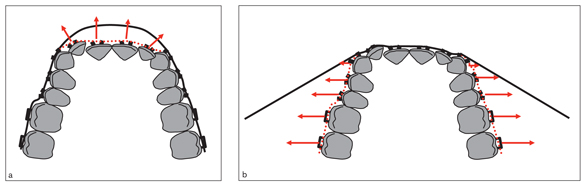
Fig 6-2 In a Class II, division 2 case, a straight arch engaged in the brackets would cause anterior protrusion (a) and posterior expansion (b).
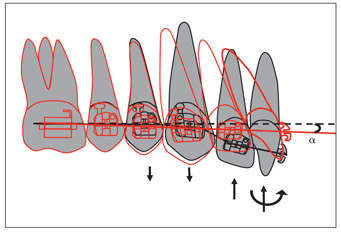
Fig 6-3 In the sagittal plane, when a straight wire is engaged in brackets on incisors erupted below the maxillary occlusal plane, overbite will be corrected by incisor protrusion. However, the maxillary occlusal plane inclination may not be fully corrected because the canines and premolars erupt as the incisors intrude and flare. At the completion of leveling (red), the occlusal plane will be inclined downward anteriorly (α).
During leveling with straight wire, tooth tipping might create premature contacts between antagonist teeth and cause the bite to open. In skeletal deep bite (low-angle) patients, bite opening with molar eruption is usually desired. In high-angle cases with deep bite, however, selective mechanics must be applied to control vertical growth of the face. Premature contacts in the posterior segment tend to stimulate clockwise rotation, resulting in an increase of lower facial height and worsening of the incisor-lip relationship and soft tissue profile. Occlusal forces normally cannot compensate for this bite opening because high-angle individuals have relatively weak chewing muscles. In growing patients, counterclockwise rotation can be achieved by intruding molars or controlling vertical movement of the posterior teeth and applying selective bite-opening mechanics, depending on the growth potential of the condyles.7
In normal- to low-angle patients, deep bite correction can be attained by any of the methods appropriate to the specific needs of the patient. In these cases, clockwise rotation of the mandible by molar extrusion is usually helpful in correcting the deep bite, increasing lower facial height, and improving the soft tissue profile. In skeletal deep bite (low-angle) patients, however, bite opening is a challenge. Even after having selective molar extrusion for a relatively long time, most patients undergo relapse because of their powerful chewing muscles and the nature of the malocclusion. These patients should be provided a fixed or removable anterior bite plane as a retainer to allow the molars to erupt.
Esthetics and the incisor-lip relationship
One of the main components of creating the esthetic smile coveted by patients is the correct alignment of the teeth, along with the harmony of this alignment with the lips (Fig 6-4). One thing that beautiful smiles have in common is that the teeth fill the labial commissures. The presence of dark corridors on each side of the maxillary arch during smiling gives the unpleasant effect of a narrow arch, while the appearance of the second premolar or molars is brighter and more esthetic.
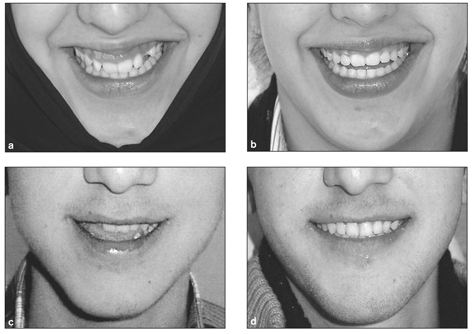
Fig 6-4 Changes in smile lines due to orthodontic treatment of a patient with a gummy smile (a and b) and a patient with a high smile line (c and d).
The relationship between the maxillary anterior teeth and the lower lip is also an important factor affecting smile esthetics. Showing maxillary incisors during speaking or natural smiling is usually associated with a young and dynamic appearance. Showing the mandibular incisors—owing to the soft tissues’ tendency to droop as a result of gravity—and hiding the maxillary incisors is, in contrast, regarded as older looking. It may therefore be necessary to intrude the mandibular incisors instead of the maxillary incisors for a more esthetic smile line in the long term.
Patients with a convex soft tissue profile associated with a vertical facial-growth pattern and retruded chin may also have a protrusive smile, even if maxillary protrusion does not exist. In these patients, lower facial height is usually increased by clockwise mandibular rotation; the lower lip strains and moves backward during smiling, giving the impression of maxillary protrusion (Fig 6-5).
The incisal edges of the maxillary incisors should follow the lower lip curve for an esthetic smile (Fig 6-6). In many deep bite patients, it may be necessary to open the bite by mandibular incisor intrusion only and level the maxillary anteriors so that the laterals are 0.5 mm gingival to the centrals.
Some patients with a deep bite also have a gummy smile. Treatment plans and final evaluation of these patients should not be based on radiographs and photos alone, which show only static relationships between the lips and incisors, but also on lip function.8,9 Exposure of the maxillary incisors in relaxed lip position is the key to assessment of the natural smile.10 One practical method that can be used to assess the smile line is to ask the patient to say the word mamma and then to keep the lips naturally apart. Peck et al10 state that the average maxillary incisor exposure in rest position is 4.7 mm and 5.3 mm in 15-year-old boys and girls, respectively, compared to an average of 9.8 mm and 10.5 mm in maximum smile, respectively. Dong et al11 emphasize the effect of age on the smile line and show that the amount of incisor exposure, both at rest and during smile, drops dramatically with age. The average amount of tooth exposure at rest in individuals who are less than 30 years of age is close to 2 mm; in individuals who are 60 years or older, the average drops below 0. During a natural smile, it is normal to see as much as 2 to 2.5 mm of gingiva; anything beyond this is considered a gummy smile.
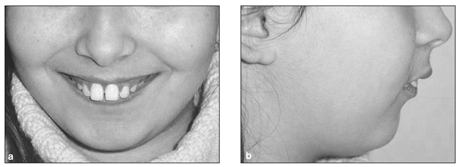
Fig 6-5 Protrusive smile (a) caused by a retruded chin (b).
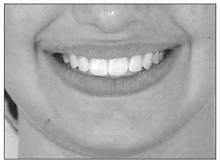
Fig 6-6 For an esthetic smile, the incisal edges of the maxillary incisors should follow the lower lip curve.
The smile can be affected by many factors, such as the muscles pulling the lip during smiling10 (Fig 6-7a). However, the most common causes of a gummy smile are
• Vertical overgrowth of the anterior maxilla (Fig 6-7b)
• Overeruption of maxillary incisors below the occlusal plane (Fig 6-7c)
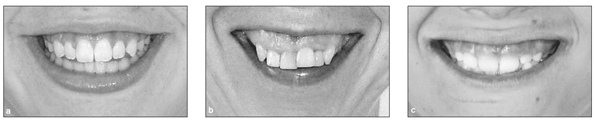
Fig 6-7 Gummy smiles due to (a) muscles raising the lip during smiling, (b) vertical overgrowth of the anterior maxilla, and (c) overeruption of maxillary incisors below the occlusal plane.
The first two causes are outside the limits of orthodontic treatment and must be evaluated within orthognathic and esthetic surgery concepts. Cases related to the third cause, however, can be treated orthodontically by selective incisor intrusion.
Certain patients present with gummy smile due to gingival hyperplasia, which can be confused with an orthodontic gummy smile. Therefore, differential diagnosis is imperative for proper treatment planning.
Selective incisor intrusion
The incisor-lip relationship is the best criterion for correcting a deep bite by selective incisor intrusion. When the maxillary incisors are positioned 2 to 3 mm below the upper lip and are below the maxillary occlusal plane, selective intrusion can be applied.1,3,12 As previously noted, determination of the incisor-lip relationship should be done when the patient is at rest or speaking. Many adults show their mandibular incisors when speaking. These types of patients may require selective mandibular incisor intrusion. Incisor intrusion is also indicated in adults with severe periodontal bone loss. Some patients requiring selective incisor intrusion may be high-angle cases, in which clockwise rotation of the mandible should be avoided. Mandibular incisor intrusion is easier in low-angle patients who present with a thick symphysis.13 Incisor intrusion is also recommended for adults with periodontal bone loss.14
Clinically, intrusion is a difficult movement to achieve, and it requires three-dimensional controls. Incisor intrusion can be performed in several ways; Fig 6-8 shows four of these methods. For an incisor with normal inclination, bodily intrusion is not practical because the intrusive force should be a combination of vertical and horizontal force vectors, both of which must be kept under control throughout the movement (Figs 6-8a and 6-8b). Clinically, intrusion combined with some protrusion (Fig 6-8c) or retrusion (Fig 6-8d) would likely occur. In a typical Class II, division 2 malocclusion with upright and extruded maxillary incisors, intrusion combined with some protrusion would be beneficial to obtain a better inclination. Intrusion and retrusion is not a practical movement and not usually necessary because the apex of the root moves forward to a less favorable position.
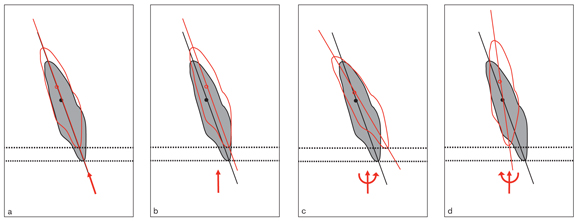
Fig 6-8 (a to d) Four approaches to intruding an incisor and the expected results (red).
Intrusion mechanics basically depend on the initial inclination of the incisor. Given the same amount of intrusive force applied to the bracket, the moment arm increases as the inclination of the tooth increases. Likewise, the more the inclination of the incisor increases, the more the clockwise moment to compensate for it increases (Fig 6-9).
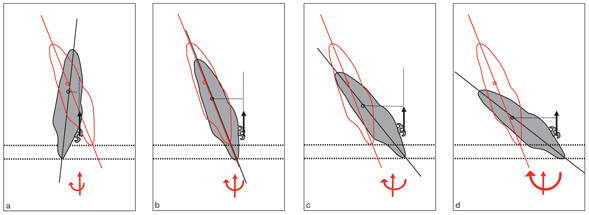
Fig 6-9 The type of intrusion of an incisor depends on its axial inclination. (a to d) As the axial inclination increases, so does the clockwise moment required during intrusion.
Clinically, continuous intrusion arches using the segmented arch technique of 2 × 4 archwires (2 × 4s) work relatively well in selective incisor intrusion.
Continuous intrusion arch
A continuous intrusion arch is bent from a 0.018 × 0.025–inch stainless steel (SS) wire with a 2.5-mm helix or a plain 0.017 × 0.025–inch titanium-molybdenum alloy (TMA) wire (Fig 6-10). Continuous intrusion arch mechanics are similar to those of 2 × 4s. A sweep (V) bend is placed in the wire at the level of the first premolars (or first primary molars). If incisor protrusion is indicated, the arch is ligated on the central incisor brackets or at the midline.15 For incisor protrusion, the arch should slide easily through the molar tubes. With these mechanics, the deep bite will be corrected with both incisor protrusion and intrusion.16–18 This is especially useful in correcting Class II, division 2 deep bite cases with mandibular retrusion in growing patients. As the maxillary incisors protrude, the mandible will have more room to grow forward to reduce the overjet and reach a Class I relationship.
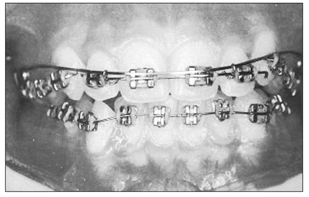
Fig 6-10 Frontal view of a continuous intrusion arch ligated to the anterior teeth between the central and lateral incisors. Note the shape of the arch.
If bodily intrusion of the incisors is necessary, the line of action of the intrusive force should pass through the center of resistance of the four incisors via ligation of the intrusion arch to the main archwire at the distal wings of the lateral incisor brackets. Clinically, pure bodily intrusion is difficult owing to the complexity of the movement. A slight change in the relationship of the line of action of the force with the center of resistance can change the type of movement. If the force passes anterior to the center of resistance, the incisors protrude, which can be prevented with a light chain elastic.
Correction of deep bite with segmented arch mechanics requires initial leveling and alignment of both anterior and posterior segments separately, which takes time. The leveling can be accomplished with a 0.014-inch nickel titanium (NiTi) wire in combination with a continuous intrusion arch, making the mechanics more efficient and shortening chair time. A 0.014-inch NiTi wire is a very flexible wire that has almost no negative effect on anchorage teeth, yet it can efficiently correct incisor crowding. The 0.017 × 0.025–inch TMA or 0.018 × 0.025–inch SS wire can control the occlusal plane if it is used in combination with a 0.014-inch NiTi wire (Figs 6-11 and 6-12). The continuous intrusion arch can be ligated to the lateral incisor brackets to hold those teeth in place while the NiTi wire intrudes the central incisors.
If the intrusive force is light, the reactive extrusive force on the molars is also light and therefore kept in check by the forces of occlusion. Table 6-1 shows the optimum intrusive forces for maxillary and mandibular anterior teeth.2 In high-angle cases, molar extrusion may need to be actively prevented to avoid clockwise rotation of the mandible. In these cases, high-pull headgear with long arms combined with a transpalatal arch works relatively well (see Figs 5-7 and 6-35).
Microimplant mechanics
Microimplants (temporary anchorage devices [TADs]) provide good anchorage support for selective incisor intrusion in both the maxilla and mandible. The micro-implant is usually placed at the midline between the central incisor roots. Intrusion force can be applied directly on the archwire if some protrusion is also indicated (Fig 6-13). If protrusion is not desired, the archwire can be cinched back so the teeth can be intruded more effectively. In severe deep bite cases, two TADs can be inserted between the central and lateral incisors to obtain more effective intrusion and to correct transverse asymmetry, if present (Fig 6-14).
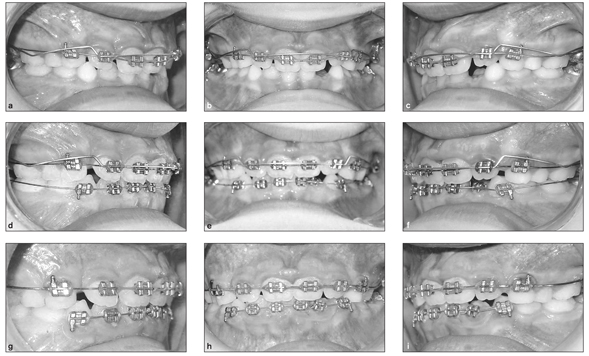
Fig 6-11 Correction of deep bite can be accomplished with a 0.014-inch NiTi wire combined with a continuous intrusion arch. (a to c) Beginning of treatment. The intrusion arch is tied on the lateral incisors, while NiTi wire is inserted into the central incisor brackets. (d to f) After 4 weeks, the central incisors have been intruded to the level of the lateral incisors. (g to i) After 12 weeks of treatment, a 0.016 × 0.022–inch SS wire is engaged in the brackets.
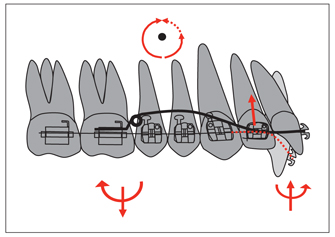
Fig 6-12 A continuous intrusion arch can be used in combination with a straight leveling wire. This arch can be ligated to the lateral incisor brackets so that the line of action of the force passes close to the center of resistance of the incisors. The central incisors intrude and protrude with the straight wire as the lateral incisors keep their positions with the effect of the intrusion arch.
| Table 6-1 | Recommended intrusive forces and headgear for deep bite correction* | |
| Teeth to be intruded | Force (g) per side | Headgear |
| Maxillary central incisors | 15–20 | Occipital–Ant to CR |
| Maxillary central and lateral incisors | 30–40 | Occipital–Ant to CR |
| Maxillary central and lateral incisors and canines | 60 | Occipital-Ant to CR |
| Mandibular central incisors | 12.5 | Cervical-Ant to CR |
| Mandibular central and lateral incisors | 25 | Cervical-Ant to CR |
| Mandibular central and lateral incisors and canines | 50 | Occipital-Ant to CR |
| Mandibular canines | 25 | None |
| *Reprinted from Burstone2 with permission. Ant = anterior; CR = center of resistance. |
||
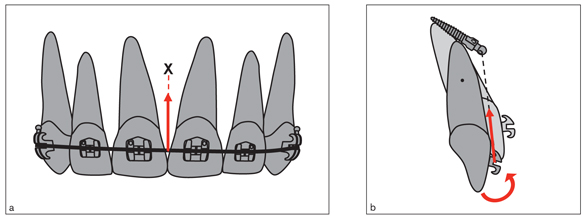
Fig 6-13 A microimplant, or TAD, can be used to correct anterior deep bite as well as the cant of occlusal planes. (a) The TAD is inserted between the incisors, and the force is applied to the archwire to obtain selective incisor intrusion. (b) In this technique, some incisor protrusion is also expected.
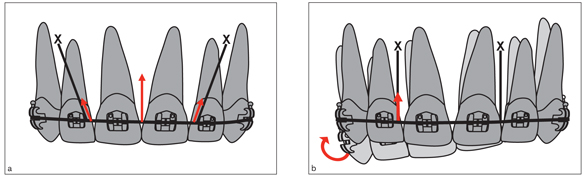
Fig 6-14 In patients with severe deep bite, two TADs can be inserted between the lateral incisors and canines (a). TADs can also be used to correct the transverse cant of the maxillary occlusal plane (b).
Selective molar extrusion
Stay updated, free dental videos. Join our Telegram channel
VIDEdental - Online dental courses


