Correction of
Anteroposterior
Discrepancies
The Class I molar relationship is one of the most important goals for the clinician seeking to achieve a functional and balanced occlusion.1 A Class II molar relationship can be corrected by distal movement of the maxillary molars, mesial movement of the mandibular molars, or a combination of both.
Molar Distalization
In some nonextraction treatments, molar distalization, or retraction, is the method of choice to gain space in the dental arch. The decision to distalize should be based on a careful examination and treatment plan. Several criteria should be considered before distally moving molars:
• Axial inclination of the molars
• Availability of space for the second and third molars
• Rotation of the molars
• Patient’s vertical growth pattern
Molar distalization is usually performed to gain 2 to 3 mm of space in the dental arch to obtain a Class I relationship. Because the distalizing force is usually applied to the buccal tube away from the center of resistance, it is easier to retract mesially tipped and mesiolingually rotated molars to where they are supposed to be than it is to move them bodily. Excessive retraction, however, may jeopardize the second and third molars—possibly impacting them.2,3
Molar distalization can be effectively accomplished in the transitional dentition before the second molars fully erupt and when the alveolar bone is relatively active.4 This is the best time to get good bone response to orthodontic treatment. If the third molars are missing, the erupting second molars that are pushed distally by the first molar can upright naturally and subsequently accommodate with a normal inclination. If the second molars are fully erupted, they will be tipped distally to an unstable inclination, causing marginal ridge discrepancies5 as well as relapse after retraction is completed. It is therefore necessary to consider including the second molars in the appliance and retracting them before or with the first molars.
Regardless of the distalizing method, the patient’s vertical growth pattern is an important point to consider. During molar distalization, some bite opening can be expected because of premature contacts. In normal- to low-angle patients, this is desired as the mandible rotates and corrects the profile by increasing lower facial height. In high-angle patients, however, clockwise rotation may worsen the profile and cause bite opening. On the other hand, bruxism and clenching, like excessive occlusal forces, may act to reduce—or even prevent—distalization.5
Molar distalization mechanisms include extraoral appliances, microimplants (temporary anchorage devices [TADs]), 2 × 4 arches, Nance appliance and coil spring combinations, superelastic wires, and sliding jigs.
Extraoral appliances
In normal- to low-angle patients, cervical or combined headgear can be used to distalize the molars effectively. These types of headgear need to be worn approximately 16 hours a day, requiring excellent patient cooperation. If the goal is to gain space on the arch by individual molar movement only, 300 to 350 g may be sufficient. When the force is higher than the optimum level needed for individual tooth movement, the molars can be used as a “handle” to obtain an orthopedic effect on the maxillary bone.6 Orthopedic as well as dental changes can be obtained with the use of 400 to 600 g of force for an average of 16 hours per day in the transitional dentition.7
Extraoral force is applied to the molar by means of a facebow. In the transitional dentition, as the molars move back, the primary teeth are also pulled back by means of the transseptal fibers. When the permanent teeth come through, they erupt into a Class I relationship. Sometimes the effect of the transseptal fibers reaches the anterior segment and effects spontaneous correction of mild incisor crowding.7 In normal to severe anterior crowding cases, however, extraoral force combined with 2 × 4 arch mechanics would improve the result. Molar distalization with extraoral force might provide enough room to rule out a second-phase comprehensive treatment in the permanent dentition.
Theoretically, if the line of action of the extraoral force passes through the center of resistance of the molar, it will cause bodily movement. In practice, however, bodily movement is difficult to achieve because the headgear is a sort of removable appliance; thus the line of action of the force may need adjusting every time it is worn to keep it constant. Usually a few tipping and uprighting movements are observed during the retraction process. If the crown is tipped excessively backward, the outer arms need to be adjusted so the force passes above the center of resistance to correct the roots. Three-dimensional control of the first and second molars is imperative to achieve functionally stable occlusion in the posterior segment.
Microimplants
In cases where second molars are fully erupted, molar distalization is a difficult maneuver requiring strong anchorage in the anterior segment. Microimplants provide the absolute anchorage needed to accomplish effective distal movement of the maxillary dentition along with the molars. A TAD is usually placed between the first molar and second premolar roots from which distal traction can be applied on a sliding jig (Fig 8-1) or a sliding hook attached to an open coil spring pushing the molar (Fig 8-2a). The direction of the force passes close to the center of resistance; thus, minor molar tipping and distopalatal rotation may occur. After distalization has been completed, if the first TADs interfere with the second premolar roots, they can be removed and a second set of TADs can be placed just mesial to the first molar roots to make room for retraction of the anterior teeth (Fig 8-2b).
Molar retraction can also be accomplished with a transpalatal arch that takes support from the microimplant inserted in the midpalatal area (Fig 8-3). This area provides excellent cortical bone support for primary stability. In young patients whose suture is still open, the microimplant can be placed adjacent to the suture. The advantage of this area is that it provides abundant space such that the force can be adjusted according to the type of movement desired.5 In shallow palatal vaults, the line of action passes through the center of resistance. Palatal TADs cause more discomfort than the buccal ones because they interfere with the tongue.
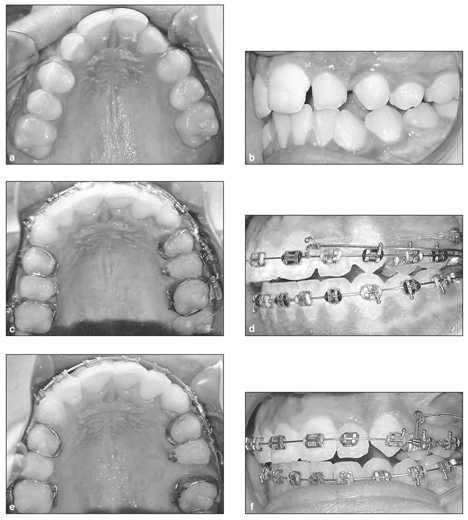
Fig 8-1 Microimplant anchorage mechanics for molar distalization. (a and b) Before treatment. (c and d) Molar distalization with chain elastic and sliding jig. (e and f) Effective molar distalization after 4 months.
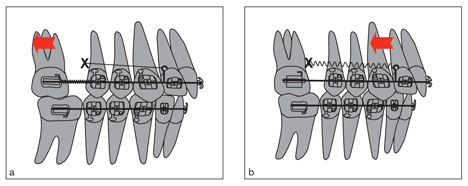
Fig 8-2 (a) Molar distalization with open coil spring and microimplant anchorage. (b) After molar distalization, the TAD needs to be removed and replaced mesial to the molar roots to retract the anterior teeth.

Fig 8-3 Molars can be distalized by taking support from the TAD inserted into the midpalatal suture.
2 × 4 arches
The tipback effect generated by 2 × 4 arches can be used to gain 1 to 2 mm of space in the arch of the transitional dentition (see Figs 6-26 and 6-27). This is usually enough to provide room for erupting permanent teeth; however, the distal inclination of the molars is not stable, and they tend to relapse when the second molars erupt. In such cases, the first molar roots must be corrected later with headgear.
Nance appliance and coil springs
Nickel titanium (NiTi) coil springs in combination with a Nance appliance on the first premolars is a convenient way to distalize molars. However, because the palate is not a reliable anchorage site, it may not resist the distally directed forces; thus, some incisor protrusion can be expected as a result of molar movement.8
Particularly shallow palatal vaults cannot provide sufficient anchorage support because the Nance acrylic button tends to slide over the palatal mucosa. Uprighting springs combined with vertical slotted brackets and heavy Class II elastics on the canines can be used to reinforce premolar anchorage (see Fig 5-2). Gianelly et al8 do not recommend anchorage reinforcement if the incisor protrusion is less than 2 mm. If it is more than 2 mm, they suggest using 100-g Class II elastics and putting 10 to 15 degrees of labial root torque on the mandibular incisors to support mandibular anchorage. They also suggest moving the molars into a Class III relationship to compensate for subsequent anchorage loss.
After distalization, headgear with long arms should be used to upright distally tipped molars and prevent relapse. Retraction of the premolars should be started immediately with a sliding jig–Class II elastics combination along with headgear application.
Superelastic wires
Locatelli et al9 suggest using superelastic NiTi archwires to distalize the molars (Fig 8-4). A 0.018 × 0.025–inch NiTi archwire deflected between the first premolar and first molar applies 100 g to each side. Using 100- to 150-g Class II elastics will prevent protrusion of the anterior teeth. With this method, the molars should move about 1 mm per month.
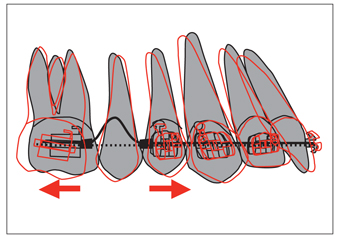
Fig 8-4 Use of superelastic archwires in maxillary molar distalization. The amount of activation of this arch is about the length of a molar tube (approximately 6 mm) (heavy line). As the wire straightens, it applies a force of approximately 100 g to both sides. Class II elastics (100 to 150 g) are used to prevent protrusion of the maxillary anteriors. (Redrawn with permission from Locatelli et al.9)
Sliding jig
The sliding jig is bent from 0.7-mm stainless steel (SS) wire. Combined with Class II elastics, the sliding jig is used to distalize molars in the permanent as well as transitional dentition (Fig 8-5). As the molars move distally, the premolars are pulled distally by means of the transseptal fibers. The horizontal component of the elastic force can be increased if the hook of the jig is placed mesial to the lateral incisor. The jig is deflected by the distal force, which tends to widen the anterior segment of the arch. This widening effect is negligible if continuous 0.016 × 0.022–inch SS wire is used; the effect can be further resolved with subsequent rectangular wires.

Stay updated, free dental videos. Join our Telegram channel
VIDEdental - Online dental courses


