In the case of photographs, where the incident light is reflected, opacity is defined as the ratio of incident over reflected light.
Dark areas of a radiograph transmit very little of the incident light, so they have a large optical density, whereas light areas are almost completely transparent and have a small density. The difference between the smallest and largest density is the density range. The density range of a radiograph may extend from 3.4 to 4.2 or more, signifying that the intensity of light passing through the brighter areas is more than 15,000 times higher than the intensity of light going through the dark areas. In contrast, the density range of a printed image is much lower, because light is reflected and not transmitted through it. Photographs and printed images seldom have a density range that exceeds 2.4. Scanners can capture a limited density range. The lower-priced models have a range of approximately 2.4, which is adequate for photographs and other printed documents, but insufficient for slides or radiographs. When the density capabilities of the scanner are insufficient, the brighter part of the image is given priority, and the darker areas are captured as a uniform blackness. This results in obliteration of the detail in dark areas, such as, for example, the hyoid bone area in lateral cephalograms.
Density values should be at least 3.4–3.6 for adequate results, values achievable by high-end flatbed scanners. Figure 4.1 shows the same image acquired from two scanners, one with optical density of 3.3 and the other with optical density of 3.6. (Note that because of the logarithmic scale used in expressing optical density, the better of these two scanners can discern twice the range than the other one.) Both images have been enhanced by the same amount to show the difference in the detail of the dark areas. Optical density is perhaps the single most important factor that determines the quality of a scanned radiographic image.
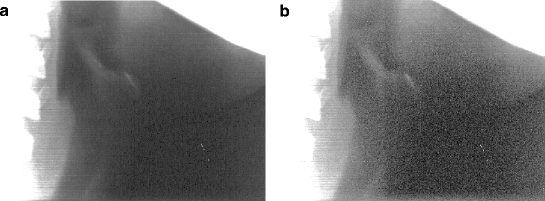
Fig. 4.1
The area of the hyoid bone scanned (a) with the Epson 1600 Pro (optical density 3.3) and (b) the Epson 1680 Pro (optical density 3.6). Note the reduced noise level and the significantly better detail capture from the scanner with the higher density. Both images have been processed by adjusting gamma so that dark areas are more apparent. For this reason, the mandible and vertebrae appear “washed out”
Noise
Noise is another factor that degrades scanned images [19]. Noise appears as random variations in image intensity at the pixel level and is most evident in the dark areas of the image. Because noise is random, it can be reduced substantially by multiple scanning. This technique scans the radiograph more than once and averages the results. Due to the random nature of noise, the average of multiple scans will tend to cancel out noise and retain the true value. High-end scanners are capable of acquiring multiple values for each pixel and take the average during a single pass. If this feature is not available, it can be done by software, but then multiple passes are required. Figure 4.2 compares the same area scanned once and four times. Noise reduction is evident.

Fig. 4.2
(a) The hyoid bone area, scanned once, with a scanner of optical density 3.3. Notice amount of random noise. The image has been manipulated by changing the gamma value, so that dark areas are enhanced. (b) The same area, produced after scanning four times and merging the results
4.2.3 Digital Radiography
Digital radiographic machines register the intensity of the radiation transmitted though the patient’s head by an electronic sensor and convert it directly to a digitised signal, thus eliminating the intermediate steps of developing a film and digitising it with a scanner. The sensor is a charge-coupled device (CCD). Most sensors have small dimensions and it is not possible to cover the whole area of interest. To solve this problem, the manufacturers use an array of sensors, arranged side by side. The array extends along the required width and is moved vertically during the exposure, in tandem with the x-ray source, to scan the whole head (horizontal scanning is also available). This method presents certain differences in comparison to the conventional approach:
1.
A longer exposure is needed, because of the movement of the source and sensor array. This requires the patient to remain still for a number of seconds (exposure times differ between machines) and may introduce errors due to movement of the head or changes in posture of the soft tissues, including the tongue and soft palate. Some systems are capable of acquiring a cephalometric digital image without scanning (“one shot”) and overcome the disadvantages of long exposure.
2.
Even though a longer exposure is used, total radiation exposure is reduced, due to higher sensitivity of the sensor array and the fact that only a thin stripe is radiated at any one time.
3.
Beam geometry may be different, resulting in a different magnification pattern. The conventional (non-digital) systems use a beam that diverges from a single point towards all directions, to produce a cone-shaped geometry. This results in symmetrical magnification of the exposed structures around the central beam. In contrast, some digital systems use a fan-shaped beam that scans the patient vertically (or horizontally) in a parallel fashion. Therefore, magnification is present only along the horizontal (or the vertical) axis [20]. This problem has been overcome in newer machines that incorporate rotational movement of the x-ray source, or movement of a slit diaphragm, thus producing comparable magnification to conventional systems.
Other digital systems use a hybrid method to acquire the image. A special phosphor storage plate (PSP), similar to a conventional film, is used to obtain the image, by means of conventional x-ray equipment. The plate is then inserted into a special scanner, and the captured image is converted to a digital file.
4.3 Advantages and Capabilities of Computer-Aided Cephalometrics
The advantages of using a computer for performing cephalometric measurements are so significant that probably no research is being conducted by manual methods any more. The obvious speed factor is especially important when a large number of diagnostic records need to be processed [21, 22]. Ease of use is also important, because it relieves the operator of fatigue. However, these are secondary benefits. Error control, a major problem in any investigation, is where computer-aided cephalometrics should focus. Reducing both random and systematic errors is not an easy task. Several methods are discussed below, but it should be noted that very limited data are available regarding their effectiveness. Most recommendations are based on logical deductions and assumptions, and further studies are needed for validation.
4.3.1 Error Control
Errors in cephalometric analysis have been extensively discussed in the orthodontic literature [1–8]. It is a common conclusion that error of point identification is the most significant source. Computers may help in reducing this error by the following methods:
Image Enhancement
Various image manipulations can be applied to make some areas more conspicuous and aid in visualisation. Contrast, brightness and gamma can be adjusted, and histogram techniques can be applied over the whole image or at specific areas [13], as shown in Fig. 4.3.
Fig. 4.3
Results of manipulation procedures: (a) original image, (b) adaptive histogram equalisation, (c) adaptive levels, (d) gamma adjustment, (e) colourisation and (f) edges
Multiple Digitisation
Multiple digitisation has been recommended as a method to reduce point identification error [2, 23]. Baumrind and Miller [23] reported that in order to reduce this error by half, each point should be digitised four times, and the average of the four attempts should be used as the location of the point. Although this may be excessive [4], even a double digitisation is not possible without a computer system. Cephalometric software allow multiple digitisation on screen (without showing the previous attempts, so as not to bias the user) and calculate the average position. The user can inspect the digitisations and delete outliers. Multiple digitisation may be more important in case reports than large-scale studies, where errors tend to average out [2].
Magnification of the Image and Precision Limitations
The scanned image can be magnified on-screen to almost any detail in order to facilitate point placement. The limiting factor here is the resolution at which the radiograph was scanned. As mentioned earlier, a resolution of 150 dpi will produce approximately 6 pixels per mm, which far exceeds the usual requirements of cephalometrics.
The precision with which points are located on-screen depends on a number of factors, such as scanning resolution, the zoom setting when digitising and the internal design of the software [15, 24]. The important thing to keep in mind is that the points are located using the mouse, so the movement of the mouse on screen is a major factor in determining the precision. For example, assume that a radiograph is displayed at approximately life size on a computer monitor. Assume a 15″ TFT monitor running at a resolution of 1,024 × 768 pixels with physical dimensions of 304 × 228 mm. The dimensions of a screen pixel are easily calculated as 0.297 × 0.297 mm. Since the mouse can only move from pixel to pixel on the screen, it becomes evident that it is not possible to digitise points with more precision than approximately one-third of a millimetre. If the radiograph is zoomed out to occupy less screen space, this value will worsen. If more detail is required, the software should allow zooming. Assume that the image is zoomed in so that 10 mm is now displayed at a size of 10 cm on screen. This should allow digitisation at an accuracy of 0.03 mm. However, two other factors come into play at this magnification. One is the resolution used during scanning. If this was relatively low, then the image pixels will be apparent, setting a limit to the effective precision; although we can place the mouse and digitise at sub-pixel positions of the image, there is no way to ensure that the digitised location is correct. The final limiting factor is the internal design of the software program, which may not allow unlimited precision.
A practical method to calculate the maximum precision under specific conditions is the following:
1.
Calculate the precision offered by the scanning procedure. This is equal to 25.4 divided by the resolution in dpi (1 in. is 25.4 mm). So a resolution of 150 will offer a maximum precision of approximately 0.17 mm.
2.
Calculate the precision offered by the screen and zoom factor. First, divide the physical width of the computer screen by the number of pixels to get the size of each pixel. Then adjust by the zoom value. For example, if the screen is 304 mm in width and is running at a resolution of 1,024 × 768 pixels, the pixel size is 0.297 mm. This is the maximum precision if the radiograph is viewed at life size. For double than life size, divide the number by 2 to get 0.148 mm. For ten times life size, the precision is 0.0297 mm.
3.
The final precision is the worse of the results calculated in steps 1 and 2 above. Check this with the data given by the software manufacturer, because the software itself may set limits, due to internal number representation or other design factors.
Automatic Point Location
One of the reasons that the error of point identification is high for points such as Gonion and Gnathion is that these points are located on curved osseous boundaries. The investigator has the task of locating the most extreme point along this boundary (e.g. the most inferior and posterior point, in the case of Gonion), not an easy task given the absence of anatomical markers. Geometrical constructions can be used as aids, but these may also introduce errors of their own. An alternative is to delegate the task to the computer. Software already exists that can assist in this respect. The user need only draw the outline of the boundary, and then the software automatically locates the points on this boundary following simple geometrical rules of point definition.
As an example, Fig. 4.4 shows the placement of points along the outline of the mandibular symphysis. The computer locates each point according to its definition; Pogonion is placed at the most anterior position, Menton at the most inferior, etc. The anteroposterior direction is defined by the Frankfurt horizontal plane, which has been digitised previously, thus circumventing errors caused by improper head orientation.
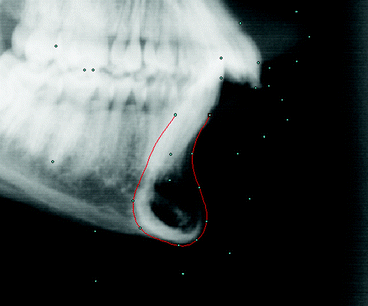
Fig. 4.4
Automatic placement of points at the mandibular symphysis. The user has drawn the outline of the symphysis (red line) and the computer automatically places each point (cyan dots) on this outline, according to predefined geometrical relationships. The Frankfurt horizontal plane (not shown) is used to establish the reference horizontal. Other digitised points are also shown
Automatic location of points on digitised outlines may remove some of the subjectivity, and therefore error, of point identification, but it may introduce a new source of error, that of tracing the outline. However, because the outline usually represents a well-defined brightness edge in the radiographic image, it is possible to use computer vision techniques to identify it. Edge-detection methods [13, 25] are among the first developed methods in computer vision, and, although not as reliable as one would like, they can be used to good effect. Such methods have only recently been introduced in cephalometric software, and their effectiveness in error reduction is beginning to be investigated [26].
4.3.2 Magnification Adjustment
A common problem with orthodontic research studies is that the cephalometric radiographs may have been acquired by different x-ray machines, each possessing a different magnification factor. Although angular measurements are not affected, linear measurements need to be rescaled to a common magnification for proper comparison. The aspect of different magnification between different machines is also important when assessing linear measurements of a patient in comparison to published standards. Correction to natural size is recommended, in order to avoid confusion and obtain valid results [27].
Differences of magnification present larger problems in superimpositioning. If the original and final cephalometric radiographs of a patient have been taken on machines with different magnification, it is not possible to superimpose them manually, unless one resorts to such creative measures as enlargement or reduction of the tracings by photocopying. The use of computers can help in this respect. All tracings can be rescaled to the same magnification (or to life size), thus enabling correct superimpositioning.
4.3.3 Structural Superimposition
Superimposition of radiographs on internal osseous structures is recommended for assessing treatment or growth changes [28]. This is not easy to accomplish manually because a lot of structures need to be traced and precision may be compromised. Computers allow direct superimpositioning of radiographic images using different colours for each (Fig. 4.5). When two structures align, the colours are blended together to produce a different colour. This facilitates the procedure significantly. Automated methods that aim to superimpose anatomical structures so that the optimum alignment is achieved are currently in the experimental stage.
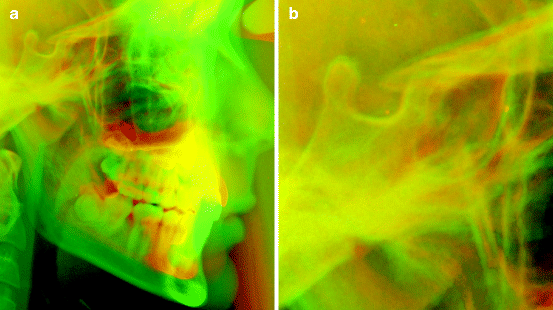
Fig. 4.5
(a) Structural superimposition of before and after radiographs on anterior cranial base. The radiographs have been colourised to red and green; aligning structures are yellow. (b) Detail of the sella area
4.3.4 Morphometrics
The field of morphometrics [29–32] is relative new in biology and has only recently been applied to orthodontics [33–38]. Morphometrics aims to overcome some of the fundamental problems of conventional cephalometrics [39], such as the problem of separating size from shape, selecting an appropriate superimposition scheme and interpreting the results of the measurements. Morphometric methods require extensive calculations that are not feasible without computer assistance. Cephalometric software are now available that can perform Procrustes superimposition and calculate principal component analysis and other morphometric procedures. Detailed explanation of such methods is beyond the scope of this chapter.
4.3.5 Warping of Images
Computer graphics have advanced to the point that it is now easy to modify images by deforming them and blending them in a controlled manner to create realistic pictures of objects that do not exist. Such effects have been applied successfully in the movie industry and have also found application in orthodontics. Two terms are coined for such procedures [40, 41], but they are sometimes used interchangeably in the literature: “Warping” refers to the deformation of a single image, and “morphing” refers to the deformation of two images and the creation of a new image by blending the two warped images together. Morphing can be used to generate smooth transformations from one image to another and is most often used for the creation of animated sequences [41]. In orthodontics, such movies are used to show simulations of treatment, by depicting a smooth transition from the initial photograph of a case to the final result (Fig. 4.6). The impact to a prospective patient is significant, because treatment procedures can be explained and presented in a highly visual manner.
Fig. 4.6
Series of images used for the creation of a morphing movie that shows a simulation of orthodontic treatment. The only real images are the initial (a) and final (e) ones. Image (b) was created from (a) by digitally deleting the premolars. Intermediate images (c, d) were constructed by morphing between images (b, e)
The technique of warping is used for creating photorealistic treatment predictions of the patient’s face. Instead of drawing a prediction tracing from a lateral cephalogram to show how the facial profile may look after a surgical procedure, it is now possible to use the pretreatment profile photograph of the patient as the starting point. The photograph is warped (deformed) so that the facial outline takes the shape of the predicted outline. Various mathematical procedures exist for such deformations [42, 43]. The result has been found to enhance patient–doctor communication [44], but the diagnostic value is debatable, due to the following reasons:
1.
The warped image is based on the cephalometric prediction of the facial outline. Thus, the final result is no more accurate than the cephalometric tracing.
2.
The warped image is based on the initial pretreatment photograph. The photograph is warped so that the facial outline changes shape and becomes the same shape as the tracing prediction. In this process, the remainder of the face is also deformed, not according to any biological model, but based on mathematical algorithms. This deformation will not reflect the true changes that are produced by treatment, even if the final facial outline has been accurately predicted. Orthodontic and surgical treatments have effects on the lateral aspects of the face (cheeks, nose, mandibular outline, etc.) that cannot be predicted by this method.
In addition to clinical applications, warping and morphing have found increasing use in research [45–50]. Until recently, studies on facial attractiveness and investigations on facial symmetry, facial shape and skin texture have been limited, because they were conducted using drawings or silhouettes, and the investigation of the subtle effects of the many confounding variables was not possible. The computer opens up a large array of possibilities, enabling us, in an experimental setting, to control, manipulate and test each parameter individually. Starting from an original photograph, we can deform it or blend in other photographs and thus change the texture of the skin, the shape of the facial outline (in profile and frontal view), the shape of the internal facial components (e.g. the shape of the eyes, the mouth or the nose), the configurational arrangement of the internal components, their colours, the hair style and a number of other features [51]. This process leads to the creation of novel photorealistic faces that can be used for testing purposes or for education (Fig. 4.7). This is a young area of research but it is growing rapidly, because the questions addressed are not limited to orthodontics but extend to aesthetics, plastic surgery, facial perception and other fields.
Fig. 4.7
(a) Average face created by merging the warped photographs of 20 patients. Photographs were warped to a common shape before merging so that corresponding facial features would superimpose closely. Warping was not applied to the hair area, and area is blurred. Average faces have been found to be highly attractive, when compared to the original faces from which they were created. (b) Virtual face created from a composite of face parts taken from four subjects. (c) Colourised areas show the parts that were taken from other subjects and merged with the underlying face. The left eye is identical to the right eye but flipped
4.4 Three-Dimensional Records
Although cephalometric radiographs are the main research source in orthodontics, other diagnostic records can be assessed in a similar manner. Facial photographs, photographs of dental casts, other radiographs (e.g. panoramics, hand/wrist) and animal records – anything that can be entered into the computer as an image – can be measured and analysed.
Three-dimensional records are utilised in increasing frequency, driven by advances in computer hardware and software and by the recognition that two-dimensional records are inherently limited in their ability to document the 3D craniofacial structures and the dentition. Since the beginning of orthodontics, the only 3D orthodontic records have been the study casts. The ideal goal in orthodontic diagnosis would be to replace all two-dimensional records (cephalometric and panoramic radiographs, facial and intraoral photographs) with three-dimensional ones. The diagnostic procedure and treatment planning (measurements and treatment prediction) would take place directly on the 3D records, thus circumventing many of the current limitations. Orthodontic 3D records aim at acquiring the geometry of three different parts of the craniofacial complex: the skeletal structures, the soft tissue surface of the face and the dentition. These components present different problems regarding methods of acquisition, because of differences in their material nature and the required accuracy.
4.4.1 Skeletal Structures
Acquisition of the 3D geometry of the craniofacial skeleton has been a mainstream application for several years now. The evolution of CT scanners and related software has enabled detailed imaging of the skeleton, but orthodontic applications have been limited to complex craniofacial problems that are seldom encountered in mainstream clinical practice. The main problems of CT scanning are the cost of the procedure and radiation exposure.
Radiation
Radiation risk is commonly assessed by the “effective dose”. The effective dose is the sum of the doses to each organ exposed to the radiation, weighted by a coefficient, which represents the organ’s sensitivity to radiation exposure. Organs such as the gonad and bone marrow have high weighting factors, whereas skin and neural tissue have low weighting factors. The unit of effective dose is the Sievert (Sv). For dental applications, where dose is low, the mSv (1,000 mSv = 1 Sv) and the μSv (1,000 μSv = 1 mSv) are used.
Due to exposure to natural radiation (from the earth minerals, from cosmic radiation, and from radiation within the human body), it is estimated that an individual receives about 3,000 μSv/year. A typical conventional CT scan of the whole head will incur an effective dose of about 2,000 μSv, which is equivalent to 8–12 months of background radiation. In comparison, a cephalometric radiograph entails a dose of about 5 μSv, and a panoramic gives approximately 25 μSv [52–56]. These values show that dental radiography involves low radiation exposure, but incorporation of 3D CT records as a routine orthodontic procedure would increase the dose substantially [57]. Cone-beam computed tomography (CBCT) results in a wide range of effective dosage to the patient, depending on the machine and the parameters of the examination, including field of view size and image resolution. Typical dosage ranges from 70 to 370 μSv [58]. Guidelines for CBCT imaging in dentistry have been established by national societies and a European initiative [59, 60].
Accuracy
The diagnostic value of 3D records is directly related to their validity and precision. The validity of CBCT records has been reported in a number of investigations, by comparing measurements taken from the 3D reconstructions of skulls or cadaver heads with direct measurements using callipers or 3D digitisers [61–70]. It is generally accepted that CBCT measurements are valid and accurate, but the threshold used for 3D reconstruction and demarcation of tissues may be a significant factor that needs attention.
The choice of the threshold for reconstruction and measurement is difficult because tissues may appear more or less dense than expected, depending on the area being examined and the effect of artefacts. Among the most significant artefacts in CBCT imaging are noise, the partial object effect and the partial volume averaging effect [71, 72]. Noise is present due to reduced x-ray energy, purposely set low on CBCT machines in order to reduce patient exposure. The partial object effect arises because the field of view is smaller than the object under investigation; the parts of the patient’s head that lie outside the field of view may significantly alter the density of the voxels, causing inconsistencies between tissue density and voxel density. These inconsistencies do not allow a reliable correspondence between voxel density and Hounsfield values and thus do not allow reliable differentiation between tissues, based solely on voxel values [73–75]. The partial volume averaging effect is evident when the voxels are large relative to the size of the object under investigation, resulting in multiple tissues occupying the space of a single voxel. In such cases, the value of the voxel will represent the average of the multiple tissues, giving a false impression of the voxel’s composition.
From the above it is evident that a global threshold for tissue segmentation and measurement may not be appropriate [76]. Especially prone to systematic errors are thin structures, such as the alveolar covering of incisor roots. Due to reduced resolution of CBCT images [77], alveolar bone is consistently underestimated and dehiscences and fenestrations are significantly overestimated [78–81]. However, high-contrast globular structures, such as teeth, also show errors in measurement which may exceed 1 mm, even if images are taken under ideal conditions, mainly because of the inconsistency of voxel values due to the artefacts mentioned above [82].
Reliability of CBCT measurements is also a significant concern. As with conventional 2D cephalograms, point identification seems to be one of the largest sources of error. CBCT images, due to their 3D nature, present new challenges to the user, as multiple views of the dataset may be needed in order to identify a landmark, including 3D reconstructions and sections through the volume. Some points may even require new definitions; for example, the external auditory canal extends in depth and follows an oblique path, so Porion’s traditional 2D definition needs updating [83]. Such difficulties reflect on repeatability; errors of measurement may exceed several degrees or mm, casting doubt on the capability of 3D measurements to reveal small treatment changes [84].
4.4.2 Soft Tissues
The geometry of the facial surface may be acquired from MRI or CT data if such data are available, but less invasive and costly methods that provide more accuracy and detail are recommended. Several techniques have been investigated, including laser scanning, structured lighting and photogrammetry [85, 86] (Fig. 4.8).
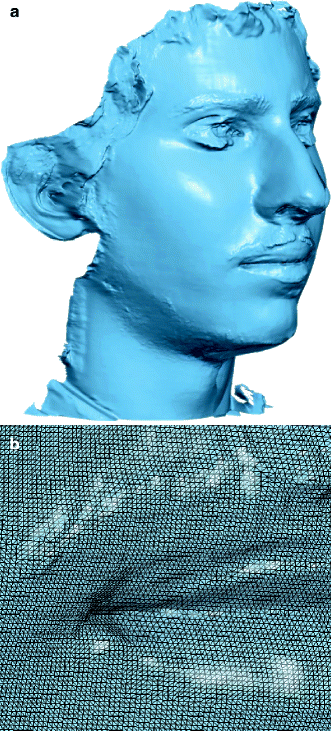
Fig. 4.8
(a) Facial surface as acquired by passive photogrammetry. (b) Detail of the corner of the mouth, showing size of triangular elements that constitute the surface
Laser Scanning
Laser scanning for 3D measurement and analysis of facial shape were introduced in orthodontics by the group of Moss in England [87–90]. Laser scanning of the head involves projecting a stripe of laser light and registering the shape of the stripe as it reflects from the three-dimensional surface. The stripe is usually projected as a vertical line and rotated around the face so that it scans the head from one side to the other. Scanning can be performed by movement of the laser and camera assembly or by rotation of the patient seated on a motorised chair. Typical scans of the face may take 10–20 s. Other manufacturers use a horizontal laser stripe that scans the head vertically. This system is much faster than the rotational scan (less than 1 s) but requires multiple shots to acquire the whole face.
Structured Lighting
Structured lighting methods do not use a single laser stripe but project a complex light pattern over the whole object and acquire the 3D information from a single image. The main advantage of this method is the reduced exposure time, making it possible to register dynamic movements and facial expressions.
Stay updated, free dental videos. Join our Telegram channel
VIDEdental - Online dental courses


