The following case studies provide insight into the integration of the principles set forward in the preceding article. Each case is evaluated first on the endorestorative principles that form the basis of the modern endo-endorestorative–prosthodontic continuum. Case 1 is provided by Dr Clark, and cases 2 to 6 are provided by Dr Khademi.
The following case studies provide insight into the integration of the principles set forward in the preceding article. Each case is evaluated first on the endorestorative principles that form the basis of the modern endo-endorestorative–prosthodontic continuum. Endorestorative needs should, whenever possible, trump previous notions of endodontic needs.
Case 1 is provided by Dr Clark, and cases 2 to 6 are provided by Dr Khademi. Dr Clark’s provides a stark contrast between the old and new models of endodontic access and shaping. Dr Clark then risks avoiding postplacement but also avoids the mutilating effects of a full crown by instead providing a minimally invasive restorative technique using direct composite to permanently splint the tooth for ideal function.
Case 2 shows the possibilities in a maxillary molar when an emphasis is made on banking of coronal and pericervical dentin (PCD). The conscientious preservation of tooth structure during access and endodontic shaping allows a second, and possibly third, prosthesis (crown) during the patient’s lifetime.
Case 3 is an ideal study of the realities of day to day endodontic access. This thought provoking access teaches that the authors are not accessing a crown, but accessing the root through the crown. This tipped and rotated maxillary molar; is also mutilated and coronally altered with a PFM crown creating a mirage that could easily lead to gouging and even perforation unless the operator follows the disciplined approach outlined in the text.
Case 4 is an access through another PFM crown. The importance of proper accessing through full crowns should not be underestimated, as the pulpal death rate from a full crown procedure has been documented in some studies to be well over 20%. This maxillary first molar demonstrates 6 canal systems, three in the mesio-buccal root alone. The aggressive lateral removal of PCD to access the MB-2 canal system is the only such example shown in the chapter, and is warranted because the enormous amount of dentin present in this unique zone and the dangers associated with the extremely high curve of the MB-2.
Case 5 is a hallmark of both non traditional and carefully individualized access. It is the best example of capitulation to the hierarchy of tooth needs of all the cases presented in the chapter.
Case 6 demonstrates the futility of the round bur in endodontic access. The roof of the calcified lower molar chamber is sawed off and broken loose with a tapering diamond or carbide followed by a prying excavator, not blindly and clumsily burrowed into with a round bur.
The reader is encouraged to visit and revisit these cases to fully absorb the anatomic and restorative techniques that are simultaneously presented in this very unique method of case presentation.
Case 1: the nonmutilated lower first molar to receive a direct composite onlay
The preoperative bitewing ( Fig. 1 A) depicts what seems to be a very shallow and minimally invasive class I composite, but the periapical radiograph reveals periapical infections, indicating that the pulp must have been exposed at the time of treatment. Fig. 1 B shows a low-magnification view of the occlusal surface of tooth No. 30. Fig. 1 C is a high-magnification view (×8) of the occlusal surface. The composite restoration seems to be minimally invasive and relatively well sealed. Fig. 1 D shows that as a saucer-shaped cut is made to explore the composite restoration and to begin endodontic access, the bur is angled at 45° instead of being parallel to the long axis of the tooth. There was a lack of bond and carious invasion along the wall of the composite restoration. This is an extremely common problem for the parallel-sided composite preparations of today. Previously exposed mesiolingual (ML) pulp horn is highlighted with red arrow.
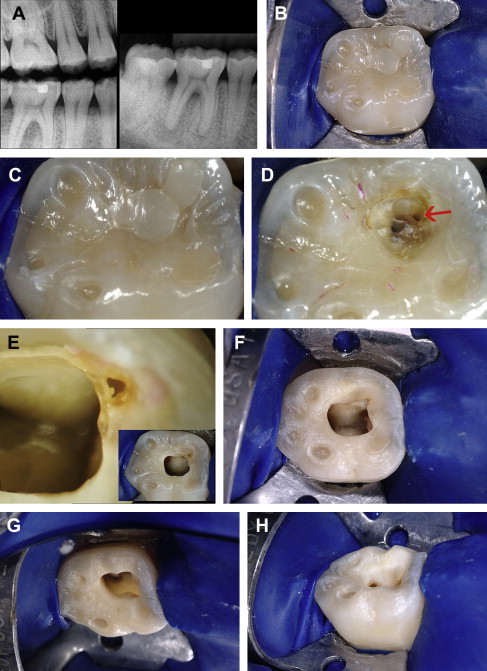
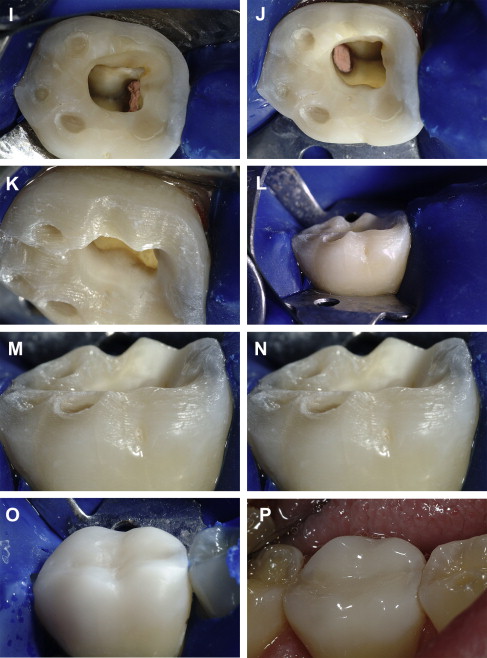
Fig. 1 E shows a ×24 magnification view, revealing that there is no such thing as a small pulp exposure. The pulp chamber is now accessed by leveraging into the chamber through the filling and caries base of operation. A small sacrifice of additional enamel with a 45° enamel wall would have allowed an ideal restorative seal and could have aided the clinician to avoid burrowing into and subsequently failing to recognize the pulp horn. Similarly, a 45° opening through the enamel for endodontic access allows better visualization, better enamel engagement, improved C factor, and improved ability to splint the tooth with direct composite. Fig. 1 F–J were captured with a traditional flash (as opposed to coaxial microscopic light) to demonstrate the good access and lighting that is possible when delicate flattening and a 45° initial penetration is performed. In spite of what initially seems to be an insufficient cervical enlargement of the chamber, the cavosurface preparation allows reasonable endodontic access and light while maintaining generous cervical dentin.
Multiple angles of the anatomic shortening of the corona of the tooth are shown in Fig. 1 K, L. As discussed later, it is of utmost importance to retain large islands of enamel on the occlusal of the molar tooth to avoid overreliance on dentin bonding to retain the bonded onlay. A clearance range of 1 to 2 mm is adequate for proper strength of modern microfilled composites. The rough polish of the composite onlay is demonstrated in Fig. 1 O. Fig. 1 P, Q shows the final polish after occlusal adjustment. Dr Clark is confident that the patient would enjoy a 10- to 20-year service from the restoration. It is the least invasive of all of the options required to splint the endodontically treated molar.
Three differently angled radiographs of the finished cusp tip-to-apex endodontic treatment are shown in Fig. 1 R. Fig. 1 S shows the first angled radiograph. The green arrow marks the 1.25-mm cuspal coverage, whereas the yellow arrow marks the soffit of dentin that was maintained and the filled pulp horn. The blue arrow marks the 45° cut through the enamel, and the large red arrow marks the mesialized access angle, which is situationally correct because the caries and filling material were encountered in the mesial portion of the tooth—a perfect example of the filling- and caries-leveraged access.
Fig. 1 T shows the second angled radiograph with the yellow arrow marking the mesial soffit. After a 6-week calcium hydroxide treatment, there was an improvement (decrease) in the size of the radiographic lesions, especially the distal ones. The series of photographs, Fig. 1 A–Q, shows an ideal bucco-occlusal-lingual composite onlay preparation, composite placement, matte finish, and final finish after occlusion was adjusted.
The chamber was carefully layered with flowable composite (Filtek Supreme Flow A-1; 3M, St Paul, MN, USA), mitigating the difficult C-factor problems by allowing the layers (2-mm increments) to touch only 1 or 2 cavity walls and never all the 4 walls at once. The cusps were built carefully with paste composite (Filtek Supreme Plus A-1 body [3M] was used with patient consent to show contrast for the photographs for a bright result) to avoid cross tooth contact during photo-polymerization of the composite. The distobuccal (DB) and distal cusps were built together with the ML cusp then photo polymerized. Then the distolingual (DL) cusp was built with the mesiobuccal (MB) cusp then photo polymerized. Although a discussion of restoratives is beyond the scope of this article, the modern version of endodontic access is constantly mindful of the restorative needs of the tooth, and that is why this brief synopsis on the composite onlay is included, to demonstrate how the ideal access leads to the ideal restoration.
Case 2
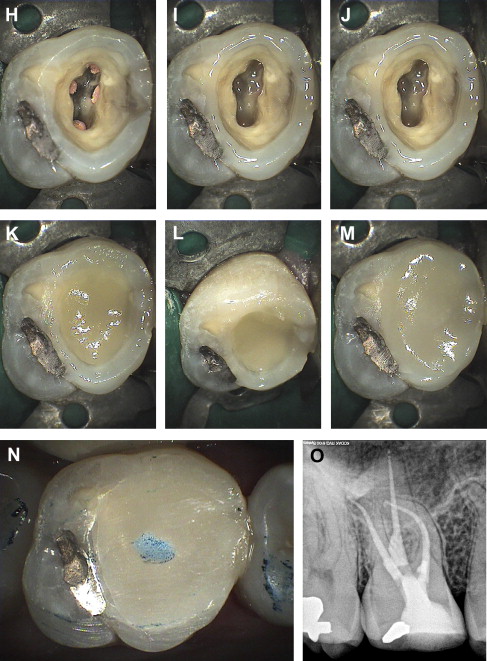
This case demonstrates the access and restorative technique for an upper molar deemed suitable for final restoration with a bonded porcelain onlay or a composite onlay ( Fig. 2 A, B). The initial presentation of the case was a somewhat calcified molar with some slight cracking and ditching of the enamel, coincident with the natural anatomic grooves. The cusps were flattened 2 mm with wheel diamond, and the central groove area was slightly flattened. This was planned to be a 2-step procedure, which presents temporization issues if a 45° initial penetration is made, because nonbonded materials generally need to be at a 90° angle. Thus, the calla lily–shaped portion of the access is delayed until the final restorative is placed. After removing the amalgam, a residual pulp horn is noted at the MB ( Fig. 2 C). The chamber is troughed out as previously described, using Clark/Khademi (CK) burs (SS White burs Inc, NJ, USA) or ultrasonics, and 3 initial point of negotiations (PONs) are located, and an initial trough for the MB2 is made using a CK bur ( Fig. 2 D). If the opening permits, the notching for access to the MB2 can be reduced, or as in this case, nearly eliminated ( Fig. 2 E). Calcium hydroxide is placed, Cavit (3M, St Paul, MN, USA) is placed deeply with no sponge or cotton pellet, and 2–3-mm unbonded flowable composite veneer is placed over the Cavit ( Fig. 2 F). At the second visit, the procedure is completed, the chamber is cleaned up, and the calla lily portion of the access is completed ( Fig. 2 G). Separate dentin- and enamel-bonding steps are then performed ( Fig. 2 H). A small amount of flowable composite is placed over the gutta-percha and worked into the enamel periphery and cured ( Fig. 2 I). PhotoCore (Kuraray America, Inc, New York, NY, USA) is placed in the cervical portion of the access and cured ( Fig. 2 J). A second increment of PhotoCore is placed with the objective of creating a nearly C-factor–1 bowl for the final increment of PhotoCore ( Fig. 2 K); Fig. 2 L shows a different view of the bowl configuration of the final increment of PhotoCore. The final increment of PhotoCore is placed and brushed to the enamel periphery ( Fig. 2 M). Occlusion is adjusted to completely eliminate any excursive contacts. Ideal occlusion in this type of case is a light single centric stop on restorative ( Fig. 2 N). The final radiograph shows a narrow “waist” to the access, which constricts from the level of the alveolar crest until it steps out to where the original amalgam was and then reflares again for maximal enamel engagement at the cavosurface ( Fig. 2 O). The flattening and the calla lily cavosurface have made this tooth safer than in the traditional methods; however, it is not safe until the cusps are physically onlayed with restorative material.
Case 2
This case demonstrates the access and restorative technique for an upper molar deemed suitable for final restoration with a bonded porcelain onlay or a composite onlay ( Fig. 2 A, B). The initial presentation of the case was a somewhat calcified molar with some slight cracking and ditching of the enamel, coincident with the natural anatomic grooves. The cusps were flattened 2 mm with wheel diamond, and the central groove area was slightly flattened. This was planned to be a 2-step procedure, which presents temporization issues if a 45° initial penetration is made, because nonbonded materials generally need to be at a 90° angle. Thus, the calla lily–shaped portion of the access is delayed until the final restorative is placed. After removing the amalgam, a residual pulp horn is noted at the MB ( Fig. 2 C). The chamber is troughed out as previously described, using Clark/Khademi (CK) burs (SS White burs Inc, NJ, USA) or ultrasonics, and 3 initial point of negotiations (PONs) are located, and an initial trough for the MB2 is made using a CK bur ( Fig. 2 D). If the opening permits, the notching for access to the MB2 can be reduced, or as in this case, nearly eliminated ( Fig. 2 E). Calcium hydroxide is placed, Cavit (3M, St Paul, MN, USA) is placed deeply with no sponge or cotton pellet, and 2–3-mm unbonded flowable composite veneer is placed over the Cavit ( Fig. 2 F). At the second visit, the procedure is completed, the chamber is cleaned up, and the calla lily portion of the access is completed ( Fig. 2 G). Separate dentin- and enamel-bonding steps are then performed ( Fig. 2 H). A small amount of flowable composite is placed over the gutta-percha and worked into the enamel periphery and cured ( Fig. 2 I). PhotoCore (Kuraray America, Inc, New York, NY, USA) is placed in the cervical portion of the access and cured ( Fig. 2 J). A second increment of PhotoCore is placed with the objective of creating a nearly C-factor–1 bowl for the final increment of PhotoCore ( Fig. 2 K); Fig. 2 L shows a different view of the bowl configuration of the final increment of PhotoCore. The final increment of PhotoCore is placed and brushed to the enamel periphery ( Fig. 2 M). Occlusion is adjusted to completely eliminate any excursive contacts. Ideal occlusion in this type of case is a light single centric stop on restorative ( Fig. 2 N). The final radiograph shows a narrow “waist” to the access, which constricts from the level of the alveolar crest until it steps out to where the original amalgam was and then reflares again for maximal enamel engagement at the cavosurface ( Fig. 2 O). The flattening and the calla lily cavosurface have made this tooth safer than in the traditional methods; however, it is not safe until the cusps are physically onlayed with restorative material.


