Fig. 5.1
a-d. Adhesive dentistry requires adhesion-receptive tooth surfaces. On the whole, burs remain the standard preparation tools; however, alternatives for dental burs have recently gained attention. Every cavity preparation technique has its own advantages and disadvantages
In the first section, the smear layer in general and its properties are discussed. The following sections deal with various forms of smear layers according to the cavity-preparation technique employed.
Smear Layer
Most commonly, the tooth surface to which the bond will occur is covered with a smear layer. A smear layer is an adherent layer of debris on tooth surfaces when they are cut with rotary or hand instruments [23]. After bur preparation of a cavity, the cavity walls are covered with a smear layer. Endodontic preparation of a root canal, either by rotary or hand instruments, or extensive root planing as periodontal treatment [24], also produce a smear layer in the root canal or on the root surface, respectively. For research purposes, a smear layer is often created in the standard way by grinding the tooth surface with silicon carbide paper.
The smear layer is revealed by scanning electron microscopy (SEM) as a 1- to 2-µm layer of debris with a mainly granular substructure that entirely covers the dentin (Fig. 5.2) [25]. Looking on top of the smear layer, its appearance is generally amorphous, but after sonication, a structure partially composed of aggregates of globular subunits of approximately 0.05-0.1 µm in diameter is exposed [25]. The orifices of the dentin tubules are obstructed by debris tags, called smear plugs, which may extend into the tubule to a depth of 1-10 µm [25, 26]. These smear plugs are contiguous with the smear layer.
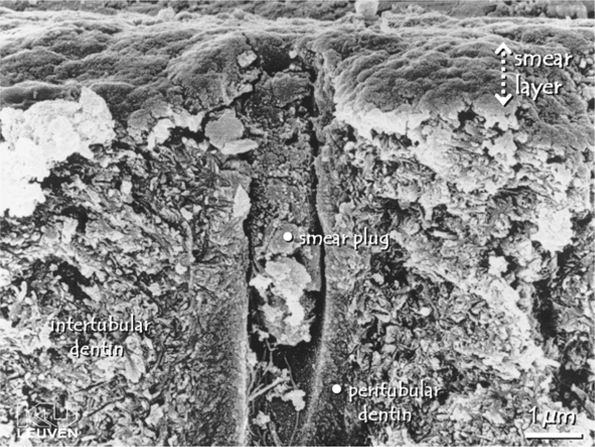
Fig. 5.2.
Field-emission scanning electron microscopy photomicrograph a lateral dentin section. The dentin surface has been prepared by wet grinding. A smear layer of approximately 1 µm covers the entire dentin surface, and a smear plug, extending several micrometers into the dentin tubule, occludes the tubule’s orifice. The smear layer is an aggregate of mainly fragmented and compacted tooth material and debris. At the surface, the smear layer’s appearance is amorphous. (From PhD thesis of J. Perdigão, Katholieke Universiteit, Leuven, 1995)
The thickness and morphology of the smear layer probably varies with the method used for producing the smear layer and with the location within dentin in relation to the pulp. Tani and Finger [27] have examined light-microscopically smear layers generated by diamond burs with different grain size and by silicon carbide (SiC) papers with varying grit numbers. They concluded that the smear layer’s thickness increases with increasing roughness of the diamond bur or SiC paper. A regular grit bur with a grain size of 100 µm (ISO number 806314141504014), often used in clinical cavity preparations, creates a smear layer of 2.2 ± 0.5 µm.
Due to its small and varying dimensions, and irregular and weak structure, studying the smear layer is complicated. The composition of the smear layer has not yet been well defined, but it presumably reflects the composition of the underlying dentin from which it is produced [25]. This was confirmed by Ruse and Smith [28] who used X-ray photo-electron microscopy to examine instrumented dentin. While cutting dentin, the heat and shear forces produced by the rotary movement of the bur cause dentin debris to compact and aggregate. The smear layer is believed to consist of shattered and crushed hydroxyapatite, as well as fragmented and denatured collagen.
In clinical conditions a smear layer may also be contaminated by bacteria and saliva [29 – 31]. Another disadvantage of a smear layer covering the bonding surface is its inherently weak bond to the underlying dentin [32] and its brittle nature [33]. Early smear-layer incorporating non-acidic adhesives, applied without prior etching, did not penetrate deeply enough to establish a bond with intact dentin. Such bonds were prone to cohesive failure of the smear layer [26, 34].
There are basically two options to overcome low bond strengths due to the limited strength of the smear layer, i.e. removal of the smear layer prior to bonding, or the use of bonding agents that can penetrate beyond the smear layer while incorporating it [35]. Both techniques have been proven successful [36]. Removal of the smear layer, however, increases the permeability of the dentin tubules radically, thereby permitting fluid flow from outside the pulp chamber, and vice versa. Pashley [37] suggested a mainly outward fluid flow under pulpal pressure of 20-70 cm/H2O. When dentin is covered with an iatrogenically produced smear layer, and the dentin tubules are occluded with smear plugs, fluid permeability is almost reduced to zero [26]. After removal of the smear layer by an acid, dentin permeability through the dentin tubules increases by more than 90 % [38 – 40]. It was feared that removal of the smear layer and subsequent wetting of the dentin surface would affect bond strength between dentin and composite, as the dentinal fluid would dilute primer and bonding agents [41] and as water contamination of bonding was known to lower the bond strength [42]; however, several contemporary systems can cope with augmented fluid permeability of dentin after smear layer removal, and a high and durable bond strength can be achieved [43]. As the main mechanism of tooth sensitivity is based on hydro-dynamic fluid movement, treatment of tooth surfaces to remove the smear layer can induce tooth sensitivity in vivo [33, 44]. It has been suggested that adhesive techniques that require smear-layer removal are associated more with post-operative sensitivity than systems that leave the smear layer in situ [33, 44 – 46]. Open dentin tubuli may also permit access of bacteria towards the pulp and irritation of the pulp by toxic chemicals such as acids. Although it has been shown that the bonding procedure may cause transient pulpal inflammation, certainly in deep cavities, a continuous bacterial irritation due to microgaps and microleakage is more likely to cause damage to the pulp and post-operative pain [47]. Advantages and disadvantages of removing the smear layer were discussed by Pashley [33]. The first adhesives achieving clinically acceptable results were based on smear layer removal (etch-and-rinse adhesives), but recently new smear-layer incorporating adhesives (self-etch adhesives) have regained popularity [36].
Complete or partial removal of the smear layer can be achieved by applying acidic or chelating solutions called dentin conditioners. In research conditions, sonication has also been used [25]. The more acidic and aggressive the conditioner, the more completely the smear layer and smear plugs will be removed [26, 48]. Strong acids do not only remove the smear layer; they also demineralize intact dentin along with removal of smear plugs to a depth of 1-5 µm, while widening the dentin tubule orifices (Fig. 5.3). Contemporary etch-and-rinse adhesives usually use a phosphoric acid gel of 30-40 % for the conditioning step. Tested alternatives are maleic acid, nitric acid, citric acid, and tannic acid in varying concentrations. A polyalkenoic acid conditioner used in glass ionomer restorative techniques also provides clean dentin surfaces, although without substantial dentin demineralization [49] and without rendering dentin tubules patent (Fig. 5.4) [50]. Whereas NaOCl is applied to remove organic remnants and bacteria in root canals, chelating agents are widely used in endodontics to remove smear debris produced during the canal preparation. Most commonly, a neutral solution of ethylene diamine tetra-acetic acid is used for removing the smear layer in the root canal [51, 52]. Researchers have been aware for a long time of the presence of a smear layer, and a consensus exists on the fact that the smear layer should be simulated in in vitro research on adhesives. For practical reasons, a smear layer is often prepared by grinding a tooth with a SiC paper. Very often, a SiC paper of 600 grit is applied; however, Tani and Finger [27] demonstrated that the thickness of a smear layer produced by 600-grit SiC is not comparable to that of a smear layer produced with a regular grit bur with a grain size of 100 µm, often used in clinical situations. Sandpapers of 600 sandpapers create thin smear layers (1.2 µm), whereas SiC paper of 180-240 grit is more appropriate to simulate a coarse and clinically relevant smear layer. Koibuchi et al. [53] showed how the use of 600-grit paper could lead to overestimated bond strength when using a self-etch adhesive. Moreover, Tagami indicated a difference in acid resistance between a smear layer produced by bur or by SiC paper grinding [40]. Van Meerbeek et al. [16] demonstrated that dentin surfaces prepared by bur or by wet sanding with SiC paper differ; therefore, it is concluded that a smear layer on dentin intended for in vitro research is best created by a diamond bur.
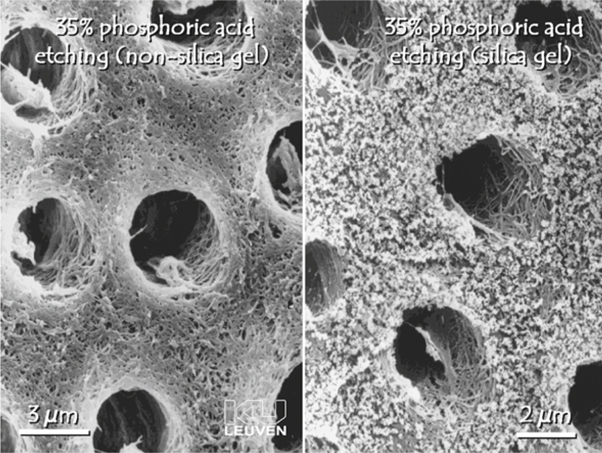
Fig. 5.3.
Field-emission scanning electron microscopy photomicrograph of dentin etched with 35 % phosphoric acid. Along with removal of the smear layer and smear plugs, the dentin tubules are widened and a porous network of collagen fibrils is exposed. Note the incomplete removal of silica in the right image, despite thorough rinsing. (From PhD thesis of J. Perdigão, Katholieke Universiteit, Leuven, 1995)
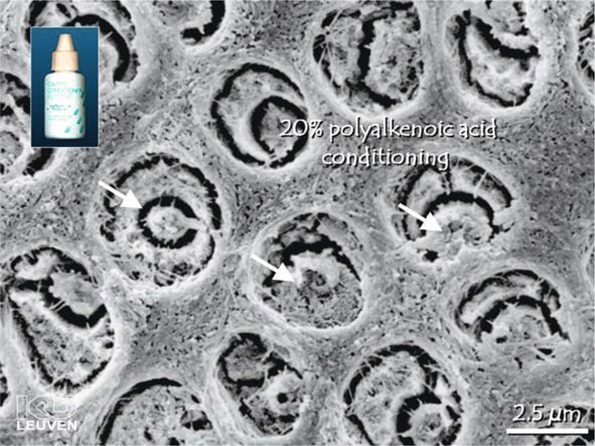
Fig. 5.4.
Field-emission scanning electron microscopy photomicrograph of a dentin surface conditioned with 20 % polyalkenoic acid. This weak acid has removed the smear layer but has not opened the tubules completely (arrows)
Sono-Abrasion
Recently, sono-abrasion (SonicSys, Germany, KaVo; PiezzonMaster 400, Switzerland, EMS) has been introduced as an alternative for preparing minimally invasive cavities (Fig. 5.5). This technique is based on the removal of tooth material by an air-driven hand piece equipped with a diamond-coated working tip that removes tooth material by ultrasonic kinetic energy. Different sizes and shapes of diamond tips have been designed, enabling easy access to occlusal and approximal tooth lesions. As these tips are coated only on one side, additional damage and trauma of the approximal side of adjacent teeth is prevented [54, 55].
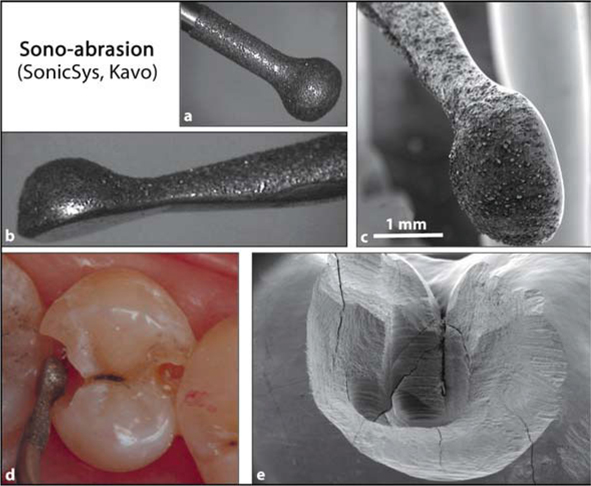
Fig. 5.5.
a, b Diamond-coated tip of the SonicSys system (Kavo). Only one side is coated with diamonds, so as to prevent damage to adjacent teeth. The constricted shape of the tip enables easy access in small occlusal and approximal cavities. c Field-emission scanning electron microscopy photomicrograph of the same tip. d Clinical situation of two class-II cavities. Sonoabrasion can be used for beveling the cavity margins, thereby improving the marginal adaptation of a composite filling. e Field-emission scanning electron microscopy photomicrograph of small class-II cavity entirely prepared by sono-abrasion
Considering the semi-rotary movement of the tip, the very high frequency of oscillations of the tip and the subsequently produced heat, dentin exposed by sono-abrasion can also be assumed to be covered by a smear layer (Fig. 5.6). Although few studies have been published, research has pointed out that sonoabraded tooth surfaces are indeed very similar to bur-cut dentin. Van Meerbeek et al. [16] found that sono-abrasion resulted in enamel and dentin surfaces equally receptive towards bonding as compared with bur-cut surfaces; however, they also found that a three-step etch-and-rinse adhesive (Optibond FL; Kerr) with omission of the acid-conditioning phase obtains higher bond strengths when bonded to sono-abraded dentin than to bur-cut dentin. This was explained by the relatively high acidity of the primer of Optibond FL (pH = 1.78), which thus acts as a self-etch adhesive, and by the fact that sono-abrasion presumably produces rather thin smear layers. Pioch et al. [56] investigated the interface of an etch-and-rinse adhesive with confocal laser scanning microscopy and did not see any difference between bur-prepared or sono-abraded dentin of primary teeth. Opdam et al. [54] reported equal microleakage in class-II cavities prepared by bur or SonicSys, respectively. Their study was confirmed by the findings of Setien [57].
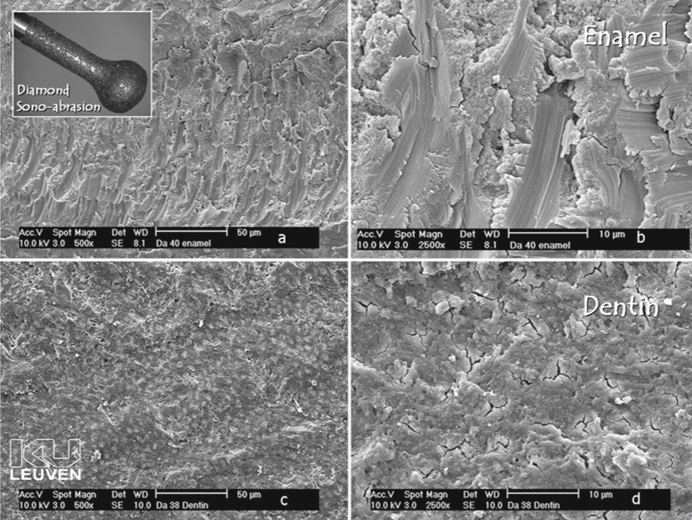
Fig. 5.6a-d.
Field-emission scanning electron microscopy photomicrographs of enamel and dentin surfaces prepared with diamond sono-abrasion. Note the coarse scratches in enamel. Dentin is covered with a relatively thin smear layer and the tubules are occluded by smear plugs
In conclusion, sono-abrasion should be regarded as a good complement to rotary instruments for cavity preparation, the main advantages being less damage to adjacent teeth and minimally invasive cavities. A sono-abraded dentin surface is also covered by a thin smear layer.
Air Abrasion
Air abrasion is a relatively old technique that only recently has regained attention. Basically, this technique can be regarded as a small version of sandblasting, which has many applications in common procedure. This technique is already widely used by prosthodontists and dental technicians, for purposes such as increasing surface roughness and enhancing adhesion. Air abrasion is specifically designed for abrading tooth material. The major benefit of this technique is that kinetic energy generated by a high-velocity stream of aluminum oxide particles can be utilized to prepare hard tooth tissues while having little effect on soft materials such as gingival tissues. In addition, this abrasive technique increases patient comfort by reducing heat, vibration, and noise, as commonly experienced during mechanical preparation of teeth when rotating burs are used [16, 58]. The main disadvantages of this technique are in the problems involving removal of the dust particles.
When applied on dentin, air abrasion creates a very irregular surface and a discrete smear layer with smear plugs (Fig 5.7) [16]. Intertubular dentin seems to be impact folded and compressed over the dentin tubules [59]. Although many manufacturers have claimed that an air-abraded tooth surface is more receptive to bonding because of the microretentive surface created by air abrasion, and that the acid-conditioning step can be omitted, many authors have refuted and disproved this [16, 57, 60, 61].

Fig. 5.7 a-d.
Field-emission scanning electron microscopy photomicrographs of enamel and dentin prepared by air abrasion. As a result of the kinetic energy of the Al2O3 particles fired at the tooth surface, tooth material is chipped away. The resultant enamel (a, b) and dentin (c, d) surfaces are very irregular and covered with a discrete smear layer. The dentin tubules are occluded by smear plugs
Laser Ablation
Laser technology has gained popularity over the past several years, and many applications in dentistry and medicine have been proposed. One of those applications is caries removal and cavity preparation. Like air abrasion, the trembling experience caused by bur cutting is omitted, rendering this technique more tolerable for patients. In particular, the Erbium:YAG laser with an ultra short square pulse technology (wavelength 2.94 µm) is used as an alternative for cavity preparation, but also Nd:YAG laser can be applied [62, 63].
Laser technology can remove tooth substrate effectively and precisely by means of a thermo-mechanical ablation process involving microexplosions [16]. Water cooling is required to prevent cracking and melting of enamel and dentin, and to prevent thermal damage to the pulp [64].
Laser preparation of tooth substrate does not yield a smear layer [16, 65]. SEM characterization of dentin prepared by Erbium:YAG laser reveals a typical scaly, coarse and irregular surface due to microexplosions and volatilization of tooth material [16, 66 – 68]. As with air abrasion, laser manufacturers often claim that laser pre-treatment on tooth tissue enhances bonding receptivity of this substrate, and that “laser etching” is able to replace an additional conditioning phase (with phosphoric acid).
Many authors have reported advantages of laser cavity preparation. The acquired rough surface, not demineralized but exhibiting patent dentin tubules, might enhance micromechanical retention [69, 70]. Comparing laser-prepared dentin with bur-cut dentin, similar or better results were found for laser-prepared dentin, regarding bond strength testing [71] and microleakage [70, 72, 73]. Despite these favorable findings concerning laser ablation, increasingly more researchers have changed their opinion regarding the usefulness of lasers for tooth tissue removal. Kataumi et al. [65] were the first to observe substructural cracks in dentin after the use of erbium:YAG laser. Other authors also mention laser damage of enamel and dentin, as more cohesive fractures occur in dentin (Fig. 5.8) [16, 74 – 76]. Controlled microtensile bond strength tests showed significantly lower bonding effectiveness to lased enamel and dentin [67, 75, 77].
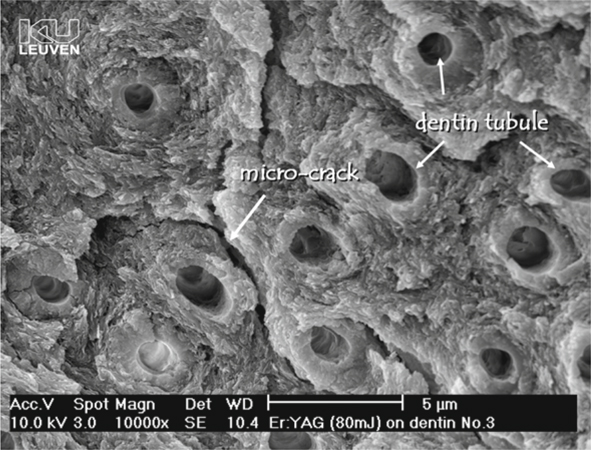
Fig. 5.8.
Scanning electron microscopy photomicrograph of laser-conditioned dentin. Laser preparation does not yield a smear layer but gives rise to a microretentive non-demineralized dentin surface with patent tubules; however, adhesion of composites to laser-treated tooth tissue is jeopardized by a structural weakening of the top layer due to microcracks
Moreover, this structural weakening is not only confined to the uppermost layer of dentin, but laser irradiation also modifies and weakens dentin over a thickness of 3-5 µm, which understandably jeopardizes adhesion of composite material. In addition, transmission electron microscopy (TEM) investigation of irradiated dentin by Ceballos et al. [67] showed a dense but fissured layer devoid of collagen fibrils. Only in the basal part of this layer were remnants of melted, fused and denatured collagen fibrils found, which were poorly attached to the underlying intact dentin. As interfibrillar spaces were lacking in this zone, resin infiltration must have been impeded, thereby having hindered good adhesion.
Mechanical removal of this laser-modified superficial layer or removal by acid etching restores bond strengths [67, 75],but only partially as damage and weakening may go beyond the superficial dentin layer. Microleakage studies also indicate less leakage when lased dentin is acid etched prior to bonding [78, 79].
In summary, current lasers do not yet offer any advantage over conventional rotary instruments for cavity preparation, as they may even affect the bonding substrate adversely. A dentist should understand what structural changes in dentin laser preparation entails and should tackle the aforementioned problems, e.g. by removing the exposed layer as well as possible.
Conclusion
A comprehensive knowledge of the structure of dentin and its altered properties after dentin preparation, according to the used preparation technique, should enable a dentist to understand how to achieve satisfactory bonding to dentin.
Research setups should always be based on the clinical situation, in order to be able to validate in vitro research.
The scope of cavity preparation methods has only recently been widened. Many new techniques need more profound examination, as they can greatly influence the clinical outcome of adhesive techniques.
Even when dealing with dentin of a non-carious lesion and when no cavity preparation is required, a dentist must be aware of the biofilm pellicle covering the tooth lesion. To obtain satisfactory bonding, this lesion should be treated to obtain a clean bonding substrate.
Interfaces and Hybridization
Micromorphological characterization of the interface is paramount to gain insight into the bonding mechanism to tooth tissue. As the adhesive interaction process occurs over a couple of micrometers, electron microscopy is preferred on the grounds of the high resolution that can be achieved (1-2 nm). Mainly two different electron microscopy techniques are used: TEM and SEM. The TEM provides highly informative overview images of both the interaction zone with intact dentin and with the resin layers. The SEM images give us a view of a surface, but special specimen preparation methodologies can also provide SEM images of the interface.
Right from the start, adhesive systems have known a large turnover rate. The big business related to these materials, as well as the continuous search for improved techniques and systems, have urged manufacturers into researching and developing new bonding systems. Whereas original simple bonding agents evolved to multi-step systems, recent development focuses on simplification of the application procedure in order to abate technique sensitivity and reduce manipulation time [80].
Classifying dental adhesives in different categories is not straightforward, because of the great supply and vast turnover of adhesives. Several classifications have been suggested in the past in scientific literature; however, no consensus concerning terminology has been reached yet. Van Meerbeek et al. [4, 36] have suggested a scientifically based classification with three main groups of adhesives: etch-and-rinse adhesives, self-etch adhesives and glass-ionomer adhesives (Fig. 5.9; Table 1). This classification is simple and has proved to be reliable and consistent. As it is based on the applied adhesion strategy, this classification provides a dentist or a researcher with background information on the adhesion mechanism and on the characteristics of an adhesive system; therefore, from this point forward, we discuss adhesives and their interaction with dentin, grouped according to the three main divisions of this classification.
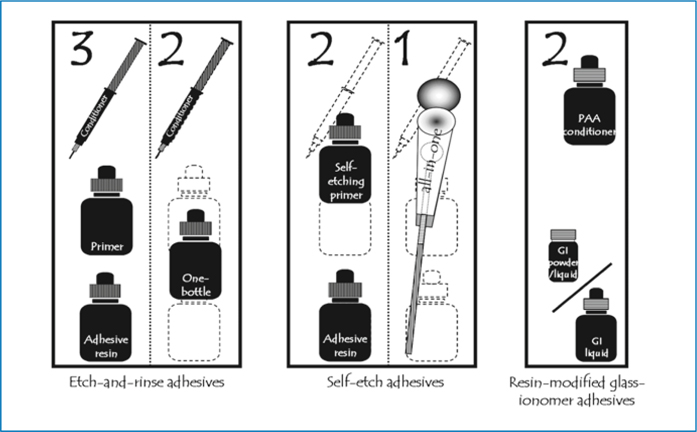
Fig. 5.9.
Classification of contemporary adhesives according the adhesion strategy and the clinical application steps
Table 5.1.
List of contemporary adhesives categorized following the classification presented in Fig. 5.9.
|
Brand name
|
Manufacturer
|
|
Three-step etch-and-rinse adhesives
|
|
|
All-Bond 2
|
Bisco (Schaumburg, Illinois)
|
|
Clearfil Liner Bond
|
Kuraray (Kurashiki, Japan)
|
|
Denthesive
|
Heraeus-Kulzer (Wehrheim, Germany)
|
|
EBS
|
ESPE (now 3 M ESPE; Seefeld, Germany)
|
|
Gluma CPS
|
Bayer (now Heraeus-Kulzer; Leverkusen, Germany)
|
|
Optibond DC
|
Kerr (Orange, Calif.)
|
|
Optibond DC
|
Kerr (Orange, Calif.)
|
|
Permagen
|
Ultradent (Salt Lake City, Utah)
|
|
Permaquik
|
Ultradent
|
|
Scotchbond Multi-Purpose
|
3 M (now 3 M ESPE; St. Paul, Minn.)
|
|
Two-step etch-and-rinse adhesives
|
|
|
C36 Prime&Bond NT
|
Dentsply-Detrey (Konstanz, Germany)
|
|
Excite
|
Vivadent (Schaan, Lichtenstein)
|
|
Gluma 2000
|
Bayer (now Heraeus-Kulzer; Leverkusen, Germany)
|
|
One-Coat Bond
|
Coltène Whaledent (Altstätten, Switzerland)
|
|
One-Step
|
Bisco (Schaumburg, Illinois)
|
|
Optibond Solo Plus
|
Kerr (Orange, Calif.)
|
|
Prime&Bond 2.0
|
Dentsply-Detrey (Konstanz, Germany)
|
|
Prime&Bond 2.1
|
Dentsply-Detrey (Konstanz, Germany)
|
|
Prime&Bond NT
|
Dentsply-Detrey (Konstanz, Germany)
|
|
Scotchbond 1 (Single Bond)
|
3 M ESPE (Seefeld, Germany)
|
|
Solobond M
|
Voco (Cuxhaven, Germany)
|
|
Stae
|
Southern Dental Industries (Victoria, Australia)
|
|
Syntac Single-Component
|
Ivoclar Vivadent (Schaan, Liechtenstein)
|
|
Two-step self-etch adhesives
|
|
|
AdheSE
|
Ivoclar Vivadent (Schaan, Liechtenstein)
|
|
ART Bond
|
Coltène Whaledent (Altstätten, Switzerland)
|
|
Clearfil Liner Bond 2
|
Kuraray (Osaka, Japan)
|
|
Clearfil SE
|
Kuraray (Osaka, Japan)
|
|
Denthesive 2
|
Heraeus-Kulzer (Wehrheim, Germany)
|
|
NRC Prime&Bond NT
|
Dentsply-Detrey (Konstanz, Germany)
|
|
One Coat SE Bond
|
Coltène Whaledent (Altstätten, Switzerland)
|
|
Perme Bond F
|
Degussa (Hanau, Germany)
|
|
Prisma Universal Bond 3
|
Dentsply-Detrey (Konstanz, Germany)
|
|
Pro Bond
|
Dentsply-Detrey (Konstanz, Germany)
|
|
Protect Bond
|
Kuraray (Osaka, Japan)
|
|
Solobond Plus
|
Voco (Cuxhaven, Germany)
|
|
Syntac
|
Ivoclar Vivadent (Schaan, Liechtenstein)
|
|
Tokuso Mac Bond II
|
MAC (Tokuyama, Japan)
|
|
Tyrean
|
Bisco (Schaumburg, Illinois)
|
|
Unifil Bond
|
GC (Tokyo, Japan)
|
|
One-step self-etch adhesives
|
|
|
Admira Bond
|
Voco (Cuxhaven, Germany)
|
|
Adper Prompt
|
3 M ESPE (Seefeld, Germany)
|
|
AQ Bond
|
Sun Medical (Shiga, Japan)
|
|
Etch&Prime 3.0
|
Degussa (Hanau, Germany)
|
|
Sustel/ F2000 primer-adhesive
|
3 M ESPE (Seefeld, Germany)
|
|
Futurabond
|
Voco (Cuxhaven, Germany)
|
|
Hytac OSB
|
ESPE (Seefeld, Germany)
|
|
iBond
|
Heraeus-Kulzer (Wehrheim, Germany)
|
|
One-Up Bond F
|
Tokuyama (Tokyo, Japan)
|
|
Prime&Bond 2.1 (without etching)
|
Dentsply-Detrey (Konstanz, Germany)
|
|
Prime&Bond NT (without etching)
|
Dentsply-Detrey (Konstanz, Germany)
|
|
Prompt-L-Pop
|
3 M ESPE (Seefeld, Germany)
|
|
Prompt-L-Pop (LP2)
|
3 M ESPE (Seefeld, Germany)
|
|
PSA
|
Dentsply-Detrey (Konstanz, Germany)
|
|
Reactmer Bond
|
Stay updated, free dental videos. Join our Telegram channel
VIDEdental - Online dental courses


