and Augusto Ureña1
(1)
Department of Orthodontics, Maimonides University, Buenos Aires, Argentina
From the biomechanical point of view, lingual orthodontic treatment has important differences in comparison to labial orthodontic treatment.
The interbracket distance is reduced, and the forces are directed from the lingual surface of the anterior teeth to the center of resistance of the same teeth. For this reason, the use of TMA archwires that has greater resilience is highly recommendable because its stiffness is in between nickel-titanium and stainless steel wires. TMA wires allow the incorporation of any type of loops for retraction or protraction forces and also minimize the reaction on the last molars when the retraction loops are activated.
This is a very important item that is sometimes not taken into account by clinicians. The adhesion of the brackets to the lingual and palatal surfaces of the teeth requires careful preparation.
Some patients have deep grooves not only near the cingulum of the central, lateral incisors and canines but also on the palatal surfaces of the 1st and 2nd molars. That is why sealing them before taking the impressions is advisable.
Also, the normalization of the palatal marginal rims is important. Occasionally, their shape and size don’t allow brackets to adapt correctly.
Gingival tissues also need to be normalized since inflammation caused by gingivitis can alter the proper position of the brackets. Working with a periodontist before, during, and after the treatment is necessary.
How to Take the Silicone Impression
Before impressions are taken, careful hygiene of the teeth has to be performed by the orthodontist in order to eliminate all the biofilm.
A two-phase technique silicone impression is recommendable to take an accurate one. The impression tray has to be rigid and nondeformable. The adhesion of the impression material to the impression tray is a crucial phase in which errors must be avoided.
Mix uniformly into homogeneous state before use (Fig. 1.1a, b).
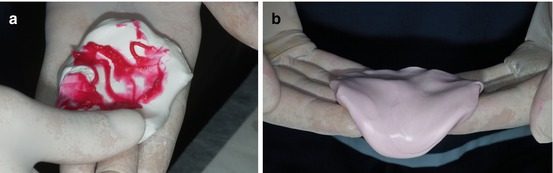
Fig. 1.1
(a, b) Mixing the impression material putty with the catalyst
It should be correctly extended on the tray in order to obtain a good surface detail.
Incorporating mostly all anatomical landmarks is required to create an ideal impression (Fig. 1.2a, b).
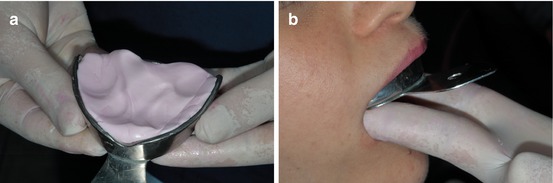
Fig. 1.2
(a, b) Impression material extended on the tray and mouth impression
For the second phase, regular body silicone impression material is suggested.
Mix the two components (base and catalyst) in a gentle way for fullfilled the first impression, following the indications of each silicone brand (Fig. 1.3a, b).
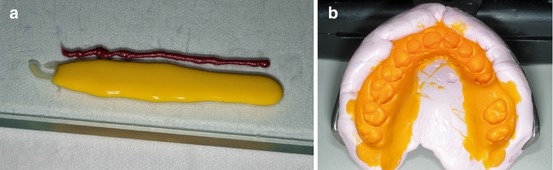
Fig. 1.3
(a, b) Pre- and post-second-phase silicone impression
It is highly recommended to disinfect the silicone impression after taking it and to follow the manufacturer’s instructions of your choice, and for best results, wait for 30 min before casting the impression, knowing that the impression remains dimensionally stable for a minimum of 7 days and a maximum of 14 days.
Laboratory Procedures
It is generally accepted by orthodontists that the indirect technique is the best option when lingual brackets are used. Several methods with different systems have been described during the last 25 years.
In this section, vital information on how to achieve excellent results with in-office indirect method will be described step by step.
No expensive outside laboratories will be needed and consistent results will be seen.
A careful setup has to be made taking into account the patient’s diagnosis, prognosis, and treatment plan.
When silicone is used, the impressions have to be taken in two stages for a better definition. It is important to control the definition of the impression in order to check for the absence of bubbles and the precise contour of the teeth (Fig. 1.4a).
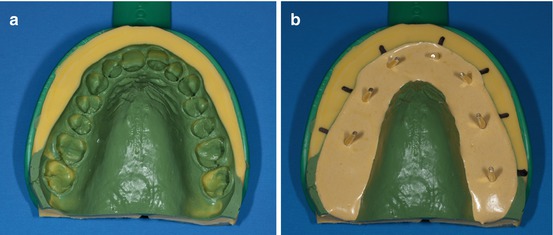
Fig. 1.4
(a, b) Silicone impression have to be taken in two stages and with the dowel pins in place
The second step is to mark the center of each tooth to determine the exact position of each dowel pin (Fig. 1.4b).
In patients with mild or severe crowding, it is recommendable to perform two cast models, to maintain the correct anatomy of the mesial and distal margins of each crowded tooth.
To avoid fractures during the laboratory process, extra-hard plaster or densita gypsum rock is suggested.
To obtain the best copy of the teeth, it is better to make two plaster models, inserting the dowel pins sorting one tooth from another (Fig. 1.5a, b).
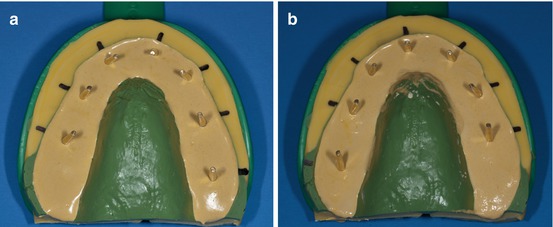
Fig. 1.5
(a, b) Two plaster models to obtain a better setup with dowel pins in place
A perfect copy of the teeth can be obtained with this method (Fig. 1.6a, b).
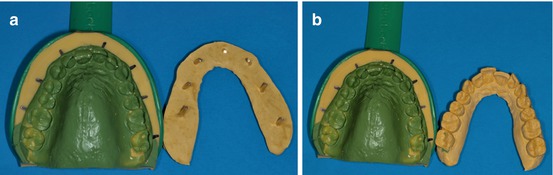
Fig. 1.6
(a, b) Models with densita gypsum rock
After the vertical cut of the plaster, stump of each tooth should be stripped with a steel or tungsten dental bur, slenderizing the stone while carefully preserving the mesial-distal dimension of each tooth without removing the dental gingival limit (Fig. 1.7a, b).
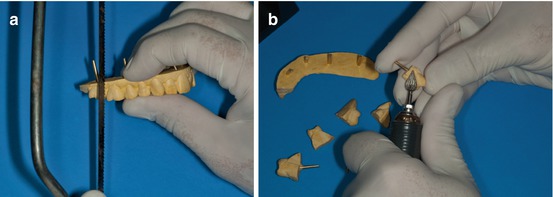
Fig. 1.7
(a, b) How to cut and prepare each tooth for the setup cast model
After reshaping and numbering each tooth, they have to be put in place in the original silicone impression, and then a horseshoe dental wax has to cover all the dowel pins (Fig. 1.8a, b).
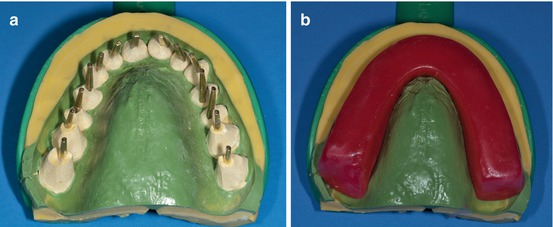
Fig. 1.8
(a, b) Dowel pins placed in each tooth and covered with dental wax
The next step is to remove the dental wax with all the teeth fully covered with it (Fig. 1.9a, b).

Fig. 1.9
(a, b) Initial malocclusion model may be identical from the original
The following step is to prepare a solid base with stone gypsum to avoid any undesirable teeth movement (Fig. 1.10a).
It is essential to remember that all the teeth have to be numbered to avoid any undesirable position mistakes (Fig. 1.10b).
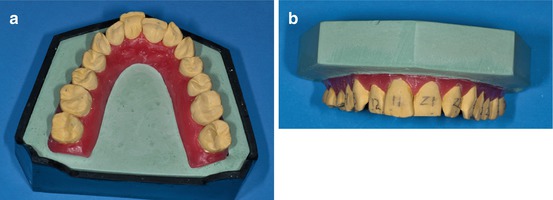
Fig. 1.10
(a, b) Initial malocclusion with numbered teeth
Lateral views to control de occlusal plane (Fig. 1.11a, b).
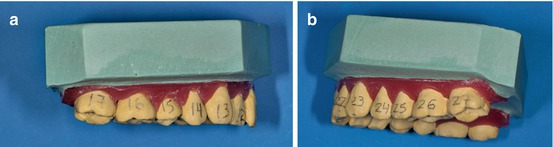
Fig. 1.11
(a, b) Numbered teeth in the lateral views
The next step is to straighten the teeth according to the previous diagnosis and treatment plan. To assess dental leveling, the amount of overbite, overjet, and curve of Spee presented in the initial malocclusion should be taken into account. The model has to be placed in hot water to facilitate the alignment of the plaster cast teeth (Fig. 1.12a, b).
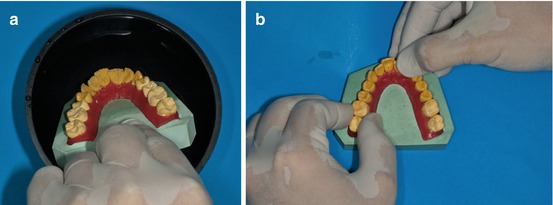
Fig. 1.12
(a, b) Softened wax in warm water to easily maneuver the teeth
The teeth have to be slightly moved to their final position, straightening the teeth and checking the contact points between them, and rotations of the premolars and molars have to be fulfilled (Fig. 1.13a, b).
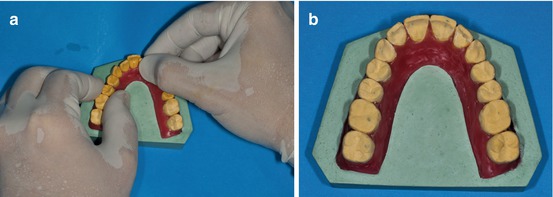
Fig. 1.13
(a, b) Final alignment
In order to achieve a more ideal and individual patient tooth alignment according to the previous diagnosis and treatment plan, an ideal chart plate can be helpful (Fig. 1.14a, b).
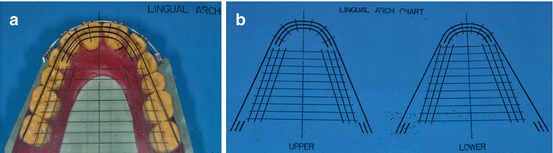
Fig. 1.14
(a, b) Ideal lingual chart plate
After that, a silicone spray (any brand) should be placed to facilitate the bracket debonding (Fig. 1.15a, b).
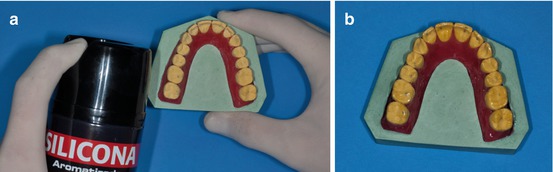
Fig. 1.15
(a, b) Silicone spray application
The model should be poured to prepare a key plaster to avoid undesirable inclinations when the brackets and the wire are bonded to the cast model (Fig. 1.16a, b).
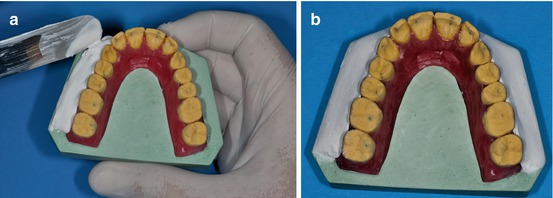
Fig. 1.16
(a, b) Vestibular plaster contention
The following step is to insert the brackets into a 0.017″ × 0.025″ TMA archwire. A ligature tying plier is very useful at this point (Fig. 1.17a, b).
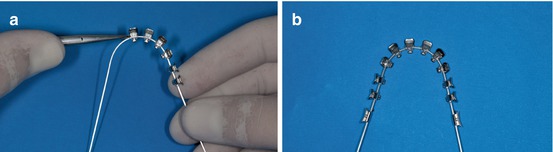
Fig. 1.17
(a, b) Bracket inserts with elastomeric ligatures
The distocanine and mesiomolar bends have to be done after all the brackets are inserted in the 0.017″ × 0.025″ TMA wire (Fig. 1.18a, b).
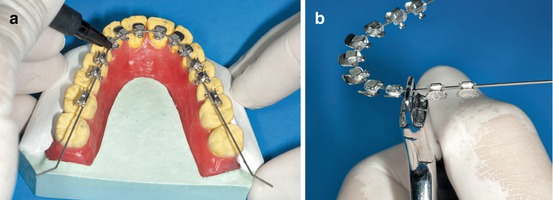
Fig. 1.18
(a, b) For better control, a tweed plier is recommended
The measure of the distal canine bend is related to the width differences between the cuspids and first premolars in every patient. Sometimes it could be different between the right and left sides. It is advisable to control the wire torque to maintain the same occlusal plane (Fig. 1.19a, b).
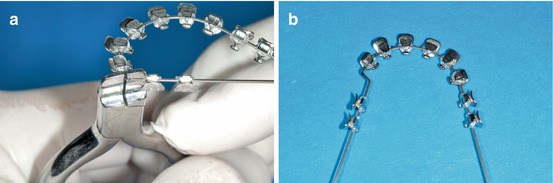
Fig. 1.19
(a, b) Upper archwire before and after disto-canine bend
After all the bends are performed, the archwire has to be stabilized in the setup with acrylic keys (Fig. 1.20a, b).
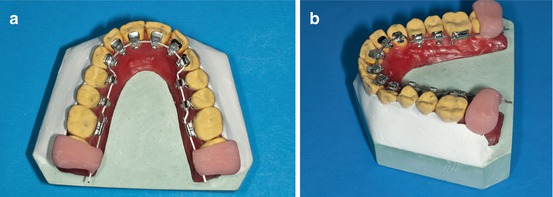
Fig. 1.20
(a, b) Acrylic distal keys in place
If the diagnosis requires extra anterior torque and before the lingual brackets are placed on the cast model, the orthodontist can manage it with an easy and controlled method. Extratorque labial anterior brackets (Ricketts brackets technique) are placed on the labial surface of the six anterior upper teeth with a rectangular 0.16″ × 0.22″ Ni-Ti wire (Fig. 1.21a, b).
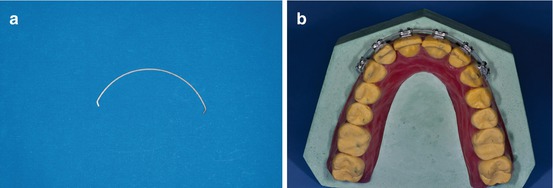
Fig. 1.21
(a, b) Ricketts brackets with a 0.016″ × 0.022″ Ni-Ti sectional wire in place
The comparison between the initial and post arch expression of the torque is clearly visible (Fig. 1.22a, b).

Fig. 1.22
(a, b) Pre- and post-extra anterior torque
The extra torque effect can be observed and is highly recommended for extraction cases and Class II Div II deep overbite patients (Fig. 1.23a, b).
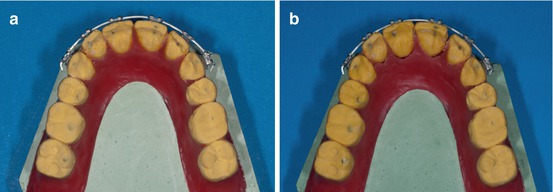
Fig. 1.23
(a, b) Occlusal view of the pre- and post-extra anterior torque
It is widely accepted that a correct setup is the only way to achieve not only the ideal bracket positioning but also successful treatment outcomes. If the setup is not totally controlled, it is impossible to achieve excellent and consistent results.
Most problems can be avoided by monitoring every step.
Indirect Bonding
Indirect method is highly recommended due to the great difference in the palatal and lingual tooth anatomy. It must be easy to make, permit accurate bonding, have control of the possible failures, easy to rebond when it is necessary, and have high precision and reduced cost.
The first step is to clean the enamel surface using a pumice paste with a rubber cup or a polishing brush (Fig. 1.24a, b).
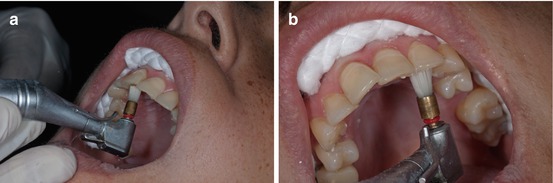
Fig. 1.24
(a, b) A low-speed handpiece with a cleansing brush is recommended
The second step is to rinse with water to remove any pumice paste and to dry thoroughly with oil-free air.
Cheek, lip, and tongue retractors are very helpful to maintain a completely dry field during all the bonding process (Fig. 1.25).
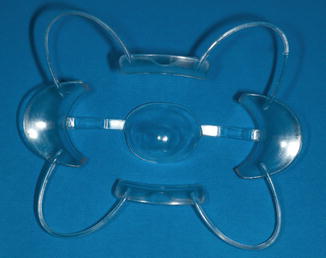
Fig. 1.25
Cheek, lip, and tongue retractors
Thirty-seven percent phosphoric acid gel for about 30″ is used for enamel conditioning. Acid gel provides more control on the surface to be etched. Since the enamel surface must not be contaminated with saliva, a wet gauze to remove the acid gel is recommended (Fig. 1.26a, b).
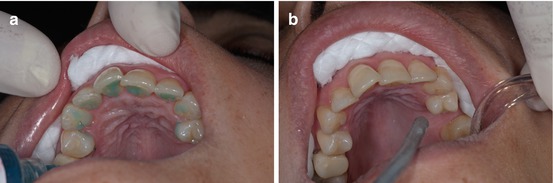
Fig. 1.26
(a, b) Before and after the plication of 37 % phosphoric acid gel
Then the enamel surface has to be dried very carefully until it acquires a frosty white appearance. In almost all patients, no micro-etching is necessary (Fig. 1.27a, b).
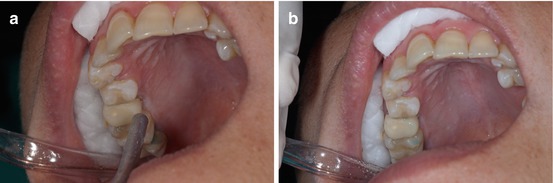
Fig. 1.27
(a, b) A dry air syringe is useful to obtain a frosty enamel surface
After this, a small amount of primer is applied to the tooth and to the bracket base at the same time.
Light-curing primer with filling microparticles is highly recommendable in order to diminish enamel decalcifications or carious lesions under the brackets (Fig. 1.28a, b).
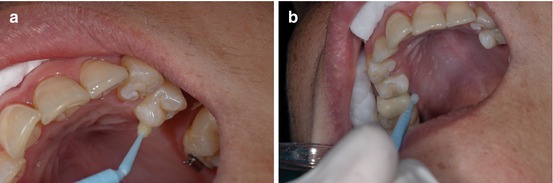
Fig. 1.28
(a, b) Light-cure bonding agent adhesive in place
It is important that all the excess adhesive is carefully removed to improve oral hygiene and less gingival inflammation or decalcification around the bracket.
It is preferred to start transferring individual caps from the last molar to midline avoiding unnecessary contamination risks (Fig. 1.29a, b).
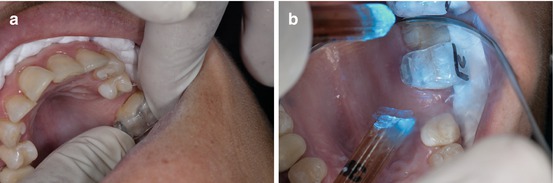
Fig. 1.29
(a, b) Molar transferring cap in place
The cap can be easily removed with a thin dental explorer instrument from occlusal to gingival (Fig. 1.30a, b).
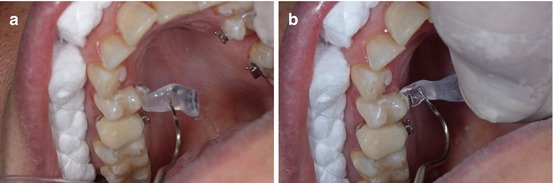
Fig. 1.30
(a, b) Easy method to remove the individual transfer cap
Methods of Ligation
There are different ligation approaches in lingual orthodontics that use stainless steel or elastomeric ligatures.
The use of esthetic ligatures is highly recommendable since their visibility was improved in the upper and lower arches. The flexibility of the esthetic ligature ALLOWS better manipulation, twist, cut, and tuck under the archwire.
The double-tie ligature allows the full insertion of the archwire into the bracket slot avoiding the archwire to slip off the bracket.
First, the ligature has to be placed behind the wire and the bracket in order to embrace and insert the wire at the end of the bracket slot (Fig. 1.31a, b).
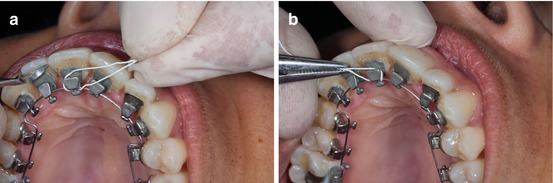
Fig. 1.31
(a, b) How to place the ligature wire behind the archwire and the bracket
Cross ligature around the bracket and pull up the ends in order to twist them on the side of the bracket (Fig. 1.32a, b).
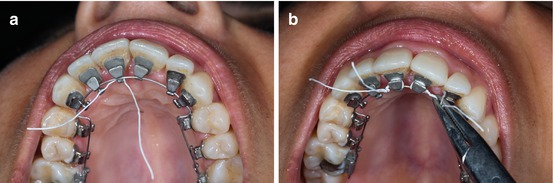
Fig. 1.32
(a, b) After the ligature wire crosses the bracket, the ends have to be twisted around them
With a cutting plier, loose ends should be cut and pressed behind the bracket, preventing any discomfort for patients. A ligature director or a Mathieu plier is helpful.
It is important that the excess wire is cut after twisting the ligature under the bracket (Fig. 1.33a, b).
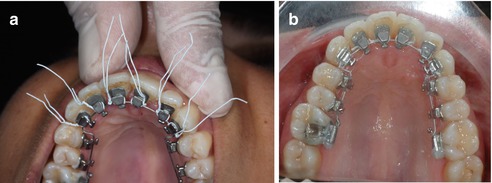
Fig. 1.33
(a, b) After twisting the ligature, the excess wire has to be cut
Phase I
Phase I always includes the alignment and leveling of the maxillary and mandibular arches.
In general, low load deflection arches are used as initial alignment wire depending on the amount of discrepancy, initial malocclusion, and treatment objectives.
To initiate Phase I, it is important to bear in mind that since the interbracket distance is narrower than in labial orthodontics, the suggested sequence is either coaxial archwire (0.0155″ or 0.0175″), Ni-Ti archwire (0.010″ or 0.013″), or Ni-Ti-Cu (0.016″) (Fig. 1.34a, b).
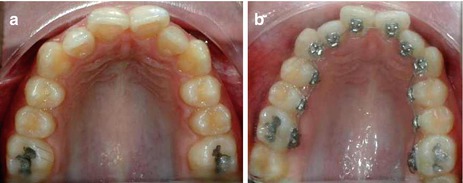
Fig. 1.34
(a, b) Initial photograph and with a 0-013″ Ni-Ti archwire
When all the slots are aligned, a 0.016″ TMA or 0.016″ SS archwire is recommendable to finish Phase I (Fig. 1.35a, b).
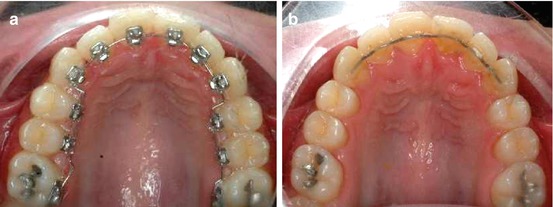
Fig. 1.35
(a, b) After the alignment was completed, a TMA 0.0175″ × 0.0175″ was suggested until the retention was placed
From the biological point of view, it is important to emphasize that the first archwire used must be very resilient to ensure very light forces at the beginning of the treatment. It is advisable that this archwire remains for a minimum period of 6–12 weeks.
Lingual Utility Arch
The intrusion of lower incisors is a real challenge not only in adolescents but in adults too. The use of a lingual utility arch is highly recommendable and easy to manage.
It is fabricated with 0.016″ × 0.016″ blue Elgiloy wire which is the same as used in labial orthodontics, described by Ricketts many years ago. An activation with 15° tip back bends mesial to the first molar is advisable (Fig. 1.36a, b
Stay updated, free dental videos. Join our Telegram channel
VIDEdental - Online dental courses


