Aesthetic Periodontal Surgery
It was Miller (1988) who established the concept of aesthetic periodontal surgery. He saw opportunities for expanding classic mucogingival surgery that dealt with broadening the vestibule and removing troublesome frenula. Aesthetic periodontal surgery does not primarily treat functional disturbances, but rather aesthetic problems, such as gingival recessions, defects, excesses, and proliferations as well as defects of the alveolar ridge and incompletely or unerupted teeth.
Many new surgical techniques are available for these conditions. The miscellaneous techniques use sliding flaps, gingival and connective tissue grafts, guided tissue regeneration with resorbable or nonresorbable membranes, reconstruction of bone with bone substituting materials (e.g., tricalciumphosphate or decalcified freeze-dried bone), and growth factors to stimulate growth of new tissue and attachment.
79 Aesthetic periodontal surgery
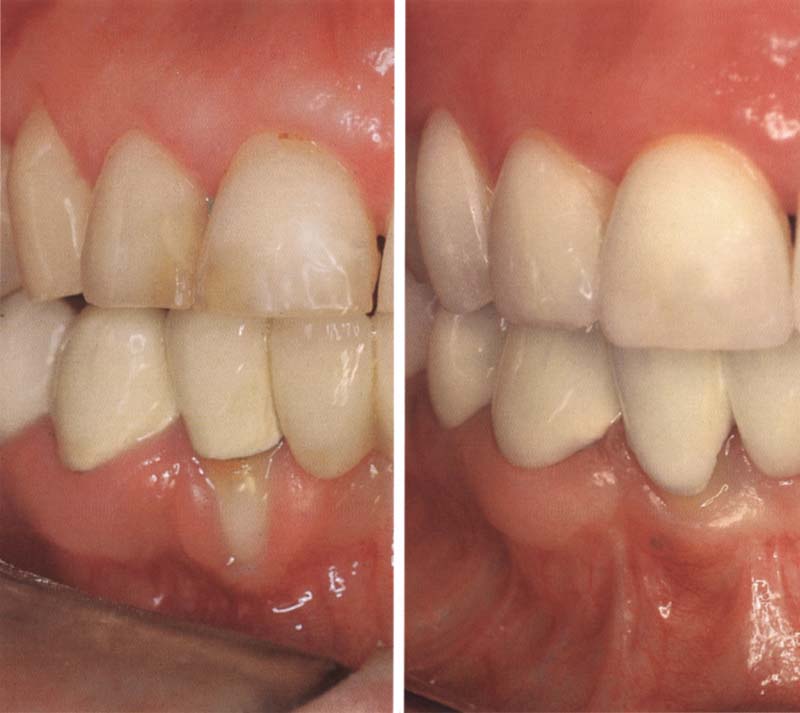
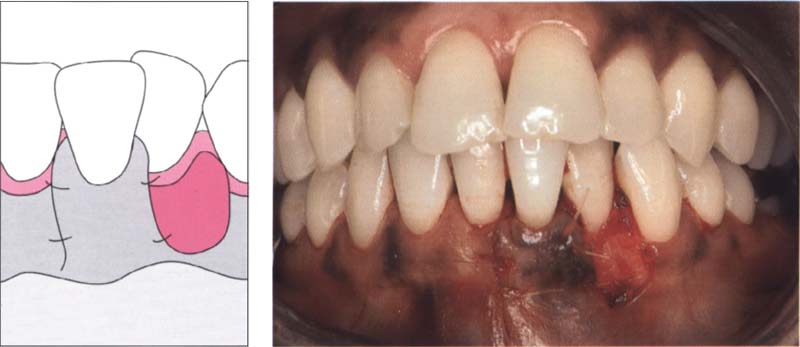
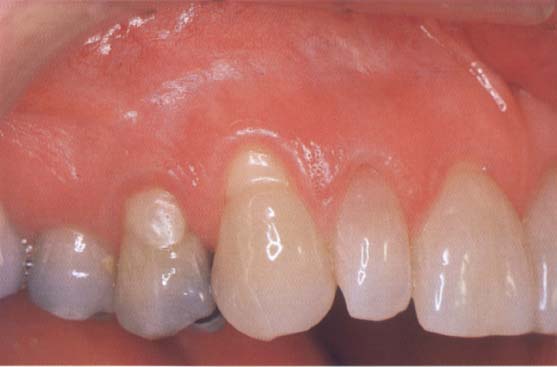
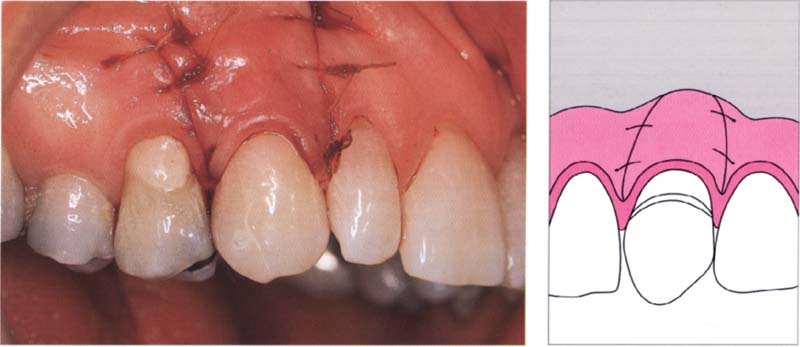
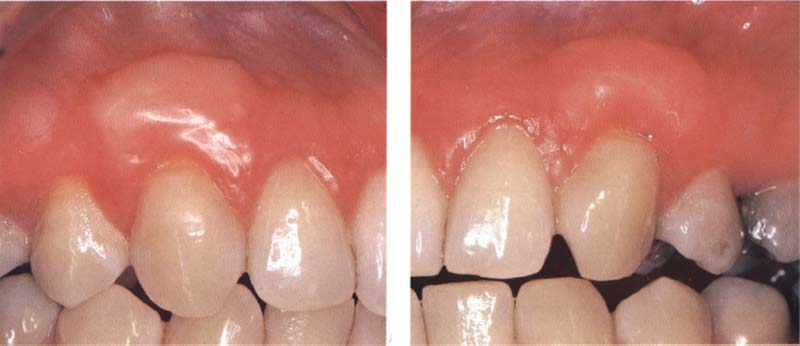
Aesthetic periodontal surgery corrects excessive tissue and tissue recessions.
Left: Excess tissue in the maxilla is removed and is used to supplement tissue in the mandibule.
Right: Situation after completed treatment and placement of new restoration.
Gingival Recessions
While a multiplicity of gingival problems can be improved with aesthetic periodontal surgery, the most frequent task is that of covering gingival recessions. A variety of treatments is available:

80 Gingival recessions before aesthetic periodontal surgical treatment
The photo shows generalized recessions of classes I and II (Miller 1985). The class I recessions of the upper incisors were treated with a coronally repositioned flap procedure. The upper canines, premolars, and the lower incisors were covered with free gingival grafts.
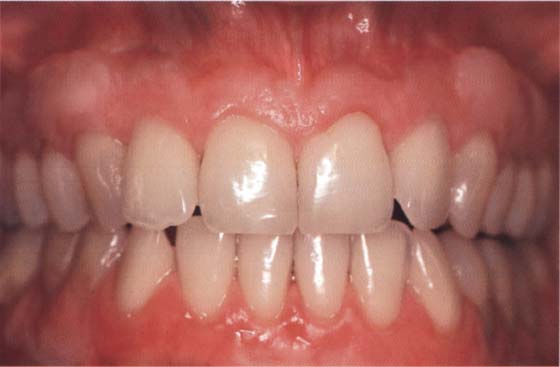
81 Treatment results
Complete coverage of the root surfaces is achieved six weeks after surgical intervention.
Classification
Miller (1985) classified gingival recessions in order to facilitate treatment planning and prognosis (see Rateitschak and Wolf 1989).
Class I: The recession is flat and narrow, or flat and broad and does not reach the mucogingival junction. Interdental tissue has not been lost. Prognosis: very good.
Class II: The recession is profound and narrow, or profound and broad. It stretches apical of the mucogingival junction. Interdental tissue is not lost. Prognosis: good.
Class III: Recessions like those in classes 1 or 2. Interdental tissue (also bone) has partially been lost. Prognosis: complete root coverage is no longer possible.
Class IV: Recession extends apical of the mucogigingival junction. Interdental tissue has been extensively destroyed. Prognosis: poor.
Sliding Flaps
Sliding flaps can be used for final coverage of gingival recessions. They can also be combined with oral mucosa grafts or membranes. Beside aesthetic indications, these techniques can also be used to eliminate mucogingival problems. In implantology they can be used for alveolar ridge augmentation and to expose impacted teeth.
Laterally Sliding Flap
This technique is described by Grupe and Warren (1956). To be successful, it is important that
—the flap is sufficiently thick and wide,
—the flap is sufficiently large and appropriately shaped, and
—sufficient attached gingiva is available.
The flap should be three times as wide as the recession it is going to cover. This ensures that the flap area is sufficiently vasculated, since the root surface cannot contribute to the vascularization of the flap. The flap should cover at least 3 mm of vasculated gingiva on each side.
The flap must also be sufficiently thick to reduce the risk of later recession. A sufficiently extendable, attached gingiva is necessary to elevate the flap. If the flap can only be held in place by means of a suture, recession is probable.
Indication: Individual recessions. It is not necessary to remove tissue from a second location. This technique is especially indicated in the case of recessions adjacent to edentulous ridge regions (simple flap mobilization).
Contraindication: Deep proximal pockets, prominently protuberant roots, severe root erosion, and advanced proximal bone loss.
Advantages: Only one surgical area, good vascularization of the flap, high success rate with root coverage.
Disadvantages: Limited amount of available keratinized gingiva, possible recession on the removal site, limited to one to two teeth.
82 Covering a class I recession by means of a laterally sliding flap
A flap was elevated from the tooth-free region of the distally located ridge and then rotated mesially in order to cover the root. Then, it was attached by single sutures to the periosteum and the attached gingiva.
Left: Situation before treatment. The crown margin and the root surface are exposed. There is a removable denture distal to the recession.
83 Treatment result
Two weeks after the intervention, all sutures have been resorbed and the root and the crown margin have been covered.
Surgical Procedure
1. A tissue bed is created adjacent to the exposed root at the recipient site. The incision begins at the adjacent tooth and is extended into the vestibulum.
2. The second incision begins at the border of the recession and reaches to the apical end of the recession. A slightly slanted incision connects the two incisions.
3. In this area, the epithelium and the uppermost layer of the tissue are removed in order to produce a suitable tissue bed. The recipient site is an exposed area where the uppermost layer of tissue has been removed, and it extends to the interpapillar region.
4. At the donor site, a vertical incision is performed to elevate a flap of sufficient size. The flap extends to the vestibulum and runs parallel to the former incision.
5. The flap is separated from the periosteum.
6. If a sufficiently large flap cannot be elevated, it is possible to extend the incision further into the mucosa.
7. This is a split thickness flap that should be as thick as possible. Therefore care should be taken during elevation to avoid perforation.
8. The first suture is embracing and should keep the flap in the correct position. For this purpose nonresorbable sutures are used. This suture keeps the flap in position over the entire healing period.
9. The edges of the flap are attached to the periost using resorbable sutures.
10. The wound can be closed at the donor side with a free gingival graft
Covering a class II recession with a laterally sliding flap
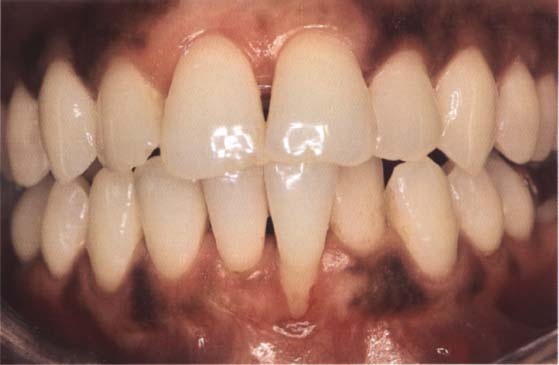
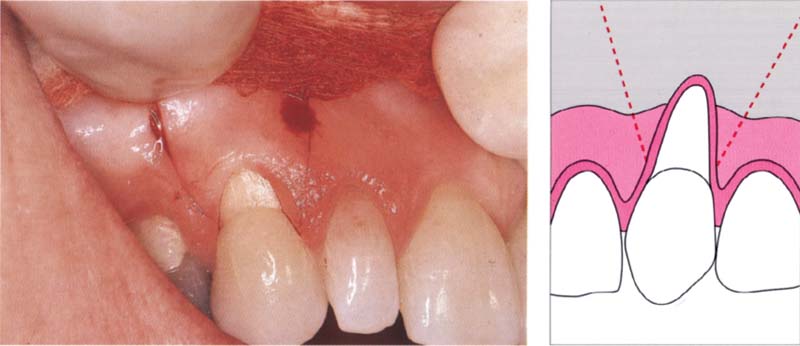
84 Initial situation
A class II recession located facially of a single lower incisor. There is a sufficiently wide removable region distal to the defect.
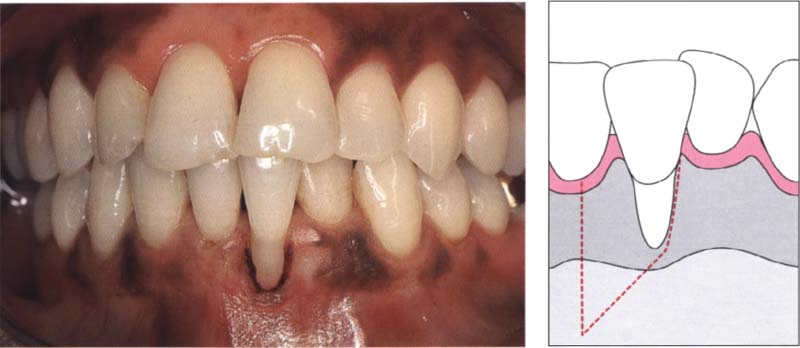
85 Conditioning of the root surface
The root surface was planed and etched with citric acid.
Right: Adjacent to the recession, the epithelium is removed from a zone of gingiva at least 3 mm wide. This region is used for the reception and vascularization of the sliding flap.
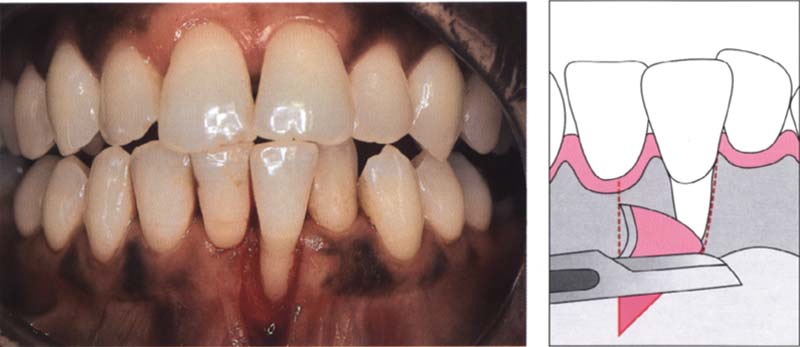
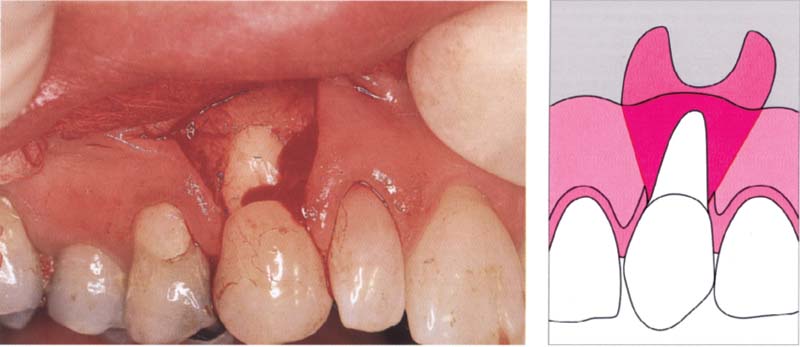
86 Preparing the recipient bed
Removing the covering tissue exposes a recipient bed.
Right: The epithelium is removed with a scalpel.
87 Mobilizing a split thickness flap
The vertical Incision extends from the gingival margin to the mesial part of the lower canine and continues apically until it reaches the mucogingival junction, where it is slightly angled in a mesial direction.
Left: The flap is elevated after sharp dissection.
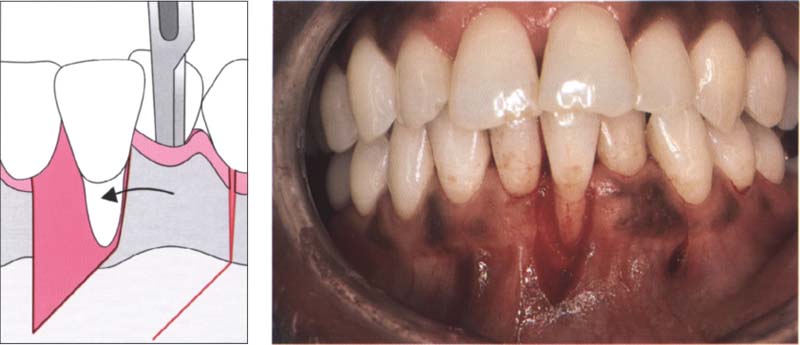
88 Sliding the flap
A scalpel mobilizes the split flap. The incision extends into the vestibulum in order to guarantee sufficient mobility of the flap. This flap is slid mesially and sutured at the lateral borders to the attached gingiva or the periosteum.
Left: Graphic representation of the sliding flap technique.

89 Postoperative view
One week after surgical intervention the recession is covered and healing tissue can be seen at the donating site.
Causes of Possible Failure
—Tension in the flap—place a vertical releasing incision.
—The sliding flap is too narrow—no correction possible.
—Too much bone is exposed—this leads to recession.
—Inadequate stabilization of the flap—mobility prevents the formation of a contact between the flap and the recipient bed that leads to necrosis and loss of the flap.
Coronally Repositioned Flap
The coronally repositioned flap is a very successful and aesthetic technique used to cover exposed root surfaces. Prerequisites for success, however, are that the flap is large enough and that there is sufficient attached gingiva. Therefore, at least 3 mm of sufficiently stretchable and thick gingiva must be present apical to the recession. If this is not the case, recession can recur. Sufficient attached gingiva is needed so that the flap can be repositioned coronally.
Covering a recession with a coronally repositioned flap
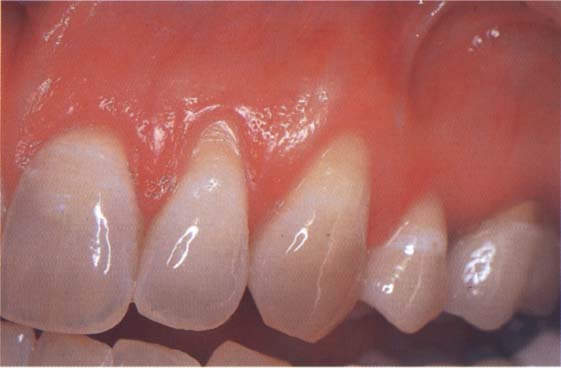
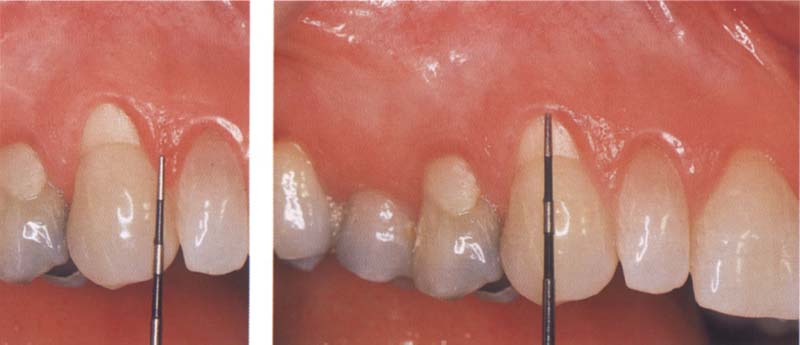
90 Initial situation
Lateral incisor and cuspid showing 2-mm recessions.
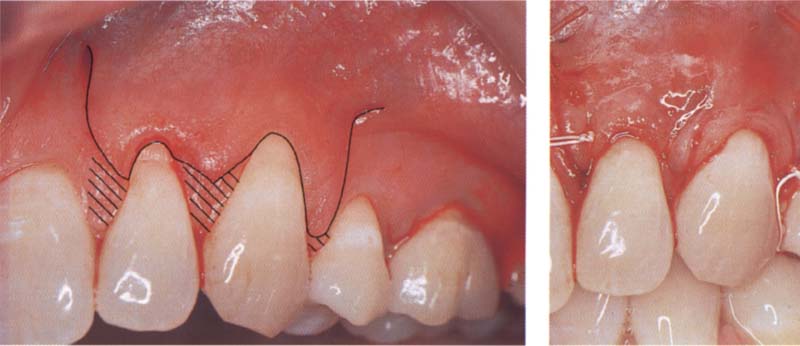
91 Elevation of flap and coronal repositioning
The picture shows the incision of a coronally repositioned flap that is to cover two teeth simultaneously.
The papillary tissue coronally to the incision is removed through superficial sharp resection (shaded area).
Right: The flap was repositioned in a coronal direction and two embracing sutures were inserted. The lateral ends were secured with single sutures.
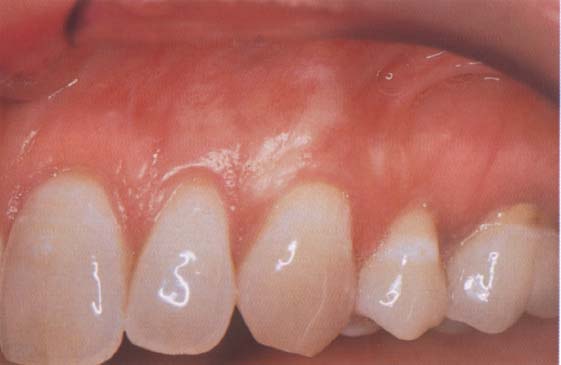
92 Results
Twenty months after the surgical intervention, an excellent aesthetic result has been obtained. The roots are completely covered.
This technique is suitable for several adjacent recessions and can be easily combined with other techniques.
Indication: To cover recessions, hypersensitive root surfaces.
Advantages: Several root surfaces can be treated simultaneously, high success rate. Adjacent teeth are not affected.
Disadvantage: Only possible with class I recessions.
Surgical Procedure
1. The root is thoroughly scaled and planed.
2. Condition the root using citric acid or tetracycline. Other authors also use 32% phosphoric acid for this purpose. Regarding the possibility to improve reattachment, the root surface can be additionally treated with Emdogain (Biora). Emdogain is a derivative of the enamel matrix and stimulates cell growth on the root cementum-forming surface. After cementum is formed, a new periodontium can regenerate with a new periodontal ligament and new alveolar bone. However, further studies will be needed to prove that this treatment would be advantageous to cover root recessions.
3. After the root has been conditioned, the recession is measured from the gingival margin to the cemento-enamel junction (distance A).
4. An apically located point is selected from the top of the papillae at distance A.
5. At this point, the incision begins and extends well into the mucosa.
6. A split thickness flap is elevated.
7. The recipient bed is prepared, by means of removing the epithelial layer with a scalpel.
8. The flap is undermined so it moves easily and is easy to reposition coronally.
9. The flap is positioned coronally and is then attached with a nonresorbable embracing suture.
10. The lateral edges are sutured to the periosteum. Resorbable sutures are used for this purpose.
Coronally repositioned flap: surgical procedure
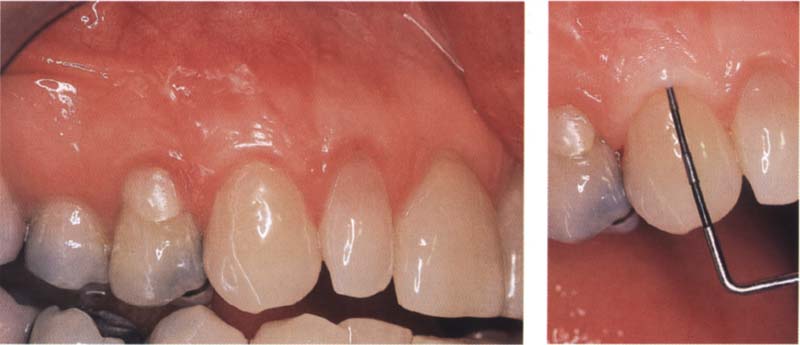
93 Initial situation
A class I recession is located at the upper cuspid 13.
94 Analyzing the recession
After the exposed root surface has been planed, it is conditioned for five minutes with saturated citric acid (pH = 1). The exposed root surface is 3 mm wide.
Left: The initial incision begins approx. 3 mm below the tip of the papillae. This distance corresponds approximately to the size of the recession. The vertical incision extends well past the mucogingival junction.
Allen and Miller (1989) and Harris (1994) have shown up to 98% root coverage can be achieved with this technique.
95 Incisions
Initial incisions for a coronally repositioned flap.
Right: The incision extends far enough into the mucosa so that sufficient mobility of the flap can be achieved.
96 Mobilizing the flap
A split flap that extends well into the vestibulum is elevated. Sufficient mobility is guaranteed.
Right: In order to be able to coronally reposition the flap, it is important that the incisions extend well into the mucosa.
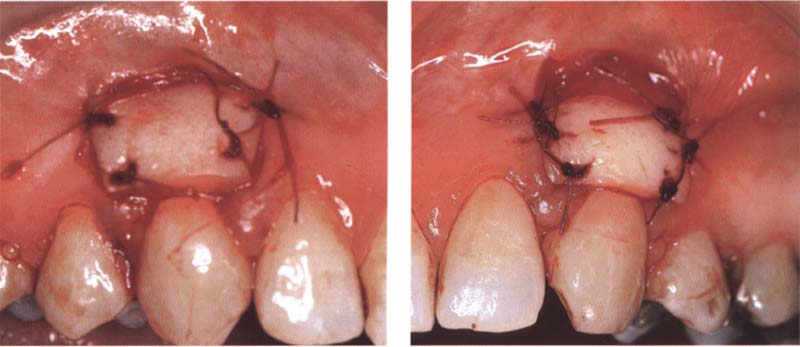
97 Fixing the flap
The flap is repositioned coronally with an embracing suture and attached via lateral sutures to the attached gingiva and the periosteum.
Right: An embracing suture keeps the flap in its coronal position. A small amount of composite material bonded to the palatal surface prevents the suture from slipping.
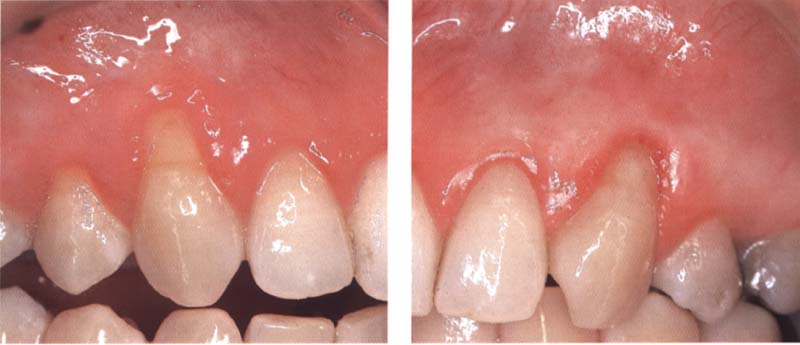
98 Result
Six months after surgery, a positive result has been achieved with complete root coverage and ideal aesthetic conditions.
Right: Two years after the intervention the entire root remains covered and pocket depths are normal.
Free Gingival Grafts
A free gingival graft is used for root coverage or rebuilding gingiva if required (augmentation). This technique, which has been significantly altered over time, produces acceptable aesthetic results.
Augmentation of jaw ridges is a recommended preprosthetic treatment. Insufficient amount of attached gingiva often leads to chronic inflammation adjacent to dentures, implants, or orthodontic appliances.
Advantages: High success rate, simple technique. Several teeth can be covered simultaneously. The technique also works when there is an insufficient amount of keratinized gingiva.
Disadvantages: Two surgical regions are needed. If the blood supply is poor, it may result in a partially unsatisfactory aesthetic outcome at the region of the root coverage. Pain may also be felt at the two surgical sites, particularly at the donating site.
99 Preoperative findings
This patient has class II recessions with cervical abrasions on the right and left maxillary canines.
100 The Miller technique
Left: A free gingival graft is attached to cover the root surface.
Right: Covering the root recession on the opposite side with a free gingival graft.
101 Result
Complete coverage on both sides of the previously exposed root surfaces three months after surgery.
Surgical Augmentation Procedure
1. The recipient bed is prepared. A horizontal incision is made along the mucogingival junction and extended into the papillary region.
2. A vertical incision is made lateral to first incision and extends into the mucosa. The supraperiostal part of this area is exposed.
3. The flap is excised.
4. The recipient bed is measured and a 1-mm-thick gingival graft is taken from the palate.
5. The graft is adapted to the tissue bed with moist gauze and sutured to the papillae and the periosteum.
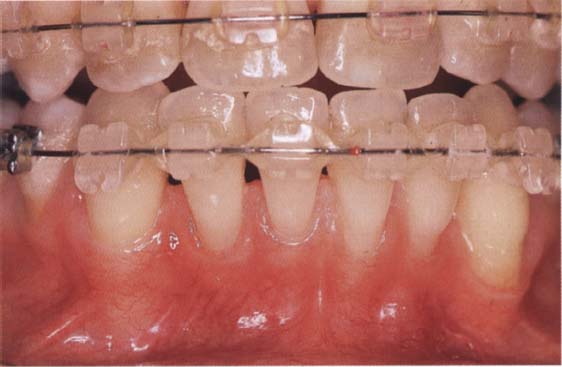
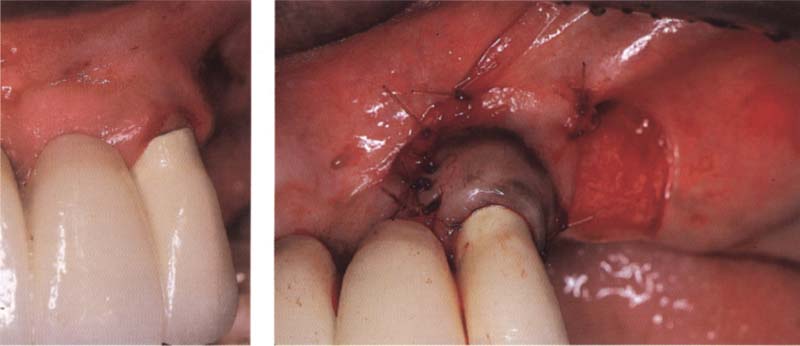
102 Initial situation: recession through protruding orthodontic appliance resulting in a lack of attached gingiva
In this patient, who was undergoing orthodontic treatment, the roots are exposed in the whole of the mandible.
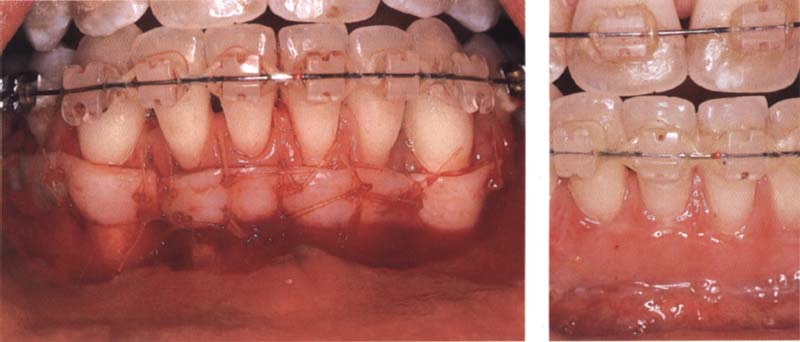
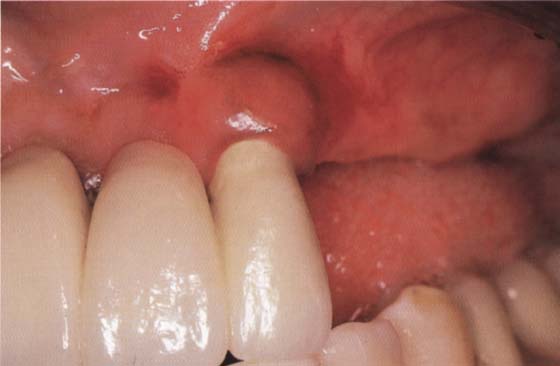
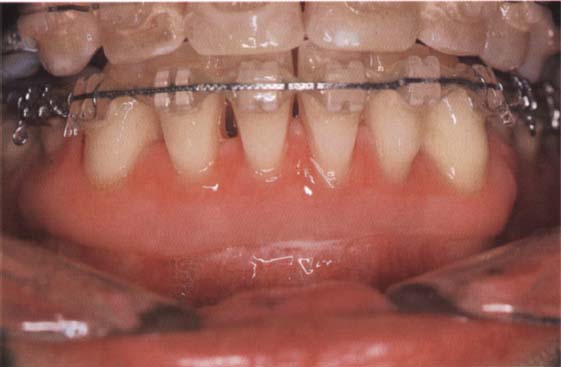
103 Free gingival grafts placed to create attached gingiva
Left: Two free gingival grafts are attached. The aim is not to create complete coverage of the entire recession. Too much of the proximal tissue has already been lost.
Right: Two weeks after the surgical intervention, the grafts are integrated and gingiva has been sufficiently attached.
Stay updated, free dental videos. Join our Telegram channel
VIDEdental - Online dental courses


