Chapter 9. Root canal filling
N.P. Chandler
CHAPTER CONTENTS
Summary131
Introduction131
Canal anatomy132
Access and canal preparation132
Criteria for filling132
Materials used to fill root canals133
Smear layer135
Coronal restoration150
Follow-up151
Treatment outcome151
Learning outcomes151
References151
SUMMARY
Over the past decade several newer root canal filling materials have been introduced, the focus being to improve on the perceived deficiencies of gutta-percha and to achieve savings in both time and cost. Most of these developments aimed to replace gutta-percha with a variety of new resins as the core filling material. Newer root canal sealers have also been introduced to complement these systems. Gutta-percha and the newer core materials are now made to match the size and taper of modern root canal preparation instruments. Single-cone, matched root fillings may provide an acceptable result in carefully selected cases. Mineral Trioxide Aggregate is finding an increasing role as a root canal filling material, following its successful application in immature teeth. The ideal root canal filling material is yet to be developed and some root canal shapes remain challenging to fill irrespective of the method used. The aim of this chapter is to describe the fundamental principles of canal filling using gutta-percha and to provide a brief overview of relevant alternative methods.
INTRODUCTION
The entire root canal system should be filled following cleaning and shaping. The objectives of root canal filling are:
1. To prevent microorganisms which remain in the root canal system after preparation from proliferating and passing into the periapical tissues via the apical foramen and other pathways.
2. To seal the pulp chamber and root canal system from leakage via the coronal restoration in order to prevent passage of microorganisms and/or toxins along the root canal and into the periapical tissues via the apical foramen and other pathways.
3. To prevent percolation of periapical exudate and possibly microorganisms into the pulp space via the apical foramen and other pathways.
4. To prevent percolation of gingival exudate and microorganisms into the pulp space via lateral/furcation canals opening into the gingival sulcus or through exposed, patent dentinal tubules around the neck of the tooth.
The quality of the root canal filling depends on the complexity of the root canal system, the efficacy of canal preparation, the materials and techniques employed, and the skill and experience of the operator. Filling of the canal does not represent the end of root canal treatment, as restoration of the clinical crown to prevent leakage of fluids and oral microorganisms into the pulp space is critical to long-term success. 1 There is mounting evidence that the quality of the coronal seal affects the prognosis of root canal treatment. 2
Many materials and techniques have been used to fill root canals. 3 The current material of choice is gutta-percha combined with a sealer, because it is versatile and can be used in a variety of techniques.
CANAL ANATOMY
Pulp anatomy is complex with many root canals having apical deltas, lateral canals and other aberrations; accessory canals, fins, and anastomoses are not uncommon, especially in posterior teeth. These, together with the consequences of physiological and pathological dentine deposition and procedural problems during canal preparation, present challenges. The inherent anatomy of the root canal system has a major influence on the techniques used to fill canals and on the quality of the final result.
ACCESS AND CANAL PREPARATION
The aims of preparation are to clean and shape the root canal system. Access and preparation have been discussed in Chapters 4 and 7 respectively. It should be emphasized that time and care spent during access and canal preparation will facilitate root canal filling. As well as removing microorganisms and debris from the root canal system, preparation produces the desired canal shape to receive the root filling. Cleaning of the canal may be achieved with irrigants and minimal removal of dentine from canal walls. However, achieving the correct canal shape invariably requires additional effort to create the flowing, flared preparation demanded by most root canal filling techniques. Inappropriate access and root canal preparation can leave microorganisms, pulpal remnants and dentine debris within the root canal system. These will, invariably, affect proper adaptation of the root filling to the canal walls, and the physical properties of the sealer will determine the effectiveness of the seal produced. Furthermore, creation of an inappropriate canal shape will make it difficult to introduce root filling materials along the length of the canal, resulting in a poorly condensed filling with voids. Thus, the ability to fill canals predictably is, significantly, dependent on the adequacy of access and the quality of the root canal preparation.
The method of root canal filling will be dictated by the preparation technique and the shaping objectives. Some operators prefer to create an apical stop at the dentine-cementum junction where a natural apical constriction is believed to exist; in this way instrumentation does not extend beyond the apical foramen. 4 With this shape of canal, the filling technique of choice is cold lateral condensation of gutta-percha. Other operators create a continuously tapering canal shape where the smallest diameter is at the foramen. 5 With this shape, a variety of warm gutta-percha techniques are more appropriate; the lack of an apical stop will predispose the master gutta-percha cone, used in lateral condensation, to being distorted and pushed beyond the foramen when a spreader is introduced.
CRITERIA FOR FILLING
Root canal filling is often delayed for one or more visits following preparation to allow interappointment medicaments placed in the canal to act on the microbial flora and for signs and symptoms to resolve. 6,7 Unfortunately, delaying root canal filling may lead to loss of, or microleakage, through provisional restorations. Also, all medicaments have limited antimicrobial activity7 and duration of effectiveness. Under the right circumstances, modern root canal preparation techniques are effective in eliminating microorganisms so in selected cases root canal preparation and filling may be completed in one visit.
The decision as to when to fill root canals is controversial and debatable. Advocates for immediate filling of canals following preparation believe that their regimen for eliminating microorganisms by preparing a continuously tapering canal shape5 and the extensive use of sodium hypochlorite and ethylenediaminetetraacetic acid (EDTA) or alternative irrigation is effective. It was argued that the root canal system is likely to be sufficiently cleared of microorganisms and substrate to allow filling to proceed immediately. 8 Meanwhile, there is strong evidence that delaying root canal filling and the use of an intracanal medicament will reduce the microbial population further9 and enhance the long-term outcome, particularly if the root canal is infected. It will encourage more rapid resolution of apical periodontitis and an improved prognosis. 10,11 To further confuse the issue, there is research reporting no difference between the outcome of one-visit or two-visit root canal treatment incorporating calcium hydroxide medication. 12
Logically, teeth with non-infected pulps and no sign of apical periodontitis can be prepared and filled in one visit, whereas infected cases with apical periodontitis should be treated cautiously, with additional appointments to allow an intracanal medicament to further reduce the microbial population. Unfortunately, research in this area is difficult and time-consuming and so far, a definitive answer is lacking. 13 Irrespective of the number of treatment visits, it is essential that the root canal can be thoroughly dried prior to filling, otherwise it will influence the effectiveness of the seal.
MATERIALS USED TO FILL ROOT CANALS
Many materials have been used to fill root canals. Historically, these range from feathers and wood sticks through a range of precious metals to amalgam and dental cements. The requirements for a root canal filling material have been specified for many years. 14 A large number of materials have proved to be inadequate, impractical or biologically unacceptable.
SEALERS
A root canal sealer (cement) is used in combination with the core root canal filling material, e.g. gutta-percha. The primary role of the sealer is to obliterate the irregularities between the root canal wall and the core material. Almost all of today’s root canal filling techniques use a sealer to enhance the seal of the root canal filling. 15
Root canal sealers are used for the following purposes:
• cementing (luting, binding) the core material to the canal
• filling the discrepancies between the root canal walls and core material
• acting as a lubricant
• acting as an antimicrobial agent
• acting as a marker for accessory canals, resorptive defects, root fractures and other spaces into which the main core material may not penetrate.
The requirements and characteristics of an ideal sealer are: 16
• non-irritating to periapical tissues
• insoluble in tissue fluids
• dimensionally stable
• hermetic sealing ability
• radiopaque
• bacteriostatic
• sticky and good adhesion to canal wall when set
• easily mixed
• non-staining to dentine
• good working time
• readily removable if necessary.
No current material satisfies all these requirements but many work well in clinical practice. As well as providing a satisfactory seal, it must be well tolerated by the periapical tissues and be relatively easy to handle. Sealers are toxic when freshly prepared; 17 however, their toxicity is reduced substantially after setting. 18 Thus, although sealers produce varying degrees of periapical inflammation, it is normally only temporary and depending on composition, it does not appear to prevent tissue healing. 19
Most sealers are absorbed to some extent when exposed to tissue fluid, 20 so the volume of sealer must be kept to a minimum with the core material forming the bulk of the root filling. The core material should force the sealer into inaccessible areas and into irregularities along the root canal walls. Excess sealer should ideally flow backwards and into the access cavity, but some gutta-percha techniques tend to force sealer apically and laterally via the foramen and accessory canals. 21,22 The passage of sealer into the periapical tissues is not encouraged. However, there is equivocal evidence that it will reduce the success rate of treatment provided that canal preparation and filling have been performed with care. Clinical experience suggests that most excess sealer in the periapical region is absorbed with time but large volumes of extruded sealer must be avoided.
Sealers in use today can be divided into five groups based on their constituents:
• zinc oxide–eugenol sealers
• calcium hydroxide sealers
• resin sealers
• glass ionomer sealers
• silicone-based sealers.
Zinc oxide-eugenol sealers
Most of the zinc oxide-eugenol sealers are based on Grossman’s formula. 23 Commercial products include Tubli-Seal (SybronEndo, Orange, CA, USA), Pulp Canal Sealer (SybronEndo) and Roth Sealer (Roth International Ltd, Chicago, IL, USA). Modified formulations with extended working times are also available.
Once set, zinc oxide-eugenol sealers are relatively weak and porous, and are susceptible to decomposition in tissue fluids, particularly when extruded into the periapical tissues. 24 All zinc oxide-eugenol cements are cytotoxic and the cellular response may last longer than those produced by other materials. 18 However, these problems are not usually apparent clinically, and zinc oxide-eugenol materials are, probably, the most commonly used sealers. The various zinc oxide-eugenol sealers have a range of setting times and flow characteristics so the choice of formulation is dependent on the case. Difficult canals that need some time to fill require a sealer with an extended working time. If heat is applied during root canal filling, its influence on the setting time of sealers should also be taken into account.
Calcium hydroxide sealers
Calcium hydroxide-based sealers have been developed on the assumption that they preserve the vitality of the pulp stump and stimulate healing and hard tissue formation at the apical wound. Laboratory research has demonstrated their sealing ability to be similar to zinc oxide-eugenol sealers25 although it remains to be seen whether during long-term exposure to tissue fluids they maintain their integrity, since calcium hydroxide is soluble and may leach out and weaken the remaining cement. 24
Commercial products include Sealapex (SybronEndo), a calcium hydroxide-containing polymeric resin, Apexit Plus (Ivoclar Vivadent, Schaan, Liechtenstein) and epoxy-based Acroseal (Septodont, Saint-Maur Cedex, France).
Resin-based sealers
Resin-based materials have been available for many years but they remain less popular than zinc oxide-eugenol sealers. The first resin sealer, AH 26 (Dentsply DeTrey, Konstanz, Germany), a powder and a liquid, consisted of an epoxy resin base which set slowly when mixed with an activator. It has good sealing26 and adhesive properties, and antibacterial activity. However, it produces an initial severe inflammatory reaction18 which subsides after some weeks and the material is then well tolerated by the periapical tissues. The resin has a strong allergenic and mutagenic potential27 and cases of contact allergy and paraesthesia28 have been reported. The material releases formaldehyde29 which may explain its strong antibacterial effect. 30 AH 26 has largely been superseded by AH Plus (Dentsply DeTrey), a two paste system formulated to polymerize without the release of formaldehyde; this sealer is also marketed as TopSeal (Dentsply Maillefer, Ballaigues, Switzerland). AH Plus is also less cytotoxic, with a thinner film thickness and lower solubility.
EndoREZ (Ultradent, South Jordan, UT, USA) is a urethane dimethacrylate (UDMA) based resin sealer. It is recommended for use with EndoREZ points (Ultradent), methacrylate resin coated gutta-percha points so that there is bonding between the root filling, sealer and the root canal dentine. Other resin sealers include Hybrid Root SEAL (Sun Medical Co. Ltd., Moriyama City, Shiga, Japan) or MetaSEAL (Parkell, Edgewood, NY, USA), both of the same chemical formulation and based on 4-methacryloethyl trimellitate anhydride(4-META).
Glass ionomer sealers
The ability of glass ionomer cement to adhere to dentine would appear to provide a number of potential advantages over conventional sealers. Its endodontic potential was recognized soon after its introduction as a restorative material31 but it was many years before a product for endodontic use was formulated. The results of a multicentre clinical trial evaluating its performance32 suggested that it was similar to traditional sealers, but this sealer is no longer available.
Activ GP glass ionomer sealer (Brasseler, Savannah, Georgia, USA) was recently introduced for use with Activ GP points (Brasseler). The surface of these gutta-percha points is coated with glass ionomer. The sealer is meant to adhere chemically and micromechanically to the Activ GP points and also bond to the root canal dentine.
Silicone-based sealers
RoekoSeal (Coltène/Whaledent, Cuyahoga Falls, OH, USA) is a polydimethylsiloxane-based sealer. The manufacturer stated that this silicone-based sealer expands slightly on setting (0.2%) and is highly radiopaque; the claimed advantages include good sealing ability33 and excellent biocompatibility. 34 However, in a histopathological study on periapical healing in dog’s teeth, no differences were noted between RoekoSeal and AH Plus. 35
GuttaFlow (Coltène/Whaledent), introduced in 2004, is a modification of RoekoSeal. GuttaFlow contains particles of gutta-percha less than 30 µm in size and and also expands slightly (0.2%) on curing according to the manufacturer. The material is considered to be almost insoluble. It is used with a single master gutta-percha cone, without mechanical compaction, although lateral or vertical condensation are acceptable. Its flow is significantly better into lateral grooves and depressions in the apical regions of root canals than lateral condensation or warm compaction with AH 26 sealer. 36 Its sealing qualities are similar to lateral compaction or the System B technique with AH 26. 37 All traces of irrigants must be thoroughly rinsed from the canal with water or isopropyl alcohol prior to introducing the material. GuttaFlow has a working time of 15 minutes and a setting time of about 30 minutes; GuttaFlow FAST has a 5 minute working time and a 10 minute set. A potential concern is extrusion of material beyond the apex36,37 although its cytotoxicity is lower than some other sealers.
Calcium silicate-based sealers
An advantage with these, newer types of sealer is their potential bioactive property. Similar to other tricalcium silicate and dicalcium silicate-containing biomaterials, calcium hydroxide is produced on reaction with water. It is anticipated that release of calcium and hydroxyl ions from the set sealer will result in the formation of apatites as it comes into contact with phosphate-containing fluids.
ProRoot Endo sealer (Dentsply Tulsa Dental, Tulsa, OK, USA) is a calcium silicate-based endodontic sealer that is designed to be used in conjunction with a root filling material in either the cold lateral, warm vertical or carrier-based filling techniques. The major components of the powder are tricalcium silicate and dicalcium silicate, with the inclusion of calcium sulphate as a setting retardant, bismuth oxide as a radiopacifier and a small amount of tricalcium aluminate. The liquid component consists of a viscous aqueous solution of a water-soluble polymer (polyvinyl-pyrrolidone homopolymer). Other calcium silicate-based sealers on the market include iRoot SP sealer (Innovative Bioceramix Inc., Vancouver, BC, Canada) and Endosequence BC sealer (Brasseler); the same product marketed under different names in different countries.
SMEAR LAYER
The smear layer, comprising both organic and inorganic components, is found on the root canal walls after endodontic instrumentation.38.39. and 40. It is composed largely of particulate dentine debris created by endodontic instruments during root canal preparation but also contains pulpal remnants and microorganisms. With further instrumentation the material is forced against the canal walls forming a friable and loosely adherent layer. The smear layer is typically 1–2 µm thick, although it can also be found within the dentinal tubules for up to 40 µm. 38
The smear layer has received much attention, not only because it may harbour microorganisms already in the canal but it may create an avenue for leakage of microorganisms and act as a substrate for microbial proliferation. It may also be broken down by bacterial action41 to provide a pathway for leakage. In addition, the smear layer has the potential to interfere with the adaptation of sealer against the root canal walls and prevent tubular penetration of sealer, thereby increasing the likelihood of leakage. 1,42 Indeed, it has been shown that most leakage occurs between the sealer and the wall of the root canal. 43
Smear layer removal prior to filling would appear to be desirable as it would eliminate microorganisms and allow for better adaptation of sealer. However, this procedure has been questioned since opening the tubules might increase the diffusion of potentially irritant root filling materials through the tubules to the root surface, 44 allow microorganisms trapped in the tubules to escape45 or to proliferate within the tubules and, potentially, increase leakage. 46 Nevertheless, the present consensus is that the removal of the smear layer is beneficial and desirable, particularly when treating infected teeth.
GUTTA-PERCHA
Gutta-percha has been used to fill root canals for over 130 years and is the most widely used and accepted root filling material. Gutta-percha is a form of rubber obtained from tropical trees of the Sapotaceae family. It is a trans isomer of polyisoprene, which exists in two crystalline forms, the α- and β-phases. The α-phase occurs naturally and the β-phase arises during refining; the two are interchangeable depending on temperature. Gutta-percha is mixed with other materials to produce a blend that can be used effectively within the root canal. Commercial gutta-percha cones contain gutta-percha (19–22%), zinc oxide (59–75%), various waxes, colouring agents, antioxidants, and metal salts to provide radiopacity. There is considerable variation in the stiffness, brittleness and tensile strength of commercially available gutta-percha cones and obturating products. 47
Gutta-percha cones are:
• inert
• dimensionally stable
• non-allergenic to almost all individuals
• antibacterial
• non-staining to dentine
• radiopaque
• compactible
• softened by heat
• softened by organic solvents
• removable from the root canal when necessary.
However, the disadvantages are:
• lack of rigidity
• do not adhere to dentine.
Canal filling with gutta-percha
The objective of root canal filling is to completely fill the canal system in an attempt to seal the canal from leakage apically and coronally. Gutta-percha is versatile and can be used in a variety of techniques, but a sealer is always necessary to cement the material to the canal wall and to fill minor irregularities.
Over the years, a large number of newer filling techniques have been described, accompanied by claims of greater efficacy, reduced leakage or time and money saving. Unfortunately, new does not necessarily mean better, and sadly there is little evidence from clinical trials to suggest that there are significant differences between root canal filling techniques and treatment outcome. Caution is required when considering newer filling techniques and it is prudent to wait for the published results of laboratory and clinical studies before investing in and learning a newer technique.
Methods for filling canals using gutta-percha can, broadly, be divided into three main groups:
• cold gutta-percha
• heat-softened gutta-percha
• solvent-softened gutta-percha.
Cold gutta-percha techniques
Cold gutta-percha techniques are relatively simple to master as they are not complicated by the need to soften the material with heat or solvents, hence they do not require expensive devices or equipment. However, cold gutta-percha cannot be effectively compacted into all the irregularities in a root canal system so this is the role of the sealer. Lateral condensation is the most popular method of root filling with cold gutta-percha.
Lateral condensation
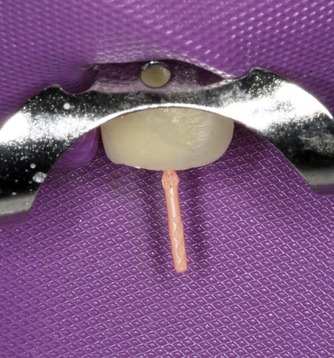
With the advent of the standardized preparation technique, 48 the method of filling root canals with a single, full length gutta-percha cone and sealer became popular. The concept was simple and attractive; the root canal was prepared to a round cross-sectional shape of a standard size with reamers and filled with a gutta-percha cone of the same diameter. Unfortunately, a round canal shape was rarely achieved, especially in curved roots, 49,50 and the single cone required large amounts of sealer to fill the intervening gaps resulting in increased leakage. 51 It was also clear that discrepancies in size52 and taper between gutta-percha cones and equivalent numbered instruments were prevalent. While many clinicians appreciated these problems and adopted other filling techniques, others continued to fill canals using this method (Fig. 9.1).
 |
| Figure 9.1
Maxillary left first premolar with a short, single cone filling in one canal and an untreated second canal.
|
Current canal preparation techniques produce a flared canal with a flowing conical shape and cannot be filled adequately with a single 0.02 taper gutta-percha cone. Gutta-percha cones with ISO standardized tip sizes but with varying tapers, e.g. 0.04 or 0.06 tapers are available (Fig. 9.2). These cones with increased taper can fill funnel-shaped canals more effectively because they are more likely to correspond to the canal shape created by instruments with similar taper. In a laboratory study on curved canals, a single tapered cone technique has been found to be comparable with lateral condensation in terms of the amount of gutta-percha occupying the root canal space; the technique is also faster than lateral condensation. 53 A clinical example shows radiographically acceptable results (Fig. 9.3).
 |
| Figure 9.2
Gutta-percha cones, 0.06 taper with standardized 15–40 tip sizes.
|
 |
| Figure 9.3
Mandibular right first molar. The mesial canals are filled with 0.04 taper, size 40 gutta-percha cones and the distal canal with a 0.06 taper, size 40 cone. Canal entrances covered with IRM and an amalgam intraradicular core for the coronal restoration.
Reproduced courtesy of D Violich.
|
Lateral condensation of cold gutta-percha is taught and practised throughout the world and is the technique of choice for many clinicians. It is simple and rapid to carry out. It can be used in virtually all cases where canal preparation results in an apical stop, and is the standard against which most newer techniques are compared (Fig. 9.4). Lateral condensation involves the placement of a master (primary) gutta-percha cone to the terminus of the preparation followed by placing additional (accessory) gutta-percha cones alongside (Fig. 9.5). The use of a standardized master cone provides the possibility of a predictable fit at the apex, while the accessory cones fill the intervening space, produced as a result of the flared canal shape. The root filling, therefore, consists of numerous cones cemented together and to the canal wall by sealer; there is no merging of the cones into a homogeneous mass of gutta-percha (Fig. 9.6). The technique is not recommended when the canal has no apical stop and files can easily pass through the foramen (when the canal has a continuous taper with the foramen being the narrowest).
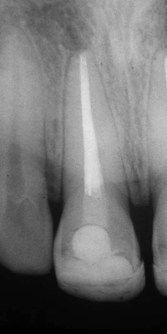 |
| Figure 9.4
Maxillary central incisor filled with laterally condensed gutta-percha.
|
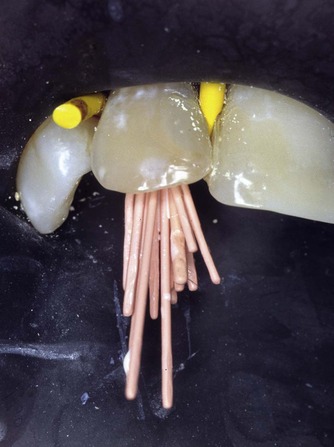 |
| Figure 9.5
Maxillary lateral incisor with multiple gutta-percha cones in place during lateral condensation.
|
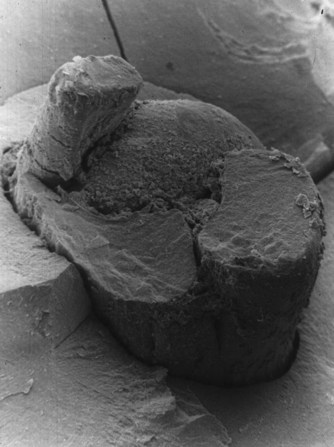 |
| Figure 9.6
Scanning electron micrograph of a section of a root with laterally condensed gutta-percha in situ. Close adaptation of the cones to the wall of the canal and the limited space occupied by sealer or voids is evident. The circular cross section of the cones have been modified by spreader insertion.
|
A spreader is inserted alongside the master cone to improve its adaptation at the terminus of the preparation and to create the space for the accessory gutta-percha cones. When inserted to within 1 mm of the terminus to condense the master cone apically54 and laterally, the result will be considerably less leakage than if the spreader had only entered part of the way into the canal. 55 The need to advance the spreader well into the root canal is one of the main reasons why canals are flared. A narrow, parallel shape will not allow the spreader to influence the adaptation of the apical region of the master gutta-percha cone. Narrow canal preparations also risk removing the master gutta-percha cone when withdrawing the spreader, as it might pierce the cone instead of condensing the material.
The requirements for successful lateral condensation are:
• a flared canal preparation with an apical stop
• a well-fitting master gutta-percha cone
• speader/s of the appropriate size and shape
• accessory cones which match the dimensions of the spreader/s
• an appropriate sealer.
The master gutta-percha cone must fit to the full length of the preparation, be tight at the end-point of the canal preparation (ideally present some resistance to withdrawal or ‘tug-back’), and it must not be able to pass through the foramen.
The size of the master gutta-percha cone should correspond to the master apical file used to prepare the apical stop. The selected gutta-percha cone is held with tweezers at the correct length, equivalent to the working distance and then inserted into the canal. Ideally, the gutta-percha cone should:
• pass down to the full working distance
• be impossible to push beyond this depth or through the foramen
• fit tightly giving some resistance to withdrawal (tug-back).
The tweezers are squeezed slightly to mark the gutta-percha cone and the tweezers removed, leaving the cone in situ (Fig. 9.7). A radiograph may be taken to confirm the correct depth in relation to the terminus of the preparation and the radiographic apex. If the canal length is correctly estimated, the gutta-percha cone should be at the right depth and position, and the canal filling procedure can proceed. However, a number of problems can occur, either as a result of technical difficulties during canal preparation or because of size discrepancies in the gutta-percha cones and/or instruments. Most of these problems can be easily addressed but they require some thought to ensure that the exact problem is identified.
 |
| Figure 9.7
Master gutta-percha cone notched at working distance corresponding to the chosen incisal edge reference point.
|
Gutta-percha cone reaches the working distance but is loose
This may occur for a number of reasons.
• The gutta-percha cone was smaller than expected. During manufacture, a tolerance of ±0.05 mm is allowed at d1 so that it is possible for a gutta-percha cone with the correct nominal size to be smaller than the equivalent master apical file size and prepared canal width. The solution may be to remove 1 mm increments from the tip of the cone with a sharp scalpel blade to increase the tip diameter, or to select a larger gutta-percha cone.
• The end-point of preparation was wider than expected. Just as the size of cones may vary so can the size of files. The tolerance of files can be ±0.02 mm at d1 so it is possible for the canal to be wider than anticipated. The solution to this problem is the same as that described above.
The canal can become wider than expected through inappropriate choice of instruments and/or preparation technique leading to the excessive removal of tooth tissue from the outer wall of the canal apically. If this is the problem, then either a selection of gutta-percha cones can be tried-in until one is found to fit or an alternative filling method chosen.
Gutta-percha cone passes beyond working distance or through foramen
This can occur when the apical stop is inadequate or when the gutta-percha cone is too small. If the stop is not sufficiently definite, then the cone will pass more deeply and through the foramen. The solution is either to reprepare the canal with larger instruments until a distinct stop is created at the end-point of preparation, or to remove 1 mm increments from the gutta-percha cone until its diameter is sufficient to bind in the canal at the working distance.
Gutta-percha cone does not reach the working distance
This is the most common problem with positioning of the master cone and there are a number of reasons:
• The gutta-percha cone was larger than expected. Just as gutta-percha cones can be smaller than the nominal size and appear loose, they can also be larger. Thus, if a cone is a short distance (<2 mm) away from the end-point of the preparation it may be possible to try a selection of cones of the same diameter to find one that fits.
• The canal was not widened sufficiently at the end-point or the canal taper was too narrow. This is a common problem and occurs when the master apical file is either smaller than its nominal size or, more likely, that it was not used sufficiently to widen the canal fully. In this way, either the apical dimensions of the canal are too small or the curved region of the canal is too narrow and causes the gutta-percha cone to bind. It is essential that the master apical file be manipulated until it can pass down freely to the termination of the preparation without the application of any undue force. With insufficient preparation it may be possible to force the master apical file to the working distance, but the gutta-percha cone will bind and buckle before reaching the expected length. The solution to this problem is to select a new file and reinstrument the canal to the working length until the file is loose. Increasing the taper along the length of the canal may also be necessary.
• Dentine debris is blocking the apical region of the canal, usually as a result of insufficient irrigation. Blockages are difficult to eliminate, so during canal preparation copious volumes of irrigant should be used and frequent recapitulation is necessary to ensure the canal is patent at the termination of the preparation. Passive ultrasonic irrigation may also be helpful to remove blockages. 56
Selection of spreaders and accessory gutta-percha cones
Once the master gutta-percha cone has been chosen, it is important to select and try-in the spreader to ensure that it can pass down the canal to within 1 mm of the termination of the preparation. Spreaders should be precurved in curved canals and a silicone stop used to mark the depth of insertion. Nickel-titanium spreaders, which are more flexible, are also available. To reduce the risk of root fracture due to excessive condensation pressures, finger rather than hand-held spreaders may be used.
Spreaders come in non-standardized or standardized 0.02 tapers, the same as for most hand files. Non-standardized spreaders have relatively small diameters at the tip but a range of tapers ranging from extra-fine through fine, medium to large; some manufacturers use letters rather than words to denote the degree of taper, e.g. A, B, C, D. Spreaders with a standardized taper are manufactured in a range of ISO diameters.
The choice of spreader design, that is, with non-standardized or standardized taper, and the type of accessory cones are determined by operator preference. When non-standardized spreaders are used the cones should also be non-standardized. However, standardized spreaders require standardized accessory gutta-percha cones. In this way, the cone will fill the space created by the corresponding spreader. The space created by a standardized spreader cannot be filled adequately with a non-standardized cone. It is also beneficial to use instruments and materials from the same manufacturer to ensure accurate sizing.
The size of the spreader, and thus cones, are determined by the size of the canal. Large canals with a substantial taper are more efficiently filled with larger taper cones, whilst smaller canals with narrower tapers should be filled with finer cones. On most occasions, an extra-fine or fine spreader is required along with matching accessory gutta-percha cones.
Completion of lateral condensation
1. The master gutta-percha cone, spreader, accessory gutta-percha cones and sealer should be organized to ensure they can be handled efficiently.
2. The canal should be dried thoroughly with paper points.
3. The sealer should be mixed and smeared onto the canal wall using either a hand file rotated anticlockwise, by coating a paper point and inserting it into the canal, or by coating the master cone itself. Large volumes of sealer introduced with motor driven devices are not necessary and may be hazardous.
4. The master cone should be ‘buttered’ lightly with sealer and then inserted immediately to the full working length.
5. The spreader is then placed alongside the gutta-percha cone and pushed apically with controlled force until it reaches the appropriate depth, 1 mm from the end-point of preparation. These forces can be considerable, 57 and the direction of force should be apical with no lateral action, which could risk root fracture. Apical pressure is applied in a constant manner for 10 to 20 seconds to compact the gutta-percha in an apical and lateral direction. In curved canals, the spreader may be precurved and applied either lateral to, or on the outer aspect of the master gutta-percha cone. It should not be applied along the inner aspect of the curve as it could pierce the cone and drag it out when the spreader is removed.
6. The first accessory gutta-percha cone is inserted into the space created by the spreader.
7. The spreader is then cleaned and reinserted immediately into the canal. It should not go down to the full working length.
8. The second accessory gutta-percha cone is inserted into the space created.
9. The sequence of spreader application and cone insertion continues until the canal is full, with the number of accessory cones required varying from canal to canal (Fig. 9.8). If a post-retained restoration is planned, if desired, lateral condensation can cease when the apical 5–6 mm have been filled.
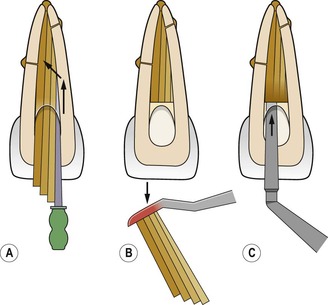 |
| Figure 9.8
Cold lateral condensation. (A) After master gutta-percha cone fitted, accessory cones added and condensed until no longer space for spreader. (B) A heated instrument is used to sever the gutta percha cones and (C) vertically condensed
(based on an original drawing by M Monteith).
|
10. If the final coronal restoration is not post-retained, the excess gutta-percha emerging from the canal entrance should be removed with a hot instrument and condensed vertically with a plugger to promote a satisfactory seal. The gutta-percha should be reduced to below the gingival level, particularly in anterior teeth, in order to maintain the translucency of the crown and to prevent the possibility of sealer staining the dentine. 58 In all cases, having the root filling confined to well within the root and protected by suitable restorations will reduce the risk of microleakage.
When a post-retained restoration is planned gutta-percha can be removed immediately but carefully, leaving approximately 4–5 mm of apical root filling undisturbed. 59,60 Post space preparation at this stage is advantageous as the operator is very conscious of the anatomy and length of the canal. A rubber dam is already in place and the required length of post is easily assessed.
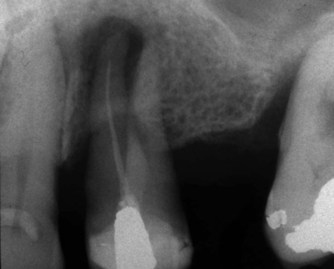
Lateral condensation is relatively simple to carry out, rapid, and has been used for many years with considerable success, even in quite demanding cases (Fig. 9.9). However, since it is impossible for cold gutta-percha to flow into all the irregularities in the root canal system, parts of the canal must either remain unfilled61 or be filled only with sealer. The importance of cleaning anatomical irregularities in oval canals has been emphasized. Otherwise, they remain packed with debris and reduce the quality of the root filling; 61,62 canals which are this shape present a challenge for most obturation methods. 63
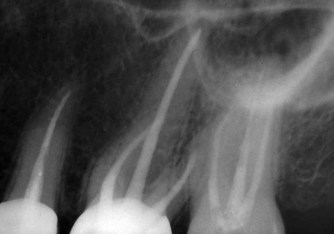 |
| Figure 9.9
Three maxillary posterior teeth filled with laterally condensed gutta-percha. Condensation is insufficient in the palatal canal of the second molar.
|
Innovative means of obturation using gutta-percha aimed at reducing the time involved with lateral condensation include SimpliFill (Discus Dental, Culver City, CA, USA). A section of gutta-percha or Resilon (see later) is held at the end of the SimpliFill disposable delivery device, which is inserted into the canal to the desired depth. An apical plug of root filling is left inside the canal by twisting, to free the delivery device, which is then withdrawn; the remainder of the canal is then back-filled if required.
The perceived deficiencies of lateral condensation have resulted in the development of techniques in which gutta-percha is softened by heat or solvents so that the core material can be condensed into anatomical irregularities. 62 Some of these techniques are ‘hybrids’ which use the controllability and safety of cold lateral condensation in the apical region and heat-softening to fill the coronal two-thirds more quickly. Other techniques involve heat to soften the whole length of gutta-percha in the root canal.
Heat-softened gutta-percha techniques
For decades the only technique that used heat-softened gutta-percha was warm vertical condensation64 but a number of innovative methods for warming and condensing gutta-percha are now available. In some, cold gutta-percha is placed in the canal and warmed in situ; these can be referred to as intracanal heating techniques. Others rely on warming gutta-percha outside and then delivering it into the canal, the extracanal heating techniques.
For canals prepared with an apical stop, lateral condensation of gutta-percha is an excellent and popular method of filling and the one best suited for most operators. The heat-softened techniques are technically more demanding for inexperienced and non-specialist operators, and caution is required. Practising on simulated canals in plastic blocks and on extracted teeth is very valuable and will aid familiarity.
Intracanal heating techniques
In these techniques, cold gutta-percha is placed in the canal and then heated to become soft and condensable. All the techniques involve the use of a sealer. The popularity of these methods was limited until Schilder64 described his method for filling canals using warm vertical condensation.
Warm vertical condensation
The aim of the Schilder technique64 is to fill the canal with heat-softened gutta-percha packed with sufficient vertical pressure to force it to flow into the entire root canal system, including accessory and lateral canals. The traditional technique requires a flared canal preparation with a definite apical stop. The flared nature of the canal is necessary to accommodate the pluggers used to condense the gutta-percha and facilitate the flow of the material apically. Excessive wide/>
Stay updated, free dental videos. Join our Telegram channel
VIDEdental - Online dental courses


