Chapter 8 Treatment Plans Related to Key Implant Positions and Implant Number
In the past, treatment planning for implant dentistry was primarily driven by the existing bone volume in the edentulous sites. As a result, distal cantilevers were extended from anterior implants or shorter implants were placed in the posterior regions of the mouth. A second historical phase of treatment planning has since developed based on esthetics. In this scheme, implant positions were primarily controlled by the teeth being replaced.
The primary causes of complications in implant dentistry are related to biomechanics.1 For example, early loading failures outnumber surgical healing failures, especially in soft bone, when forces are greater than usual or implant sizes are shorter than 10 mm. Misch developed a treatment plan sequence to decrease the risk of biomechanical overload, consisting of following2:
ABUTMENT OPTIONS
Several treatment options are available for the adequate restoration of an edentulous segment. As a general rule, implant-supported prostheses independent from natural adjacent teeth are designed whenever possible. This concept reduces the risk of decay on the natural tooth margin next to the adjacent pontic or abutment. The incidence of decay on a tooth splinted in a fixed partial denture accounts for 22% of the complications within 10 years, whereas individual crowns have less than 1% risk of decay within this time frame.3 Unrestored natural teeth have less risk of decay, and implants do not decay at all. A second common complication of teeth-supported fixed prosthetic restorations is endodontic-related factors that occur in approximately 15% of cases within 10 years. Implant abutments do not require endodontic procedures, and unsplinted natural tooth crowns have less endodontic procedures. Independent implant prostheses may also reduce or eliminate pontics, while simultaneously increasing the number of abutments and distributing forces more effectively. The increase in abutment number decreases the risk of an unretained restoration, which is the third most common fixed prosthesis complication supported by natural teeth. Therefore independent implant prostheses cause fewer complications and exhibit greater long-term success rates of the prosthesis and greater survival rates of the adjacent teeth.4 However, when an implant restoration is joined to a natural tooth, an increased risk of abutment screw loosening, implant marginal bone loss, and unretained restoration occurs. In addition, the distribution of occlusal forces is optimized when independent implant prostheses are designed. As a result, the ideal treatment plan for a partially edentulous patient includes an independent implant restoration.
Key Implant Positions
Some implant positions are more critical than others in regard to force reduction. There are four general guidelines to determine key implant positions (Box 8-1):
No Cantilevers
The first rule for ideal key implant positions is that no cantilever should be designed in the prosthesis (Figure 8-1). Cantilevers are force magnifiers to the implants, abutment screws, cement or prosthesis screws, and implant-bone interface. Cantilevers on fixed partial dentures supported by teeth have a higher complication rate than prostheses with terminal abutments, including unretained restorations. This is especially noted with parafunction or reduced crown height spaces.5 Therefore the ideal key implant positions include the terminal abutment positions when adjacent teeth are missing.

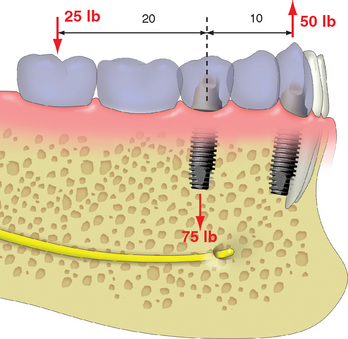
A cantilevered restoration on multiple implants may be compared with a class I lever. The extension of the prosthesis from the last abutment is the effort arm of the lever. The last abutment next to the cantilever acts as a fulcrum when a load is applied to the lever. The distance between the last abutment and the farthest abutment from the end of the cantilever represents the resistance arm and may be called the anteroposterior distance or A-P spread of the implants. The length (usually in millimeters) of the cantilever (effort arm) divided by the resistance arm represents the mechanical advantage. Therefore, when two implants are 10 mm apart with a cantilever or extension of 20 mm, the mechanical advantage is two (20 mm/10 mm). In this example, a 25-lb force on the cantilever results with a 50-lb force on the farthest abutment from the cantilever (25 lb × 2 = 50 lb). The abutment closest to the cantilever (fulcrum) receives a force equal to the sum of the other two forces, or, in this example 75 lb (25 lb + 50 lb) (Figure 8-2). Therefore cantilevers magnify forces to all the abutments supporting the prosthesis.
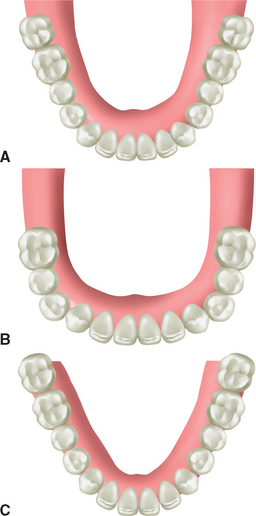
To enforce the rule of no cantilever, the key implant positions when one or two adjacent teeth are missing indicate one implant per tooth. When 3 to 14 adjacent teeth are missing, the key implant positions include the two terminal abutments, one on each end of the prosthesis. A three- to four-unit prosthesis may be fabricated with only these abutments, when nearly all the force factors are low and the bone density is favorable (Figure 8-3). Restorations of 5 to 14 units require additional abutments.

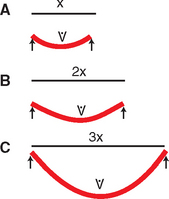
The ideal treatment plan should eliminate cantilevers. However, in some clinical conditions, a cantilever is the most prudent treatment option. For example, in an edentulous mandible, available bone in the posterior regions may be insufficient for root form implant placement, without advanced procedures (e.g., nerve repositioning, iliac crest bone grafts). An alternative treatment plan may be to cantilever pontics from anterior implants. However, when terminal abutments are not designed in the treatment plan and a cantilever is planned, other force and surface area factors should compensate for the increase in force. When this option is considered, the force factors of parafunction, crown height, masticatory dynamics, implant location, and opposing arch are closely scrutinized. In addition to force modifiers, the A-P distance (A-P spread) of the distal and anterior implants is also a factor. When the implants are in one plane, the cantilever should rarely extend farther than the A-P distance, regardless of how low the patient force factors (see Figure 8-1). When the force factors are unfavorable, the cantilever length should be reduced or eliminated, the implant number increased, the implant size increased, or the implant design surface areas increased. When five or more implants are positioned around an arch, and several different plans exist because of the arch form of the splinted implant, the cantilever may extend as far as 2.5 times the A-P distance when force factors are low and density is favorable (Figure 8-4). However, more than two pontics are not indicated on a posterior cantilever, even under ideal conditions.
When the cantilever on the prosthesis is represented by only a lateral incisor, the ideal implant position may not include the lateral incisor position when bite forces are low to moderate. The lateral incisor is the smallest tooth in the arch, so the cantilever is limited. The anterior bite forces are lowest in the central and lateral incisor region. The occlusal contact on the pontic may be eliminated and further reduce risk of overload. When a pontic replaces the lateral incisor, the soft tissue drape may be improved compared with an implant. As a result, the ideal implant position based on force and esthetics may be a larger-diameter implant in the canine position (i.e., 5-mm versus 4-mm diameter) and a cantilever pontic to replace the lateral incisor.
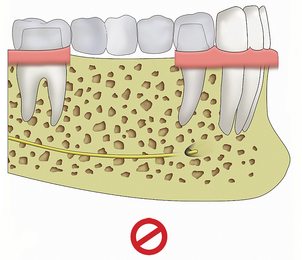
No Three Adjacent Pontics
In most prostheses designs, three adjacent pontics are contraindicated on implants, just as they are contraindicated on natural abutments.6 The adjacent abutments are subjected to considerable additional force when they must support three missing teeth, especially in the posterior regions of the mouth. In additions, all pontic spans between abutments flex under load. The greater the span between abutments, the greater the flexibility of the metal in the prosthesis. The greater the load, the greater the flexure. This metal flexure places shear and tensile loads on the abutments (see Chapter 25).7 The greater the flexure, the greater the risk of porcelain fracture, uncemented prostheses, and abutment screw loosening.
A one-pontic span exhibits little flexure—8 μm or less with precious metal under a 25-lb load.8 A two-pontic span flexes eight times more than a one-pontic span, all other variables being equal. A three-pontic span flexes 27 times more than a one-pontic span (Figure 8-5).7–9 As a result, not only is the magnitude of the force increased to the adjacent abutments when the prosthesis has three pontics (because they are supporting two abutments and three pontics), but the flexure of the metal increases to a point that the incidence of complications make the treatment plan contraindicated, especially when forces are greater (as in the posterior region).
The span of the pontics in the ideal treatment plan should be limited to the size of two premolars, which is 13.5 to 16 mm. When a molar is one of the teeth missing between existing teeth, the missing molar space may be 10- to 14-mm long. Therefore when the span is greater than 14 mm, two pontics should be considered to replace the molar. As a result, when a second premolar and first molar are missing, this span is often treatment-planned to replace three teeth, rather than two. In other words, a missing tooth span is often related to the missing number of roots in the mandible and number of buccal roots in the maxilla. This is especially appropriate for greater patient forces (i.e., moderate to severe parafunction) or softer bone types (i.e., D3 and D4) (Figure 8-6). As a result of these guidelines, an edentulous arch missing 14 natural teeth may have 18 potential implant sites. Rarely are second molars replaced; therefore when 12 natural teeth are considered in an edentulous arch, 14 potential implants sites are present.
To limit the effect of the complications of three adjacent premolar size pontics, additional key implant positions are indicated in prostheses missing more than four adjacent teeth. To have three potential pontics in a restoration, at least four adjacent posterior teeth or five adjacent anterior and premolar teeth must be missing (when terminal abutments are present). Therefore, when 4 to 14 missing adjacent teeth are to be replaced, key implant positions are located in the terminal abutments and additional pier or intermediary abutments are indicated to limit the pontic spans to 2 premolar-sized pontics or less. Following this rule, a five to seven premolar-sized unit prosthesis has three key abutments (two terminal and one pier) (Figure 8-7). An 8 to 10 premolar-sized unit prosthesis has 4 key implant positions (2 terminal and 2 pier). An 11- to 13-unit prosthesis has 5 key abutments (2 termin/>
Stay updated, free dental videos. Join our Telegram channel
VIDEdental - Online dental courses


