Chapter 13 Diagnostic Casts and Surgical Templates
Diagnostic casts are critical to preimplant and treatment prosthodontics. Once the preimplant phase is satisfactory, prosthetically driven implant placement must also accommodate anatomical limitations, and possible adaptations of the original planning may be necessary. This set of requirements can be achieved using precise surgical guides. In recent years, advanced guidance has been developed to achieve predictable, precise placement. This chapter emphasizes important components of the diagnostic phase and then describes how guided placement can overcome anatomical limitations.
DIAGNOSTIC CASTS
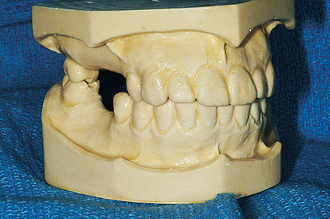
Diagnostic casts enable the dentist to evaluate several prosthodontic criteria in the absence of the patient. These casts permit an open discussion of treatment with other practitioners and laboratory technicians for consultation. In addition to all the data provided that are similar to nonimplant treatment evaluation, the casts also assist in implant site selection and angulation requirements during the surgical phase. Surgical templates often are designed from the diagnostic casts or after diagnostic wax-up of the designed prosthesis. One set of casts may be used as a permanent record of pretreatment conditions for dental—legal issues because nonreversible procedures may be performed. The diagnostic casts and pretreatment setups also may be used for presentations to motivate the patient’s acceptance of the proposed treatment (Figure 13-1).1
Diagnostic casts mounted using an accurate record of centric jaw relationship and maxillomandibular occlusion on a semiadjustable articulator provide much information related to treatment that influences the final prosthodontic treatment plan.2–4 Important factors include the following:
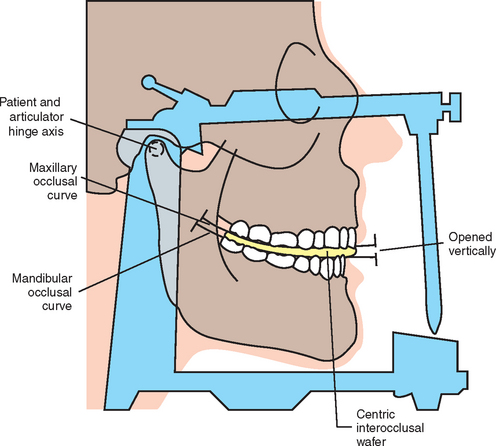
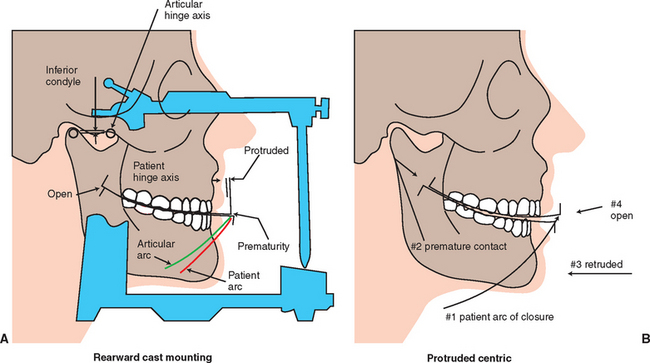
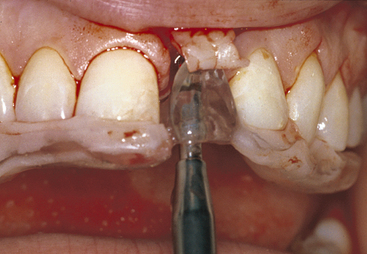
The dentist should evaluate the existing occlusion before implant placement. Partially edentulous patients often have occlusal interferences as a result of tooth migration. The dentist identifies and eliminates deflective contacts before the implant prosthodontic phase. A facebow transfer and centric and eccentric occlusal records should help in mounting the casts on a semiadjustable articulator (Figures 13-2 to 13-5). Occasionally a panographic recording of mandibular movements and a fully adjustable articulator may be indicated. The diagnostic casts are mounted in centric relation occlusion with a wax spacer between the arches. Premature contacts can be detected on removal of the wax spacer. The dentist then may perform an occlusal adjustment on duplicates of the diagnostic casts and replicate them in the mouth.5
Research has shown almost 75% of earbow transfers are within 5 mm of the axis of the temporomandibular joint. Almost 25% of individuals have one ear higher than the other, in relation to the occlusal plane. The distance from the hinge axis to the central incisors range from 87 to 120 mm, with more than 80% within 100 to 105 mm.5
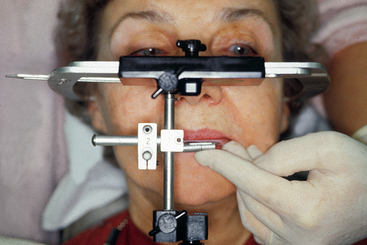
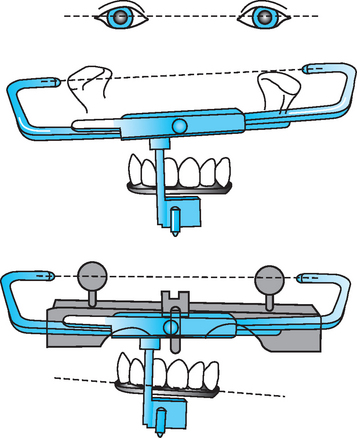
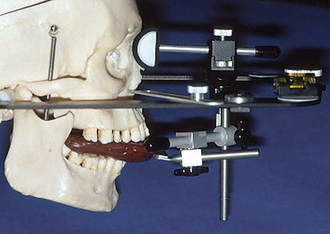
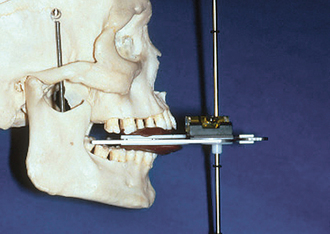
Kois has developed a unique facebow transfer that corresponds to the facial midline and horizontal plane to the 100-mm distance of the conditional hinge position. This technique simplifies the process of the facebow transfer and ensures the occlusal plane of the teeth is evaluated and fabricated correctly (Figures 13-6 to 13-8) (Kois Dento-Facial Analyzer System, Panadent Corp., Grand Terrace, Calif.).

Figure 13-6 The maxillary incisal edge is 100 mm from the hinge axis in 80% of patients (± 5 mm).
(Courtesy Panadent Corporation, Grand Terrace, Calif.)
The occlusion may require complete rehabilitation to eliminate potential unfavorable forces against the implant. Both arches may require prosthodontic treatment to establish the desired occlusal schemes. Parafunctional bruxism with loss of incisal guidance from attrition or an opposing single denture are the most common conditions that mandate more involved opposing dentition modification. The first condition often indicates a need to increase the anterior guidance for posterior disclusion in excursions, whereas the second warrants bilateral balance occlusion.
The dentist, in addition to using radiographic surveys, may also use the diagnostic casts to estimate the underlying bone volume. The dentist inserts a needle equipped with an endodontic stop through the patient’s mucosa overlying the implant site and measures the mucosal thickness on the crest, facial, and lingual areas. The dentist also can use a bone caliper that contains sharp beaks penetrating soft tissues at a known height. Once the calipers are inserted, bone width can be measured with the calibrated instrument.6 The edentulous region of the diagnostic cast is cut perpendicular to the ridge. The diagnostic cast cross section then is shaded with a pencil to represent the tissue thickness observed while probing. The remaining cross section of the cast roughly estimates the bony contours under the soft tissue.6–8
RESTORATIVE DIAGNOSIS VERSUS SURGICAL DIAGNOSIS
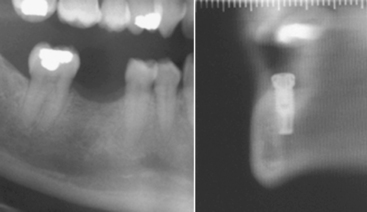
Although a prosthetically driven implant placement is best for simplification of abutment selection, ideal force distribution,9 and long-term success, anatomical limitations may force the surgeon to redirect the implant angulation. When buccal bone loss has occurred, modification of the treatment plan and placement of a bone graft for better implant angulation may be necessary. However, other areas such as lingual concavities cannot be grafted, and a change in angulations or implant selection is the only option. A typical instance of such limitation is in the mandibular first molar area. A panoramic or periapical radiograph does not show a possible severe lingual concavity, which can be depicted only with careful clinical examination or cross-sectional imaging. Prosthetically driven implant placement would lead only to a risk of lingual perforation. If a concavity is suggested, further radiographs such as a traditional tomogram or a computed tomography scan, together with a diagnostic radiographic template, will reveal the angulation dilemma and allow for clear communication between the restorative dentist and the surgeon. The example in Figure 13-9 represents an actual case in which the diagnostic wax-up was transferred to a scannographic template,10 but the prosthetic requirement cannot be met surgically—an implant placed in the long axis of the diagnostic tooth would force the surgeon to perforate the lingual cortical bone. In addition, the mandibular nerve is relatively high. Therefore the dentist must make a decision to modify the angulation and later redirect the implant path with an angulated abutment, position a shorter implant, or avoid this site all together. A careful clinical examination with the diagnostic template in place would reveal the issue as well, but radiographic visualization is more ideal to ensure surgical success, limit liability, and communicate and discuss planning. Unfortunately, such anatomical limitations often are revealed during surgery, when decision making is more difficult and debate is impossible. Other common locations for similar limitations include the prominent premaxilla or the severely resorbed anterior part of the mandible. As discussed subsequently, precise diagnosis to rule out anatomical limitations can be followed by a thorough plan that can be transferred to the surgical field using surgical guidance.
SURGICAL GUIDES
Several methods of fabricating the surgical template are available. The requirements are more relevant than the options of fabrication. The template should be stable and rigid when in the correct position. If the arch being treated has remaining teeth, the template should fit over or around enough teeth to stabilize it in position (Figure 13-10). When no remaining teeth are present, the template should extend onto unreflected soft tissue regions (i.e., the palate and tuberosities in the maxilla or the retromolar pads in the mandible). In this way, the template may be used after the soft tissues have been reflected from the implant site.
The surgical template should relate to the ideal facial contour. Many edentulous ridges have lost facial bone, and the template can assist in determining the amount of augmentation required for implant placement or support of the lips and face (see Figure 13-10). The surgical template may be used for a bone graft, and later the same template may be used for insertion of implants and again for implant uncovery. A study template facilitates sterilization and use for several procedures.
To construct a surgical guide, modification of the radiographic guide is often possible if an ideal wax-up of the teeth was used as a template for the radiographic guide. Ideal tooth position is already present, and enlargement of the access hole and buccal or lingual opening is achieved easily. When the long axis of the teeth is visible and can be maintained, after verifying bone availability, then enlargement of the long axis channel guarantees accurate implant guidance.11
An easy method to fabricate a surgical guide is to use a modification of Preston’s clear splint for the diagnosis of tooth contours, tooth position, and occlusal form.12 The diagnostic wax-up is completed to preview the tooth size, position, contour, and occlusion in the edentulous regions where implants will be inserted. No selective grinding or modification is performed on any teeth that have not been altered before surgery; otherwise, the template will not fit correctly in the mouth. A full-arch, irreversible, hydrocolloid impression is made of the diagnostic wax-up and poured in dental stone. On the duplicate cast of the wax-up teeth, a vacuum acrylic shell (0.060 to 0.080 inch) is pressed and trimmed to fit over the teeth and gingival contours of the buccal aspect of the ridge. If no natural teeth remain, the posterior portion of the template should be maintained and cover the retromolar pads or tuberosities and palate to aid in positioning.
The occlusal surface is trimmed over the ideal and optional implant sites, maintaining the facial and facioocclusal line angle of the surgical template (Figure 13-11). A black line then is drawn on the template with a marker to indicate the center of each implant and the desired angulation. This provides maximum freedom for implant placement yet communicates the ideal tooth position and angulation during surgery.
In the edentulous arch the vacuum form may be fabricated from the existing removable prosthesis, if within accepted guidelines. A soft tissue liner then may be added in the tuberosity or retromolar pad regions and other soft tissue areas not involved in surgery. Acrylic resin then is added over the occlusal portion of the template where no implants are planned. The patient then occludes into this index after using petroleum jelly over the opposing teeth. In this manner, the template can be correctly positioned over the edentulous ridge during surgery once the tissue is reflected. Otherwise, a template position set too far facially or off to one side is likely (Figures 13-12 to 13-15).
Stay updated, free dental videos. Join our Telegram channel
VIDEdental - Online dental courses


