Radiographic Examination and Diagnosis
Hanne Hintze and Ivar Espelid
Radiographic examination in children is essential for diagnosis, treatment planning, and monitoring of a number of changes and pathologies related to teeth and jaws. However, since no exposure to X‐rays can be considered completely free of risk, a radiographic examination should be performed only when it is likely that it will benefit the patient; for example, to improve the diagnosis and/or result in a more appropriate treatment considered more beneficial to the patient.
Indications for radiographs in children and adolescents
Before ordering a radiographic examination of a patient the clinician should consider the parameters listed in Box 8.1.
In general, exposure to X‐rays must not be undertaken without a previous clinical examination [1]. This requirement has been introduced to ensure that radiographs are exposed on the basis of individual prescriptions rather than generalized approaches not taking into consideration individual patient history and clinical findings.
Principles for interpretation of radiographs
Before image interpretation, the quality of the image should be assessed. Important criteria to be evaluated in this connection are listed in Box 8.2.
In the case of radiograph being of poor quality, a new radiograph with a higher quality should be exposed before image interpretation can begin. When a radiograph is ready for interpretation it should ideally be observed under proper viewing conditions. For details see Box 8.3.
The best way to start the analysis of a radiograph is to use a systematic viewing procedure including a standard examination sequence ensuring assessment of the different tissues (periapical and alveolar crest bone, number and localization of teeth, each tooth subdivided into crown, root, pulp, etc.) in all parts of the radiograph. The next step is to perform an interpretation including a differentiation between normal and abnormal structures, and a diagnostic decision concerning the latter. The optimal endpoint is a definitive interpretation and a definitive diagnosis.
Radiographic anomalies and pathologies in children and adolescents
Box 8.4 lists the most frequent reasons for radiographic examination in children.
Caries and its sequelae
Using radiographs it is possible to identify approximal enamel and dentin caries lesions and occlusal dentin lesions and to disprove the presence of such lesions. In general, it is recommended to perform a radiographic caries examination when the preceding clinical examination has not resulted in sufficient information for a final diagnosis or for the planning of treatment. This implies that radiography is considered most useful in surfaces that are not easily accessible with conventional methods such as visual inspection and careful probing.
As caries prevalence decreases in a population there is a continuous need for reassessment of a strategy to take radiographs of individuals where no clinical signs of caries or previous caries experience are present. To do such reassessments, the clinician needs to know the characteristics of the method. Such characteristics are sensitivity and specificity. These parameters are essential in evaluating new methods which are launched to “improve” the caries diagnosis. To determine sensitivity and specificity of a caries diagnostic method a “gold standard” has to be established for every surface included in the study. Often, a histologic reference standard is made during sectioning of teeth and thereafter microscopic validation is performed [2–4].
Evidence‐based reports on caries diagnosis frequently exclude or give a poor‐quality rating to studies due to major imperfections in the study design [5,6]. In Table 8.1 sensitivity and specificity values from a number of studies judged to fulfill the general principles for good study design are listed. From the table it appears that sensitivity (true‐positive ratio) is low in contrast to a relatively high specificity. This means that the radiographic method misses lesions in enamel and even in dentin. On the other hand, relatively few false‐positives will occur since the specificity is relatively high. Whether these values, which are obtained mainly under in vitro study circumstances, are also valid in patients is not well researched.
Table 8.1 Sensitivity and specificity values and ranges in parentheses for radiographic diagnosis of caries based on a systematic review.
| Diagnostic accuracy | ||||
| Sensitivity | N | Specificity | N | |
| Approximal caries in: | ||||
| Enamel | 0.39 (0.22–0.68) | 10 | 0.87 (0.67–0.97) | 10 |
| Dentin | 0.45 (0.13–0.61) | 9 | 0.96 (0.89–1.00) | 9 |
| Occlusal caries in: | ||||
| Dentin | 0.58 (0.03–0.96) | 17 | 0.85 (0.71–1.00) | 17 |
Note: in some studies macroscopic methods were used for validation (the gold standard), but microscopic methods were more commonly used. N denotes the number of studies which were included after a quality assessment of the literature dealing with the subject.
Source: Swedish Council on Technology Assessment in Health Care, 2007 [6]. Reproduced with permission of SBU.
Clinical examination (visual and tactile) is always the prerequisite before any other type of additional examination should be considered. The primary type of supplementary examination should then be the radiographic method. A radiographic image is a good documentation for the dental record and is useful for several purposes including assessment of the caries experience and current activity if undertaken longitudinally. Methods such as fiberoptic transillumination, electrical resistance measurements and laser‐induced fluorescence (DIAGNOdent) have to be considered as additional techniques that may be used in cases of doubt, but thus far cannot replace the radiographic caries examination.
The recommended radiographic technique for caries diagnostics is the bitewing projection. A bitewing radiograph must have a dark density and a good contrast as these factors have a significant influence on the diagnostic outcome [7]. A rule of thumb says that good density for caries diagnostics is when image areas representing soft tissue and “air” are intensely black (not dark gray). Usually this will also result in a good contrast. A good contrast ensures optimal differentiation of the various tissues, e.g., that enamel is clearly different from dentin, that demineralized enamel is clearly different from sound enamel, etc. In radiographs with a light density and poor contrast many existing lesions will remain undetected, resulting in false‐negative diagnoses. The opposite—that nonexistent lesions are detected—may be the case in radiographs with a very dark density [7]. This results in false‐positive diagnoses, which may lead to unnecessary treatment (overtreatment).
Deep caries may cause pulp involvement and lead to necrosis of the pulp. Radiographic examination of teeth with pulp involvement may be useful for the detection of internal and external root resorptions and periradicular ostitis. In the primary molars the first sign of necrosis may be a radiolucent zone close to the bifurcation or trifurcation area.
Intervals between bitewing examinations
How often radiographs should be performed for caries detection depends on several factors:
- The post‐eruptive age of the tooth with a lesion
- In which tooth and surface types lesions are present
- Lesion depth at baseline
- Risk of surface cavitation
- Previous caries experience
- Caries/filling status of neighboring approximal surfaces.
Caries progression through the permanent enamel will take on average several years, but some surfaces and newly erupted teeth are at a higher risk [8,9]. Enamel lesions may arrest, but it is less likely that dentin lesions will, and it is a fact that caries progression in dentin is much faster than in enamel [8].
There are no rules for how often bitewings should be repeated in any patient category. It is generally agreed that the decision to take bitewing radiographs for detecting caries should be based on the benefit to the individual patient in relation to the risks associated with low‐dose radiation exposure and the costs. There is incomplete knowledge about the effectiveness of various methods for selecting individuals who will benefit from bitewing examination and therefore different strategies are in use.
Strategy 1. Bitewing radiographs are prescribed on the basis of a clinical examination of the individual patient. It may be a challenge for the dentist precisely to decide the time interval for the next bitewing examination since caries activity is never constant but changes through life often depending on the individual’s lifestyle and changes in lifestyle (e.g., dietary, social and familiar environment, stability of dental hygiene routines, etc.). During a patient’s first visit it may be difficult to overview all factors relevant for deciding the optimal time for the next bitewing examination, but if seeing the patient regularly (which is the case in many Western countries) this may become easier. High caries risk factors and/or the presence of lesions with increased risk of fast progression, e.g., lesions in outer dentin in high‐risk surfaces or in recently erupted teeth, will call for repeated bitewings at short intervals (e.g., yearly) whereas clinical observation of the presence of caries risk factors under control and the presence of a sound gingival status in combination with no signs of active lesions will call for repeated bitewings at longer intervals.
Strategy 2. To overcome the difficulties with individual timing for the next bitewing examination, some authors [10] and dental organizations [11] have proposed that children are allocated to different caries risk categories each operating with fixed time intervals for repeated bitewings. Guidelines for such a selective screening procedure nave been suggested by Mejàre [10] based on longitudinal studies on caries progression in a group of children followed from the age of 11–13 years to young adulthood [12]. The mentioned guidelines are based on child ages in combination with radiographic characteristics at certain key ages and are illustrated in Table 8.2. According to these guidelines children are allocated to a low‐risk or high‐risk group on the basis of findings obtained from bitewings exposed in all children at the age of 5 years—constituting the baseline reference. If the child has no radiographically diagnosed caries lesions at this early age there is low probability that lesions will develop over the next 3–4 years. However, radiographic caries experience at the age of 5 years indicates a greater future risk and therefore repeated bitewings should be taken with short intervals. At the age of 8–9 years it is reasonable to obtain new radiographs because caries might then have developed in the first permanent molars and the distal aspect of the second primary molars. At ages from 12–13 years the approximal contacts of premolars and permanent molars have been established for some years and it may be reasonable to take bitewings to check caries‐prone clinically non‐accessible surfaces. Thereafter, the time interval between repeated bitewings should not exceed 2 years, since the teenager still has relatively many newly erupted teeth and runs a considerable risk of caries development and should therefore be followed regularly. At the age of 15–16 years bitewings may be useful for making sure that the teenager is allocated to the correct risk group since large difference in time interval between repeated bitewings is present for the two groups.
Table 8.2 Individual key ages for bitewing radiography and proposed time intervals between radiographic examinations].
Source: Mejàre 2005 [10]. Reproduced with permission of George Warman Publications (UK) Ltd.
| Key age (years) | Time interval in years between bitewing examinations | |
| In low‐risk individuals | In high‐risk individuals | |
| 5 | 3–4 | 1 |
| 8–9 | 3–4 | 1 |
| 12–13 | 2 | 0.5 |
| 15–16 | 3 | 0.5 |
While fixed time intervals for repeated bitewings according to risk assessment seem attractive, it is important to remember that such an approach is no excuse for not seeing the patient more frequently for a clinical examination. At each clinical examination it is then up to the dentist to assess whether the patient is allocated to the correct caries risk group or should be moved to another one to be certain that the time for the next bitewing examination is adjusted to fit with the patient’s actual risk level. Moving to a lower risk level should imply bitewings at longer time intervals as opposed to moving to a higher risk level which should imply bitewings at shorter intervals. The aim with repeated bitewings of active lesions is often to monitor if the lesions respond as expected to the applied treatment and, in case of progression, to be in due time to change treatment strategy to avoid further lesion progression. However, it should be remembered that radiographs should not be used as the sole criterion in making treatment decisions.
Trauma to teeth and supporting tissue
In children exposed to an acute mechanical trauma of the oral region, radiography is very useful for assessing the extent of possible damage such as displacement of tooth fragments and position of foreign bodies in the soft tissue, root and jaw fractures, tooth displacements, and possible damage to the permanent tooth germs. Patients with moderate to manifest traumas are usually received at an emergency department in a hospital where they will undergo the radiographic examinations specified in the hospital’s trauma protocol. Often, such a protocol recommends computed tomography (CT) for severe and multi‐traumatized patients. Patients exposed to mild traumas that primarily cause damage to teeth and supporting marginal bone only are usually seen in a dental clinic where the radiographic examination should depend on the patient’s individual history and clinical appearance.
For correct evaluation of fractures and displacements of teeth, a good radiographic overview (e.g., panoramic examination, occlusal projection) supplemented with periapical radiographs of all involved teeth is recommended. Ideally, each traumatized tooth should be examined from at least two different directions at right angles to one another, but when this is not possible, two projections at two different horizontal or vertical angles may be useful (Figure 8.1). The angulation of the beam is essential in order to produce an image of the fracture line. In cases where the suggested radiographs cannot be obtained or they do not provide the needed diagnostic information, cone beam computed tomography (CBCT) should be considered.
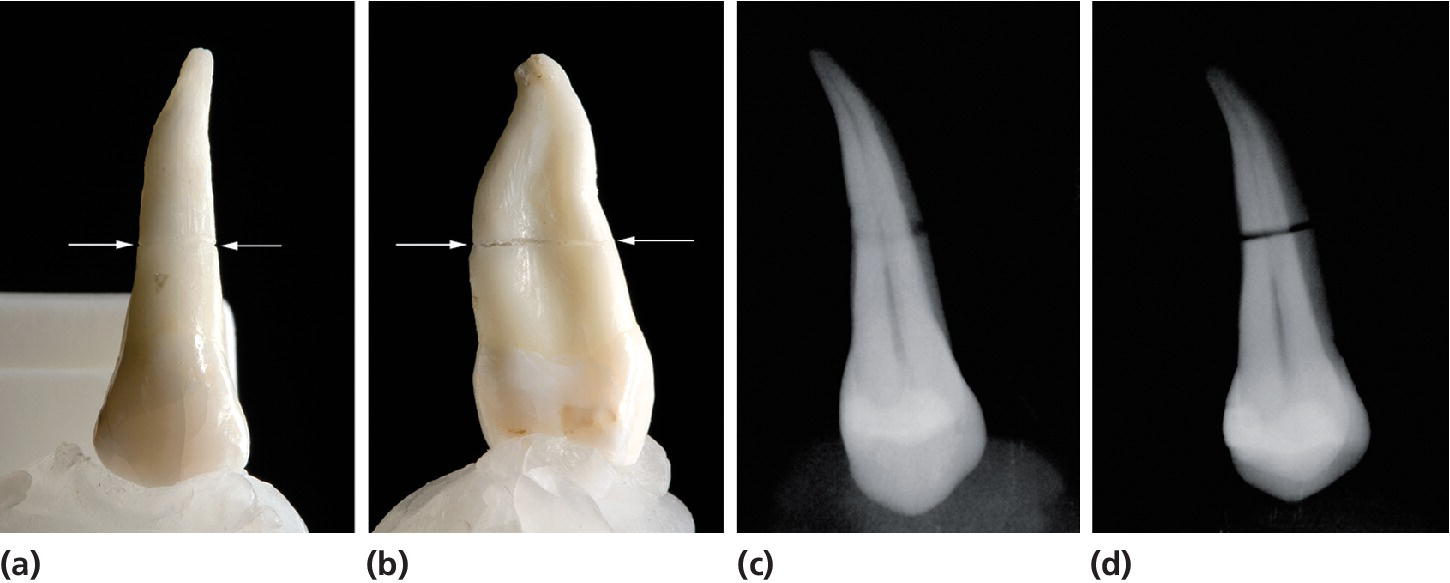
Figure 8.1 A tooth with a root fracture (arrows indicate direction) seen from (a) the facial aspect and (b) an approximal side. On a periapical radiograph this fracture will be shown indistinct or appear (c) as a circle in the case of a steep vertical X‐ray beam angulation and as a distinct line in the case of (d) a flat vertical beam angulation.
Developmental and acquired dental anomalies
The most frequent dental anomalies in the permanent dentition requiring radiographic examination are:
- tooth agenesis
- unerupted teeth due to: (a) absent eruption space, (b) blocked eruption path caused by an impacted supernumerary tooth, an odontoma or a dentigourous cyst, and (c) ectopic tooth position (mostly upper jaw canines and lower jaw third molars).
Radiographic examination for the assessment of dental anomalies should be undertaken on the basis of individual selection criteria, and the radiographic technique should fit the actual problem in the individual patient. For assessment of a single to few tooth ageneses, periapical radiographs will be the correct choice, whereas for multiple ageneses a panoramic examination might be more relevant to keep the radiation dose to the patient as low as possible [1]. For assessment of unerupted teeth the same recommendation is valid. However, a panoramic radiograph will be the most obvious choice if larger pathology or manifest ectopic displacement is suspected clinically. Panoramic radiography will also be the choice when the intraoral image receptor cannot be placed correctly, for example, for the examination of impacted lower third molars.
When the buccal–oral placement of an unerupted tooth is to be assessed, localization radiography conducted by intraoral or extraoral techniques (see below) is indicated.
Systemic diseases and syndromes
Systemic diseases and syndromes causing developmental changes in the maxillofacial bone and in teeth usually need to be examined and monitored by radiography. Major changes often require CBCT offering the possibility to view the changes in several anatomical planes.
Treatment planning prior to orthodontics
Radiography prior to orthodontic treatment is essential to establish the diagnosis and treatment plan, and as a reference for follow‐up examinations to monitor the results of the procedure. Traditionally, a panoramic radiograph and a lateral cephalometric skull radiograph are the images required. However, the introduction of CBCT has been shown to be very valuable for the assessment of growth and development [13,14], and some orthodontists seem to prefer a CBCT examination (see section “Computed tomography”) to the traditional panoramic and cephalometric radiographs [15].
Treatment planning prior to surgery
Radiography prior to surgery is usually needed to provide the surgeon with information leading to a realistic treatment plan ensuring that no unforeseen problems occur during the operation. In general, this means that the most convenient access to the operative area, the extent in all planes of the surgical object, and its localization in relation to important neighboring structures should appear from the radiographic examination. In children with a mixed dentition, specific focus on the localization of developing permanent tooth germs is often necessary to avoid any damage during operation. These requirements often imply that the radiographic examination combines intra‐ and extraoral techniques performed in various anatomical planes. In the case of close or uncertain relationship between the surgical object and essential neighboring structures, CBCT will often be preferable.
Intraoral radiographic techniques
Periapical radiographs
Periapical radiographs are indicated when the whole tooth and its supporting tissues are to be examined. For intraoral conventional radiography five film ISO sizes (sizes 0–4) are available on the market. Figure 8.2 shows different sizes of digital image receptors. The rule of thumb is that the size of the image receptor should fit the “size of the problem” in the best possible way to minimize the number of exposures. However, in children especially, this rule should be applied with great caution since the discomfort connected with a large receptor usually will have a negative affect on a child’s cooperation and acceptance of the radiographic procedure, and in the end result in an inferior radiographic quality.

Figure 8.2 Two different sensor sizes and five different phosphor plate sizes. The numbers indicate dimensions in millimeters.
Periapical radiographs can be performed by a paralleling or a bisecting‐angle technique [16]. The paralleling technique is preferable because it is easier to perform and gives a more reliable image of the tooth and surrounding alveolar bone (minimal distortion). However, in a young child this technique might be difficult to practice because it requires a film holder, which often will be difficult to place because of the small dimensions of the oral cavity.
In children aged 0–3 years it is in general difficult to obtain periapical radiographs. When necessary due to trauma to the upper front teeth, for example, a dental size 2 image receptor fixed by a needle holder can be placed parallel to the occlusal plane and the X‐ray beam angled perpendicularly to the imaginary line bisecting the angle between the surface of the receptor and the long axis of the front teeth in two identical halves (Figure 8.3). The use of a needle holder makes it easier for a parent to keep the receptor in the correct position during exposure. Another possibility is to place the child backwards on the parent’s knee as shown in Figure 8.4. A needle holder is useful for stabilizing a phosphor plate or a film in the molar region as well, especially in the case of a non‐cooperative child, but cannot be used in combination with a sensor, which is much thicker than phosphor plates and films. If a sensor has to be applied it should to be used in combination with a holder provided with an extraoral beam‐aiming device, offering the possibility for an accompanying person to hold it in position.
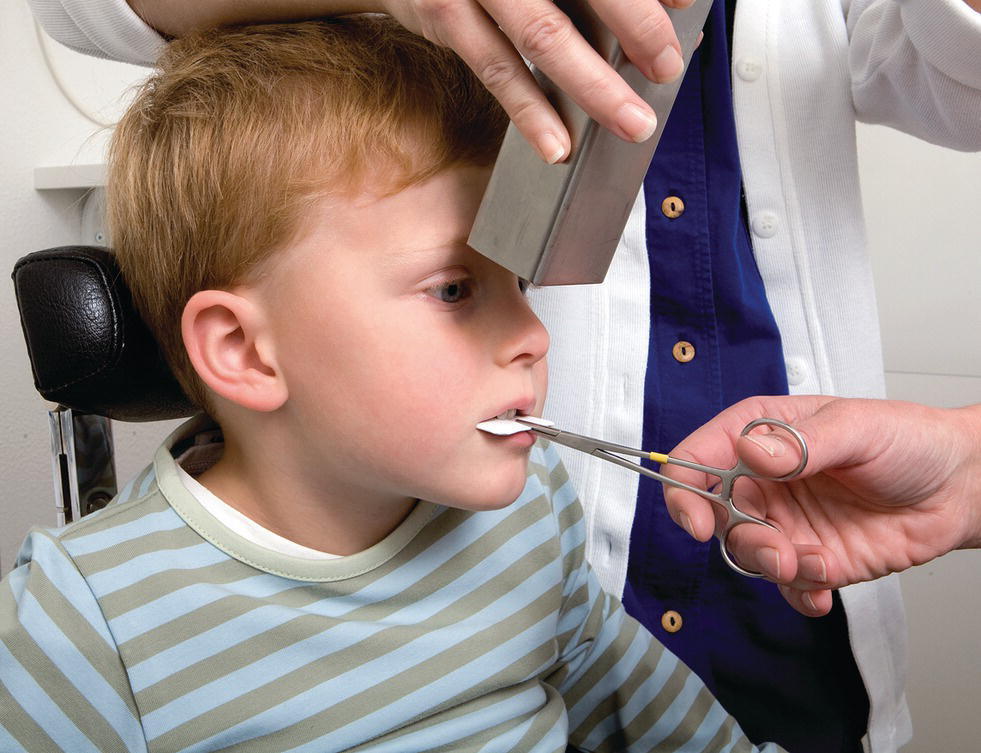
Figure 8.3 Periapical radiography of the upper front teeth. The image receptor is placed in a needle holder parallel to the occlusal plan and the X‐ray beam is orientated perpendicular to the line dividing the angle between the surface of the receptor and the long axis of the front teeth in two identical halves.
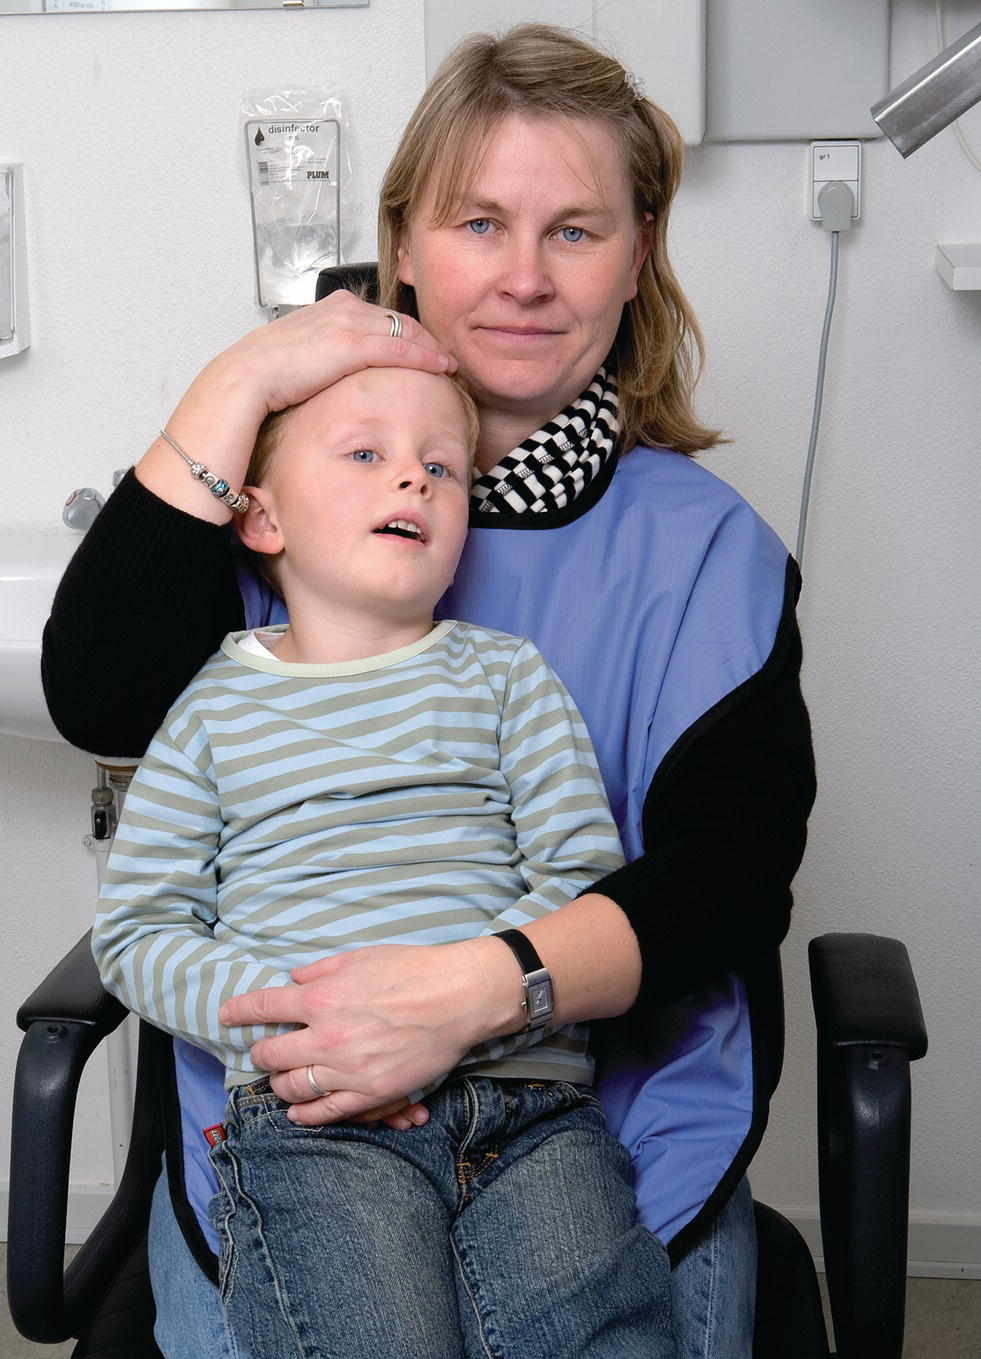
Figure 8.4 A young child placed on the lap of a parent during exposure. To avoid the child moving the parent should hold the child’s hands with one hand and support the child’s head with the other. The child’s head should rest against the parent’s shoulder. The legs of very small children can be stabilized between the adult’s legs when necessary.
Figure 8.5 shows the “tell–show–do” technique used to introduce a young child to dental radiography. The accompanying parent should be instructed to support the child during exposure to avoid any sudden movement which increases the risk of image blur and subsequently the need for a retake. Box 8.5 gives a number of suggestions to help to obtain good intraoral radiographs in young children.
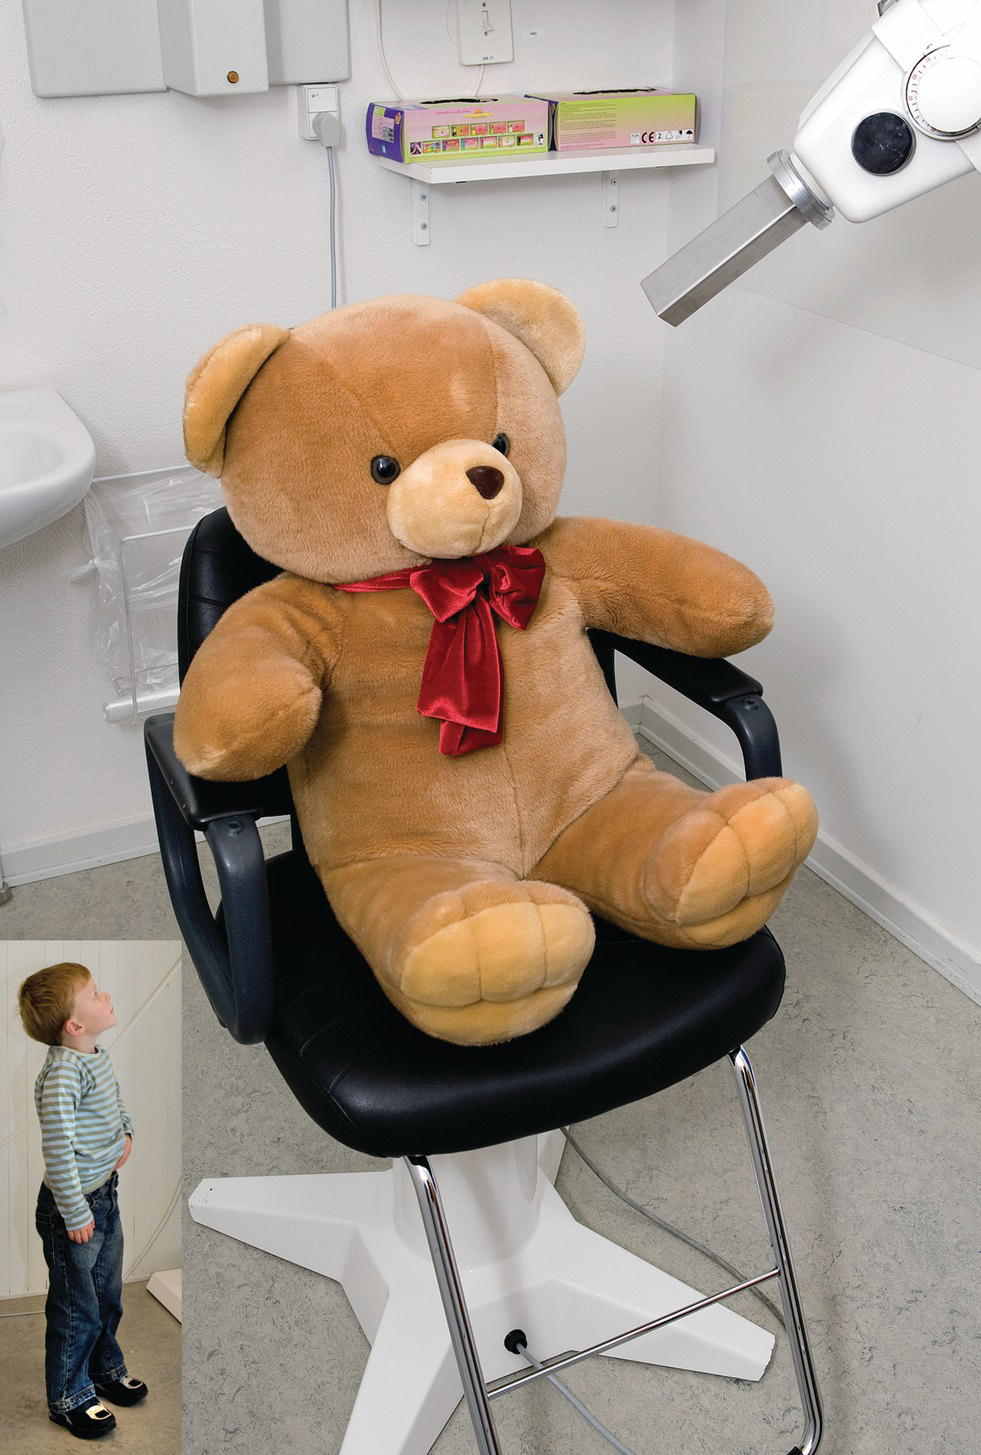
Figure 8.5 “Tell–show–do” technique might be useful to obtain good child cooperation. Before exposure of the child the radiographic procedure can be demonstrated on a teddy bear while the child is watching from a “safe” place.
VIDEdental - Online dental courses


