Pulp Therapy of Immature Permanent Teeth
Hani Nazzal and Monty S. Duggal
Introduction
An immature permanent tooth is defined by the British Society of Paediatric Dentistry as [1]:
… a tooth which is not fully formed, particularly the root apex. A vital pulp is necessary for the development and maturation of the tooth root. If vitality is lost, this maturation process will cease leaving the tooth with a wide root canal, thin canal walls and an open apex. Root canal treatment is complicated by the lack of an apical constriction against which to condense and contain a root filling.
The definition highlights the challenges associated with loss of vitality in these teeth; therefore, every effort should be made to preserve radicular pulp vitality. Maintaining radicular pulpal vitality, sometimes termed apexogenesis, allows continuation of root formation and thickening of dentinal walls which improves the tooth’s long‐term prognosis.
Apexogenesis, following an insult to the pulp of an immature tooth through either caries or trauma, can be achieved through several techniques such as direct pulp capping, indirect pulp capping, partial pulpotomy, and coronal pulpotomy.
When managing these cases a decision should be made whether maintaining the tooth is in the patient’s best interest and whether apexogenesis is still possible. These decisions are dependent on:
- pulpal status of the tooth
- presence/absence and size of pulpal exposure
- radicular pulpal health
- tooth restorability
- patient’s oral health, caries risk and motivation
- patient’s orthodontic needs
- whether the treatment should be performed under local analgesia or general anaesthesia
- patient’s medical history.
Once a decision is made to maintain an immature pulpally affected tooth, the treatment decision to use either vital techniques for pulp preservation or nonvital pulp therapy is dependent on the pulpal status of the tooth.
Vital treatment techniques in managing immature permanent teeth with normal pulp and reversible pulpitis
There are different apexogenesis techniques for the management of immature teeth with a normal pulp or reversible pulpitis, such as:
- stepwise excavation
- indirect pulp capping
- direct pulp capping
- partial pulpotomy
- coronal pulpotomy.
Stepwise excavation
The objective of this technique is to arrest further caries progression by disrupting the cariogenic environment in the immediate vicinity of the pulp. This is achieved through decreasing the number of bacteria, and isolating the remaining caries from the biofilm of the oral cavity [2]. This therapy is successful in young permanent teeth with extensive carious lesions with obvious risk of pulp exposure (Figure 17.1). It alleviates subjective symptoms and, according to the literature, the risk of pulp exposure at the final treatment is decreased compared to removal of all caries at the first treatment session [3,4]. This treatment, however; carries the risk of developing irreversible pulpitis; therefore, the risks and benefits should be discussed with the patient and legal guardians. Furthermore, when treating young permanent teeth with extensive carious lesions, stepwise excavation provides time for a more considered evaluation of the long‐term prognosis for the dentition as well as for the patient.
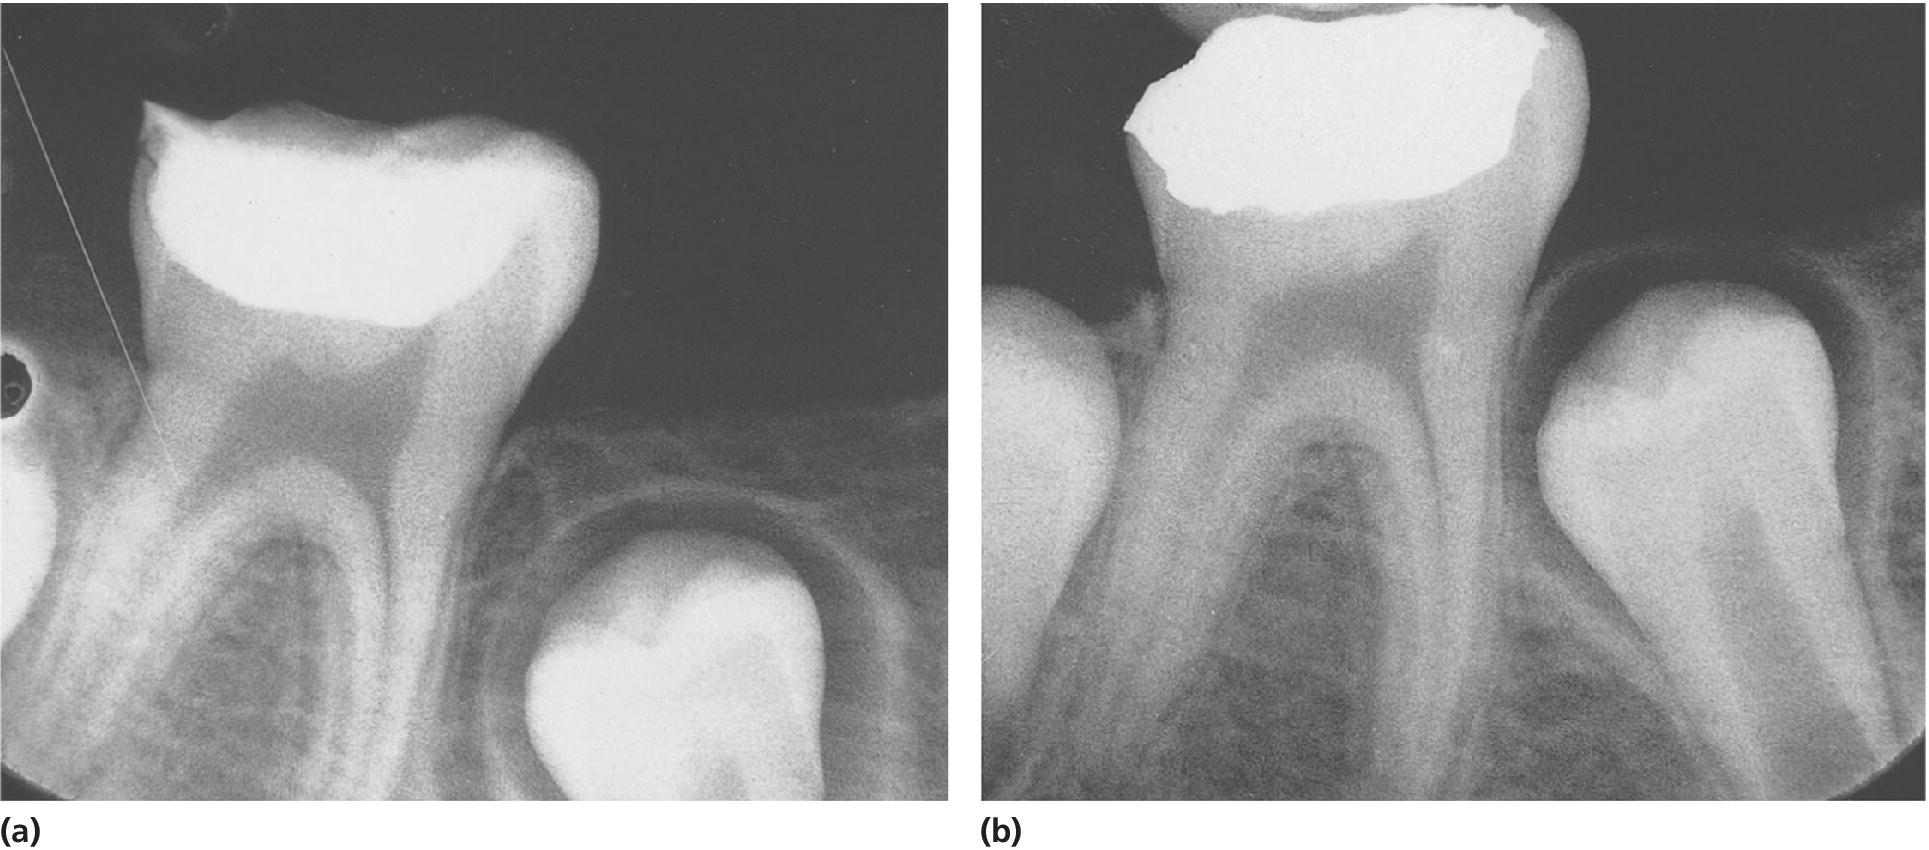
Figure 17.1 Stepwise excavation of a permanent molar, (a) at the time of treatment and (b) 9 months later. The formation of dentin between the temporary filling and the pulp has proceeded and the risk of pulp exposure at the time of final restoration of the tooth is minimal.
This procedure involves three steps [4,5]:
Step one:
- Removal of carious dentin along the dentin–enamel junction
- Excavation of only the outermost infected dentin, leaving a carious mass over the pulp
- Placement of a well‐sealed restoration, which is crucial [4,6].
Step two:
- Sufficient time (3–6 months) for the formation of tertiary dentin and a definitive pulpal diagnosis should be allowed.
Step three:
- Removal of the remaining caries and placement of a final restoration
- Placement of a well‐sealed restoration is, again crucial [4,6].
Indirect pulp treatment
This technique involves excavation of dental caries as close as possible to the pulp, and placement of a protective liner followed by a long‐term restoration providing good coronal seal [6]. The objective of this technique is to completely seal the carious dentin from the oral environment, which will arrest carious progression and allow the pulp to form tertiary dentine. This treatment option is suitable for permanent teeth with deep caries that might otherwise be associated with pathologic pulpal exposure. This treatment does carry the risk of an unintentional pulp exposure or irreversible pulpitis.
Indirect pulp capping versus stepwise excavation
These two techniques are very much similar in their aims and have been shown to reduce the risk of pulp exposure; however, there is insufficient evidence to show whether it was necessary to re‐enter the tooth as described by the stepwise excavation technique [4]. Several factors were suggested by Bjorndal in 2008 such as lack of agreement in defining deep caries in different studies, the different diagnostic criteria used in assessing pulpal inflammation, or the lack of a standardized excavation method.
Further research using high‐quality research methodology such as randomized controlled trials is needed to assess the success of the single session indirect pulp capping compared with the multi‐session stepwise technique. This is relevant for children where the number of clinical interventions should be as few as possible.
Direct pulp capping
The objective of this technique is to promote pulpal healing and reparative dentin formation following small pulp exposures during cavity preparation. The technique involves hemorrhage control followed by capping the pulp with a material such as calcium hydroxide [7] or mineral trioxide aggregate (MTA) [8]. Placement of a restorative material with good coronal seal is essential for the success of this technique [6]. However, before it is decided to undertake direct pulp capping an accurate diagnosis of the state of pulp contamination or pulp inflammation should be determined. It should be remembered that in an immature tooth the pulp has a tremendous healing potential due to the large neurovascular bundle entering the pulp space through the apices. Direct pulp capping should only be considered in cases where the pulp is exposed as a result of trauma, where the pulp is deemed to be only superficially contaminated, and inflammation to be reversible.
Partial pulpotomy
Partial pulpotomy for carious exposures
The objective of this technique is removal of inflamed pulp tissue beneath an exposure until healthy pulp tissue is reached. A high‐speed diamond bur is used to remove 2 mm of pulp tissue at a time until healthy pulp tissue is reached. A bactericidal irrigant such as sodium hypochlorite or chlorhexidine should be used. The pulpotomy site should be covered with either calcium hydroxide [9] or MTA [10] and followed by a layer of light‐cured resin‐modified glass ionomer. A restoration that seals the tooth from microleakage is placed.
Partial pulpotomy can sometimes be performed for young permanent teeth with carious exposure of the pulp (Figure 17.2). The outcome is favorable as studies showed 89–91% success rate with a follow‐up of about 3–4.5 years, irrespective of root development at the time of treatment. A recent study using MTA as wound dressing showed high success rate, 93% after about 3 years.
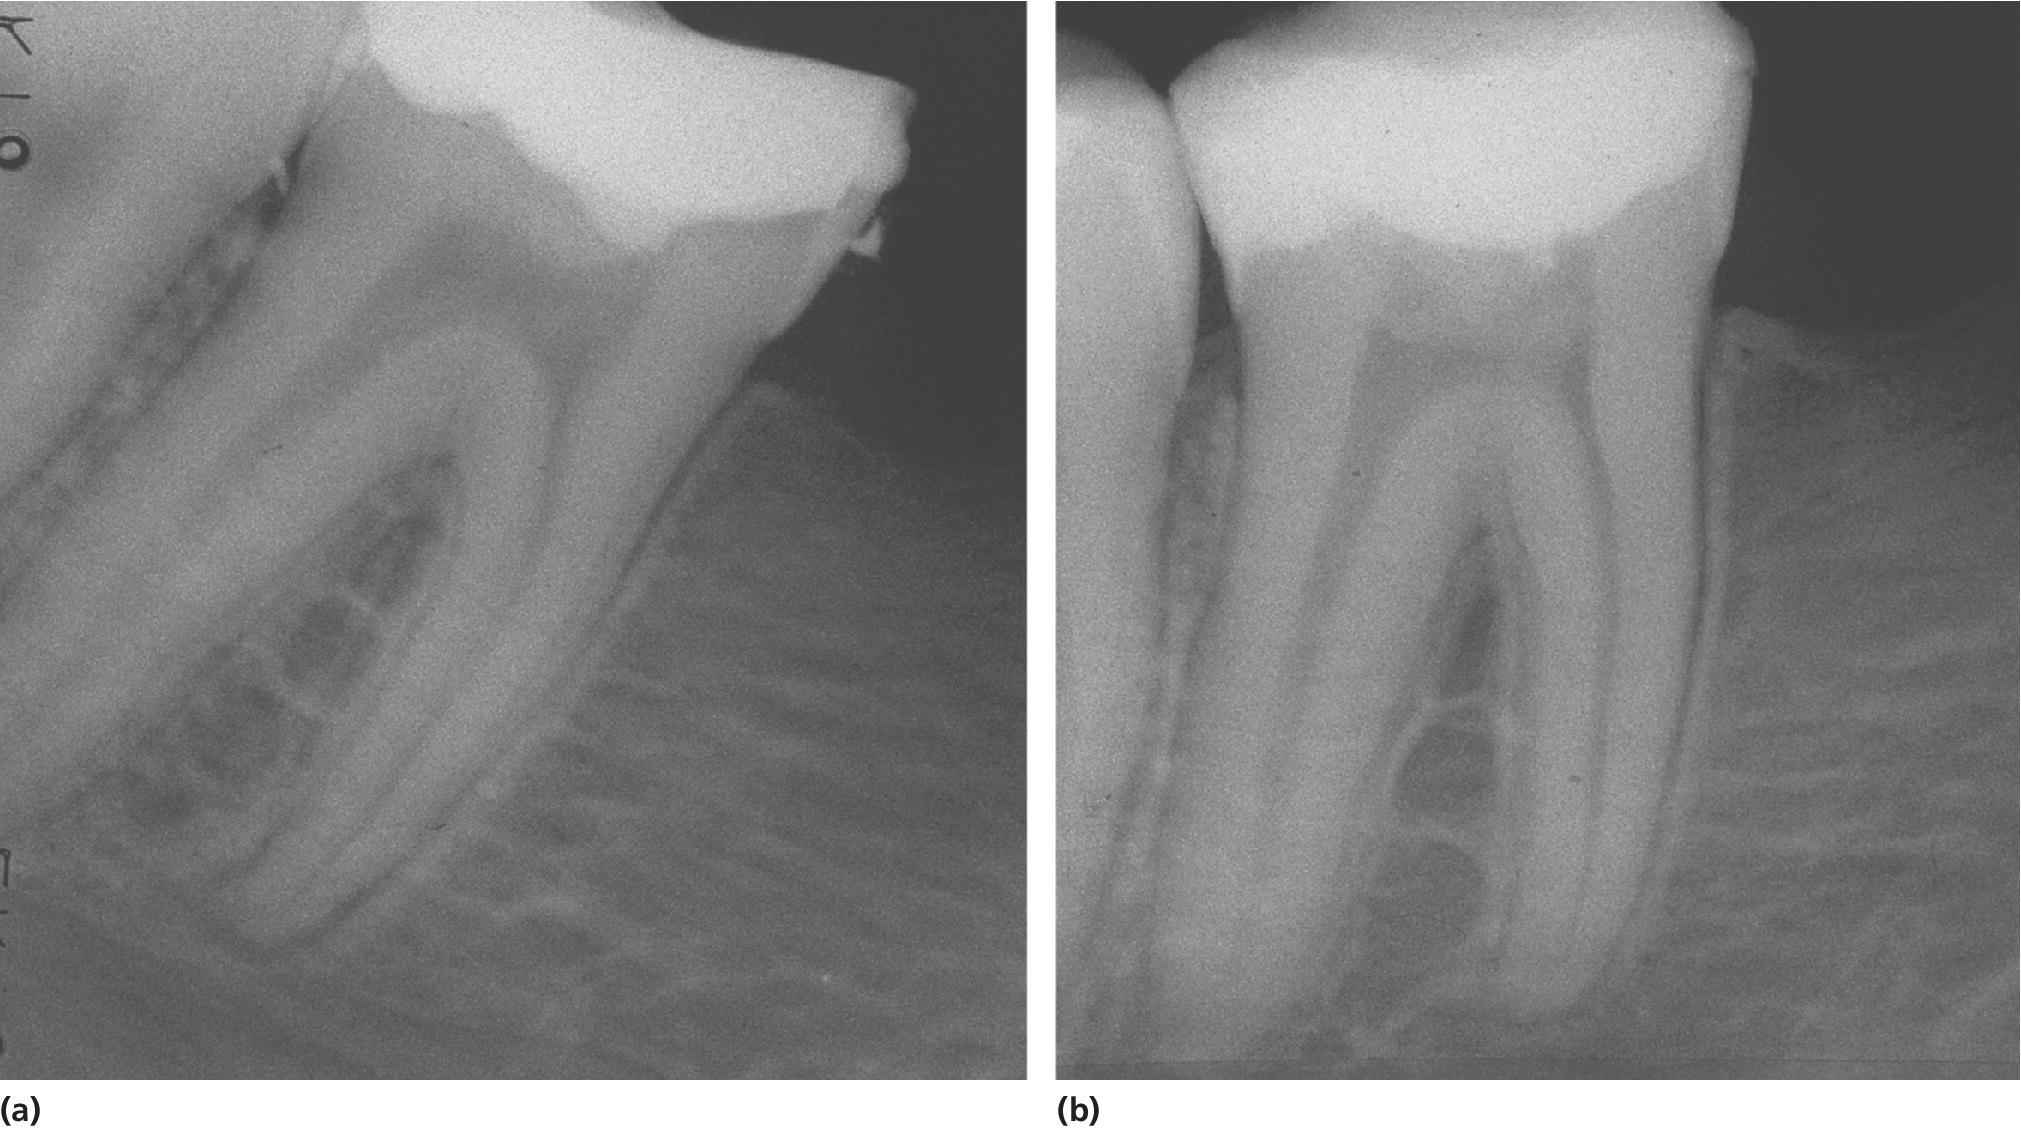
Figure 17.2 Partial pulpotomy of permanent molar. (a) Radiograph taken at the time of treatment and (b) 2 years after treatment.
Partial pulpotomy for traumatic exposures
Partial pulpotomy has been shown to be the treatment of choice in traumatically exposed pulps of immature permanent teeth where the pulp is recently exposed and not extensively contaminated (Figure 17.3). The partial pulpotomy makes physiologic narrowing of the coronal pulp lumen possible, which means a mechanically stronger tooth less prone to future fracture, compared to a tooth subjected to coronal pulpotomy. Partial pulpotomy is also to be preferred to pulp capping, since there is a much better possibility to control the wound surface, avoid any extrapulpal blood clot, to get sufficient retention for wound dressing and a tight seal, and thereby prevent bacterial infection. Partial pulpotomy of traumatized incisors has a success rate of 95% following an observation period of 3–15 years.
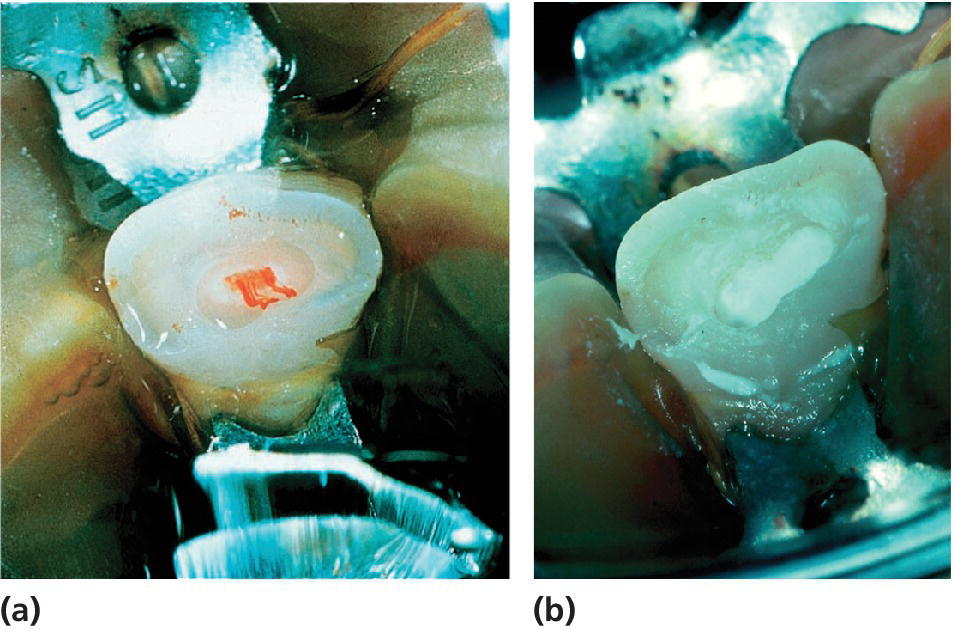
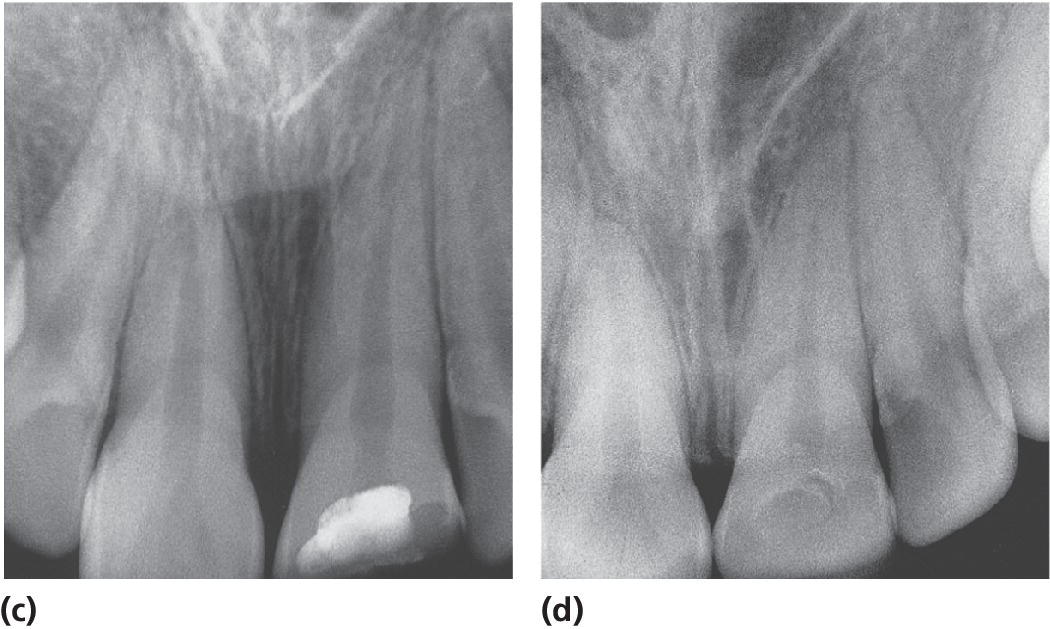
Figure 17.3 Partial pulpotomy of a permanent incisor with complicated crown fracture. (a) At the time of treatment; (b) application of calcium hydroxide; (c) radiograph at the time of treatment; and (d) several years later.
Partial pulpotomy should be considered a permanent treatment and should only be followed by pulpectomy if there is a need for a post in the root canal in the future.
Pulpotomy
Since partial pulpotomy was introduced, pulpotomy is seldom performed for traumatized immature incisors unless the contamination and inflammation is considered to be extensive due to late presentation. It was most often looked on as a temporary measure, especially in carious molars, until root development was complete after which a pulpectomy with permanent root filling could be done. Calcium hydroxide or MTA are the wound dressings to be used in this instance.
Should this treatment be required in traumatized immature incisors, the pulp should be amputated to the level of the cervical constriction or even deeper to a level where the bleeding is deemed to be normal. However, it is not recommended to use MTA in the pulp chamber of incisor teeth as it tends to cause extensive discoloration of the crown. More recently some formulations of MTA are increasingly available that do not contain bismuth oxide, which was the main cause of discoloration of the crown. Portland cement could also be used as it is not usually associated with this discoloration problem.
Non vital pulp therapy for immature teeth with irreversible pulpitis or necrotic pulps
Posterior immature teeth
Endodontic management of immature permanent teeth is challenging and therefore root canal treatment of posterior immature multirooted teeth is only considered in selected cases where the preservation of the tooth is crucial for the occlusion. Extraction of nonvital immature first permanent molars is usually the recommended approach; however, careful orthodontic assessment should be conducted and an extraction plan in accordance with the latest guidance on first permanent molar extraction should be employed [11]. If first permanent molars are extracted at an optimal time, then it is highly likely that the second permanent molars will erupt in a good occlusal contact with the second premolar.
When managing single‐rooted nonvital immature premolars, esthetic considerations are not always paramount and therefore other treatment options should also be considered when managing these challenging cases. Therefore, an orthodontic assessment should be performed in order to explore the possibility of extracting these teeth as part of an orthodontic plan. The patient’s oral hygiene, motivation, caries risk, and periodontal health should be carefully considered. In addition, other treatment modalities such as bridge work and implants should be considered with the advantages, disadvantages, and challenges of proposed treatments discussed carefully with the patient and their legal guardian. Alternatively, endodontic management for anterior nonvital immature teeth could be considered (see section “Anterior immature teeth”).
Anterior immature teeth
Despite the challenging endodontic management of nonvital anterior teeth, attempts should be made to maintain these teeth due to the esthetic considerations associated. The lack of further root development in these cases renders the tooth weak and unable to withstand the physiologic forces of mastication, which results in a high fracture rate, and therefore a poor prognosis in the medium to long term.
Indeed most studies have shown that over 50% of such teeth will be lost in the first 10 years following the trauma despite being treated endodontically [12,13]. Traditional endodontic treatment approaches have concentrated on achieving disinfection followed by the creation of an apical barrier against which the root filling can be condensed. This has been achieved using either an apexification approach with the use of calcium hydroxide, or more recently with the use of MTA to physically create a barrier against which the root canal can be obturated with a root filling material, such as guttapercha. With the advancement in the field of tissue engineering, more recently there has been a paradigm shift in the approach to this intractable clinical problem and different regenerative endodontic techniques had been reported.
Calcium hydroxide apexification
Apexification is a technique first introduced by Kaiser and Frank in the 1960s. This technique aims at inducing a calcified barrier in a root with an open apex through the use of calcium hydroxide as an intracanal medicament (Figure 17.4). The high pH (ranging between 12.5 and 12.8) of calcium hydroxide results in the material being bactericidal in addition to initiating a zone of liquefaction and coagulation necrosis adjacent to the healthy apical tissues. This results in the formation of a cementum‐like structure acting as a calcific barrier.
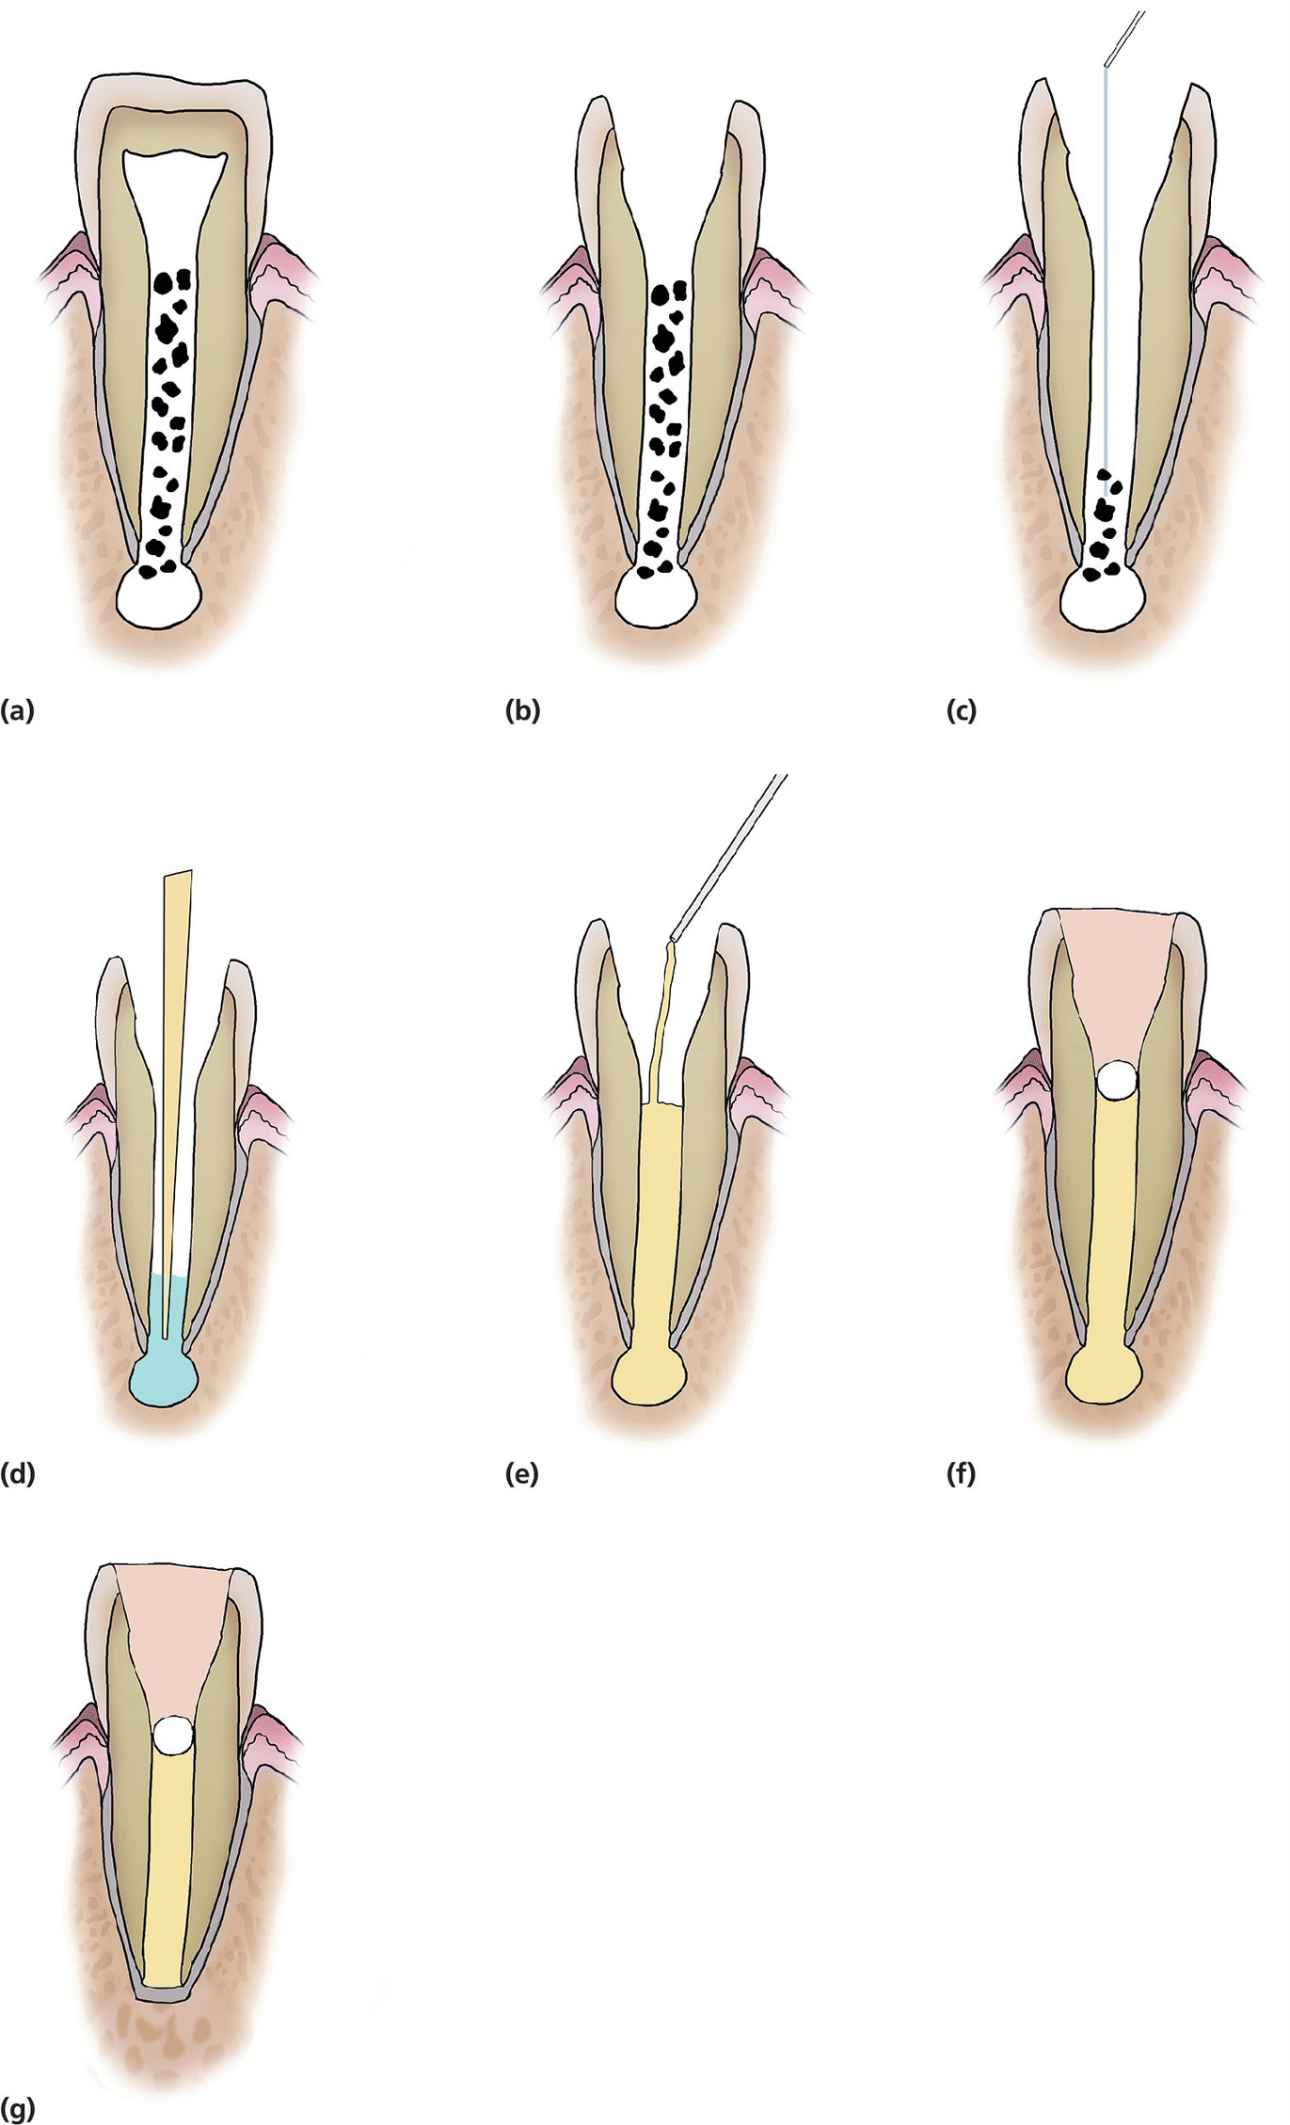
Figure 17.4 Diagrammatic representation of calcium hydroxide apexification technique. (a,b) Access pulp chamber, (c) light filing or no filing and irrigation with 0.5% sodium hypochlorite, (d) drying the canal using paper points, (e) placement of calcium hydroxide to the apical foramen (spiral filler could be used), (f) placement of cotton pledget (white) and glass ionomer filling (brown) for a minimum of 3 months until clinical or radiographic evidence of a calcific barrier is seen (g).
Despite the popularity of this technique, there are several disadvantages:
- It has been shown recently [14] that the prolonged use of calcium hydroxide in the root canal increases the risk of root fractures (Figure 17.5) [13]. This is thought to be due to the high alkalinity of calcium hydroxide which denatures the collagen of the dentin, specifically by interfering with the phosphate and the carboxylate groups within the dentinal proteins.
- This technique also requires application of calcium hydroxide at 3‐monthly intervals for 6–18 months with an average of 9 months (Figure 17.6) [15,16]. Therefore, this technique is associated with higher cost, patient taking time off school, and parents taking time off work. The speed of apical barrier formation was shown to be dependent on:
- frequency of calcium hydroxide application [17])
- patient’s age [18]
- apical foramen width [17]
- severity of the trauma [19,20]
- presence of an abscess and periapical radiolucency [21].
- Histologic studies had shown the presence of numerous vascular channels into the calcific barrier (“Swiss cheese” like) which could lead to bacterial invasion and leakage of filling materials (sealers).
- The calcific barrier does not always form at the radiographic apex of the tooth. (86.2% within 0–1 mm) [16].
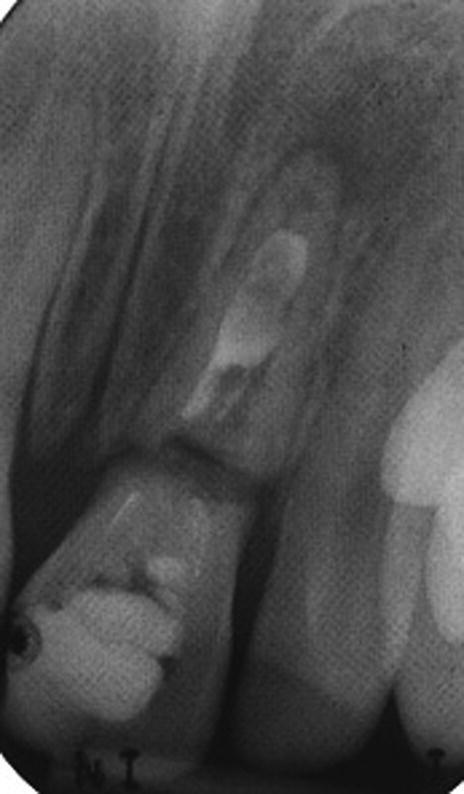
Figure 17.5 Radiograph showing cervical root fracture of a tooth treated with calcium hydroxide apexification.
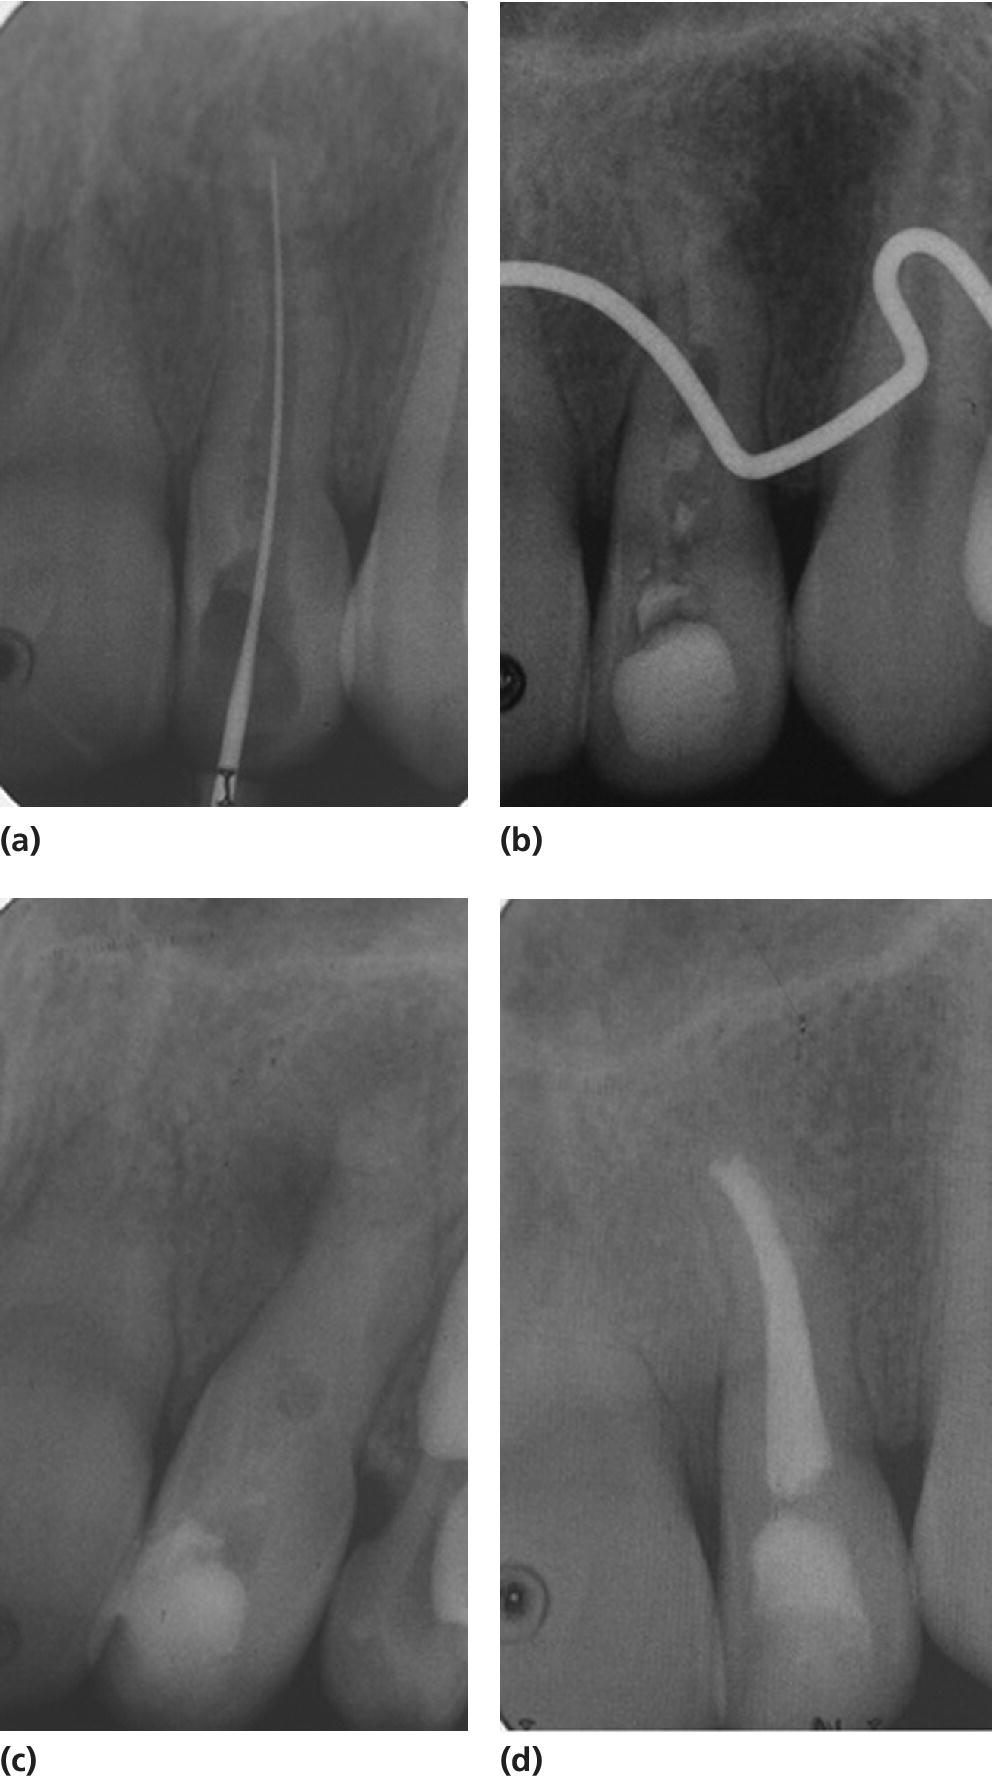
Figure 17.6 Periapical radiographs showing calcium hydroxide apexification of the upper left lateral incisor over a period of 9 months. (a) 15 May 2004, (b) 21 September 2004, (c) 15 January 2005, and (d) 11 February 2005.
Mineral trioxide aggregate plug technique
Mineral trioxide aggregate (MTA) was developed at the beginning of the 1990s at Loma Linda University in California and has since been used widely in pulpal management of immature permanent teeth (Figure 17.7). There are some differences among published studies regarding the chemical composition of MTA with incorporation of tricalcium silicate, tricalcium aluminate, calcium silicate, tetracalcium aluminoferrite, and bismuth oxide.
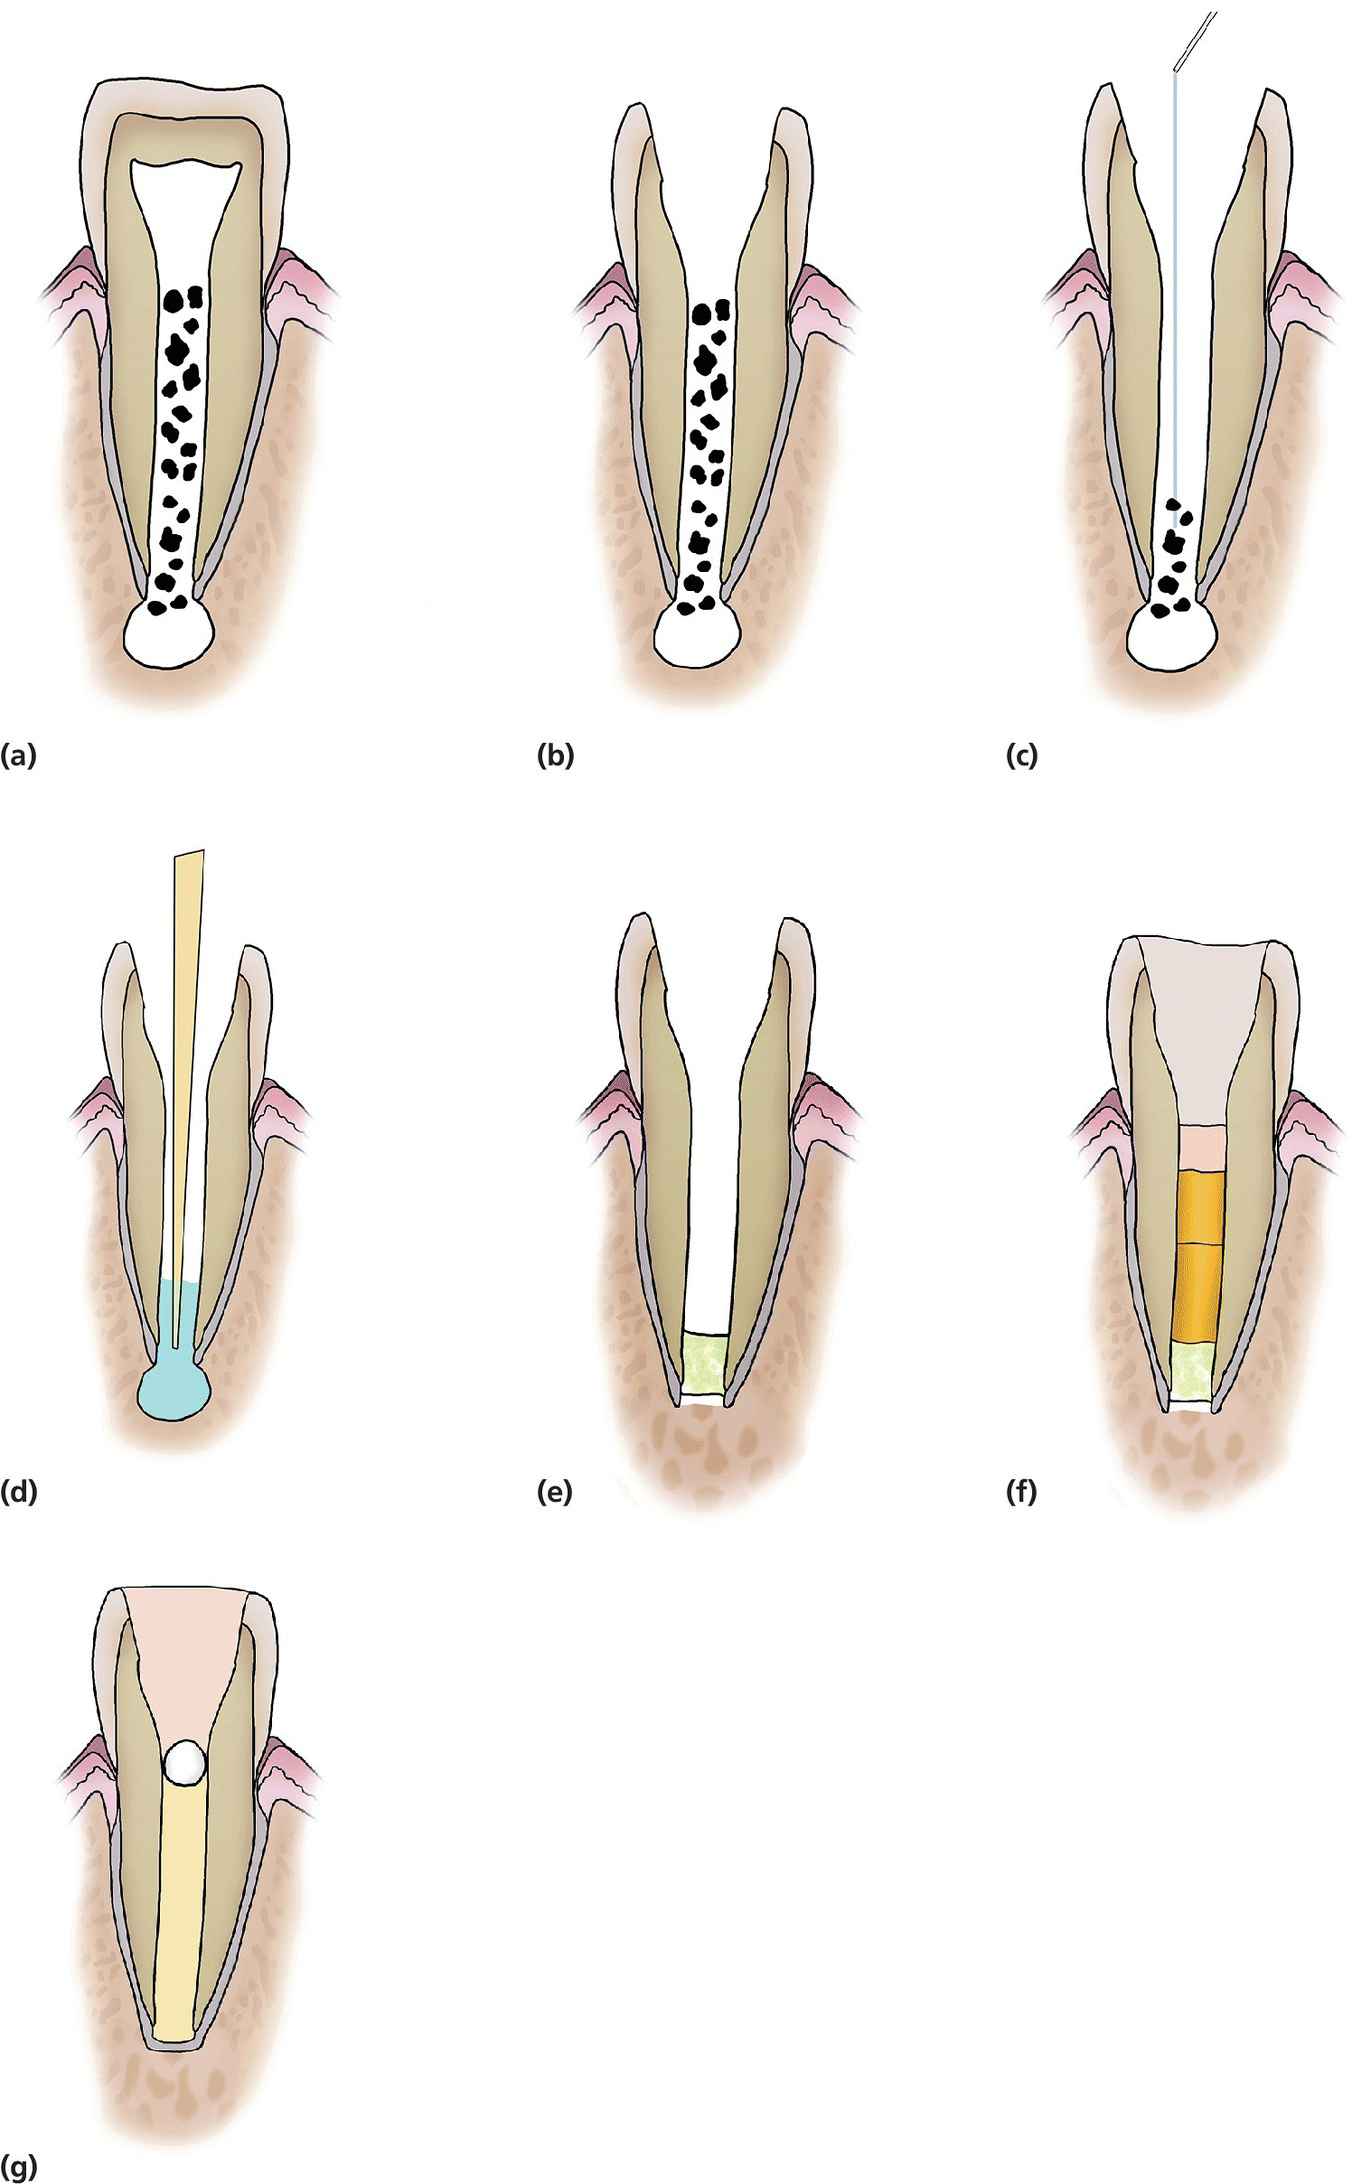
Figure 17.7 Diagrammatic representation of MTA plug and thermal guttapercha obturation of immature teeth. (a,b) Access pulp chamber, (c) light filing or no filing of canal and irrigation with 0.5% sodium hypochlorite, (d) drying of the canal using paper points, (e) placement of 4–5 mm white MTA (light green) in the apical third of the canal, (f) incremental obturation using Obtura (orange), (g) placement of a glass ionomer based (gray) base and composite filling (brown).
There are several advantages and disadvantages to the use of MTA.
Advantages:
- Reduced number of dental visits
- Good biocompatibility
- Prevents microleakage
- Induction of odontoblasts and hard tissue barrier
- Capacity to set in a moist environment
- Radiopacity that is slightly greater than dentine
- Low solubility.
Disadvantages:
- Highly alkaline with a pH of 12.5 after setting which results in antimicrobial properties, but may also result in denaturing of dentine collagen, potentially leading to root fracture especially in immature thin roots
- Discoloration of the crown [22] which is linked to bismuth oxide content
- Setting time of 3–4 hours
- Compressive strength after setting is 70 MPa.
Apexification vs MTA plug technique
Due to the weak, unreliable evidence supporting the use of calcium hydroxide in multi‐visit apexification in traumatized necrotic immature anterior teeth [23], coupled with the recent evidence showing negative effect of long‐term calcium hydroxide use of dentine fracture strength [12,24–26], the use of calcium hydroxide is no longer the technique of choice when managing immature non‐vital teeth.
The use of a MTA plug technique in the last decade has improved the outcomes of managing immature nonvital teeth (Figures 17.7 and 17.8) [27]. Nevertheless, MTA’s high alkalinity could result in tooth brittleness and future root fractures [26]; therefore, research on the long‐term effect of this technique is needed.

Figure 17.8 Radiographs showing a case treated with MTA plug and Obtura.
Both these techniques have a fundamental problem in that although they allow root canal obturation, they do not contribute to any qualitative or qualitative increase in root dimensions, and the tooth remains predisposed to fracture [12,13], with over half of the teeth suffering root fractures and loss within the first 5–10 years of treatment, leaving the child with a treatment burden for the rest of their lives.
Regenerative endodontic technique
More recently there has been a paradigm shift in the approach to the management of this intractable clinical problem. In order to achieve any qualitative or qualitative increase in root dimensions, it would be essential to restore the blood supply to the tooth that was disrupted. Similarly, in trauma cases, a viable epithelial root sheath of Hertwig is required for consolidation of root length and increase in the crown‐to‐root ratio.
A better understanding of tissue engineering of the pulp–dentin complex has made it possible to design techniques to achieve regeneration of pulp–dentin complex [28]. It is now accepted that the tissues surrounding the apex of an immature permanent incisor tooth in children is rich in stem cells and these stem cells have now been characterized as stem cells of the apical papilla (SCAP), and shown to be similar to dental pulp progenitor cells [29,30]. In order to harness their potential a few techniques have been proposed in the literature [28], with the primary aim of regenerating a new pulp–dentin complex. Several case reports [31–34], case series [35–37], and more recently a randomized controlled trial [38] have been published and shown the technique to have a good predictable outcome in terms of periapical healing and continued root development [38] that would indicate that regeneration of the pulp–dentin complex has occurred. It has been suggested that continued root development is less successful in trauma cases due to damage to the epithelial root sheath of Hertwig; however, further research is needed.
Most of the clinical published data describe the regenerative endodontic technique (RET) using blood clot as a scaffold (Figure 17.9) [38]; however, further research into alternative scaffolds and signaling molecules is under way.
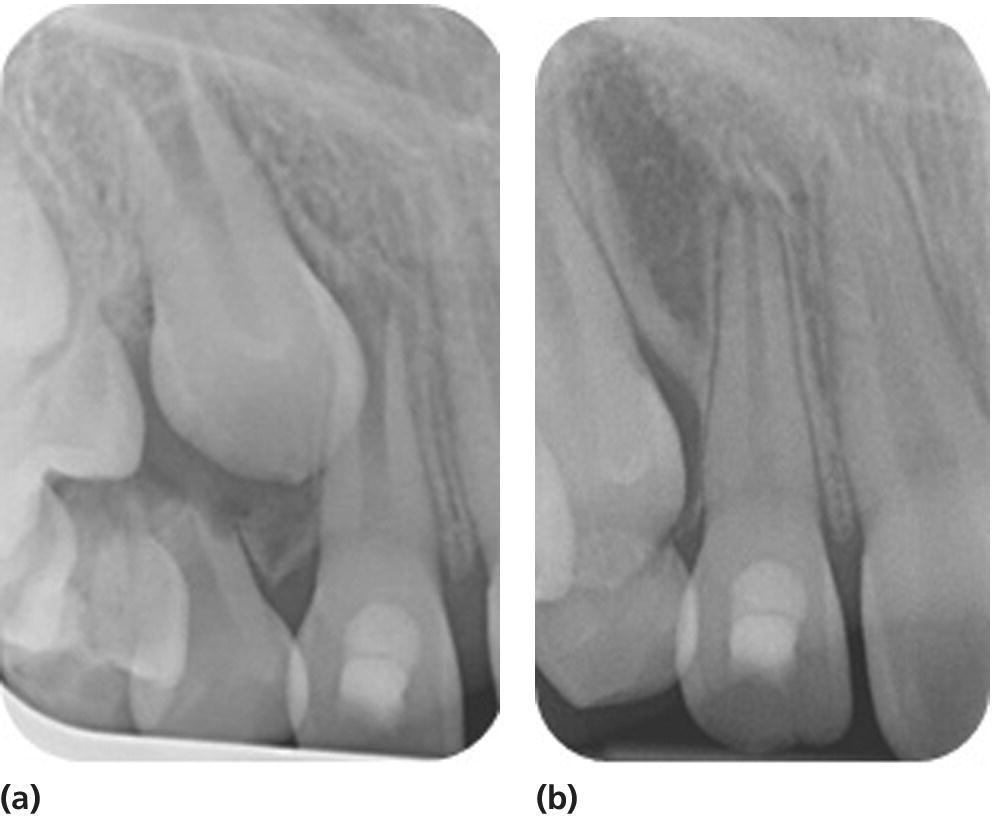
Figure 17.9 Radiographs showing continuation of root development in a patient treated with RET using blood clot as a scaffold. (a) 23 October 2013, (b) 23 October 2014.
RET using blood clot scaffold is performed as follows (see Figure 17.10a–j).
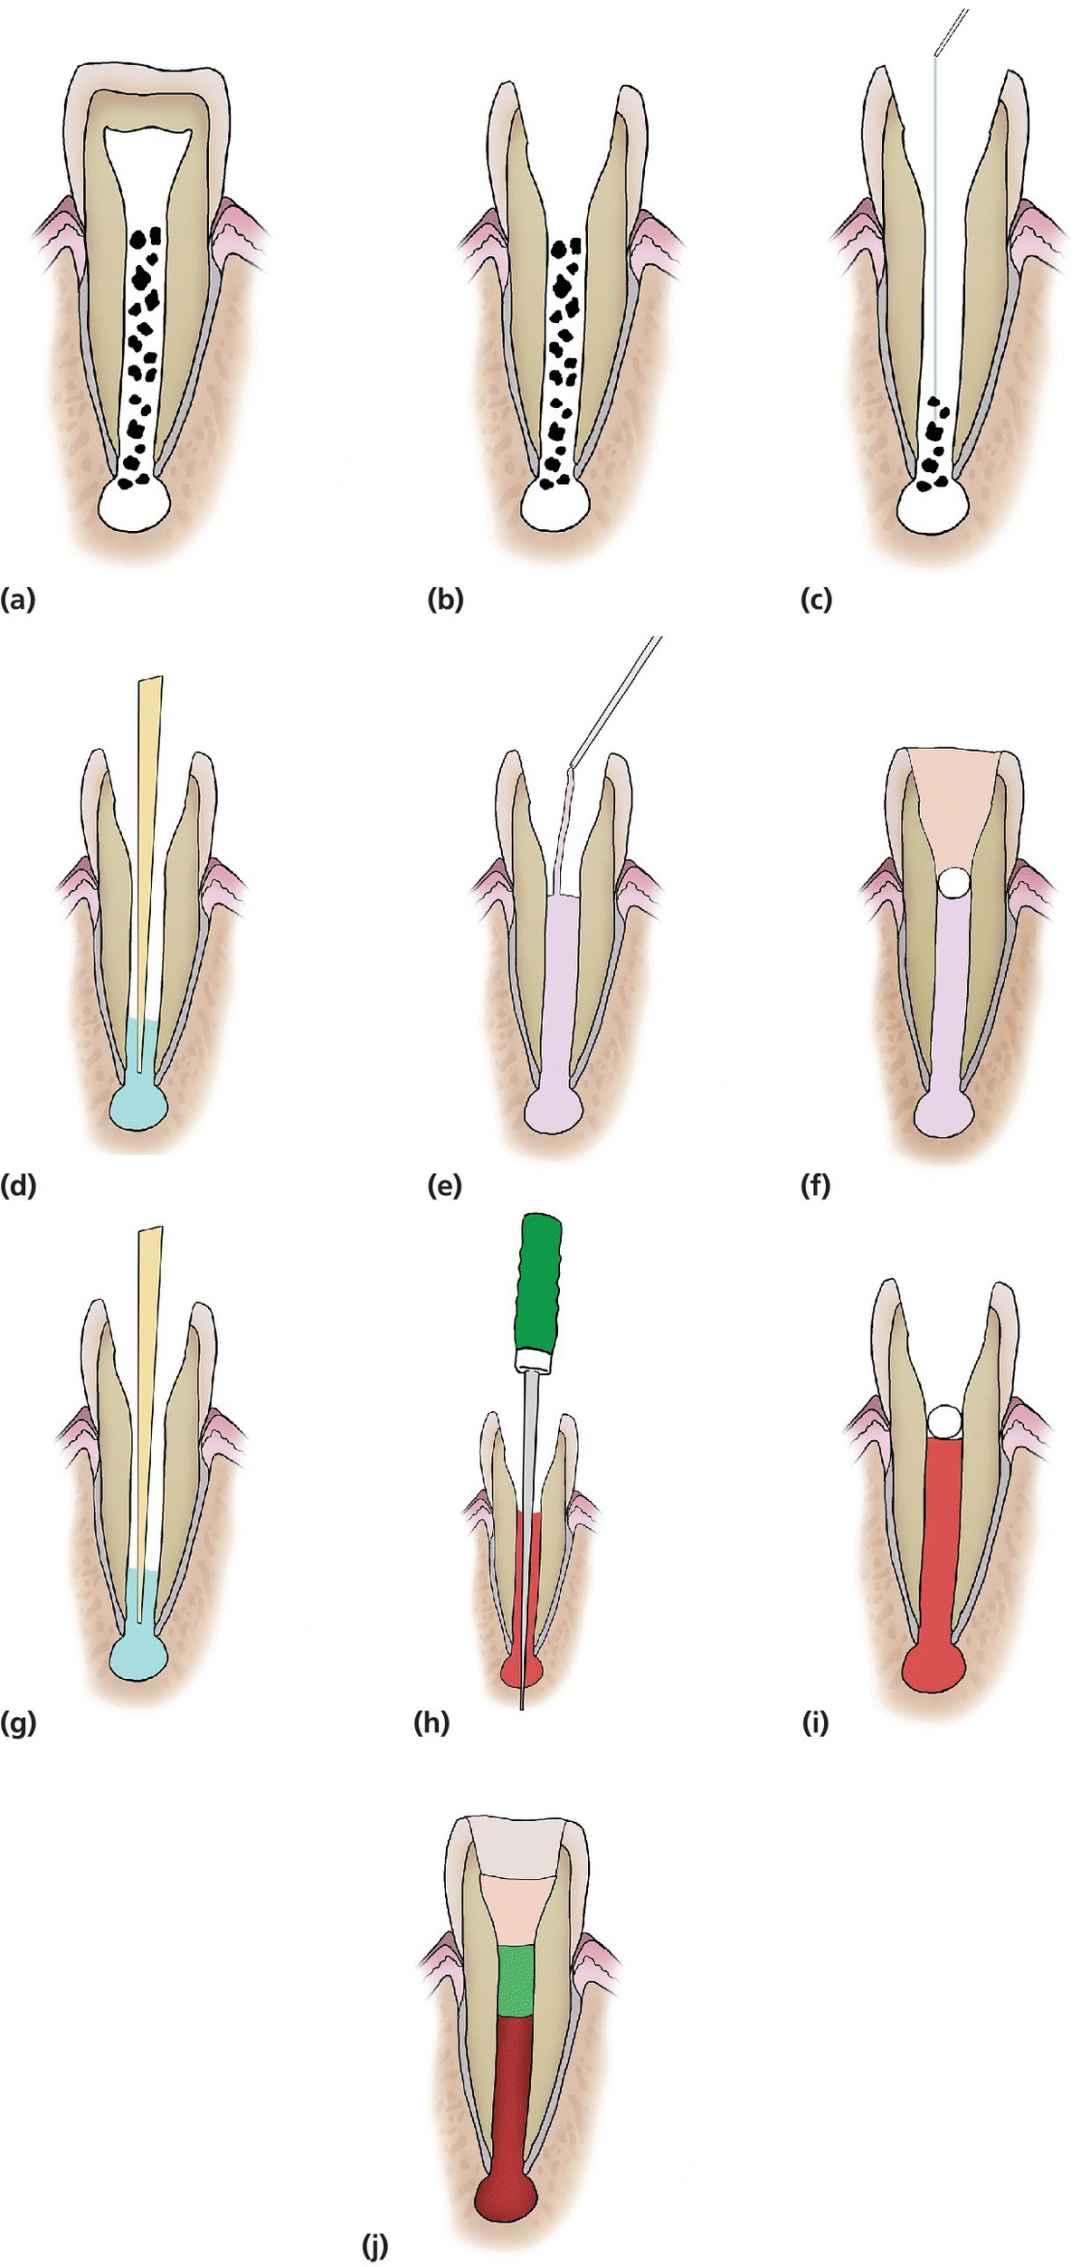
Figure 17.10 Diagrammatic representation of RET of immature teeth. (a,b) Access pulp chamber, (c) light filing or no filing of canal and irrigation with 2.5% sodium hypochlorite, followed by 5 mL sterile saline, (d) drying of the canal using paper points. (e) A mixture of metronidazole (100 mg) and ciprofloxacin (100 mg) is mixed with distilled water and delivered into the root canal system, (f) placement of cotton pledget and a temporary glass ionomer filling until symptoms and signs of infection resolve. (g) At the second stage and after accessing the tooth again, the canal is irrigated by ccopious amounts of normal saline followed by 10 mL 17% EDTA and thoroughly dried with paper points. (h) A sterile sharp instrument (needle or a finger spreader) with a length of 2 mm beyond the working length is pushed past the confines of the root canal, into the periapical tissues to intentionally induce bleeding into the root canal. (i) The bleeding is then allowed to fill the root canal followed by placement of a cotton pledget for 5 min until a clot has formed. (j) Once the clot has formed, the access cavity is then hermetically sealed with three layers of material to prevent coronal leakage and contamination: Portland cement, followed by glass ionomer and then composite resin.
First treatment visit
- Local analgesia to be given (if indicated).
- The tooth is isolated using dry dam.
- The tooth is accessed and the pulp extirpated (Figure 17.10a,b).
- The canal is negotiated with minimal or no filing to prevent further weakening of the existing dentinal walls.
- The root canal system is irrigated (Figure 17.10c) with:
- copious amounts of 2.5% sodium hypochlorite. When irrigating with NaOCl, the needle should be introduced into the root canal to a point 2 mm short of the apical foramen, and the NaOCl is slowly expressed from the syringe to prevent its introduction into the periapical tissues.
- followed by 5 mL sterile saline.
- The canal is dried using paper points (Figure 17.10d).
- Metronidazole (100 mg) and ciprofloxacin (100 mg) should be mixed with distilled water. A mixture of metronidazole and ciprofloxacin was shown to have the same sterilization of the root canal system as that of the tri‐antibiotic mixture (metronidazole, ciprofloxacin and minocycline) described by Sato et al. in 1996 [39,40].
- The mixture of the two antibiotics is filled into the root canal (Figure 17.10e).
- A cotton pellet is placed to cover the root canal orifice and the access sealed with a glass ionomer cement to prevent any coronal leakage or contamination of the root canal with oral microorganisms (Figure 17.10f).
Second treatment visit
After resolution of infection; if clinical signs or symptoms persist, the procedures performed in the first appointment should be repeated.
- Local analgesia without vasoconstrictor is administered and the tooth isolated and re‐accessed as described above.
- The antibiotic mixture is flushed out of the root canal by irrigation with:
- copious amounts of normal saline
- followed by 10 mL 17% EDTA.
- The root canal is thoroughly dried with paper points (Figure 17.10g).
- Insert a sterile sharp instrument (needle or a finger spreader) with a length of 2 mm beyond the working length (Figure 17.10h), past the confines of the root canal, into the periapical tissues to intentionally induce bleeding into the root canal. The bleeding is allowed to fill the root canal.
- Once the root canal is filled with blood, a cotton pledget is placed in the pulp chamber and a clot allowed to form in the root canal (Figure 17.10i).
- Once the clot has formed, the pulp chamber in the coronal part is thoroughly cleaned to remove any remnants of blood, which could cause discoloration in the future.
- The access cavity is hermetically sealed with three layers of material to prevent coronal leakage and contamination; Portland cement, followed by glass ionomer and then composite resin (Figure 17.10j).
Bleaching of nonvital discolored permanent teeth
The clinical procedure for bleaching with 10% carbamide peroxide using the inside–outside bleaching technique is shown in Box 17.1.
VIDEdental - Online dental courses


