Immediate provisionalization of implant restorations
 Additional illustrations can be found on the companion website at www.blockdentalimplantsurgery.com
1. A tooth-borne prosthesis with the crown of the tooth placed within a clear acrylic vacuum-form
2. A removable prosthesis, commonly termed a “flipper”
3. A pontic placed on orthodontics appliances
4. A provisional crown bonded to the adjacent teeth. This is performed often a few weeks after implant surgery to avoid disturbance of the surgical site.
5. A fixed, implant-borne prosthesis delivered either within hours of the surgery or within a few days. When considering each patient’s specific needs and desires, an immediate provisional prosthesis placed at the time of implant placement is an ideal solution for many patients. Compliance must be excellent. The patient needs to understand that the single-tooth or multitooth provisional prosthesis is not intended for occlusion, only to shape soft tissue and for esthetics.
Methods for immediate provisionalization of single-tooth implant restorations
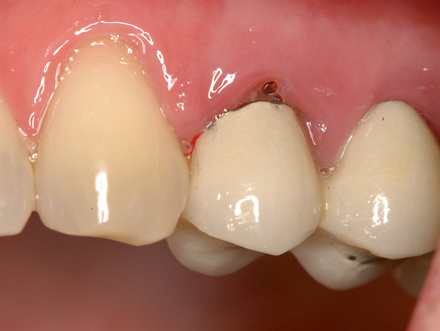
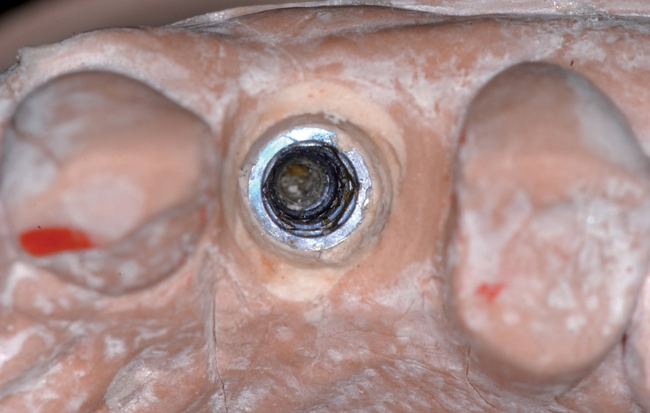
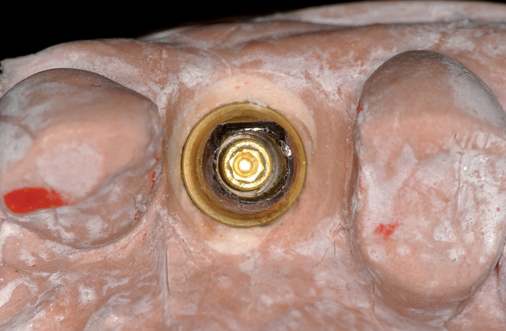
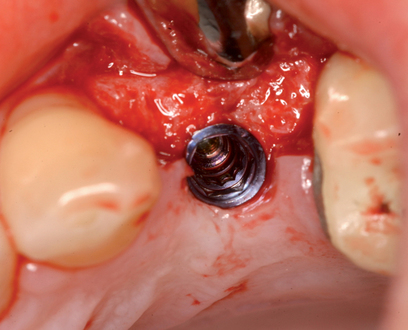
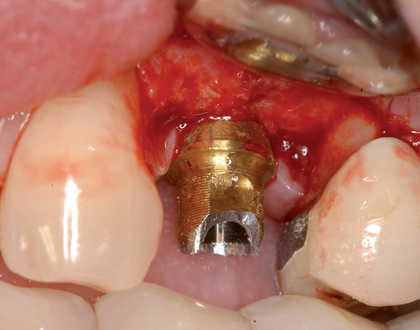
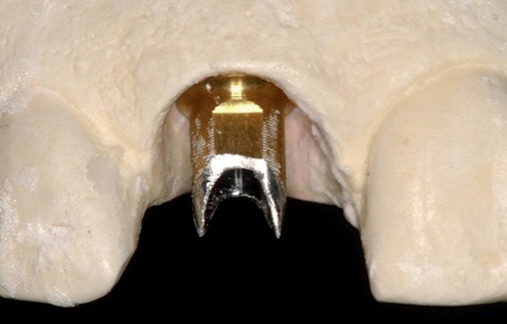
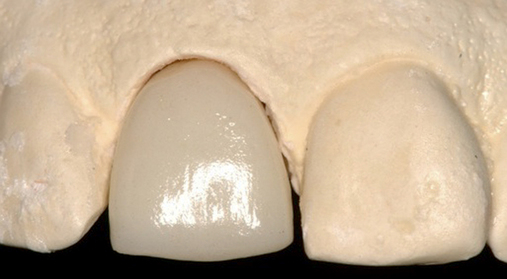
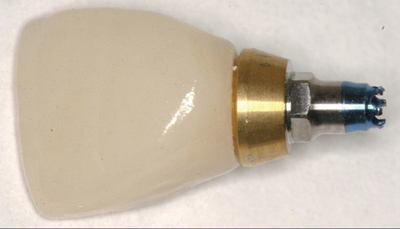
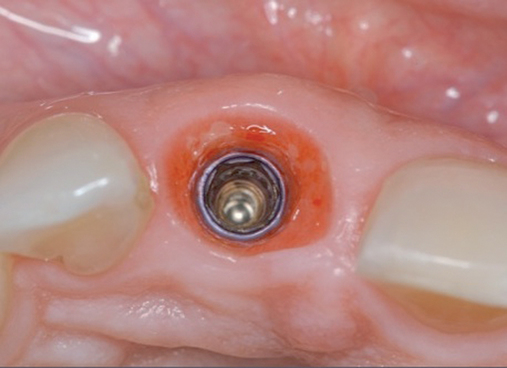
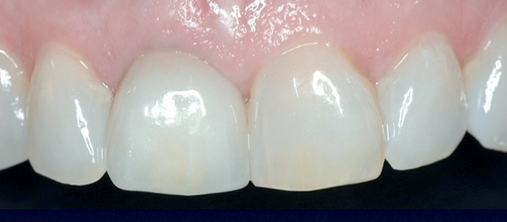
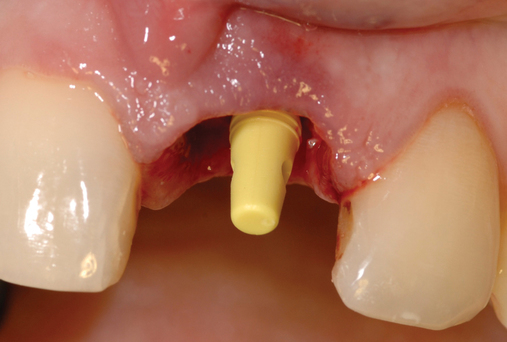
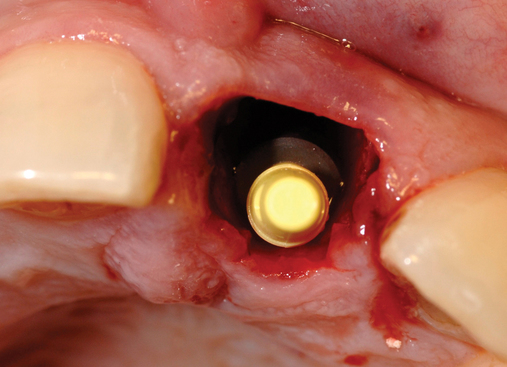
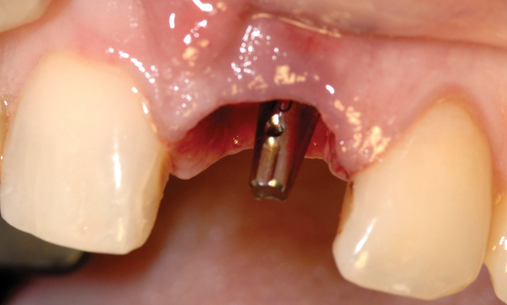
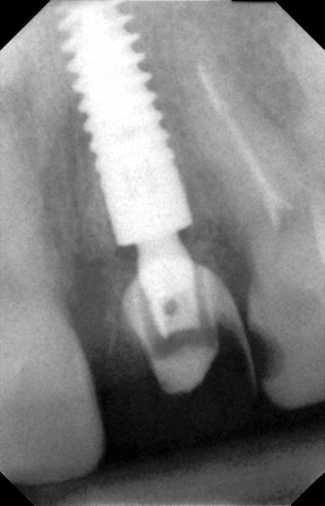
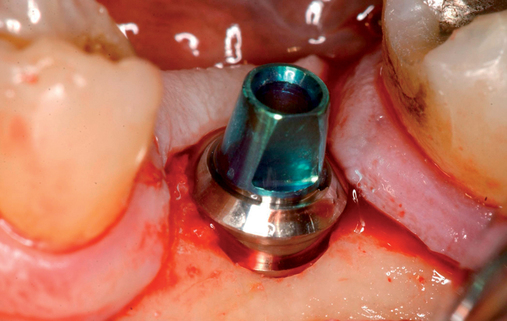
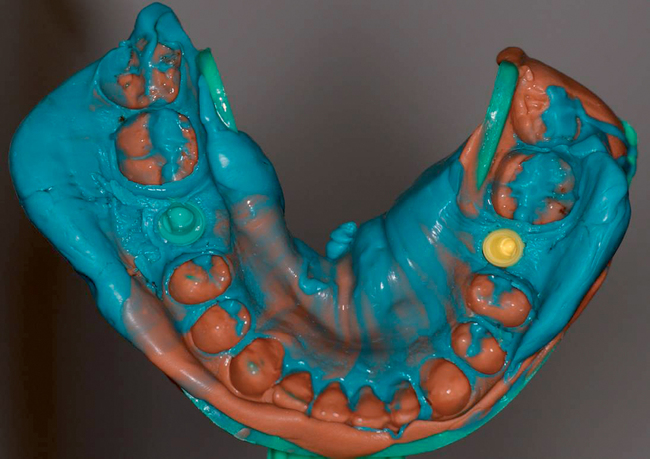
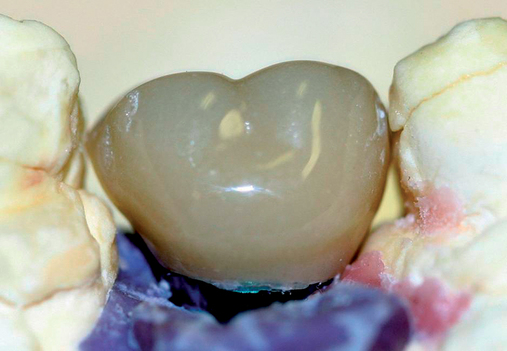
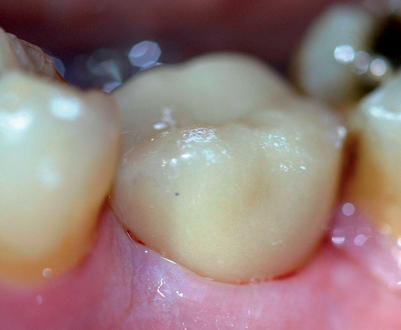
• Preoperative laboratory preparation of abutment and provisional crown. This technique minimizes chairside time for the restorative dentist. From simple impressions, an implant analog is placed into the patient’s model, an abutment is prepared, and a provisional crown is made in the laboratory. At the time of implant placement, the abutment and the provisional crown are placed by the surgeon and modified by the restorative dentist if necessary. Contacts and occlusion may need to be adjusted at chairside (Figures 8-1 and 8-2).

• Chairside abutment preparation and fabrication of a provisional crown. This technique requires the abutment to be minimally prepared at implant placement. This requires the surgeon to perform the adjustment, which can be further refined by the restorative dentist. The provisional crown is fabricated by relining a hollow shell. The patient will need to see the implant team and have closely coordinated appointments. The disadvantage of this method is the relining part of the procedure during which the reline material can be forced into the surgical site and compromise the surgical result. If the temporary abutment can be removed easily, then the adjustments and refining of the provisional crown can be performed out of the mouth. This method is not recommended because better options may be available.
• Chairside fabrication of a provisional crown using a stock abutment
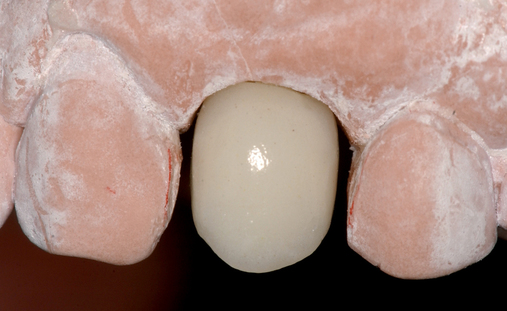
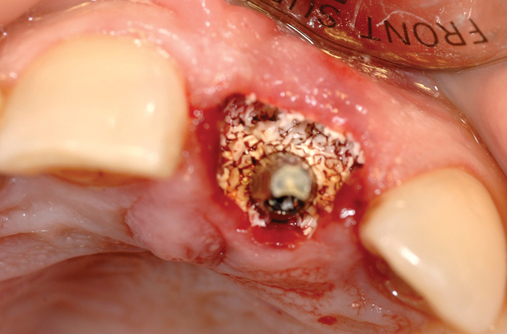
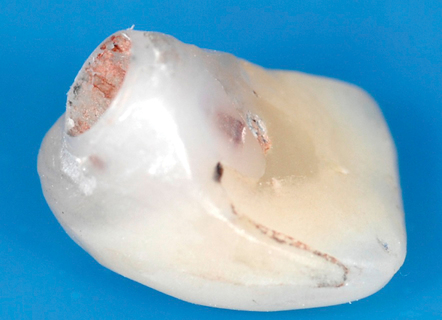
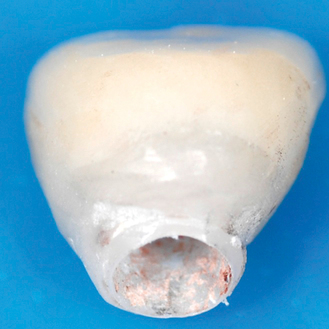
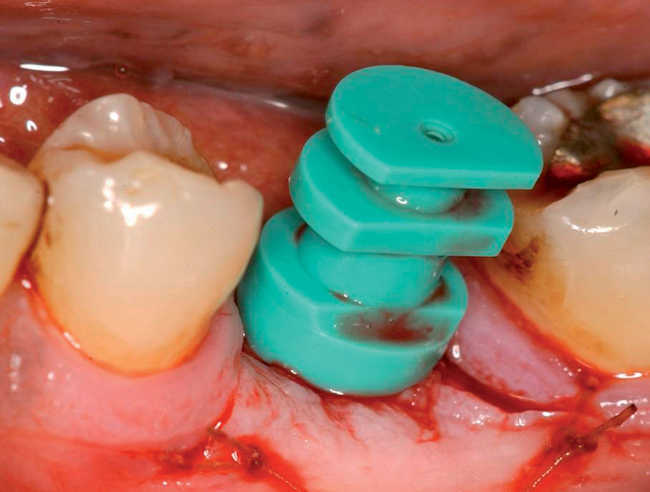
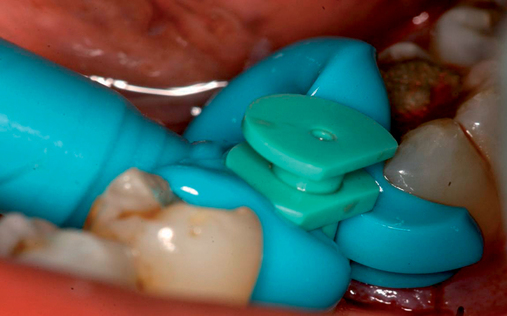
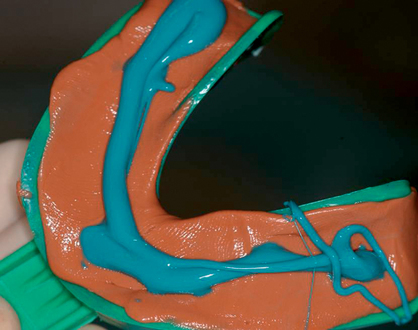
• The surgeon and restorative dentist will plan this procedure to be performed on the same day as surgery. Pre-extraction impressions are made and duplicated. One set is used to fabricate a vacuum form, which can be used to hold the extracted tooth’s crown if for some unanticipated reason an abutment and provisional crown cannot be immediately fabricated. This is “plan B” and ensures that the patient will leave the clinic with a tooth in place, which is critical in the esthetic zone. The second cast has the crown on the tooth to be extracted removed from the cast. A denture tooth of appropriate form and shade is wax retained in proper position. An alginate of this setup is made and a stone model poured. A second vacuum form is made. The denture tooth is trimmed to leave the facial aspect as a “shell” or “facing.” The vacuum form is trimmed to hold the denture tooth facing in position when luting it to the abutment after implant and abutment placement (Figure 8-3; see the companion site for the complete case).

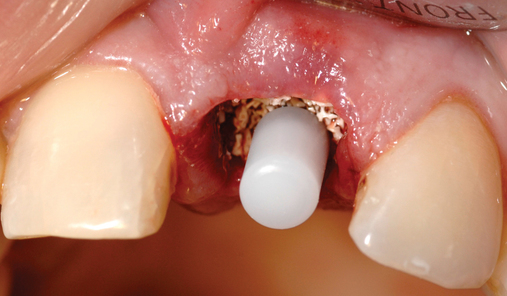
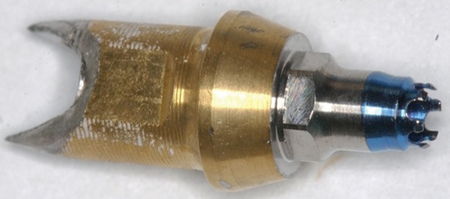
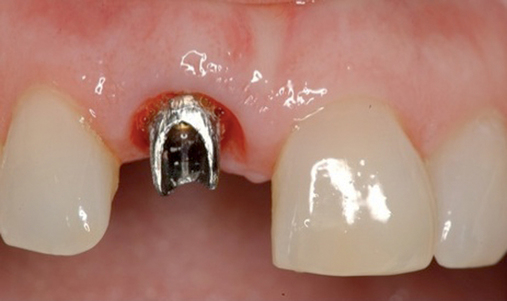
• Transfer impression (“indexing”) of implant or abutment for laboratory fabrication of provisional prosthesis, with placement in patient’s mouth within hours or days. At implant placement, an index can be made to allow for a provisional crown to be made in the laboratory. A conventional implant transfer coping can be used or an index can be made using the implant’s driving mount. In these indexing methods, the crown is fabricated out of the mouth and adjusted slightly when placed over the abutment. The impression can be given to the restorative dentist or laboratory for fabrication of the provisional crown, which is placed as soon as it is completed by the laboratory (Figure 8-4).

General considerations
Careful patient and site selection result in successful implant integration and decreased failure. Literature review indicates that single-tooth restorations with a delayed approach, which allows integration of the implant before the final restoration is placed, have a success rate of 94% to 100%, depending on specific implant protocols and the nature of the implant site.1–4
Criteria associated with success using immediate provisionalization include the following:
1. Sufficient bone height, width, and density for stability of the implant at placement. The choice of implant length and width involves considerations similar to those used for implants in a two-stage method. A satisfactory implant insertion torque of or a radiofrequency index greater than 60 are the deciding factors that indicate that implant stability is sufficient for immediate provisionalization.
2. Sufficient mesial-distal, buccal-lingual, and interocclusal space for placement of an anatomic restoration. If the opposing occlusion interferes with the provisional restoration, a two-stage technique is used rather than the immediate provisionalization method.
3. Sufficient vertical dimension stability with occlusal stops to prevent occlusal loading of the provisional restoration
4. The patient should agree to limit chewing to only the softest of foods, preferably liquids, for up to 8 weeks. Patients with excessive parafunctional habits are not provisionally reconstructed.
Preoperative laboratory preparation of abutment and provisional crown
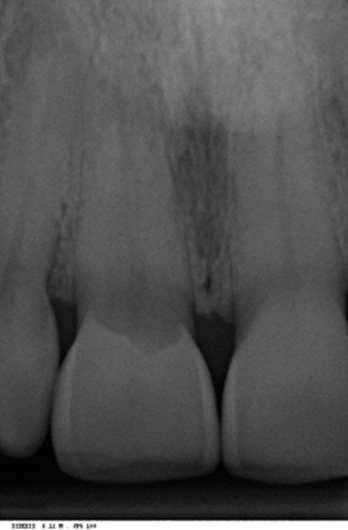
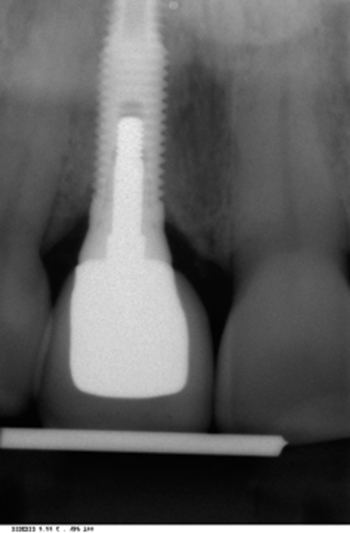
After the patient has been confirmed as a candidate for immediate provisionalization, a preoperative phase precedes implant placement. Cone-beam scans indicate that there is sufficient bone available for ideal implant placement. Mandibular and maxillary impressions are made, the preoperative laboratory phase is completed, and the patient is scheduled for surgery. At the time of implant placement surgery, the surgeon should have the abutment, retaining screw, provisional crown, and models with the analog in place (see Figures 8-1 and 8-2).
Laboratory technique
1. Impressions are made of the maxilla and mandible, and stone casts are poured.
2. For a site planned for tooth extraction, the tooth is removed from the cast after a model has been poured. The need for a wax-up is determined by the need for esthetic implant positioning. For many situations, a surgical guide stent is not necessary. The position of the implant to be placed is marked, and a pilot hole is drilled in the stone cast. The stone coronal to the analog is shaped to allow an emergence profile for the provisional restoration.
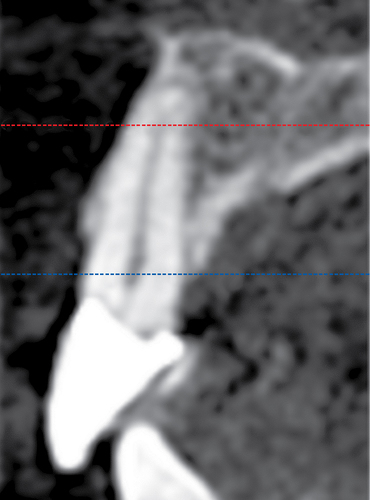
3. The proposed vertical position of the implant analog is marked on the cast, anticipating approximately 3 mm of gingival thickness. In the mandibular area, the thickness of the gingiva may be 2 mm. A cross-section cone-beam radiograph can be used to approximate the position of the bone on the crest. The vertical position of the analog in the model should result in an ideal implant position.
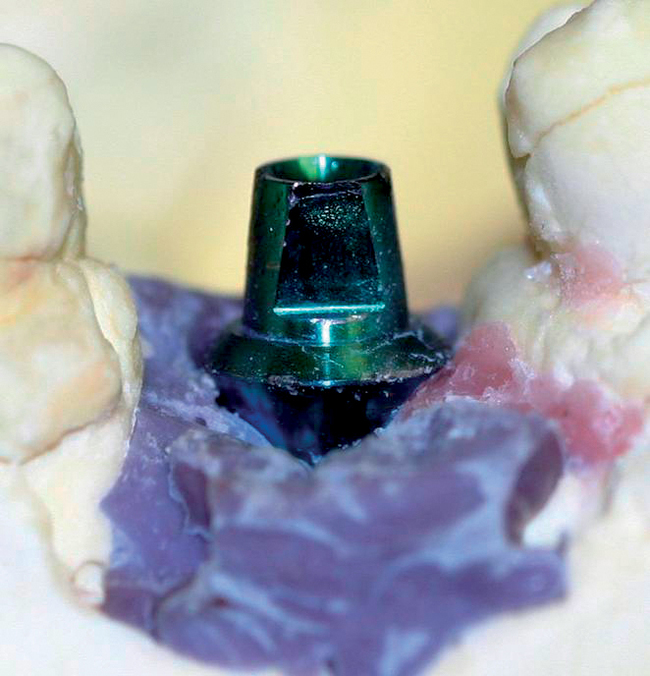
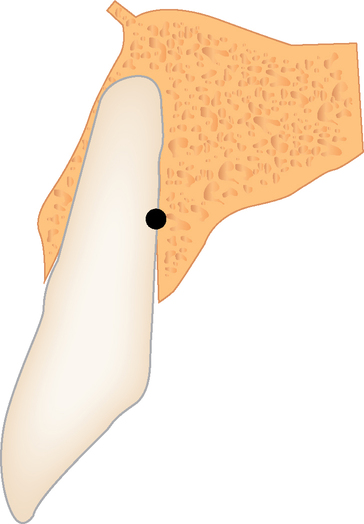
4. A hole is drilled in the model for placement of the analog. The hole must be large enough for passive placement of the analog. The analog is tried in place to confirm proper alignment. Its vertical position should place the top of the implant at the anticipated level of the bone, or 3 mm from the planned gingival margin. The analog is secured in the hole with cyanoacrylate glue, stone, plaster, or light-cured resin. The analog should be consistently positioned with its internal or external retentive feature, such as the flat surface of a hex, facing labially. When the implant team maintains consistent orientation of the analog, the result is less variability of implant orientation, better positioning of the prepared abutment and temporary crown, and better communication among members of the implant team. Implant rotational orientation is not needed for conical internal connections, which rely on abutment torque for rotational stability.
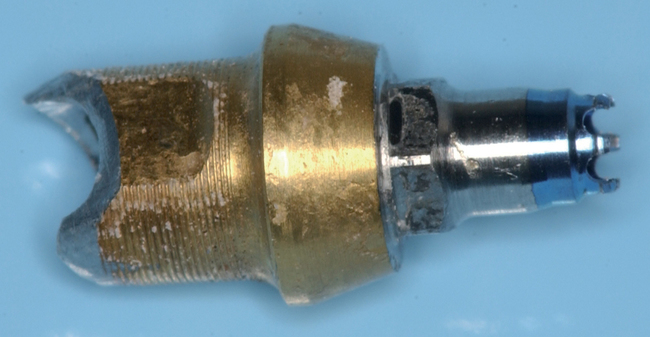
5. A “prepable” abutment is placed in the analog and modified in the laboratory to allow placement of a provisional crown. Another option is to use a try-in kit and choose a final stock abutment that does not need preparation. Many dentists and laboratory technicians make a mistake by preparing the abutment in a manner similar to a tooth preparation. Fixed stock abutments have flat surfaces and small retentive grooves incorporated into their structure, which aids in crown retention. The preparation of the abutment should take into consideration the vertical clearance and modification of the labial or lingual surfaces while retaining much of the retentive aspects of the abutment. An abutment preparation that looks like a tooth prep is not recommended. If the provisional crown will be milled, then the margin shoulder and rounded contours of the abutment preparation are made to be consistent with the needs of a milled crown restoration.
6. The abutment margins should be at the level of the gingiva to avoid deep subgingival margins and to allow ease of cleaning after the implant and provisional crown have been placed. With the use of stock abutments and machined caps, the margins can be more subgingival.
7. Some feature should identify the labial surface of the prepared abutment, such as the flat surface of the abutment or a dot or groove placed into the abutment’s surface. This allows accurate orientation of the abutment at surgery. The prepared fixed abutment should be left with a rough surface to allow retention of the abutment to the provisional crown with temporary cement. The abutment preparation may result in a shorter abutment than the final abutment to allow 2 mm of interocclusal space between the provisional crown and the opposing restoration. These crowns are provisional and are not placed in occlusion. Typically, 2 mm of interocclusal space is required.
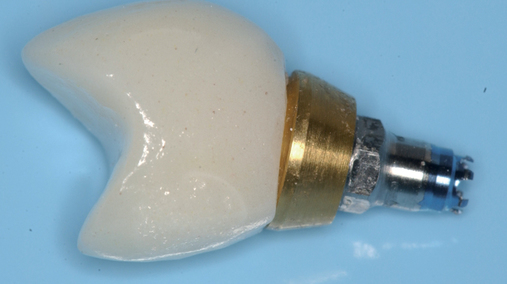
8. After the abutment has been prepared or chosen from a stock selection, either a hollow denture tooth or a hollow-shell crown is relined over the abutment using the opposing model. The provisional crown is adjusted to prevent occlusion. It is useful to leave 0.5 mm of space at the mesial and distal marginal ridges to allow surgical flexibility at the time of the placement and to prevent micromotion on the implant caused by movement of the adjacent teeth. The provisional crown margins are smoothed and polished to optimize the soft tissue response.
9. A hole can be made in the occlusal aspect of the provisional crown to allow access to the retaining screw that secures the abutment to the implant. In addition, this gives the restorative dentist the option of taking an impression of the provisional crown to avoid the use of transfer copings. The abutment retaining screw is removed, and the abutment and provisional crown are removed as one piece. The abutment and crown are placed as one unit onto an analog of the appropriate implant system. This is then placed in the impression, which is poured in stone. The transfer of the implant and the subgingival sulcus is very accurate and eliminates the need for a transfer coping and placement of resin into the gingival sulcus.
Surgical procedure
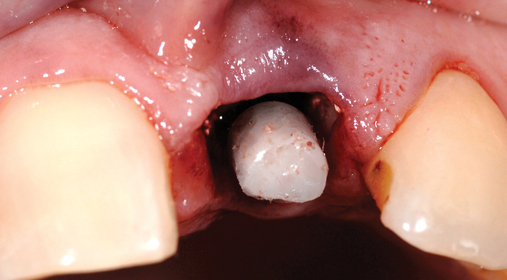
Extraction and immediate provisionalization of a central incisor.
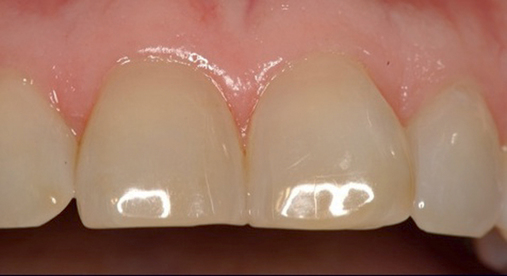
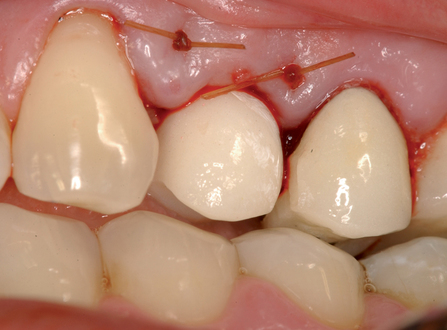
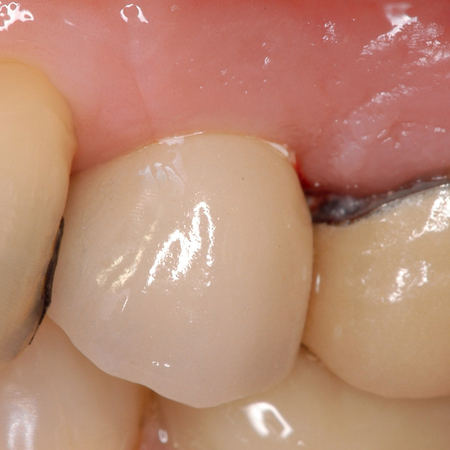
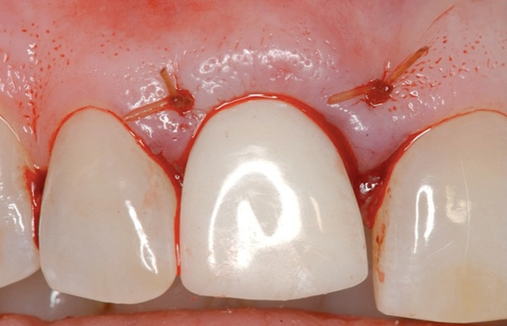
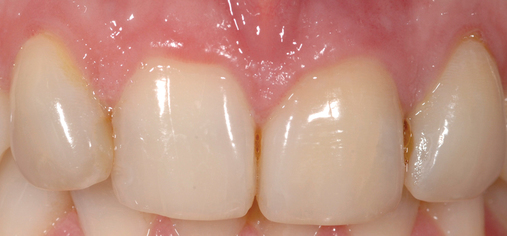
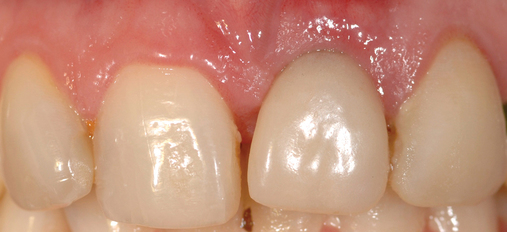
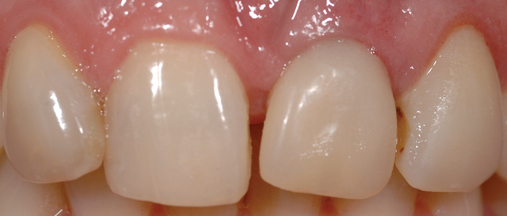
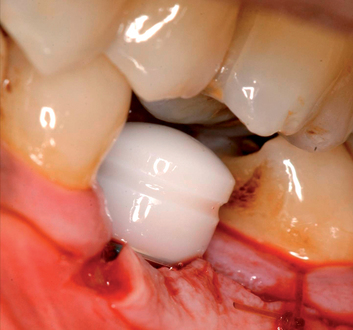
The patient in Figure 8-2 has an excellent prognosis for success because she has intact thick labial bone, relatively thick gingiva, square teeth with the interproximal contact close to the bone crest, and an occlusion that allows 1 mm of shortening of the provisional without esthetic compromise. The expected success rate is similar to that for placing implants into edentulous bone.
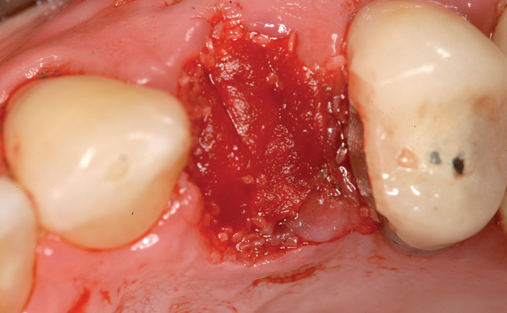
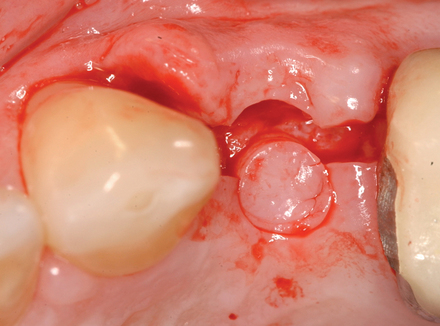
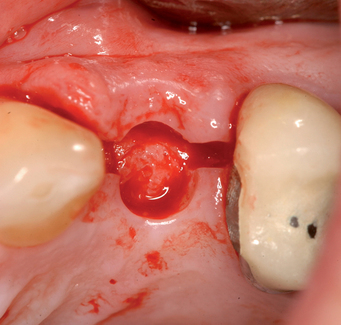
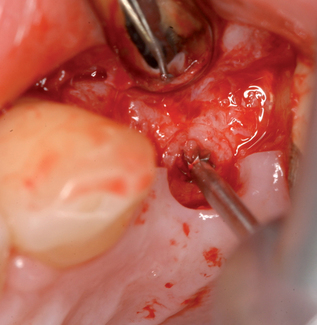
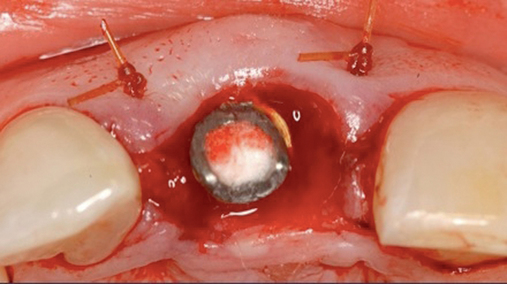
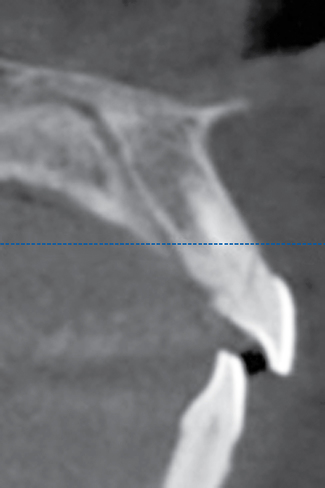
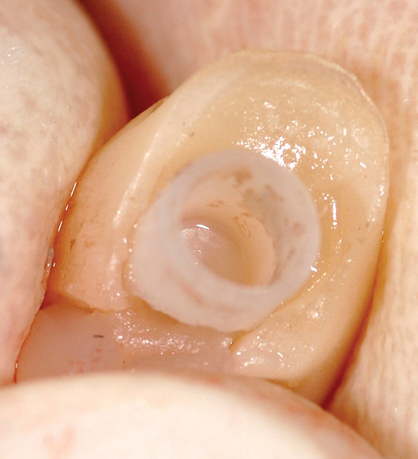
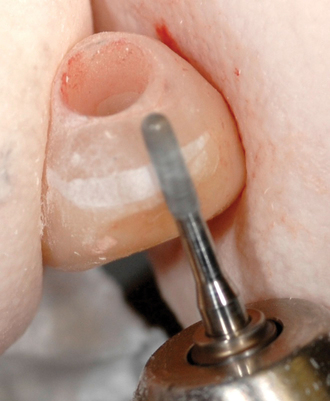
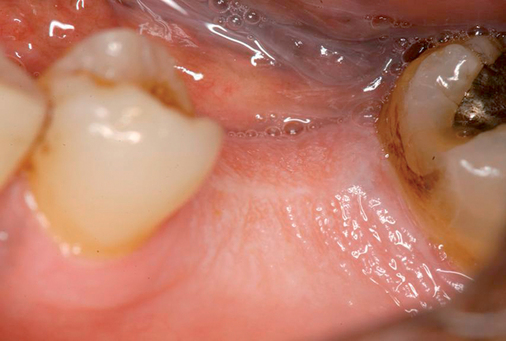
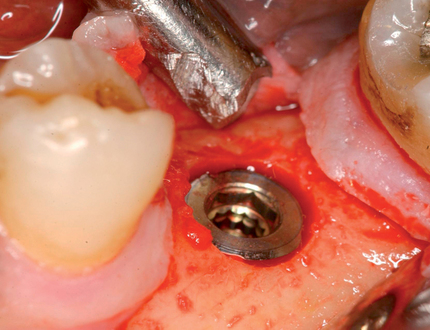
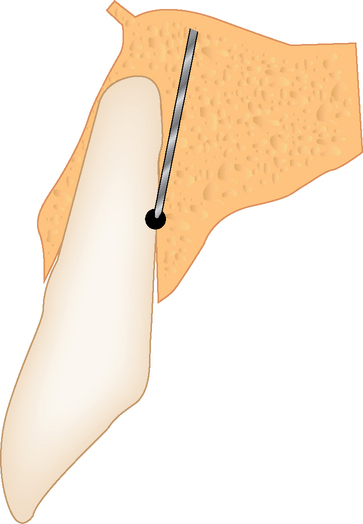
The implant preparation procedure starts with a small round or sharp-tipped bur on the palatal slope of the extraction site. This initial hole is located where the most lingual aspect of the implant is planned. The succeeding series of drills tend to bounce off of the dense palatal bone since the labial aspect of the site has minimal dense bone secondary to the extraction site (Figure 8-5). When completed, the central axis of the implant will be slightly labial to the initial round drill hole made in the palatal slope of the extraction socket. If this is not considered, then the implant will be placed too far labial, resulting in compromise of the restoration and compromise of the labial bone with resorption, gingival recession, and an unhappy patient.
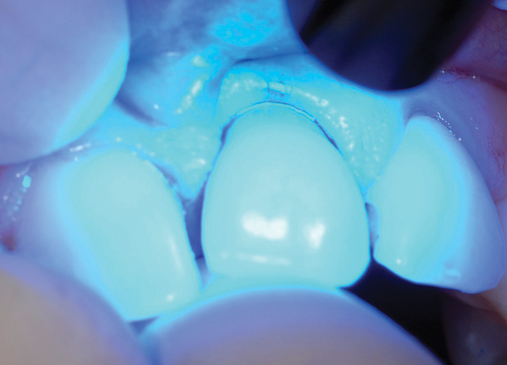
Incision design to facilitate ideal soft tissue.
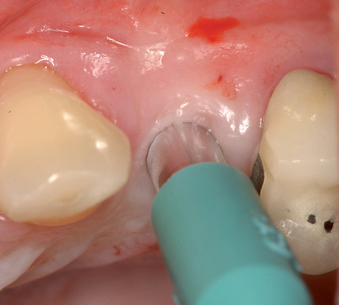
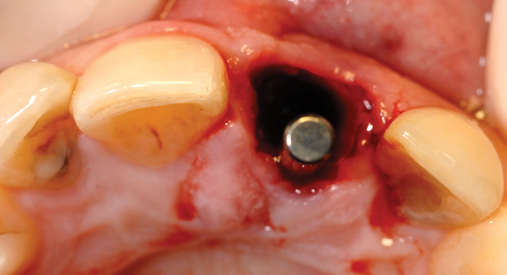
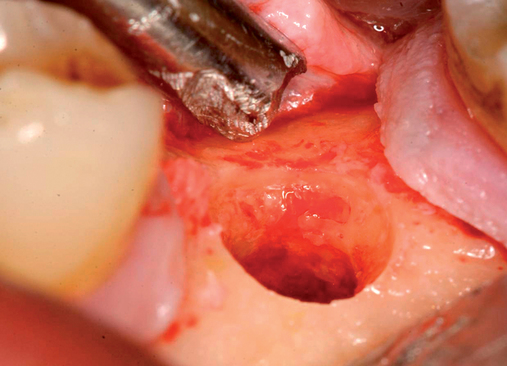
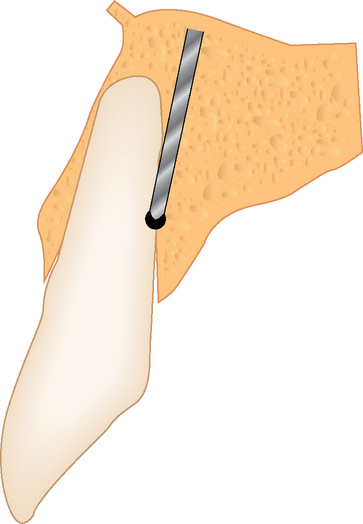
If the surgeon is certain that sufficient bone width is available for implant placement, the implant site can be prepared through the gingival hole without elevation of a flap (see Figure 8-1). The implant site is prepared using the standard series of drills for implant placement. Attention must be paid to positioning the implant vertically 3 mm apical to the planned gingival margin. The implant should be rotated to match the analog in the model. When a flapless approach is used, the implant driver mount is used to place the implant at the correct depth and to orient it correctly.
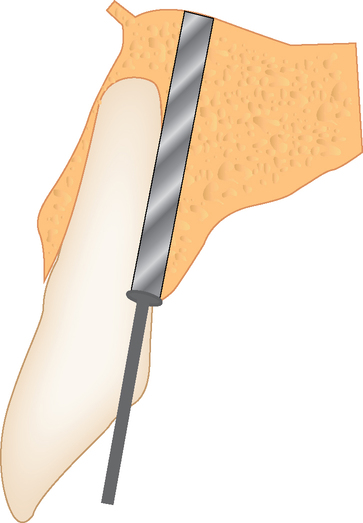
Chairside abutment preparation and fabrication of a provisional crown
With the use of new high-speed drills and gentle technique, abutments can be adjusted in the mouth. This reduces implant dentistry to conventional dentistry, without the need for transfer copings and other parts. The surgeon places the implant and the abutment or a one-piece implant with the abutment incorporated into its body. The surgeon or restorative dentist performs a simple reduction in height and labial or lingual contouring as necessary, and then a hollow shell is relined (see Figures 8-1 and 8-2).
Case example
The patient in Figure 8-3 fractured her central incisor at the level of the alveolar crest. The restorative dentist thought that the long-term prognosis for post and core with crown lengthening would be lower than an implant restoration. The patient desired a fixed provisional restoration.
1. Impression of the arch with the tooth in place. A vacuum form was made just in case the implant could not be provisionalized. This option would allow the crown of the removed tooth to be placed into the Essix-type retainer to avoid the patient’s leaving the office without a crown.
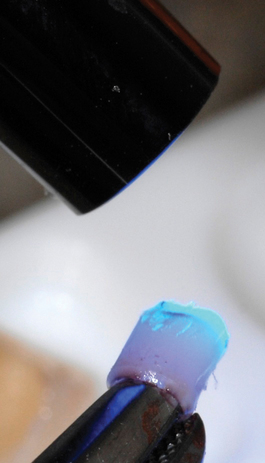
2. A second cast was made, and the tooth was removed from the cast. A denture tooth of proper shade and shape was chosen and hollowed to fit in the edentulous site. It was secured with wax. An alginate impression was taken and a vacuum form made. This was trimmed to allow for stabilization of the denture tooth facing during the light-cured composite connecting process to the prosthetic cap.
Surgical method.
A round bur was placed along the palatal slope of the extraction site, and an entry site was created for the subsequent twist drill (see Figure 8-5). The twist drill was used to length with its axis slightly palatal to the planned incisor edge. The final drill was used to length. The slow-speed bone-shaping drill was used to shape the osteotomy site and the implant (Ankylos; Dentsply Implants, Waltham, MA) placed. The shoulder of the implant was countersunk 1 mm apical to the crestal bone.
Stay updated, free dental videos. Join our Telegram channel
VIDEdental - Online dental courses


