Chapter 7. Preparation of the root canal system
J.S. Rhodes
CHAPTER CONTENTS
Summary97
Introduction97
Working length determination100
Root canal irrigation101
Learning outcomes107
References107
SUMMARY
A major goal of root canal treatment is the removal of microorganisms from the root canal system. This chapter on preparation of the root canal system will cover gaining access to the root canals, determining working length, preparation techniques including with rotary nickel-titanium instruments, root canal irrigation and controversies associated with cleaning and shaping.
INTRODUCTION
It is widely accepted that microorganisms and their byproducts are the main aetiological factors in the initiation and progression of pulpal inflammation and periapical disease.1.2. and 3. The central focus of root canal treatment is, therefore, to eliminate microbes and their substrates from the root canal system. 4 This may involve the removal of necrotic pulp and tissue debris, removal of an inflamed pulp or, in elective treatment, the removal of healthy pulp tissue. Retreatment of failing cases is addressed in Chapter 14.
Historically, a mechanistic approach to root canal treatment was frequently adopted. However, there is now a greater awareness of the microbiota and pattern of colonisation within the complexities of an infected root canal system (Fig. 7.1). This has led to the development of newer techniques, instruments and materials and a biologically-based rationale for root canal treatment:
1. Removal of all tissues, microorganisms, their byproducts and substrates from the root canal system.
2. Shaping of the root canal system to facilitate placement of irrigants, medicaments and a root canal filling.
3. Filling of the shaped canal system coupled with an adequate and timely coronal restoration.
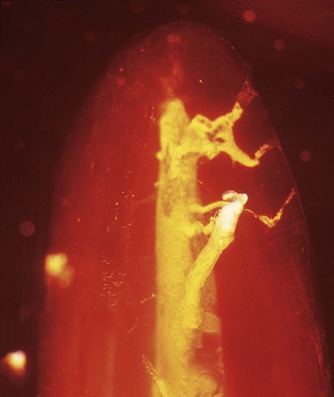 |
| Figure 7.1
A root end which has been made transparent by clearing showing two lateral canals.
|
The traditional ‘endodontic triad’ concept of cleaning, shaping and filling may be modified. Considering that a major goal of root canal treatment is the removal of microorganisms from the complex root canal system ‘shaping to facilitate cleaning and filling’ might be a more appropriately modified concept. Nevertheless, these three objectives must be achieved while ensuring conservation of tooth structure and maintaining canal shape.
GAINING ACCESS TO THE ROOT CANAL SYSTEM
The main function of an access cavity is to create an unimpeded pathway to the pulp space and the apical foramen of the tooth. Good access cavity design and preparation is imperative for quality treatment results, prevention of iatrogenic problems and avoidance of technical failure of root canal treatment. Conservation of coronal tooth structure should never preclude the proper design and fulfilment of the requirements of the access opening. 5,6 On the other hand, injudicious tooth removal should be avoided. Pulp space anatomy and access cavities are covered in Chapter 4.
Pretreatment assessment
The dimensions of the pulp chamber and the location of the root canal orifice(s) will be influenced by the amount and position of tertiary ‘irritation’ dentine that has been deposited during the life of the tooth and in response to ‘insults’ that the tooth had suffered since eruption. Canal orifices may also become obstructed by pulp stones and/or dystrophic calcifications. Such calcifications and increased amounts of fibrotic tissue in the pulp chamber will make identifying and negotiating the root canals more challenging.
Preparation of the tooth
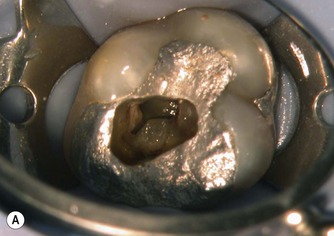
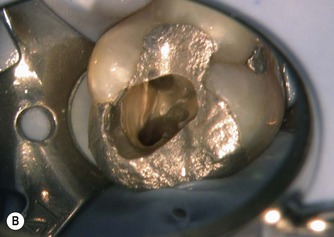
Caries and failing restorations must be completely removed prior to preparing the access cavity to prevent infected dentine and restorative material being inadvertently introduced into the root canal system, and to prevent microleakage or reinfection. If there is any doubt regarding the restorability of the tooth, the existing restoration should be completely removed7,8 to confirm that there is sufficient tooth substance remaining. Removal of existing restorations and crowns may reveal caries, additional canals or hairline cracks on one or more axial walls, which may influence the prognosis and/or the design of the post-endodontic restoration (Fig. 7.2).
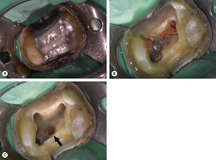 |
| Figure 7.2
Retreatment case. (A) The cast restoration was removed to reveal caries around the core material. (B) Following caries removal the root filling material is visible. (C) Exploration of the pulp floor revealed the second mesiobuccal canal (arrowed).
|
Unsupported cusps should be removed or protected by, for example, placing an orthodontic band around the tooth to prevent cusp fracture during and after treatment. In some cases, following dismantling of the coronal restoration it may be necessary to place a provisional restoration to prevent microleakage, aid rubber dam isolation and create a reservoir for the irrigant solution in the access cavity.
Rubber dam
Removal of the pulp chamber roof and coronal pulp tissue
The number of canals and their approximate positions can be predicted from a sound knowledge of dentinogenesis and the nature of root formation. The pulp chamber and root canal space are always located in the cross-sectional centre of the crown and root respectively. 5 The location of canal orifices is best achieved with good illumination and carefully drying the pulp floor. Magnification with either loupes or an operating microscope is beneficial and the latter is better for detecting canal orifices. 11
The design of the access cavity should reflect the anticipated position of the underlying root canal orifices. The relationship between the pulp chamber and the external anatomical outline is assessed from preoperative radiographs. Careful alignment of the bur will reduce the possibility of perforation either vertically, through the floor of the chamber into the furcation, or laterally (Fig. 7.3). Occasionally, where an extracoronal restoration is severely tilted relative to the root, or in cases with sclerosed root canal systems, initial access may best be made prior to rubber dam placement to permit more accurate orientation of instruments. When using instruments such as long-shank round burs or tungsten-carbide LN burs (Dentsply Maillefer, Ballaigues, Switzerland), frequent re-evaluation of the alignment visually and/or radiographically will help reduce the risk of procedural errors. The direction of the search can then be adjusted if necessary (Fig 7.4).
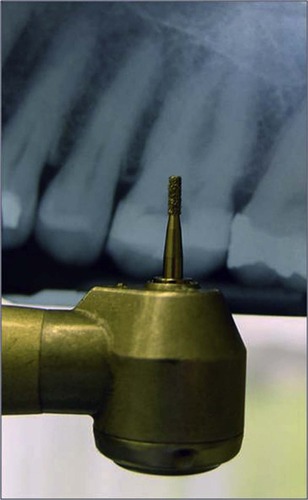 |
| Figure 7.3
Alignment of the bur on the preoperative radiograph will help indicate the position and depth of the restoration and pulp chamber.
|
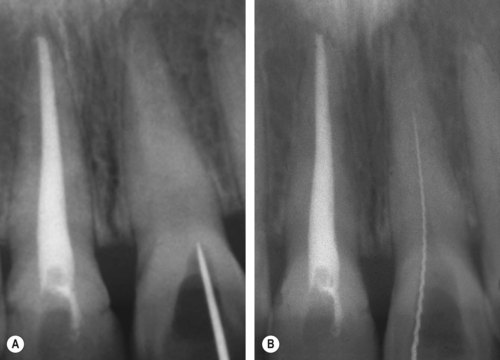 |
| Figure 7.4
In a tooth with an extensively calcified canal (A) a check radiograph with a probe in the base of the cavity will provide guidance for instrument progression. (B) A later radiograph confirms that the file is in the root canal.
|
The roof of the pulp chamber should be penetrated at a point where the roof and floor of the pulp chamber is the widest, this commonly occurs at the point where the pulp horn relating to the largest canal is situated, for example, the palatal root in maxillary molars. Tungsten carbide burs are ideal for cutting through metal. However, a diamond bur should be used to map out the access in porcelain fused to metal crowns, before using a tungsten carbide bur, to reduce the likelihood of porcelain fracture. For this reason, it is wise to warn the patient beforehand that a restoration may be irreversibly damaged and may need replacing following root canal treatment. Once the roof of the pulp chamber has been breached, the bur will suddenly drop into the pulp chamber space. To prevent damage to the floor of the pulp chamber a non-end-cutting bur is then used to remove the entire roof of the pulp chamber. The walls of the access cavity should be probed to ensure that the roof of the pulp chamber has been completely removed, i.e. no dentine ledges/lips are present (Fig 7.5).
 |
 |
| Figure 7.5
Inadequate access: (A) the pulp horns have been mistaken for the canal orifices and the roof of the pulp chamber is still in situ; (B) removal of the roof of the pulp chamber allows good visualization of the pulp floor.
|
Careful inspection of the pulp chamber floor will reveal subtle changes in the colour of the dentine, which aids identification of the canal orifices. Dark developmental lines may be visible linking canal orifices, which will appear as a small area of opaque dentine against a background of yellow/grey secondary dentine. A canal orifice will feel sticky when probed with a DG16 endodontic explorer or Micro-Opener (Dentsply Maillefer). In extensively calcified canals, transillumination or the use of dyes may provide some guidance for canal orifice identification.
The pulp chamber is irrigated with sodium hypochlorite during access cavity preparation to dissolve tissue and aid debridement. This will also reduce the inadvertent inoculation of microorganisms from the pulp chamber into the root canal system. Ultrasonically energized tips (Fig. 7.6) are useful for breaking up calcific masses and aid removal of gross debris.
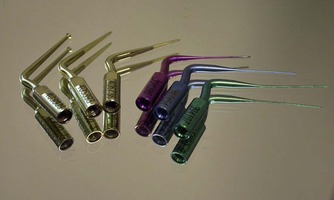 |
| Figure 7.6
A selection of ultrasonic tips that can be used to break up calcific masses in the canal orifice.
|
Creating straight-line access
Once the canal orifice(s) have been identified it may be necessary to refine or modify the outline of the access cavity to allow endodontic files unimpeded, straight-line access into the coronal third of the root canal system. Straight-line access will reduce the likelihood of iatrogenic problems such as zips, elbows and ledges being created by large, and therefore, less flexible files as they attempt to straighten, particularly, in curved canals. Straight-line access will also allow unimpeded penetration of files for root canal preparation.
Although nickel-titanium (NiTi) rotary files are very flexible, poor straight-line access can still result in instrument separation.
A well-designed access cavity permits:
• complete debridement of the pulp chamber
• visualization of the pulp floor
• unimpeded placement of instruments into the root canals
• conservation of tooth tissue.
WORKING LENGTH DETERMINATION
Regardless of treatment philosophy on the desired final end point of preparation, it is always necessary to ascertain the length of the root canal accurately.2.12.13. and 14. The most widely accepted method of establishing working length has been with radiography. In this method, 15 the working length is initially estimated by taking a measurement from an undistorted, preoperative radiograph. A file, preferably ISO size 15 or larger, so that it is easily discernible radiologically, is inserted into the canal to the estimated working length and a working length radiograph exposed. If the tip of the file is within 1 mm of the ideal location, then the radiograph can be accepted as an accurate representation of the tooth length. If adjustments of 2 mm or more are needed, the working length should be reconfirmed with an additional working length radiograph. 16 This method usually provides acceptable results but radiographs are, frequently difficult to interpret especially with posterior teeth. More importantly, the apical foramen may be distant from the radiographic apex further confusing interpretation. In such circumstances, additional methods of working length determination should be utilized.
Modern electronic apex locators measure the impedance of the root canal at different frequencies and have been reported to be accurate to within 0.5 mm in >90% of cases.17.18. and 19. Consequently, an apex locator can be more reliable than a radiograph for determining working length. 20 The use of an apex locator allows for a reduction in the number of radiographs required during root canal treatment. In a long-term retrospective study in which an apex locator was used solely to determine working length in infected root canals with periapical lesions, a high success rate was achieved21 confirming its benefit. Not just one method but the combination of the radiographic method and the use of electronic apex locators will enhance the accuracy of working length determination.
ROOT CANAL IRRIGATION
Root canal treatment involves a chemomechanical approach; microorganisms are removed mechanically during canal preparation and eradicated chemically using irrigants. Microorganisms are present in the lumen of the root canal in a planktonic form and as a biofilm adhering to the canal walls. Regardless of the instrumentation technique or system chosen, the use of irrigants is essential for thorough debridement of the root canal system. 22
The actions of an irrigant include:
• rinsing of debris
• lubrication of the canal system which facilitates instrumentation
• dissolution of remaining organic matter
• antibacterial properties
• softening and removing the smear layer
• penetrating into areas inaccessible to instruments, thereby extending the cleaning process.
Ideally, the irrigant should be non-toxic and have a low surface tension, in addition to being stable, inexpensive and easy to use. A plethora of irrigants have been used. Currently, the most widely used irrigant is sodium hypochlorite. It is highly effective at killing bacteria and breaking down organic material; various concentrations of sodium hypochlorite, varying from 0.5% to 5.25%, have been recommended. 23 The effectiveness of sodium hypochlorite has been shown to depend on the concentration and time of exposure. Higher concentrations of sodium hypochlorite have greater tissue-dissolving properties24 but the higher the concentration, the more severe the potential reaction if it is inadvertently forced into the tissues. Accidental extrusion of sodium hypochlorite into the periapical tissues may result in tissue damage accompanied by varying degrees of pain, swelling and bruising. This topic is discussed in Chapter 14.
The use of calcium hydroxide as an intracanal medicament between visits has been shown to enhance disinfection following the use of sodium hypochlorite. Other irrigants used in root canal chemomechanical preparation include chlorhexidine, 25 iodine potassium iodide26 and electrolytically-activated water. 27 Irrigants such as chlorhexidine and iodine potassium iodide have antibacterial properties but no tissue-dissolving properties. Apart from the rinsing effect, local anaesthetic solution or saline have none of the desired properties of a root canal irrigant and their use is not recommended. Photoactivated disinfection, involving a dye and a diode light, and lasers have also been advocated for disinfection of the root canal system28 but its superiority over sodium hypochlorite is yet to be proven.
During root canal preparation a layer of ‘sludge’ is formed by the action of the instruments against the canal walls. This material is deposited on the canal wall and is called the ‘smear layer’. It has both organic and inorganic components and exists as a superficial, loosely bound layer and a deeper adherent layer. 29 Considerable debate has taken place as to whether or not the smear layer should be removed. Complete removal of the smear layer may open up dentinal tubules to the passage of microorganisms from the root canal into the dentine. On the other hand, failure to remove the smear layer will, possibly allow bacteria to remain in the canal system and impair the adaptation of the root filling to the dentine wall and tubules. 30,31 A very close adaptation of thermoplasticized gutta-percha to the dentine wall has been shown following smear layer removal. 32,33 Removal of the smear layer is best achieved by irrigating the root canal system with sodium hypochlorite throughout the preparation procedure to flush out and prevent accumulation of debris on the canal walls. A final rinse with 17.5% ethylenediaminetetraacetic acid (EDTA), a chelating agent, is recommended for removal of the inorganic component. 34 The effects of chelating agents such as EDTA are self-limiting.
The irrigant is commonly delivered using specially designed endodontic needles and syringes. The needle is inserted into the canal to the level of the apical third. However, during initial canal preparation, the needle may not reach this depth so it should be inserted to the binding point, pulled out slightly so that it is loose in the canal and then the irrigant delivered gently and passively. As canal preparation proceeds, the needle will gradually reach deeper into the canal but at all times, the needle must not be jammed into the canal and the irrigant delivered with unnecessary force. Irrigants may also be delivered using ultrasonic devices. The effectiveness of ultrasonic irrigation is due to the creation of acoustic microstreaming and allows more effective delivery of irrigant to the apical part of the root canal system. 35,36 A passively vibrating ultrasonic instrument is more effective than one that is being dampened by the canal wall. 37,38 For this reason, modern tips designed for this purpose are fine in size (ISO size 15) or even smooth, without cutting flutes. There is limited evidence to specify the ideal length of time that passive ultrasonic irrigation should be activated within the canal.
INSTRUMENTATION TECHNIQUES
All root canal systems are curved in one or more planes with the degree and extent of curvature varying from root to root. Irrespective of the instrumentation technique used, the apical part of the root canal system is usually the least well-cleaned and prepared. The morphology of the apical root canal system is complex and highly variable. This has been clearly demonstrated from clearing techniques and micro-computed tomography. 39
Preparation of the root canal system requires considerable skill, particularly in cases with more severely curved canals or other complex anatomical features. Despite advances in instrument design, the experience and tactile skills of the operator remains important. 40 There is no replacement for practical instructions on root canal preparation in order to acquire the necessary skills and competency. Regardless of the instrumentation technique or type of instrument used, the goals of shaping and cleaning of the root canal systems are:
• thorough debridement of the root canal system
• development of a continuously tapering preparation
• avoidance of procedural errors.
Maintaining the anatomy of the apical constriction (Fig. 7.7) during canal shaping is essential for predictable healing of the periapical tissues. Long-term studies have shown improved success rates when instrumentation and filling procedures are maintained within the canal system, at approximately the level of the cemento-dentinal junction. 41
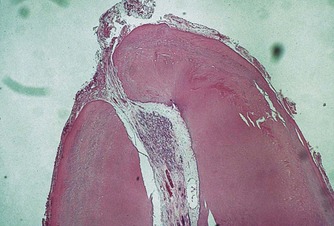 |
| Figure 7.7
The anatomy of the apical constriction must be maintained during canal preparation.
|
Historical methods of canal preparation that encompassed a mechanistic approach have largely been superseded. Canal preparation techniques can be broadly divided into those that adopt an ‘apical-to-coronal’ approach or those that adopt a ‘coronal-to-apical’ approach. Most endodontists would now advocate using a crown-down (coronal-to-apical) approach to preparation with hand files manipulated in a balanced-force action or nickel titanium rotary instruments in a handpiece. Numerous protocols have detailed the crown-down approach, these include: the Crown-down pressureless technique, 42 the Roane or Balanced-force technique, 43 the ‘Double-flare’ technique, 44 and the Modified double-flare technique. 45 In the Balanced-force technique, hand files of a triangular cross-section are rotated a quarter-turn clockwise to engage dentine of the root canal wall. Whilst applying apical pressure, this is followed by a half turn of the file in the counter-clockwise direction, which effectively ‘cuts’ the dentine that was engaged. The process can be repeated for two or three times before removing the instrument to clean the flutes and irrigate the canal. Unlike many other techniques, files are not pre-cu/>
Stay updated, free dental videos. Join our Telegram channel
VIDEdental - Online dental courses


