Preliminary Considerations for Operative Dentistry
Preoperative Patient and Dental Team Considerations
Patient and Operator Positions
The practice of dentistry is demanding and stressful. Physical problems may arise if appropriate operating positions are neglected.1 Most restorative dental procedures can be accomplished with the dentist seated. Positions that create unnecessary curvature of the spine or slumping of the shoulders should be avoided. Proper balance and weight distribution on both feet is essential when operating from a standing position. Generally, any uncomfortable or unnatural position that places undue strain on the body should be used only rarely.
Chair and Patient Positions
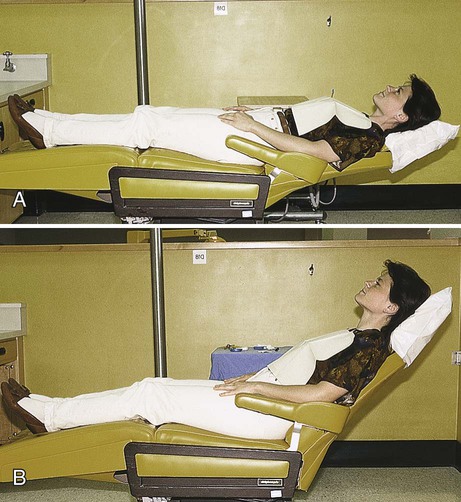
The most common patient positions for operative dentistry are almost supine or reclined 45 degrees (Fig. 7-1). The choice of patient position varies with the operator, the type of procedure, and the area of the mouth involved in the operation. In the almost supine position, the patient’s head, knees, and feet are approximately the same level. The patient’s head should not be lower than the feet; the head should be positioned lower than the feet only in an emergency, as when the patient is in syncope.
Operating Positions
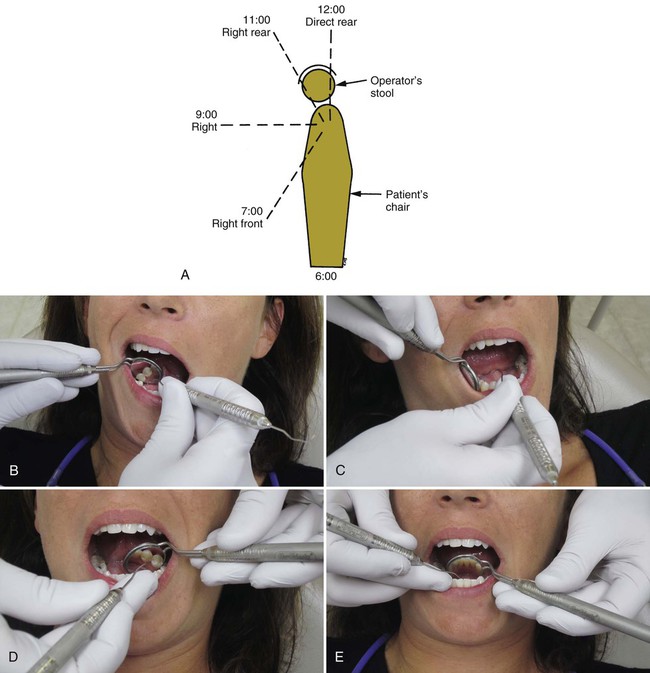
Operating positions can be described by the location of the operator or by the location of the operator’s arms in relation to patient position. A right-handed operator uses essentially three positions—right front, right, and right rear. These are sometimes referred to as the 7-o’clock, 9-o’clock, and 11-o’clock positions (Fig. 7-2, A). For a left-handed operator, the three positions are the left front, left, and left rear positions, or the 5-o’clock, 3-o’clock, and 1-o’clock positions. A fourth position, direct rear position, or 12-o’clock position, has application for certain areas of the mouth. As a rule, the teeth being treated should be at the same level as the operator’s elbow. The operating positions described here are for the right-handed operator; the left-handed operator should substitute left for right.
Right Front Position
The right front position facilitates examination and treatment of mandibular anterior teeth (see Fig. 7-2, B), mandibular posterior teeth (especially on the right side), and maxillary anterior teeth. It is often advantageous to have the patient’s head rotated slightly toward the operator.
Right Rear Position
The right rear position is the position of choice for most operations. The operator is behind and slightly to the right of the patient. The left arm is positioned around the patient’s head (see Fig. 7-2, D). When operating from this position, the lingual and incisal (occlusal) surfaces of maxillary teeth are viewed in the mouth mirror. Direct vision may be used on mandibular teeth, particularly on the left side, but the use of a mouth mirror is advocated for visibility, light reflection, and retraction.
General Considerations
When operating for an extended period, the operator can obtain a certain amount of rest and muscle relaxation by changing operating positions. Operating from a single position through the day, especially if standing, produces unnecessary fatigue. Changing positions, if only for a short time, reduces muscle strain and lessens fatigue.1
Operating Stools
The seated work position for the assistant is essentially the same as for the operator except that the stool is 4 to 6 inches higher for maximal visual access. It is important that the stool for the assistant have an adequate footrest so that a parallel thigh position can be maintained with good foot support. When properly seated, the operator and the assistant are capable of providing dental service throughout the day without an unnecessary decline in efficiency and productivity because of muscle tension and fatigue (Fig. 7-3).

Magnification and Headlamp Illumination
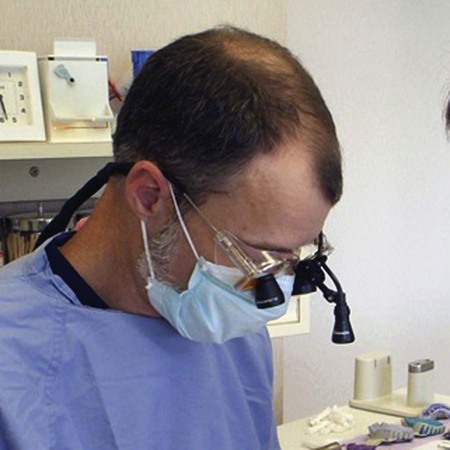
Another key to the success of clinical operative dentistry is visual acuity. The operator must be able to see clearly to attend to the details of each procedure. The use of magnification facilitates attention to detail and does not adversely affect vision. Magnifying lenses have a fixed focal length that often requires the operator to maintain a proper working distance, which ensures good posture. Several types of magnification devices are available, including bifocal eyeglasses, loupes, and surgical telescopes (Fig. 7-4). The use of such magnification devices also provides some protection from eye injury. To further improve visual acuity, headlamps are recommended in operative dentistry. Their greatest advantage is the light source being parallel to the clinician’s vision, eliminating shadows at the operating field. Current headlamps use light-emitting diode (LED) technology and produce whiter light than conventional tungsten halogen light sources.
Isolation of the Operating Field
The goals of operating field isolation are moisture control, retraction, and harm prevention.
Goals of Isolation
Moisture Control
Operative dentistry cannot be executed properly unless the moisture in the mouth is controlled. Moisture control refers to excluding sulcular fluid, saliva, and gingival bleeding from the operating field. It also involves preventing the spray from the handpiece and restorative debris from being swallowed or aspirated by the patient. The rubber dam, suction devices, and absorbents are variously effective in moisture control. Generally, the rubber dam is the recommended technique for moisture control. Raskin et al. and Fusayama have reported, however, that achieving effective isolation is more important than the specific technique used.2,3
Harm Prevention
An important consideration of isolating the operating field is preventing harm to the patient during the operation.4,5 Excessive saliva and handpiece spray can alarm the patient. Small instruments and restorative debris can be aspirated or swallowed. Soft tissue can be damaged accidentally. The same devices used for moisture control and retraction contribute not only to harm prevention but also to patient comfort and operator efficiency. Harm prevention is achieved as much by the manner in which the devices are used as by the devices themselves.
Rubber Dam Isolation
In 1864, S.C. Barnum, a New York City dentist, introduced the rubber dam into dentistry. Use of the rubber dam ensures appropriate dryness of the teeth and improves the quality of clinical restorative dentistry.6,7 The rubber dam is used to define the operating field by isolating one or more teeth from the oral environment. The dam eliminates saliva from the operating site and retracts the soft tissue.
Advantages
Dry, Clean Operating Field
For most procedures, rubber dam isolation is the preferred method of obtaining a dry, clean field. The operator can best perform procedures such as caries removal, proper tooth preparation, and insertion of restorative materials in a dry field. The time saved by operating in a clean field with good visibility may more than compensate for the time spent applying the rubber dam.8 When excavating a deep caries lesion and risking pulpal exposure, use of the rubber dam is strongly recommended to prevent pulpal contamination from oral fluids.
Improved Properties of Dental Materials
The rubber dam prevents moisture contamination of restorative materials during insertion and promotes improved properties of dental materials. Amalgam restorative material does not achieve its optimum physical properties if used in a wet field.6 Bonding to enamel and dentin is unpredictable if the tooth substrate is contaminated with saliva, blood, or other oral fluids.9,10 Some studies have concluded that no difference exists between the use of the rubber dam and cotton roll isolation as long as control of sources of contamination is maintained during the restorative procedures.2,11–13
Protection of the Patient and the Operator
The rubber dam protects the patient and the operator. It protects the patient from aspirating or swallowing small instruments or debris associated with operative procedures.14 A properly applied rubber dam protects soft tissue from irritating or distasteful medicaments (e.g., etching agents). The dam also offers some soft tissue protection from rotating burs and stones. Authors disagree on whether the rubber dam protects the patient from mercury exposure during amalgam removal.15,16 However, it is generally agreed that the rubber dam is an effective infection control barrier for the dental office.17–19
Operating Efficiency
Use of the rubber dam allows for operating efficiency and increased productivity. Excessive conversation with the patient is discouraged. The rubber dam retainer (discussed later) helps provide a moderate amount of mouth opening during the procedure. (For additional mouth-opening aids, see the section on Mouth Props.) Quadrant restorative procedures are facilitated. Many state dental practice acts permit the assistant to place the rubber dam, thus saving time for the dentist. Christensen reported that use of a rubber dam increases the quality and quantity of restorative services.8
Disadvantages
Rubber dam use is low among private practitioners.20–22 Time consumption and patient objection are the most frequently quoted disadvantages of the rubber dam. However, the rubber dam usually can be placed in less than 5 minutes. The advantages previously mentioned certainly outweigh the time spent with placement.
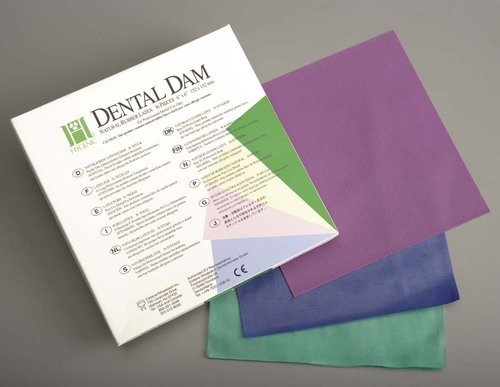
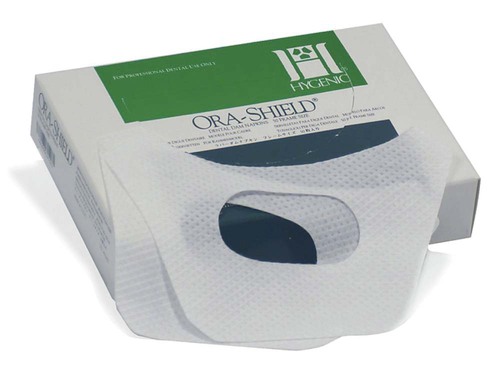
Certain situations may preclude the use of the rubber dam, including (1) teeth that have not erupted sufficiently to support a retainer, (2) some third molars, and (3) extremely malpositioned teeth. In addition, patients may not tolerate the rubber dam if breathing through the nose is difficult. In rare instances, the patient cannot tolerate a rubber dam because of psychological reasons or latex allergy.12,23 Latex-free rubber dam material is, however, currently available (Fig. 7-5). Jones and Reid reported that use of the rubber dam was well accepted by patients and operators.24
Materials and Instruments

Retainer
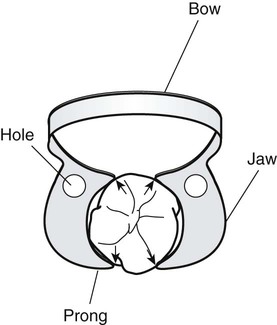
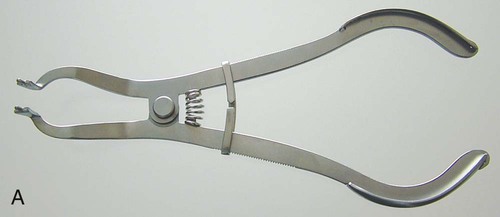
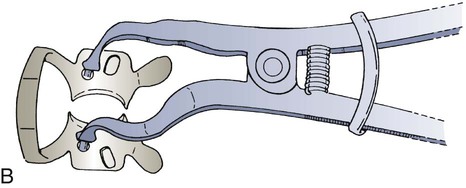
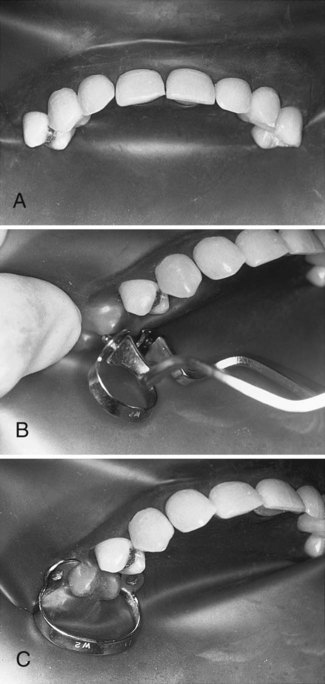
The rubber dam retainer consists of four prongs and two jaws connected by a bow (Fig. 7-7). The retainer is used to anchor the dam to the most posterior tooth to be isolated. Retainers also are used to retract gingival tissue. Many different sizes and shapes are available, with specific retainers designed for certain teeth (Fig. 7-8). Table 7-1 lists suggested retainer applications. When positioned on a tooth, a properly selected retainer should contact the tooth in its four line angles (see Fig. 7-7). This four-point contact prevents rocking or tilting of the retainer. Movement of the retainer on the anchor tooth can injure the gingiva and the tooth, resulting in postoperative soreness or sensitivity.25 The prongs of some retainers are gingivally directed (inverted) and are helpful when the anchor tooth is only partially erupted or when additional soft tissue retraction is indicated (Fig. 7-9). The jaws of the retainer should not extend beyond the mesial and distal line angles of the tooth because (1) they may interfere with matrix and wedge placement, (2) gingival trauma is more likely to occur, and (3) a complete seal around the anchor tooth is more difficult to achieve.
Table 7-1
Suggested Retainers for Various Anchor Tooth Applications
| Retainer | Application |
| W56 | Most molar anchor teeth |
| W7 | Mandibular molar anchor teeth |
| W8 | Maxillary molar anchor teeth |
| W4 | Most premolar anchor teeth |
| W2 | Small premolar anchor teeth |
| W27 | Terminal mandibular molar anchor teeth requiring preparations involving the distal surface |

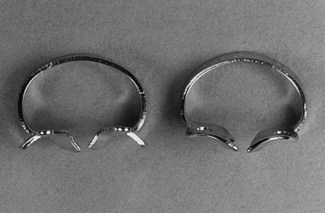
Wingless and winged retainers are available (see Fig. 7-8). The winged retainer has anterior and lateral wings (Fig. 7-10). The wings are designed to provide extra retraction of the rubber dam from the operating field and to allow attachment of the dam to the retainer before conveying the retainer (with dam) to the anchor tooth, after which the dam is removed from the lateral wings. As seen in Figure 7-10, the anterior wings can be cut away if they are not wanted.
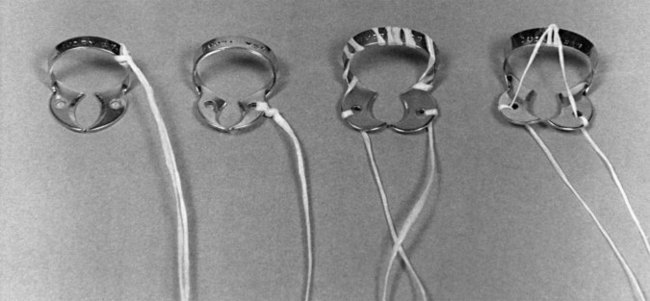
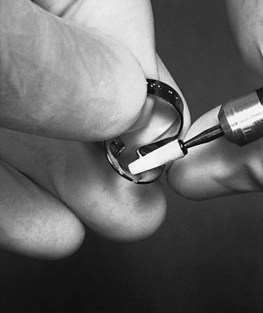
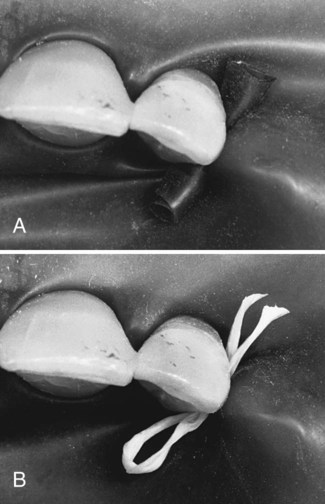
The bow of the retainer (except the No. 212, which is applied after the rubber dam is in place) should be tied with dental floss (Fig. 7-11) approximately 12 inches (30 cm) in length before the retainer is placed in the mouth. For maximal protection, the tie may be threaded through both holes in the jaws of the retainer because the bow of the retainer could break. The floss allows retrieval of the retainer or its broken parts if they are accidentally swallowed or aspirated. It is sometimes necessary to re-contour the jaws of the retainer to the shape of the tooth by grinding with a mounted stone (Fig. 7-12). A retainer usually is not required when the dam is applied for treatment of the anterior teeth except for the cervical retainer for Class V restorations.
Punch
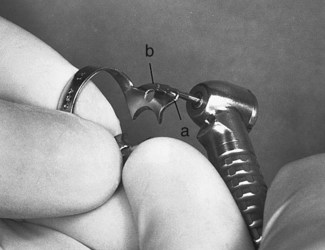
The rubber dam punch is a precision instrument having a rotating metal table (disk) with holes of varying sizes and a tapered, sharp-pointed plunger (Fig. 7-13). Care should be exercised when changing from one hole to another. The plunger should be centered in the cutting hole so that the edges of the holes are not at risk of being chipped by the plunger tip when the plunger is closed. Otherwise, the cutting quality of the punch is ruined, as evidenced by incompletely cut holes. These holes tear easily when stretched during application over the retainer or tooth.

Napkin
1. It improves patient comfort by reducing direct contact of the rubber material with the skin.
2. It absorbs any saliva seeping at the corners of the mouth.
4. It provides a convenient method of wiping the patient’s lips on removal of the dam.
5. The rubber dam napkin adds to the comfort of the patient, particularly when the dam must be used for long appointments (Fig. 7-15).
Anchors (Other Than Retainers)
Besides retainers, other anchors may also be used. The proximal contact may be sufficient to anchor the dam on the tooth farthest from the posterior retainer (in the isolated field), eliminating the need for a second retainer (see Step 13 of Procedure 7-1). To secure the dam further anteriorly or to anchor the dam on any tooth where a retainer is contraindicated, waxed dental tape (or floss) or a small piece of rubber dam material (cut from a sheet of dam) or a rubber Wedjet (Hygenic, Akron, OH) may be passed through the proximal contact. When dental tape is used, it should be passed through the contact, looped, and passed through a second time (Fig. 7-16, A). The cut piece of dam material is first stretched, passed through the contact, and then released (see Fig. 7-16, B). When the anchor is in place, the tape, floss, dam material, or Wedjet should be trimmed to prevent interference with the operating site.
Hole Size and Position
Successful isolation of teeth and maintenance of a dry, clean operating field largely depend on hole size and position in the rubber dam.26 Holes should be punched by following the arch form, making adjustments for malpositioned or missing teeth. Most rubber dam punches have either five or six holes in the cutting table. The smaller holes are used for the incisors, canines, and premolars and the larger holes for the molars. The largest hole generally is reserved for the posterior anchor tooth (Fig. 7-17). The following guidelines and suggestions can be helpful when positioning the holes:

 (Optional) Punch an identification hole in the upper left (i.e., the patient’s left) corner of the rubber dam for ease of location of that corner when applying the dam to the holder.
 When operating on the incisors and mesial surfaces of canines, isolate from first premolar to first premolar. Metal retainers usually are not required for this isolation (Fig. 7-18, A). If additional access is necessary after isolating teeth, as described, a retainer can be positioned over the dam to engage the adjacent nonisolated tooth, but care must be exercised not to pinch the gingiva beneath the dam (see Fig. 7-18, B and C).


 Isolation of a minimum of three teeth is recommended except when e/>
Stay updated, free dental videos. Join our Telegram channel
VIDEdental - Online dental courses


