Periodontal Plastic and Esthetic Surgery
Henry H. Takei, E. Todd Scheyer, Robert R. Azzi, Edward P. Allen and Thomas J. Han
Terminology
The term mucogingival surgery was initially introduced in the literature by Friedman38 to describe surgical procedures for the correction of relationships between the gingiva and the oral mucous membrane with reference to three specific problem areas: attached gingiva, shallow vestibules, and a frenum interfering with the marginal gingiva. With the advancement of periodontal surgical techniques, the scope of nonpocket surgical procedures has increased, now encompassing a multitude of areas that were not addressed in the past. Recognizing this, the 1996 World Workshop in Clinical Periodontics renamed mucogingival surgery as “periodontal plastic surgery,”4 a term originally proposed by Miller in 1993 and broadened to include the following areas3,4:
• Periodontal-prosthetic corrections
• Esthetic surgical corrections
• Coverage of the denuded root surface
Periodontal plastic surgery is defined as the surgical procedures performed to correct or eliminate anatomic, developmental, or traumatic deformities of the gingiva or alveolar mucosa.3,4 Mucogingival therapy is a broader term that includes nonsurgical procedures such as papilla reconstruction by means of orthodontic or restorative therapy. Periodontal plastic surgery includes only the surgical procedures of mucogingival therapy (see Video 63-1: Periodontal Plastic and Esthetic Surgery).
This chapter discusses the periodontal plastic surgical techniques included in the traditional definition of mucogingival surgery: (1) widening of attached gingiva (2) deepening of shallow vestibules, and (3) resection of the aberrant frena. In addition, esthetic surgical therapy around the natural dentition and tissue engineering (biologic mediator) are included in this chapter. Other aspects of periodontal plastic surgery, such as periodontal-prosthetic surgery, esthetic surgery around implants, and surgical exposure of teeth for orthodontic therapy, are covered in Chapters 51, 66, and 78.
Objectives
The five objectives of periodontal plastic surgery addressed in this chapter are as follows:
1. Problems associated with attached gingiva
2. Problems associated with a shallow vestibule
Problems Associated with Attached Gingiva
The ultimate goal of mucogingival surgical procedures is the creation or widening of attached gingiva around teeth and implants.4 The width of the attached gingiva varies in different individuals and on different teeth of the same individual (see Chapter 2). Attached gingiva is not synonymous with “keratinized gingiva” because the latter also includes the free gingival margin.
However, those individuals whose oral hygiene practices are less than optimal can be helped by the presence of keratinized gingiva and vestibular depth. Vestibular depth provides space for easier placement of the toothbrush and prevents brushing on mucosal tissue. To improve esthetics, the objective is the coverage of the denuded root surface. The maxillary anterior area, especially the facial aspect of the canine, often presents extensive gingival recession. In such cases, the covering of the denuded root surface not only widens the zone of attached gingiva but also creates an improved esthetic result. This recession and the resultant denuded root surface have a special esthetic concerns for individuals with a high smile line. A wider zone of attached gingiva is also needed around teeth that serve as abutments for fixed or removable partial dentures, as well as in the ridge areas bearing a denture. Teeth with subgingival restorations and narrow zones of keratinized gingiva have higher gingival inflammation scores than teeth with similar restorations and wide zones of attached gingiva.96,97 Therefore, in such cases, techniques for widening the attached gingiva are considered preprosthetic periodontal surgical procedures. Chapter 66 discusses this subject in detail.
Widening the attached gingiva accomplishes the following four objectives:
Etiology of Marginal Tissue Recession
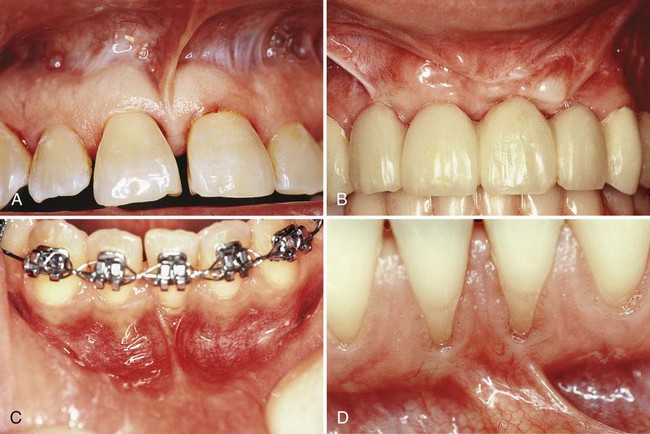
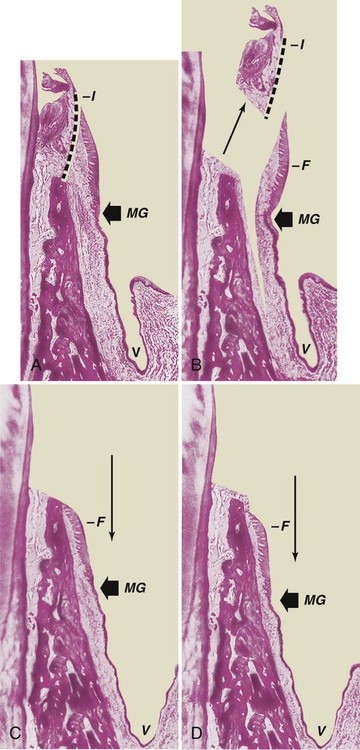
Frenal and muscle attachments that encroach on the marginal gingiva can distend the gingival sulcus, which creates an environment for plaque accumulation. This condition increases the rate periodontal recession and will contribute to the recurrence of the recession even after treatment (Figure 63-1). These problems are more common on facial surfaces, but may also occur on the lingual surface.11
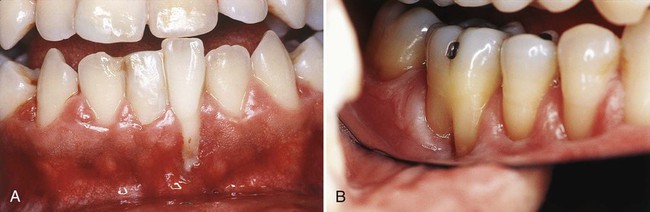
Orthodontic tooth movement through a thin buccal osseous plate may lead to a dehiscence beneath a thin gingiva. This also can lead to the recession of the gingiva46,117 (Figure 63-2).
Factors That Affect Surgical Outcome
Irregularity of Teeth
Abnormal tooth alignment is an important cause of gingival deformities that require corrective surgery and also an important factor in determining the outcome of treatment. The location of the gingival margin, width of the attached gingiva, and alveolar bone height and thickness are all affected by tooth alignment. On teeth that are tilted or rotated labially, the labial bony plate is thinner and located farther apically than on the adjacent teeth; therefore the gingiva is recessed so that the root is exposed.117 On the lingual surface of such teeth, the gingiva is bulbous, and the bone margins are closer to the CEJ. The level of gingival attachment on root surfaces and the width of the attached gingiva after mucogingival surgery are affected as much by tooth alignment as by variations in treatment procedures.
Roots covered with thin bony plates present a hazard in mucogingival surgery. Even the most protective type of flap, a partial-thickness flap, creates the risk of bone resorption on the periosteal surface.49 Resorption in amounts that ordinarily are not significant may cause loss of bone height when the bone plate is thin or tapered at the crest.
Mucogingival Line (Junction)
Normally, the mucogingival line in the incisor and canine areas is located approximately 3 mm apical to the crest of the alveolar bone on the radicular surfaces and 5 mm interdentally.98 In periodontal disease and on malposed disease free teeth, the bone margin is located farther apically and may extend beyond the mucogingival line. The distance between the mucogingival line and the CEJ before and after periodontal surgery is not necessarily constant. After inflammation is eliminated, the tissue tends to contract and draw the mucogingival line in the direction of the crown.31
Techniques to Increase Attached Gingiva
• Gingival augmentation apical to the area of recession. A graft, either pedicle or free, is placed on a recipient bed apical to the recessed gingival margin. No attempt is made to cover the denuded root surface where there is gingival and bone recession.
• Gingival augmentation coronal to the recession (root coverage). A graft (either pedicle or free) is placed covering the denuded root surface. Both the apical and the coronal widening of attached gingiva enhance oral hygiene procedures, but only the latter can correct an esthetic problem. For preprosthetic purposes, the combination of widening keratinized gingiva apical and coronal to the recession would satisfy this objective. Consideration of the objectives as apical, coronal, or both provides a better understanding of the techniques required to achieve the goals.
Gingival Augmentation Apical to Recession
Techniques for gingival augmentation apical to the area of recession include free gingival autograft, free connective tissue autograft,10 and the apically positioned flap.
Free Gingival Autografts.
Free gingival grafts are used to create a widened zone of attached gingiva. They were initially described by Bjorn12 in 1963 and have been extensively investigated since that time (Figure 63-3).13
The Classic Technique.
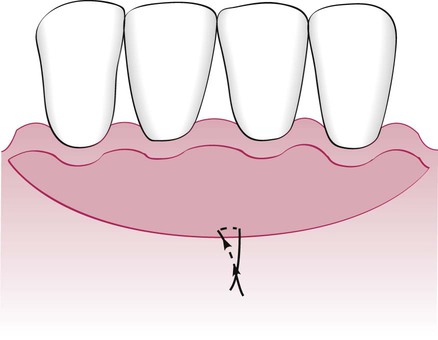
The #15 blade is used to incise along the gingival margin to separate a flap consisting of epithelium and underlying connective tissue without disturbing the periosteum. Extend the flap to the depth of the vertical incisions. Suture the flap where the apical portion of the free graft will be located. Three to four independent gut sutures are placed. The needle is first passed as a superficial mattress suture perpendicular to the incision and then on the periosteum parallel to the incision (Figure 63-4).
An aluminum foil template of the recipient site can be made to be used as a pattern for the graft.
Grafts can also be placed directly on bone tissue. For this technique, the flap should be separated by blunt dissection with a periosteal elevator. The advantages of this variant are less postoperative mobility of the graft, less swelling, better hemostasis,32 and 1.5 to 2 times less shrinkage.52,53 However, there is a healing lag period that is observed for the first 2 weeks.21,22,36
For the classic technique, a partial-thickness graft is used. The palate is the usual site from which the donor tissue is removed. The graft should consist of epithelium and a thin layer of underlying connective tissue. Place the template over the donor site, and make a shallow incision around it with a #15 blade. Insert the blade to the desired thickness at one edge of the graft. Elevate the edge and hold it with tissue forceps. Continue to separate the graft with the blade, lifting it gently as separation progresses to provide visibility. Placing sutures at the margins of the graft helps control it during separation and transfer and simplifies placement and suturing to the recipient site.10
Proper thickness is important for survival of the graft. It should be thin enough to permit diffusion of fluid from the recipient site, which is essential in the immediate posttransplant period. A graft that is too thin may necrose and expose the recipient site.75,82 If the graft is too thick, its peripheral layer is jeopardized because of the excessive tissue that separates it from new circulation and nutrients. Thick grafts may also create a deeper wound at the donor site, with the possibility of injuring major palatal arteries.112 The ideal thickness of a graft is between 1.0 and 1.5 mm.75,82 After the graft is separated, remove the loose tissue tags from the undersurface. Thin the edge to avoid bulbous marginal and interdental contours. Special precautions must be taken with grafts from the palate.
Step 3: Transfer and immobilize the graft. Remove the sponge from the recipient site; reapply it with pressure if necessary until bleeding is stopped. Remove the excess clot. A thick clot interferes with vascularization of the graft.76
Variant Techniques.
The accordion technique, described by Rateitschak et al,88 attains expansion of the graft by alternate incisions in opposite sides of the graft. This technique increases the donor graft tissue by changing the configuration of the tissue.
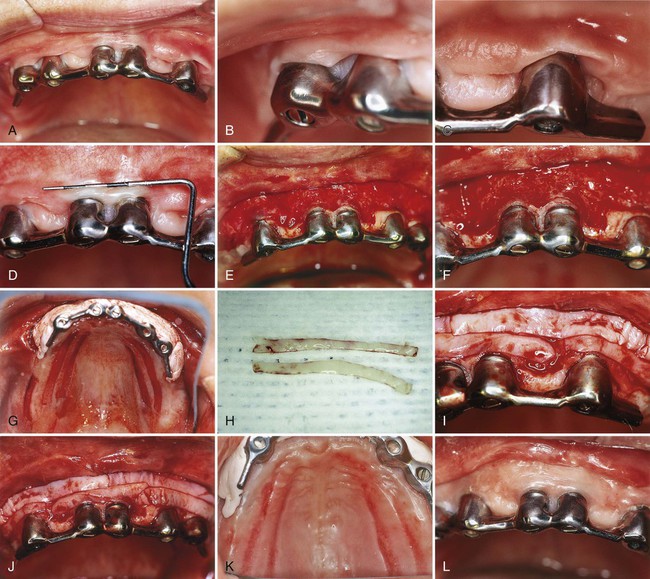
The strip technique, developed by Han et al,48 consists of obtaining two or three strips of gingival donor tissue about 3 to 5 mm wide and long enough to cover the entire length of the recipient site (Figure 63-5). These strips are placed side by side to form one donor tissue and sutured on the recipient site. The area is then covered with aluminum foil and surgical dressing.
Alternative Donor Tissue.
Another technique to minimize the use of the palate as a donor site is the use of acellular dermal matrix (ADM) as a substitute for palatal donor tissue. The use of the palate as a donor site for gingival augmentation has numerous disadvantages, for not only are the patients fearful of palatal surgery from where the donor tissue is procured but, there is also a limitation on the amount of tissue that can be removed. Currently, there are numerous clinicians who advocate the use of ADM as a substitute for palatal donor tissue. (See Tissue Engineering for more information regarding ADM.) This product is commercially available under the name AlloDerm and is derived from donated human skin.1 Commercial preparation of this tissue includes a multistep proprietary process that removes both the epidermis and the cells that can lead to tissue rejection and graft failure without damaging the matrix. The remaining ADM consists of a nondenatured three-dimensional arrangement of intact collagen fibers, ground substance, and vascular channels.29 Randomized, controlled clinical trials have demonstrated outcomes with ADM equivalent to palatal donor tissue in treatment of gingival recession.1,29,40,79,81,103 Equivalent root coverage has been shown in four trials.1,79,81,103 Equivalent increase in marginal tissue thickness has been demonstrated at 6 and 12 months postoperatively, both by clinical assessment and by histometric analysis.1,29,81 Equivalent attachment to the root surface has been found by histologic evaluation of human block sections at 6 months postoperatively.29
Surgical Techniques.
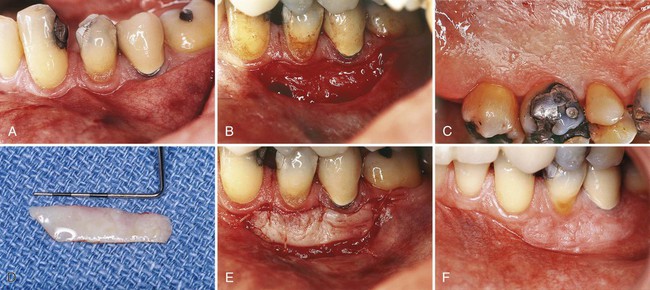
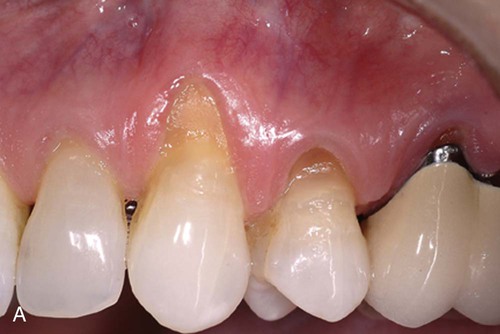
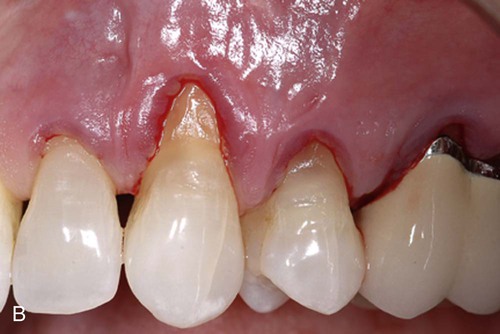
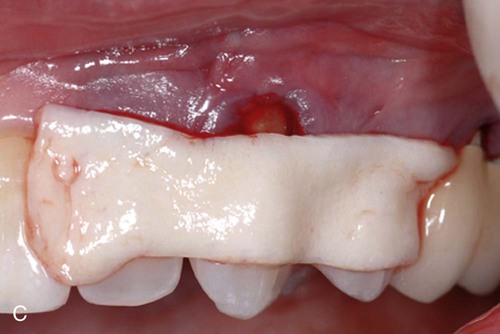
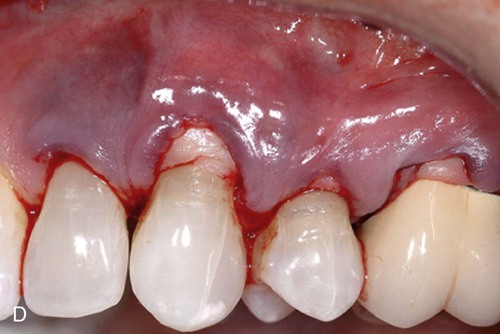
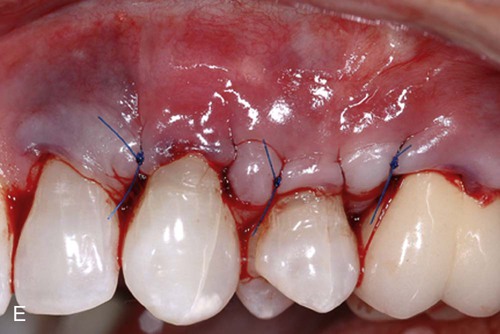
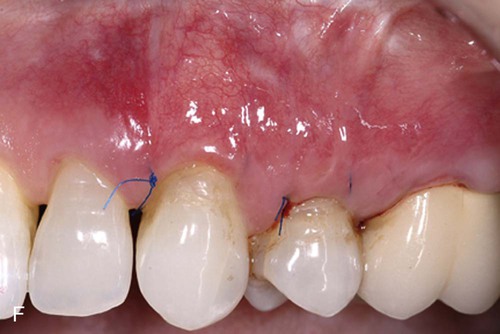
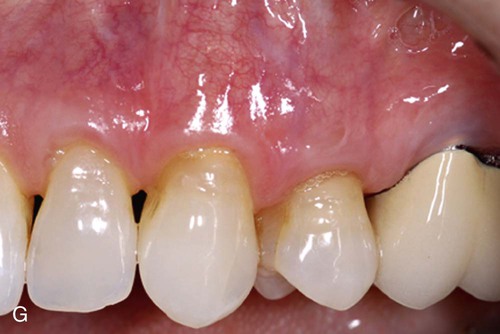
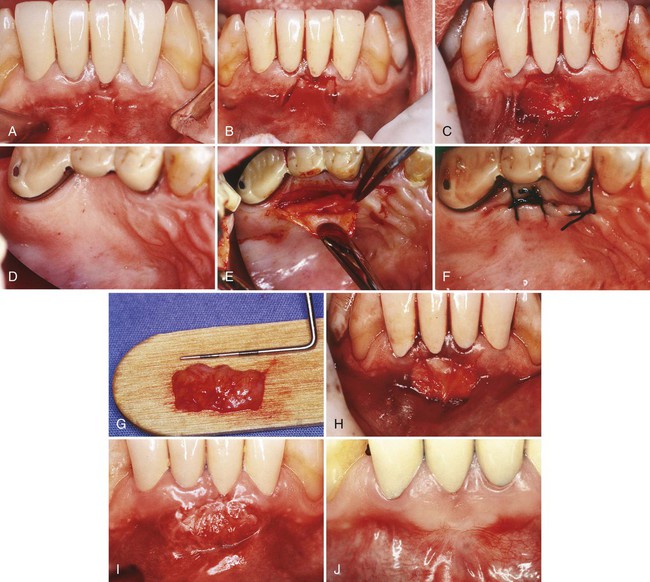
Two surgical techniques are suggested for use of ADM in treating gingival recession. Each is a coronally positioned pouch method. The first is the alternate papilla tunnel (APT) method and the second is the papilla retention pouch (PRP) method (Figure 63-6, A–G).
Postoperative care is similar for both methods and includes the following:
1. Systemic antibiotics for 10 days.
2. Chlorhexidine mouthrinse for 2 to 3 weeks.
5. Ice applied to face for 24 hours.
6. Cold liquids for first three meals.
7. No mastication or toothbrushing at surgical site for 2 to 3 weeks.
Developed over 15 years ago, ADM is a safe and effective biomaterial for use as a substitute for palatal connective tissue in root coverage grafting. There have been no reports of any disease transmission in medical or dental applications over this time period. ADM has proven equivalence to palatal connective tissue for root coverage procedures in randomized controlled clinical trials. It produces a thicker marginal tissue and a higher percentage of root coverage than a coronally advanced flap alone.116 It provides advantages over palatal connective tissue in that it does not require a second surgical site to obtain donor tissue and provides an unlimited amount of tissue to treat multiple teeth in one appointment. The use of AlloDerm under a coronally advanced flap extends the application of the most esthetic procedure in root coverage. Further discussion regarding ADM and other techniques to avoid palatal donor site morbidity involve the use of biologic mediators, which is presented later in this chapter
Healing of the Graft.
The success of the graft depends on survival of the connective tissue. Sloughing of the epithelium occurs in most cases, but the extent to which the connective tissue withstands the transfer to the new location determines the fate of the graft. Fibrous organization of the interface between the graft and the recipient bed occurs within 2 to several days.95
The graft is initially maintained by a diffusion of fluid from the host bed, adjacent gingiva, and alveolar mucosa.42 The fluid is a transudate from the host vessels and provides nutrition and hydration essential for the initial survival of the transplanted tissues. During the first day, the connective tissue becomes edematous and disorganized and undergoes degeneration and lysis of some of its elements. As healing progresses, the edema is resolved, and degenerated connective tissue is replaced by new granulation tissue.
Revascularization of the graft starts by the second6 or third44 day. Capillaries from the recipient bed proliferate into the graft to form a network of new capillaries and anastomose with preexisting vessels.54
The epithelium undergoes degeneration and sloughing, with complete necrosis occurring in some areas.20,80 It is replaced by new epithelium from the borders of the recipient site. A thin layer of new epithelium is present by the fourth day, with rete pegs developing by the seventh day. Heterotopically placed grafts maintain their structure (keratinized epithelium), even after the grafted epithelium has become necrotic and has been replaced by neighboring areas of nonkeratinized epithelium, which suggests that a genetic predetermination of the specific character of the oral mucosa exists that depends on stimuli originating in the connective tissue.55 This is the basis for the technique that uses grafts composed only of connective tissue obtained from areas in which it is covered by keratinized epithelium.17,30,36
As seen microscopically, healing of a graft of intermediate thickness (0.75 mm) is complete by 10.5 weeks; thicker grafts (1.75 mm) may require 16 weeks or longer.43 The gross appearance of the graft reflects the tissue changes within it. At transplantation, the graft vessels are empty and the graft is pale. The pallor changes to an ischemic grayish white during the first 2 days until vascularization begins and a pink color appears. The plasmatic circulation accumulates and causes softening and swelling of the graft, which are reduced when the edema is removed from the recipient site by the new blood vessels. Loss of epithelium leaves the graft smooth and shiny. New epithelium creates a thin, gray, veil-like surface that develops normal features as the epithelium matures.
Accomplishments.
Free gingival grafts effectively widen the attached gingiva. Several biometric studies have analyzed the width of the attached gingiva after the placement of a free gingival graft.19,49,52 After 24 weeks, grafts placed on denuded bone shrink 25%, whereas grafts placed on periosteum shrink 50%.62 The greatest amount of shrinkage occurs within the first 6 weeks.
The placement of a gingival graft does not “improve” the status of the gingiva.34,35,108 Therefore the indication for a free gingival graft should be based on the presence of progressive gingival recession and inflammation. When recession continues to progress after a few months with good plaque control, a graft can be placed to prevent further recession and loss of attached gingiva.
Other materials have been used to replace gingival tissue in gingival extension procedures. Attempts with lyophilized dura mater,93 and sclera have not been satisfactory. The use of irradiated free gingival allograft showed satisfactory results,91 but further research is necessary before it can be considered for clinical use.
Free autogenous gingival grafts have been found to be useful for covering nonpathologic dehiscences and fenestrations. Nonpathologic refers to openings of the bone through the tooth surface not previously exposed to the oral environment and found in the course of flap surgery.33
Free Connective Tissue Autografts.
The connective tissue autograft technique was originally described by Edel36 and is based on the fact that the connective tissue carries the genetic message for the overlying epithelium to become keratinized. Therefore only connective tissue from beneath a keratinized zone can be used as a graft (Figure 63-7).
Apically Displaced Flap.
This technique uses the apically positioned flap, either partial thickness or full thickness, to increase the zone of keratinized gingiva. Chapter 59 provides a step-by-step description of the surgical technique for apically displaced flaps, and Figure 63-8 illustrates the procedure.
Accomplishments.
1. Slightly coronal to the crest of the bone. This location attempts to preserve the attachment of supracrestal fibers; it may also result in thick gingival margins and interdental papillae with deep sulci and may create the risk of recurrent pockets.
2. At the level of the crest (Figure 63-8, C). This results in a satisfactory gingival contour, provided that the flap is adequately thinned.
3. Two millimeters short of the crest (Figure 63-8, D). This position produces the most desirable gingival contour and the same posttreatment level of gingival attachment as obtained by placing the flap at the crest of the bone.39 New tissue covers the crest of the bone to produce a firm, tapered gingival margin.
Placing the flap short of the crest increases the risk of a slight reduction in bone height,28 but the advantage of a well-formed gingival margin compensates for this.
Other Techniques.
The “vestibular extension technique,” originally described by Edlan and Mejchar,37 produced statistically significant widening of attached nonkeratinized tissue. This increase in width in the mandibular area reportedly persisted in patients observed for up to 5 years.37,92,110 Currently, this technique is of historic interest only.
The fenestration operation was designed to widen the zone of attached gingiva with a minimum loss of bone height.89,90 It has also been called the periosteal separation technique.26 It uses a partial-thickness flap, except in a rectangular area at the base of the operative field, where the periosteum is removed, exposing the bone. This is the area of fenestration. Its purpose is to create a scar that is firmly bound to the bone.23 It prevents soft tissue separation from the bone and postsurgical narrowing of the attached zone. Results obtained with this technique are not as predictable as with the free gingival graft; therefore it is not widely performed except for small isolated areas.
Gingival Augmentation Coronal to Recession (Root Coverage)
Understanding the different stages and conditions of gingival recession is necessary for predictable root coverage. Several classifications of denuded roots have been proposed. In the 1960s, Sullivan and Atkins100 classified gingival recession into four anatomic categories: (1) shallow-narrow, (2) shallow-wide, (3) deep-narrow, and (4) deep-wide.
Stay updated, free dental videos. Join our Telegram channel
VIDEdental - Online dental courses


