Chapter 6
Metals and Alloys
6.1 Introduction
Metals and alloys have many uses in dentistry. Steel alloys are commonly used for the construction of instruments and of wires for orthodontics. Gold alloys and alloys containing chromium are used for making crowns, inlays and denture bases whilst dental amalgam, an alloy containing mercury, is the most widely used dental filling material.
With the exception of mercury, metals are generally hard and lustrous at ambient temperatures, and have crystalline structures in which the atoms are closely packed together. Metals are opaque and are good conductors of both heat and electricity.
The shaping of metals and alloys for dental use can be accomplished by one of three methods, namely, casting, cold working or amalgamation. Casting involves heating the material until it becomes molten, when it can be forced into an investment mould which has been prepared from a wax pattern. Cold working involves mechanical shaping of the metal at relatively low temperatures, taking advantage of the high values of ductility and malleability possessed by many metals. Some alloys can be mixed with mercury to form a plastic mass which gradually hardens by a chemical reaction followed by crystallization. The material is shaped by packing it into a tooth cavity whilst still in the plastic state. This specific technique of shaping by amalgamation is dealt with in detail in the chapter devoted to dental amalgam (Chapter 21).
6.2 Structure and properties of metals
Crystal structure
Metals usually have crystalline structures in the solid state. When a molten metal or alloy is cooled, the solidification process is one of crystallization and is initiated at specific sites called nuclei. The nuclei are generally formed from impurities within the molten mass of metal (Fig. 6.1a). Crystals grow as dendrites or spherulites, which can be described as three-dimensional, structures emanating from the central nucleus (Fig. 6.1b). Crystal growth continues until all the material has solidified and all the dendritic or spherical crystals are in contact (Fig. 6.1c). Each crystal is known as a grain and the area between two grains in contact is the grain boundary.
Fig. 6.1 Diagram illustrating crystallization of a metal (a) from nuclei, (b) through dendritic growth, (c) to form grains.
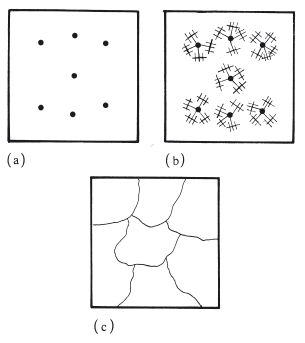
After crystallization, the grains have approximately the same dimensions in each direction, measured from the central nucleus. They are not perfectly spherical or cubic however, nor do they conform to any other geometric shape. They are said to have an equiaxed grain structure. A change from an equiaxed structure to one in which the grains have a more elongated, fibrous structure can cause important changes in mechanical properties.
The atoms within each grain are arranged in a regular three-dimensional lattice. There are several possible arrangements such as cubic, body-centred cubic and face-centred cubic as shown in Fig. 6.2. The arrangement adopted by any one crystal depends on specific factors such as atomic radius and charge distributions on the atoms. Although there is a tendency towards a perfect crystal structure, occasional defects occur, as illustrated, two-dimensionally, in Fig. 6.3. Such defects are normally referred to as dislocations and their occurrence has an effect on the ductility of the metal or alloy. When the material is placed under a sufficiently high stress the dislocation is able to move through the lattice until it reaches a grain boundary. The plane along which the dislocation moves is called a slip plane and the stress required to initiate movement is the yield stress.
Fig. 6.2 Some possible arrangements of atoms in metals and alloys: (a) cubic structure; (b) face-centred cubic; (c) body-centred cubic.
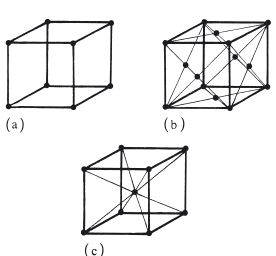
Fig. 6.3 (a) Simplified, diagrammatic indication of an imperfection in a crystal structure. (b) Under the influence of sufficient force atoms may move to establish a more perfect arrangement.
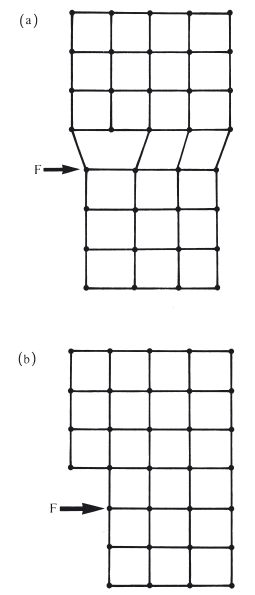
In practical terms, the application of a stress greater than the yield stress causes the material to be permanently deformed as a result of movement of dislocations. Depending upon the circumstances, this can be a disadvantage or, alternatively, may be used to advantage, as in the formation of wires.
Grain boundaries form a natural barrier to the movement of dislocations. The concentration of grain boundaries increases as the grain size decreases. Metals with finer grain structure are generally harder and have higher values of yield stress than those with coarser grain structure. Hence it can be seen that material properties can be controlled to some extent by controlling the grain size.
As stated in Chapter 2, the yield stress is not easily determined experimentally. The proportional limit is therefore often used as an indication of yield stress. Alternatively the proof stress is used. The proof stress is the stress required to produce a certain level of permanent strain. For example the 0.2% proof stress indicates the stress required to produce a strain of 0.002.
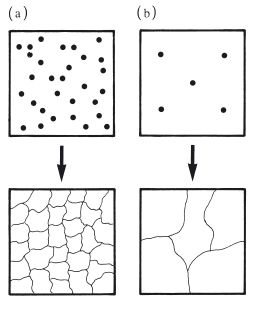
A fine grain structure can be achieved by rapid cooling of the molten metal or alloy following casting. This process, often referred to as quenching, ensures that many nuclei of crystallization are formed, resulting in a large number of relatively small grains as shown in Fig. 6.4a. Slow cooling causes relatively few nuclei to be formed which results in a larger grain size as shown in Fig. 6.4b. Some metals and alloys are said to have a refined grain structure. This is normally a fine grain structure which is achieved by seeding the molten material with an additive metal which forms nuclei for crystallization.
Fig. 6.4 Control of metallic grain size by controlling the rate of cooling from the melt. (a) Rapid cooling – more nuclei, smaller grains. (b) Slow cooling – fewer nuclei, larger grains.
Cold working
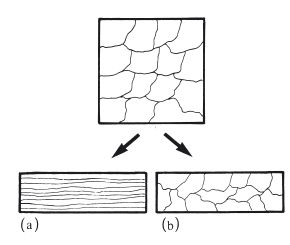
In the previous section it was mentioned that permanent deformation takes place on the application of a sufficiently high force, due to the movement of dislocations along slip planes. For an applied tensile force the maximum degree of extension is a measure of the ductility of the metal or alloy. For an applied compressive force the maximum degree of compression is a measure of malleability. These changes occur when the stress is greater than the yield stress and at relatively low temperatures. Such cold working not only produces a change in microstructure, with dislocations becoming concentrated at grain boundaries, but also a change in grain shape. The grains are no longer equiaxed but take up a more fibrous structure (Fig. 6.5a). The properties of the material are altered, becoming harder and stronger with a higher value of yield stress. The ductility or malleability is decreased because the potential for further cold working is reduced. Cold working is sometimes referred to as work hardening due to the effect on mechanical properties. When mechanical work is carried out on a metal or alloy at a more elevated temperature it is possible for the metal object to change shape without any alteration in grain shape or mechanical properties (Fig. 6.5b). The temperature below which work hardening is possible is termed the recrystallization temperature. Examples of cold working in dentistry include the following.
Fig. 6.5 Mechanical work carried out on a sample of metal or alloy. (a) Below the recrystallization temperature – produces a fibrous grain structure. (b) Above the recrystallization temperature – retains an equiaxed grain structure.
Since metals and alloys have finite values of ductility or malleability there is a limit to the amount of cold working which can be carried out. Attempts to carry out further cold working beyond this limit may result in fracture. This limitation should be remembered when carrying out alterations to clasps constructed from low-ductility alloys.
If a cold-/>
Stay updated, free dental videos. Join our Telegram channel

VIDEdental - Online dental courses


