Chapter 6
Achieving Radicular Access
Aim
To outline techniques and equipment for removing root filling materials for non-surgical retreatment.
Outcome
At the end of this chapter, the practitioner should be conversant with techniques available for safe removal of different root filling materials such as silver points, gutta percha and paste/cement.
Introduction
A key difference between root canal retreatment and initial root canal treatment is the need to remove existing root canal fillings during canal negotiation. Only when radicular access is achieved, and the root canals have become negotiable, can the deficiencies of the original treatment be corrected.
Removal of Gutta Percha
Single Cone or Poorly Condensed Gutta Percha
When a root canal is filled with a single cone or poorly condensed gutta percha, the root filling is likely to be loose in the canal and should be relatively easy to remove (Fig 6-1). The first method of removal is to try and negotiate alongside the root filling and remove the gutta percha intact using:
-
Hedstrom hand files
-
barbed broaches.
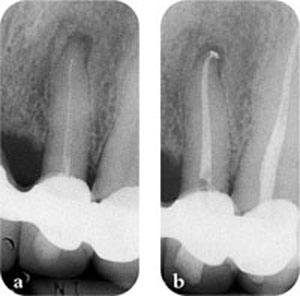
Fig 6-1 A poorly condensed gutta percha root filling is likely to be loose and relatively easy to remove. (a) Pre-op radiograph. (b) Post-op radiograph.
Alternative methods involve:
-
rotary files
-
ultrasound.
Hedstrom hand files
A Hedstrom file of a suitable size is chosen and inserted by screwing gently into the root canal to engage the gutta percha, but not the dentine wall. When the file is withdrawn, it should pull the gutta percha root filling free of the canal (Fig 6-2). The action is repeated as necessary with successive larger sizes of files until all the gutta percha is removed.
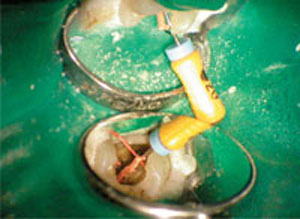
Fig 6-2 Loose gutta percha root filling removed using a Hedstrom file.
Barbed broaches (Fig 6-3) may be used in the same way, but they should be inserted in a “watch-winding” motion (see Chapter 7, Fig 7-16) as they are made from very soft steel and susceptible to breakage if screwed into the canal.
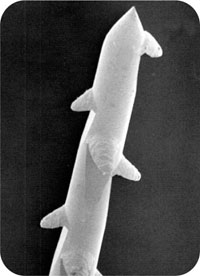
Fig 6-3 Barbed broach (SEM).
Rotary files
A rotary file is chosen so that the cutting flutes will engage the root filling and not the canal walls; when activated, the flutes should “churn” out the root filling. To reduce the risk of rotary file breakage, in particular with small size files, caution should be exercised not to apply excessive apical pressure and to keep within the recommended speed and torque limits of the chosen rotary system.
Ultrasound
Ultrasound may also be used to remove a single cone or poorly condensed gutta percha root filling (Fig 6-4). An ISO size 15 endosonic file is inserted into the root canal. When activated, a combination of irrigation and ultrasonic vibration will break down the sealer, loosening and allowing the gutta percha to float out. The file must be irrigated rather than run dry. Otherwise, the gutta percha will be plasticized, making it difficult to remove the root filling intact.
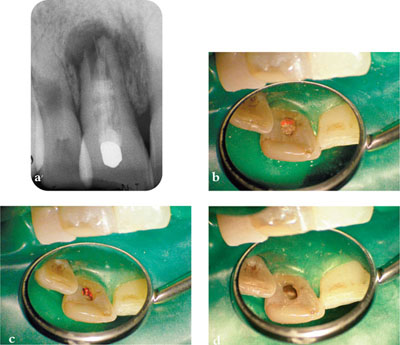
Fig 6-4 Removal of multiple, loose gutta percha cones. (a) Pre-op radiograph. (b) Palatal access cavity. (c) Gutta percha cones uncovered after removal of underlying cement and debris with an ultrasonic scaler. (d) Empty canal after root filling removed using an ultrasonically activated, irrigated file.
Condensed Gutta Percha
A well-condensed gutta percha root filling cannot be removed en masse. It must first be softened with heat or solvents.
Heat
Heat may be applied using:
-
old instruments including pluggers and probes or special heat-retentive spreaders and pluggers (e.g. GP2 and GP3 heat carriers, Hu-Friedy, Chicago, IL, USA), which are heated in an open flame (Fig 6-5)
-
electrically heated spreaders and pluggers like the “Touch ’n Heat” (SybronEndo, Orange, CA, USA) (Fig 6-6) or System B (see Chapter 4, Fig 4-16).
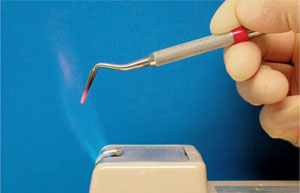
Fig 6-5 Heated plugger used to aid removal of condensed gutta percha root filling.
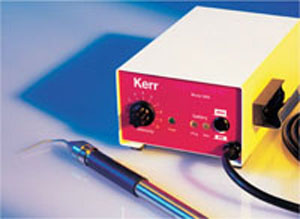
Fig 6-6 “Touch ’n Heat”, an electrically-heated spreader device.
A Hedstrom file is then used to engage a portion of the heat-softened gutta percha, which is removed when the file is withdrawn. Heat is then reapplied and the procedure repeated until all the material is removed. Heat may also be created when drilling out the gutta percha using:
-
Gates-Glidden drills
-
long-neck burs
-
specially-designed gutta percha removal instruments.
Gates-Glidden drills and long-neck burs are limited by the depth to which they may be used in the canal – in particular, a curved root, where they have to be confined to the straight part of the canal. Gutta percha removal instruments (e.g. GPX, Brasseler USA, Savannah, GA, USA) are more effective than Gates-Glidden drills or long-neck burs. When operated in a root canal, the frictional heat generated softens the gutta percha which is evacuated coronally by the cutting flutes, operating in an Archimedian screw principle. There is always a risk of fracture when using gutta percha removal instruments. As a result, great care must be exercised, avoiding excessive force and too high a rotational speed. All these instruments may facilitate removal of most of the root filling – however, some gutta percha remnants are inevitable and its removal requires the use of a solvent.
Solvents
The use of solvents particularly deep in the canal is safer and comparably more effective and faster than using heat. Numerous gutta percha solvents (Fig 6-7) have been evaluated, including:
-
chloroform
-
eucalyptol oil
-
xylene (xylol)
-
rectified turpentine
-
methyl chloroform
-
halothane.
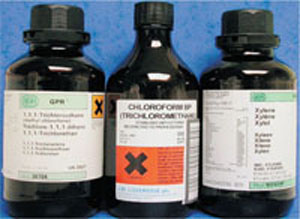
Fig 6-7 Gutta percha solvents.
These solvents are available from larger pharmacies and laboratory chemical suppliers. Some solvents are more effectiv than others. Chloroform is highly effective and the most popular gutta percha solvent. Concerns have been expressed, however, about its carcinogenic potential, although evidence is limited. Xylene may also be carcinogenic, whilst rectified turpentine, methyl chloroform, and halothane have been suggested as safer alternatives.
For the most efficient use of solvents, the pulp chamber and the coronal part of the canal should be cleared of gutta percha with a Gates-Glidden bur, a NiTi coronal flaring rotary file or a heated instrument, to create a well (Fig 6-8a). If the solvent is placed in the pulp chamber instead of into a well, it will evaporate more quickly because of the greater surface area. In addition, a well permits intimate contact between the solvent and gutta percha.
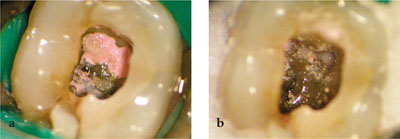
Fig 6-8 Using a solvent to aid removal of condensed gutta percha. (a) Root filling exposed. (b) Gutta percha in coronal part of canals cleared with Gates-Glidden burs and solvent placed in wells created in canal entrances.
The chosen solvent is drawn up into a small syringe made of glass, polypropylene, or other materials not affected by the solvent. A 1 mL syringe is ideal for the small volume needed. The well is then filled with solvent (Fig 6-8b), avoiding flooding the pulp chamber since excess solvent will evaporate or run onto the rubber dam which may be dissolved or punctured.
A hand or rotary file is then used to work the solvent into the gutta percha to hasten its dissolution. As the file is rotated gently, advanced and then withdrawn, the softened gutta percha is removed. Gutta percha is wiped off the file with gauze before being reinserted. The process is repeated until most of the gutta percha has been removed. Any residual gutta percha will be eliminated when the canal is reprepared. Alternatively, more solvent may be added to dissolve any remnants and paper points used to soak up the dissolved gutta percha (Fig 6-9). If necessary, a radiograph may be taken to ensure that all previous root filling material has been removed. Gutta perc/>
Stay updated, free dental videos. Join our Telegram channel

VIDEdental - Online dental courses


