Chapter 5 Smile Design
Section A Smile Design
Brief History of the Smile Design Procedure
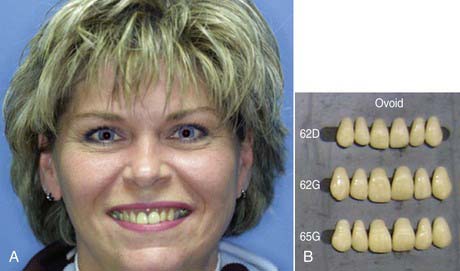
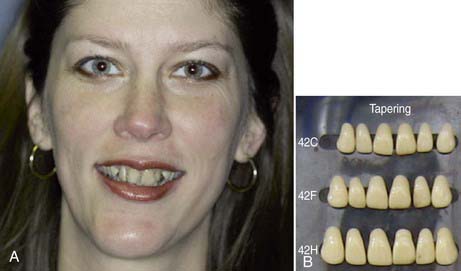
When I attended dental schools in the 1970s, each student was given a mold guide of available denture teeth. Different manufacturers created their own guides for the teeth they designed. Common to all was the philosophy that tooth form was determined and should be selected based on the shape of a person’s face and head. The teaching was that patients with round-shaped faces were given ovoid teeth (Figure 5-1), whereas tapering teeth went with a long face (Figure 5-2).
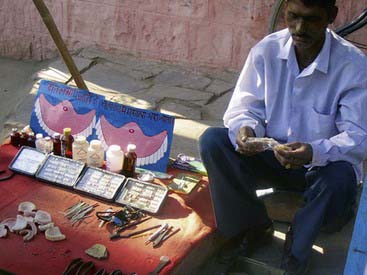
Incredibly, and probably accidentally, some third-world countries demonstrated superior smile design to what was being done in North America. For instance, in India it is possible to purchase dentures from street merchants (Figure 5-3). The buyer can select a denture, try it in his or mouth, and then look at the appearance in a mirror. When the buyer finds a set of teeth he or she likes, the merchant (denturologist) relines the denture with acrylic, and the buyer leaves with new teeth. The buyer has immediate gratification from being able to see exactly what he or she is getting before approving the purchase.
Relating Function and Esthetics
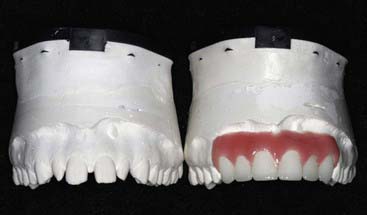
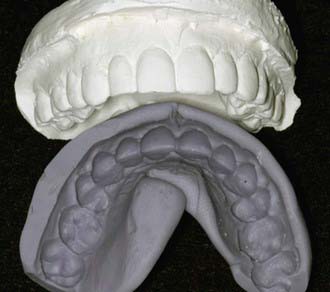
The key to achieving a predictable smile design, eliminating guesswork and satisfying the patient’s expectations on the first attempt without having to return the restoration to the lab for modifications, is to set the teeth up in a well-made provisional restoration. This temporary restoration provides a blueprint for both the desired function and esthetics. The dentist takes photos, bite records, and impressions of the patient’s teeth, studies them, and decides what functional and esthetic changes are needed. The dentist then has the models mounted on an articulator and fabricates a diagnostic wax-up to act as a guide for the temporary restoration (Figure 5-4).
Clinical Considerations
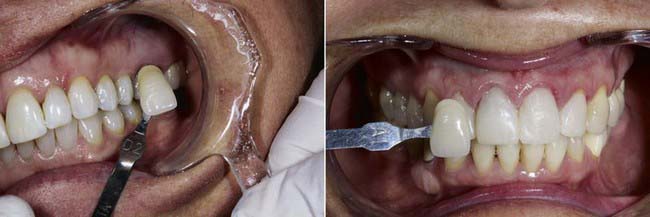
Any and all types of dental rehabilitation and reconstruction should be treated in exactly the same manner. For each and every single crown, and so on, the same principles should be applied. Even a simple one- or two-unit case is initially worked out and tested in provisional restorations to assess the desired function and esthetics of the permanent restoration. Impressions are taken of the temporary restoration, and photos are taken with a shade tab alongside the bis-acryl provisional restoration and the natural teeth (Figure 5-5).
Even a posterior lower or upper molar can have the cusp height, buccal position, and width of the tooth redesigned. The lab technician is given exact instructions so that when the restoration is returned it is exact. When the restoration arrives from the lab, it is compared with the models and photos of the provisional restoration—they should look identical (Figure 5-6).
The Diagnostic Wax-Up
The key to achieve a pleasing smile design is having the dentist interview the patient and listen to exactly what the patient wants. Photos of the patient show what the teeth initially look like, and both the dentist and patient can study and assess the situation. It is possible to draw what is wanted, make the teeth longer or shorter, or change the midline or gingival position on the photos (Figure 5-7).
The diagnostic wax-up is poured in high-quality, low expansion stone and mounted on a semi-adjustable articulator so that the teeth are oriented on the lab bench exactly as they are in the patient’s mouth. An articulator is nothing more than a chewing simulator of the person’s function. The lab technician will create preparations of the teeth on the model in a realistic fashion to accommodate the design of the desired restoration. The technician uses dental waxes in natural tooth colors to produce the anticipated result. The diagnostic wax-up should resemble the projected finished look of the patient’s dentition. On the diagnostic wax-up the lab technician can make all the changes needed by correcting occlusion, changing the incisal or midline cant of the teeth, changing the dimensions of the teeth, expanding the arches, and so on. Every physical change can be made on the diagnostic wax-up. However, it is absolutely essential that the lab prepare the teeth in a realistic fashion. Once the diagnostic wax-up has been completed, the lab technician or dental assistant fabricates a silicon putty template that can be used to make the bis-acryl provisional restoration after the dentist similarly prepares the patient’s actual teeth (Figure 5-8).
Making the Provisional Restoration
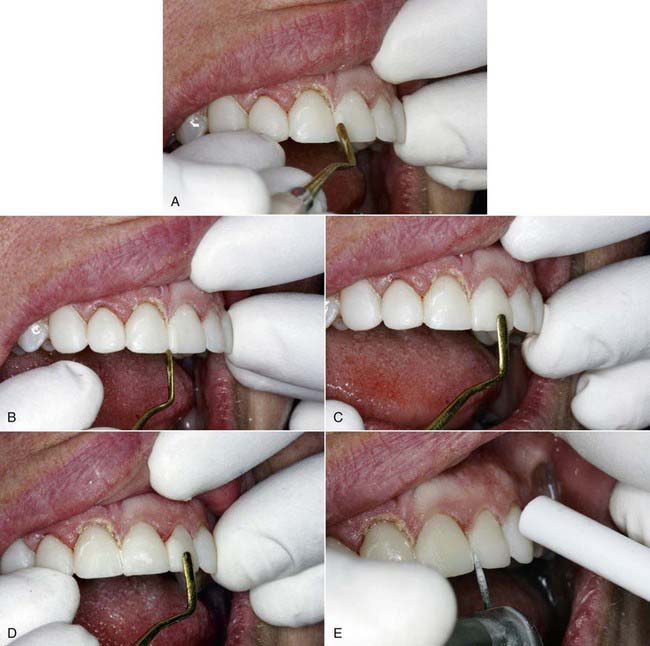
Today’s standard of fabricating a provisional restoration is to create a diagnostic wax-up of the desired result, fabricate a putty template of it, and flow a bis-acryl temporization material into it, which is then placed over the patient’s prepared teeth and allowed to set. This technique yields provisional restorations that are a facsimile of the diagnostic wax-up. The introduction of bis-acryl materials dispensed from cartridge guns paved the way for dentists to be able to easily assess and to modify a proposed smile design (Box 5-1).
Before the introduction of bis-acryl materials, dentists mostly used methylmethacrylate acrylics created by mixing a tooth-colored acrylic powder with a liquid monomer. These materials are smelly, give off heat, take a lot of time to set, and are difficult to add to and modify. Bis-acryl changed the standard of dental temporization. It gives dentists a means to creatively do bonding additions to the provisional restorations and customize a look for each individual (Figure 5-9).
Thinking outside the Box
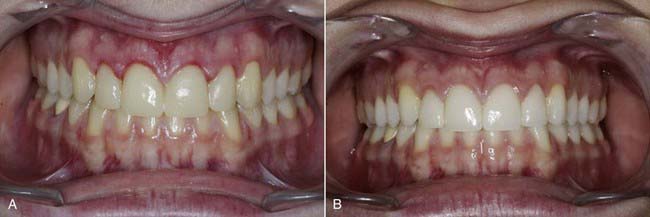
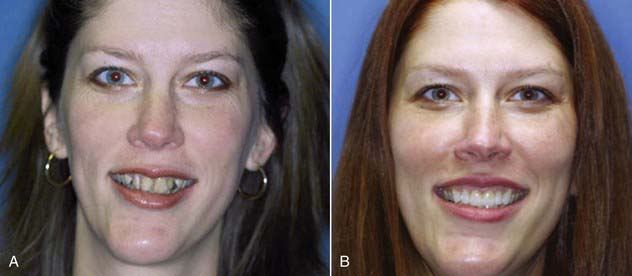
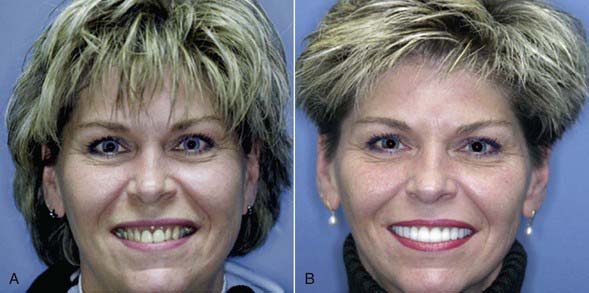
Dentists have come to realize that the old rules of selecting a tooth shape that were taught in school may not apply in the real world. These protocols were created in order to select appropriate tooth molds to fabricate dentures. Formerly, a patient who had a long face was given long teeth. Today patients with long faces are often better off with square or more symmetrical flat teeth. These make a long face appear to be wider and more symmetrical (Figure 5-10). Similarly, someone with a round face can receive longer teeth to counteract the roundness (Figure 5-11).
From a technologic point of view, dentists stopped thinking like scientists, following the rules of science taught in school, and started taking an artistic approach to dentistry. This began in the 1990s. Dentists started thinking like designers of smiles and stopped thinking of just rules and formulas. Rules and formulas may be great on paper, but they do not always look good on people. Human beings exist in different variations—people come in different sizes, colors, and forms and have different personalities. Dentists began to think of technologic and artistic ways to create teeth to match and enhance personalities (Box 5-2). Dentists are today more than ever regarded as artists.
Artistic Elements
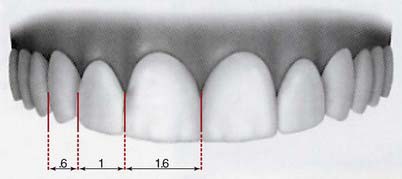
Every dentist has been preached the golden proportions. The golden proportions state that if a person’s teeth are viewed straight on and using the lateral incisor as the reference tooth, the adjacent central incisor should be 1.6 times the size of the lateral incisor, and the visible part of the canine 0.6 times the size of the lateral incisor (Figure 5-12).
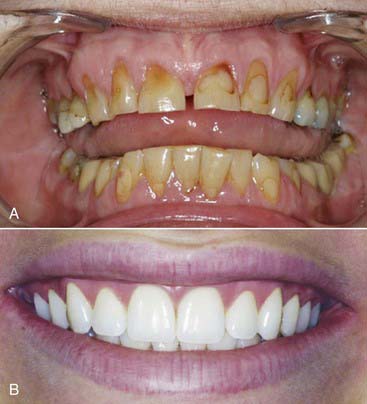
What is today being referred to as “pink esthetics” is fundamental in achieving a natural- and healthy-looking smile. The patient’s gingival levels should be in the most natural-looking position. Usually as people age, their gingival levels change. The tissue may have receded because of disease, tooth abfraction, or overbrushing (Figure 5-13). Often with patients who are “long in the tooth,” gingival grafting must be performed.
Treatment Planning
The patient’s next appointment is made 1 to 2 weeks later for a review of the entire case. This is often referred to as the case presentation. In the meantime, the models, radiographs, and photos are studied and scientific principles applied to formulate a treatment plan. The dentist studies the photos first to see how much tooth is showing when the patient smiles. A study by Vig and Brundo in 1978 concluded that at age 30 years, people show 3 mm of upper tooth, and for every decade thereafter they start showing more molar teeth. At age 60 years they show virtually no upper teeth and 3 mm of lower teeth. Reviewing the photos, the dentist determines if sufficient maxillary teeth are displayed and if the patient’s smile can be made more youthful in appearance. The planned changes can be drawn on the photos. It can also be determined if periodontal surgery, orthodontics, or other procedures are needed. The entire treatment plan is worked out by the time the dentist next meets with the patient.
Stay updated, free dental videos. Join our Telegram channel

VIDEdental - Online dental courses


