5
Planning and Insertion Techniques
As with all orthodontic treatments it is important to properly plan each mini-implant case and the following general principles should help inform this diagnostic and treatment planning process. This chapter provides as comprehensive an aide memoire as possible, which at first glance suggests that there is a lot of information to analyse and remember. However, not all points apply to every case and experience will quickly lead you to discern the relevant steps for individual cases. In addition, common clinical scenarios are described in a sequential manner in the remaining book chapters and, whilst this entails some degree of repetition, it ensures that nothing relevant is left out for each clinical scenario.
Mini-implant planning
Treatment goals and anchorage requirements
Determine these as per your normal orthodontic assessment and treatment planning regimen. The only differences may be that your treatment options and expectations may be greater than with conventional treatment, e.g. achieving full overjet reduction in a Class II case, or non-surgical correction of an anterior openbite.
Mini-implant location
Consider the ideal antero-posterior and buccal/palatal site(s) from both anchorage and biomechanical perspectives. For example, since incisor retraction requires posterior anchorage, the typical insertion site for this purpose is the buccal side of the alveolus between the second premolar and first molar teeth. This is because more anterior insertion sites may not provide sufficient range for traction and may steepen the vector of traction, which may introduce vertical side-effects. Buccal mini-implants are also easier (than palatal ones) to attach directly to a labial fixed appliance. The optimum insertion sites will be described in detail in each specific clinical scenario chapter.
Hard tissue anatomy
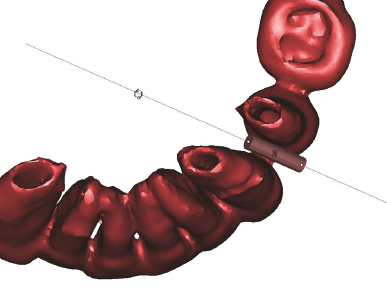
Assess each insertion site in terms of the interproximal space in three dimensions (3D), i.e. its mesio-distal width and alveolar depth; the positions and shape of adjacent tooth roots; the proximity of nearby structures (e.g. the maxillary sinus); and the bone quantity (in particular, whether there is alveolar necking or conversely a convex alveolar morphology). Much of this information can be derived from radiographs (Figs 5.1a,b). Periapical radiographs are preferable to panoramic views since the latter may misrepresent the shape, position and angulation of roots, and make it difficult to identify mesial bowing of the mesio-buccal molar root. However, periapicals are prone to parallax errors if a film or sensor holder is not used for standardisation (Fig. 5.1c). Cone beam computerised tomography (CBCT) provides the clearest amount of detail in 3D (Fig. 5.2), including estimations of the cortical thickness and density, but this is not yet widely available nor considered essential for mini-implant planning. The exact insertion site and insertion angles are determined by studying each patient’s radiographs, supplemented by examination of the patient (especially to highlight soft tissue details) and either their dental or virtual model (to give a 3D appreciation). Interestingly, it is often easier to observe surface undulations on a physical model than in the patient’s mouth, where a surface concavity indicates the interproximal area between the prominences of adjacent roots.
Figure 5.1 (a) Panoramic and (b) intra-oral pre-treatment radiographs of the dentition as used to visualise the interproximal area between the left maxillary second premolar and first molar teeth. (c) The intra-oral radiograph is repeated to confirm the position of a mini-implant in this site.
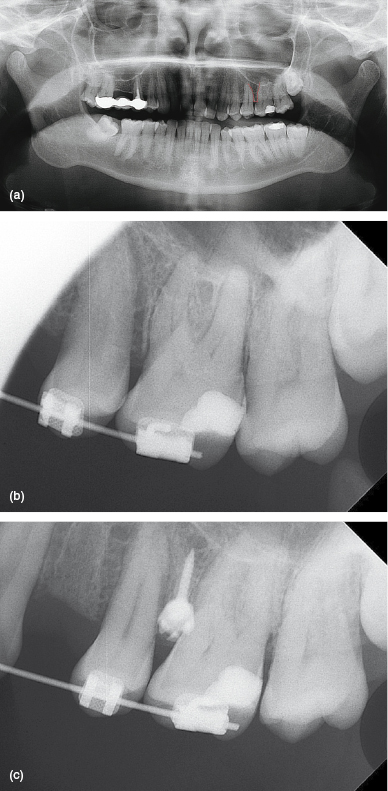
Figure 5.2 A rotated CBCT image with a cylinder representing the position and orientation of a virtual mini-implant distal to the canine root. This also shows the proximity of the cylinder to the adjacent roots.
Soft tissue anatomy
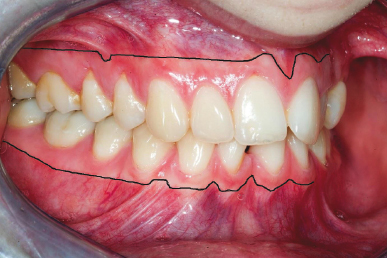
Mini-implants should be inserted through the attached gingiva (not loose mucosa) in order to minimise the risk of either the cheek or lip soft tissues wrapping around the mini-implant threads during insertion; and later destabilisation of the mini-implant from subsequent plaque accumulation and (mobile) soft tissue movements. The occlusal boundary of the attached tissue is superficially indicated by the gingival margin. However, remember that the correct limit, set by the alveolar bone crest level, is approximately 2 mm more occlusal than the soft tissue margin. The apical boundary (on the buccal aspect) is formed by the mucogingival junction (MGJ) and any adjacent frenal attachments (Fig. 5.3). Insertion close to the MGJ usually provides access to the largest interproximal alveolar space, but beware that the apparent height of buccal attached gingiva is artificially exaggerated on a dental model because the sulcus is easily stretched during the impression process. Therefore, if you are using a dental model to plan a buccal alveolar insertion, first record the clinical height of the attached gingiva (distance from the gingival margin) at the impression appointment, or verify it from clinical photographs. The apical insertion limit on the palatal side of the maxillary alveolus is best determined by palpation of the tissues to determine areas of firm attachment. Palatal alveolar insertions should be planned in areas where the mucosa displays little sign of mobility and compressibility.
Figure 5.3 The upper and lower mucogingival junctions are highlighted as black lines between the attached and free mucosal tissues.
Vertical location and inclination
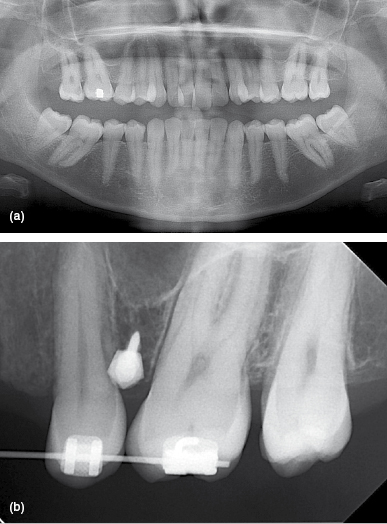
The vertical level and angle of a mini-implant insertion are affected by two factors: the interproximal bone space and the height of attached gingiva. An ideal mini-implant insertion site should provide at least a 0.5 mm margin of bone around the threads, with it generally being the case that greater interproximal space is available at more apical levels, due to the tapering shape of the adjacent roots. The exception to this rule may occur when a maxillary molar is absent and the sinus floor has migrated in an inferior/occlusal direction, limiting mini-implant insertion to a relatively coronal level at this site (Fig. 5.4).
Figure 5.4 (a) Pre-treatment panoramic and (b) intra-oral post-insertion radiographs of an adult with early loss of all first molars. The maxillary sinus floor is at a relatively coronal level bilaterally, which limits the vertical (apical) level of mini-implant insertion.
The overlying soft tissue is relevant since this dictates the range of vertical levels available for insertion through the attached gingiva. However, this choice may be limited in patients with only a narrow band (height) of attached gingiva, such that the mini-implant needs to be inserted at an oblique angle (e.g. 20–30o in the maxilla, 10–20o in the mandible) in order to keep its neck (and head) at a relatively coronal level, within the attached gingiva, whilst directing its body apically between the roots (Fig. 5.5).1
Figure 5.5 The clear elastomeric attachment provides horizontally orientated traction from the mini-implant head directly to a powerarm on the fixed appliance, for en masse retraction of the anterior teeth.
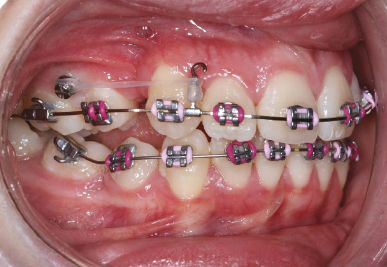
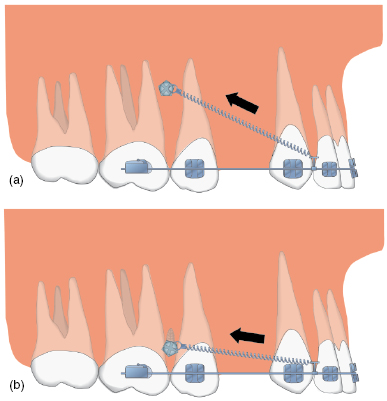
In turn, a mini-implant’s vertical level and angle of insertion influence its head position, emergence profile and ease of attachment. In particular, the head of an obliquely angled mini-implant, when inserted in an area of restricted attached gingival height, emerges at a relatively coronal level and its lateral (buccal) edge will be more prominent than the medial (palatal) aspect. Furthermore, the vertical position of the head affects the vector of force application such that an apical head position potentially produces an oblique traction vector (Fig. 5.6a) compared to a position closer to the fixed appliance level (Fig. 5.6b). This aspect will be discussed further in the chapters on clinical biomechanics.
Figure 5.6 Diagrams of (a) oblique and (b) horizontal vectors of traction to the anterior teeth from a buccal mini-implant inserted at a relatively apical and coronal level, respectively.
Insertion timing
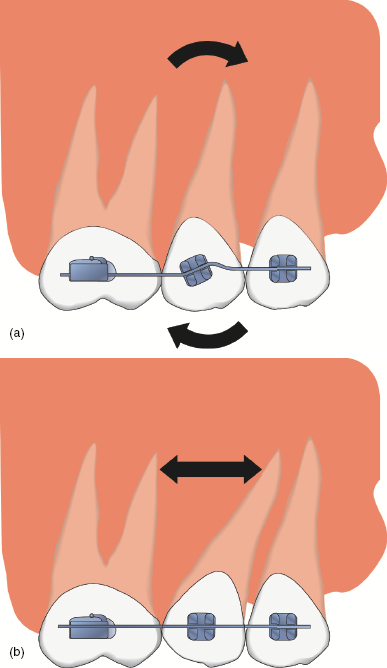
Determine this relative to the fixed appliance bond-up, by deciding how much arch alignment is appropriate before mini-implant insertion. Crucially, if there is insufficient interproximal space at the planned insertion site then consider a preliminary phase of fixed appliance treatment in order to diverge the roots and hence facilitate mini-implant insertion (Fig. 5.7). This is achieved by bonding the bracket(s) with a modified tip, especially adding mesial tip to the normal second premolar bracket orientation (Fig. 5.8). Indeed, I routinely perform this step prior to the majority of buccal insertions since it is a simple process which can make mini-implant treatment much easier. The bracket position is then corrected during the fixed appliance finishing stage (after explantation). Furthermore, it may be biomechanically beneficial to align the full arch such that it is ready to accommodate a rigid (e.g. 0.019 × 0.025 stainless steel) archwire and powerarm by the time of mini-implant insertion. This helps with sliding mechanics and the reduction of unfavourable vertical side-effects.
Figure 5.7 (a) A pre-treatment panoramic, and (b) pre-insertion and (c) post-insertion intra-oral radiographs. The insertion site between the left maxillary second premolar and first molar roots is highlighted in red in images (a) and (b). Root divergence has been performed to widen the interproximal space before radiograph (b) was taken.
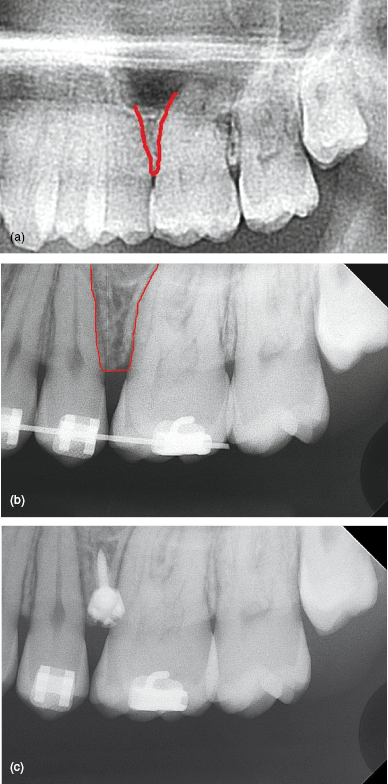
Figure 5.8 Diagrams of the premolar and first molar teeth where (a) the second premolar bracket has been bonded with mesial tip to cause (b) mesial tipping of this root during the fixed appliance alignment phase and hence an increase in this interproximal space.
Guidance stent
Fabricate a stent (as described in Chapter Three) if you think that it will be helpful for the insertion stage. This depends on factors such as your level of experience and the ease of visual and physical access to the insertion site. In particular, even experienced orthodontists find a stent very useful in posterior areas which are difficult to see by direct vision and reach with a manual screwdriver and/or where the interproximal space is limited (requiring a high degree of insertion accuracy). Clinicians who are new to mini-implants may also find a stent useful for the majority of locations. If a stent is to be fabricated by a laboratory then it is best that you fully plan the insertion site and angles on a working model and then pass this to the technician, so that the orthodontist is directly responsible for planning the case. In addition, it is advisable to give one to two weeks between impression and insertion appointments for this process to be undertaken.
Mini-implant dimensions
Determine the optimum body diameter and length primarily according to the insertion site, but also considering general patient factors such as age, and to a lesser extent body mass (Table 5.1, Fig. 5.9). In general, narrow diameter mini-implants (e.g. the Infinitas 1.5 mm version) are selected for interproximal sites, whereas a larger diameter (e.g. 2.0 mm) may be safely inserted in edentulous sites and the mid-palate. A long (e.g. 9 mm) body length is ideal for posterior maxillary sites since this length gains additional stability (from cancellous bone engagement) in such areas with potentially suboptimal cortical bone support (depth and density). However, short (e.g. 6 mm) length mini-implants are likely to have sufficient stability in adult patients in areas of thick and dense cortical plates, e.g. the posterior mandible and mid-palate. In addition, a short body length is preferred for horizontal (perpendicular) insertions in sites with limited alveolar (bucco-lingual) or palatal bone depth, e.g. the anterior maxillary and mandibular alveolus, and the mid-palate. The bone depth in such sites may be gauged on a lateral cephalograph (Fig. 5.10) or a CBCT. If the depth is too shallow then the mini-implant tip may perforate the palatal/lingual side of the alveolus or nasal floor, respectively. This is less likely when mini-implants are inserted obliquely hence enabling the safe use of 9 mm body length versions in the anterior alveolus, especially if the insertion level is restricted by a narrow band of attached gingiva (Fig. 5.5).
Figure 5.9 Algorithms (flowcharts) highlighting the most common considerations in the selection of optimum mini-implant body and neck dimensions according to the planned insertion site and directions.
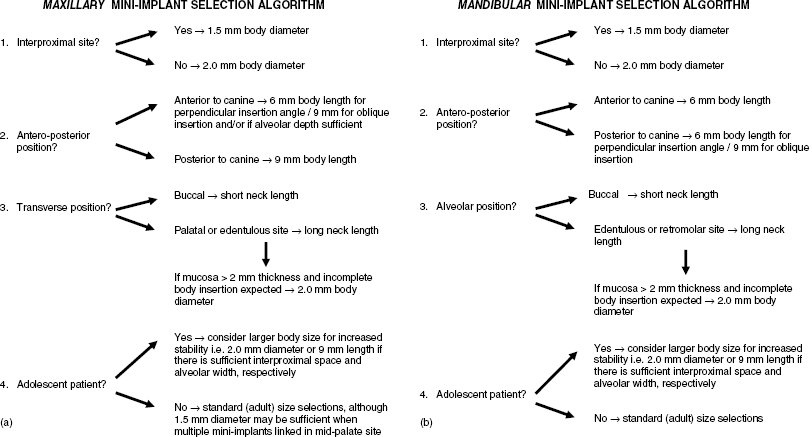
Figure 5.10 Lateral cephalogram showing the palatal bone thickness, the width of the maxillary and mandibular alveolar processes, and a 6 mm length mid-palate mini-implant angled towards the anterior nasal spine. An indirect anchorage wire was shaped to follow the anterior palate’s contour.
Stay updated, free dental videos. Join our Telegram channel

VIDEdental - Online dental courses


