Chapter 5
Free Gingival Autograft
HISTORY
Bjorn in 1963, and Sullivan & Atkins in 1968, were the first to describe the free gingival autograft. The latter two applied the principles of plastic surgery to periodontology. The autograft was initially used to increase the amount of attached gingiva and extend the vestibular fornix. Later it was used to attempt coverage of exposed root surfaces (Sullivan & Atkins 1968; Holbrook & Ochsenbein 1983; Miller 1985). Simple and highly predictable when used to increase the amount of attached gingiva, it is also quite versatile: it can also be used over an extraction socket or osseous graft (Ellegaard et al. 1974).
INDICATIONS
Free gingival autografts are used for:
- Increasing the amount of keratinized tissue (more specifically, attached gingiva)
- Increasing the vestibular depth
- Increasing the volume of gingival tissues in edentulous spaces (preprosthetic procedures)
- Covering roots in areas of gingival recession
ARM AMENTARIUM
This includes the basic surgical kit plus the following:
- Absorbable gelatin sponge (Gelfoam; Pharmacia Upjohn, Kalamazoo, MI, USA), oxidized regenerated cellulose (Surgicel; Johnson & Johnson, New Brunswick, NJ, USA) or Avitene (Bard, Murray Hill, NJ, USA)
- Purified n-butyl cyanoacrylate (PeriAcryl GluStitch; Delta, BC, Canada)
- Citric acid pH 1 (40%) or 1 capsule of tetracycline hydrochloride (HCl), 250 mg, for root coverage
FREE GINGIVAL AUTOGRAFT TO INCREASE KERATINIZED TISSUE
Technique
Preparation of the recipientsite
Using the scalpel, a no. 15 blade, trace the horizontal incision line below the gingival recession (Figs. 5.1 & 5.2). You may keep or remove the gingival sulcus. Place two vertical incisions, extending beyond the mucogingival junction, at the end of that horizontal line. Place the releasing incisions at line angles of the adjacent teeth and proceed with a partial thickness flap, leaving the periosteum on the alveolar bone.
At this stage, it is critical to dissect as close as possible to the periosteum, to remove epithelium, connective tissue, and muscle fibers, so there is as little movable soft tissue as possible. This decreases the likelihood of a movable graft after the healing process.
Once the bed has been prepared, the superficial flap can be removed using scissors. If you decide to keep the flap, it should be sutured below the graft once the graft has been secured.
Figure 5.1. Tooth 25 had a recession and lack of attached gingiva.
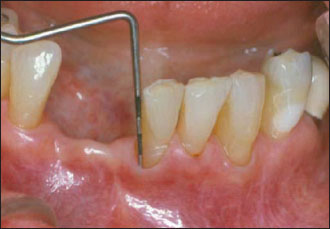
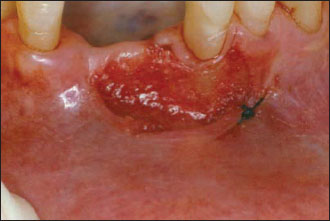
Figure 5.2. Preparation of the recipient site. A bleeding vessel has been tied with a black silk suture.
Some authors advocate the placement of the graft on denuded bone (Dordick et al. 1976; James & McFall 1978), reporting less shrinkage and a firmer, less mobile graft. In this particular technique, the surgeon removes the periosteum, as well as the other structures mentioned previously, such as the epithelium, connective tissue, and muscle fibers, to expose the alveolar bone. The incisions go down to the bone, with the blade in contact with the bone, cutting the periosteum.
The full-thickness flap is then elevated with a periosteal elevator to uncover the underlying bone. This dissection is called a blunt dissection as opposed to the aforementioned sharp dissection for the partial thickness flap. If the graft is placed on denuded bone, it is important to decorticate the alveolar plate using a small round burr (no. ½). This enables faster revascularization of the graft via the formation of capillary outgrowths.
Graft harvesting from the donor site
It is customary to take the graft from the palate between the palatal root of the first molar and the distal line angle of the canine. This is the area where the thickest tissue can be found (Reiser et al. 1996). However, any other edentulous area, such as the edentulous ridge, attached gingiva, or accessible tuberosities, will be just as sufficient.
When harvesting the graft, it is advisable to avoid the neurovascular bundle, which includes the greater and lesser palatine nerves and blood vessels. Avoid the palatal rugae as well (Cohen 1994). The neurovascular bundle enters the palate through the greater and lesser palatine foramina, apical to the third molars, and then travels across the palate and into the incisive foramen.
Reiser et al. in 1996 reported that the neurovascular bundle could be located 7–17 mm from the cemento-enamel junction (CEJ) of the maxillary premolars and molars. According to these authors, in the average palatal vault the distance from the CEJ to the neurovascular bundle is 12 mm (Fig. 5.3). That distance is shortened to 7 mm in case of a shallow palatal vault and lengthened to 17 mm in case of a high palatal vault.
Other research has shown gender-related variations. The mean height of the palatal vault, as measured from the midline of the palate to the CEJ of the first molars, is 14.90 ± 2.93 mm in men and 12.70 ± 2.45 mm in women (Redman et al. 1965).
Needle sounding while anesthetizing the area can be a useful tool in approximating the location of the palatal artery as well as the thickness of the tissues. The inclusion of palatal rugae in the graft should be avoided because it could be detrimental to aesthetics. The transplanted graft may retain its original morphology long after the procedure is done, and the rugae remain despite efforts to eliminate them surgically (Breault et al. 1999).
Figure 5.3. Anatomy of a donor region. Palatal vessels and nerve running from the greater and lesser palatine foramina to the interincisive foramen.The anterior palatal submucosa is mainly fatty, whereas the posterior palatal submucosa is mainly glandular.

After measuring the denuded area with a periodontal probe at the recipient site, the measurements of the palate should be recorded and the graft outline traced with the scalpel (Fig. 5.4). The graft thickness should be close to 1.5 mm, which approximately corresponds to the length of the bevel on a no. 15 blade, and should not be too thick or too thin. The dissection is done with a no. 15 blade kept parallel to the epithelial outer side of the graft, not the long axis of the tooth.
The submucosa of the anterior palate is rich in fat (Orban 1996) and care must be taken to avoid including the fatty layer in the graft. If that layer is included, the fat is removed from the graft with the scalpel before suturing it to the recipient bed. The excision has to be atraumatic, and every effort must be made to have a smooth, even, and regular connective tissue surface (Figs. 5.5 & 5.6). This is important because it will minimize dead space between the graft and the recipient bed and enable quick revascularization of the graft.
Figure 5.4. Palatal donor site. The graft to be harvested had been delineated with a no. 15 blade.
Stay updated, free dental videos. Join our Telegram channel
VIDEdental - Online dental courses


